Bounce flash for portraits of a bride
Deep into the busy part of the wedding season, the articles posted recently will be more wedding-centric than usual. But, as I’ve mentioned before, many of the techniques translate to other fields of photography.
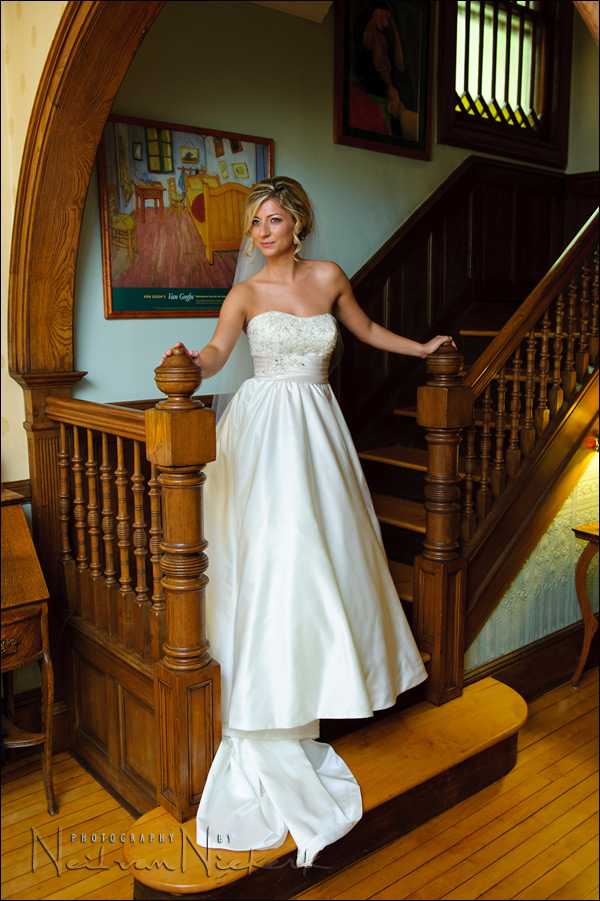
This photograph of a bride, Christine, received some very favorable comments when I posted it on Facebook. So I thought it might make a good topic here, as well as being a good recap of some essential bounce flash techniques. The portrait is quite straightforward in execution – the lighting was quite simple, but effective. It was also super fast to set up.
Photographing Christine, the bride, in her parent’s home, she wanted a photo here at the bottom of the stairs. Instead of setting up off-camera flash, I knew I could shoot much faster and get similar results by bouncing my on-camera flash in a specific way. The trick to using on-camera bounce flash, is to bounce the light towards the direction you want your light to come from. It’s not an efficient way to use flash since much of the light is lost. However, the light that returns looks very sweet indeed. And of course, I used the infamous black foamie thing to shield direct flash from hitting my subject. I bounced the flash toward my left shoulder into the room behind and to the side of me. I wasn’t bouncing off a specifically chosen surface … but rather, a specifically chosen direction.
Here is the straight-out-of-camera image for comparison.
Click on the image to see a larger version.
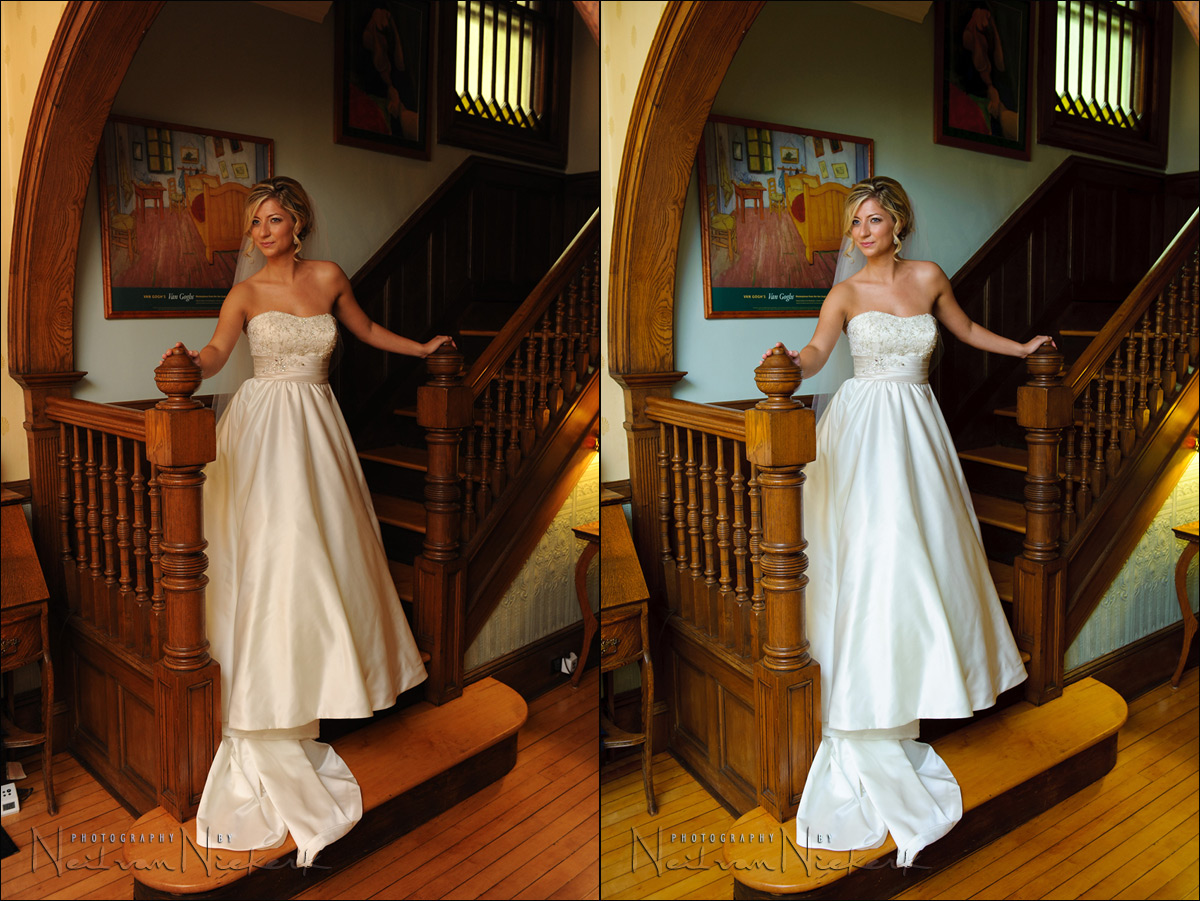
Aside from the Exposure and WB adjustment of the RAW file, I also edited out the wall and phone plugs and piece of carpet in the JPG that I generated from the RAW file. This kind of retouching of the JPG is something I only do for posting on the blog and on Facebook, and of course for album and print orders.
- camera settings: 1/60 @ f4 @ 800 ISO … TTL bounce flash
- Nikon D3
- Nikon 24-70mm f2.8G AF-S / Canon 24-70mm f/2.8L II / lens used at 32mm
- Nikon SB-910 Speedlight / Canon 600EX-RT Speedlite
My camera settings were chosen such that enough of the ambient light registers to give a greater color palette to the image.
My WB setting somehow was set to Auto, which I rarely use. But since I shoot in the RAW format, it was of no consequence. I finessed it in post. Simple. Bouncing my flash off the colored surfaces in this lobby, would also have affected any WB preset I might have used. Ultimately, I had to shoot in RAW. In fact, I think I should create a new terminology for WB settings. What WB am I using? “Daylight RAW” … or, “Cloudy RAW” … meaning that my WB setting, while chosen, is a flexible setting exactly because I am shooting in RAW.
Something else to note – in bouncing the flash like this, above and to the side of me, there are no flash hot-spots in the wood. The light from the flash is now a large diffused light source. Soft and directional – just like we want the bounced flash to be.
In line with my recent observations that it is more interesting to use a diverse way of lighting our subjects, here is a portrait of Christine lit by hand-held LED video light (affiliate).

- camera settings: 1/80 @ f2.8 @ 800 ISO
- recommended LED video light
As always, the video light gives dramatic lighting with how quickly the light falls off to the edges. I had the Incandescent gel over the video light, and this gave that distinctive blue hue to the background which is daylight filtering in through the curtains. I commandeered the bride’s dad to hold the video light for me. Nice guy!
Related articles
On-camera flash modifier – the black foamie thing

The BFT is held in position by two hair bands (Amazon), and the BFT is usually placed on the under-side of the flash-head.
The linked articles will give clearer instruction, especially the video clip on using the black foamie thing.
There’s always something to look at and read here. Virtually every day. But that lead image today? Absolutely gorgeous in its warmth and depth. I’m not even particularly interested in brides, weddings, wedding photography or, for that matter, labouring in the trough of commercial work. Nonetheless! And I haven’t even read the text yet! Great stuff, Neil. Keep at it!
The lead Image for today is simply outstanding !
Beside that i like the idea of videolighting. I have been using torchlights for years and switched over to LED in the last year. What an impressive way to work with light. You show it in your pictures at its best !
Regards
Klaus
Simply beautiful.
I visit your site daily and almost every day you have another nice post!. I cannot believe how much i’ve learned from your posts and book
Thanks!
Erwin
Very nice!
I’ve been using your bouncing technique for almost 2 years now and my clients appreciate it deeply. I usually shoot more bar/bat mitzvah than weddings, and the teenagers all know me already. At the last bar mitzvah I had a swarm of teenage girls begging me to take pictures of them, and most of the pictures went on their profiles on FB! A big part of my success is thanks to your technique: People always say to me something like “What a wonderful light there is in your pictures”.
So my thanks to you for giving me the tools to develop a fine career!
I have a question about WB:
One of the places where I photograph events a lot (actually the Synagogue I usually pray at) has a very yellow light: lots of gold and warm wood panels on top of yellow illumination. All this mixed with a touch of bluish light from the window panes. A mess! From my experience there, trying to fix the WB so that what is supposed to be white turns out white is almost impossible, even shooting RAW. I came up to the solution of “riding the wave” and leave some yellow cast where I have yellow light and some blue cast where I have blue light, otherwise the wood and decorations of the Synagogue itself would get unreal colors.
In your top picture you obviously set the neutral color somewhere on the wedding dress. But the wall behind the bride takes a blueish tone, and even worse, the woodwork is way to yellow. When you look at the original you see how the wood is much more red than in your final result.
Now, this is the kind of picture the proud father (the one who helped you with the video light) would probably hang in the very place where it was taken, and in that case the difference in color of the wood would stand out.
Taking in account that the wedding dress is made of quite highly reflective material, it sound reasonable to me it would take some color cast from the light it is photographed into, that light being reddish because of the wood.
If I was retouching this photo, I would have balanced the white off the wall behind her, leaving the dress with some reddish hue, reflecting the light off the wood in the room.
What do you think about it?
Neil, you mentioned using your black foamie thing but then said you bounced the flash backwards into the room. Is your black foamie thing still sheilding the subject from the flash even though its aimed totally away from her? Thanks!
So Neil, why bounced to your left instead to your right ?.
TIA,
John
Good Stuff Neil!
Hello Neil,
still a great article.
A question:
I always very difficult to understand if I make the flash exposure Ev.
In your article you talk about not specify TTL Ev (-3 …..+ ….. 0 3) … why not use EV compensation +1 for example.
My difficulty ‘is whether to use + or Ev Ev –
I know that the flash exposure compensation follows the same rule camera exposure compensation.
Another question: have you used or SPOT MATRIX on the face of the bride?
Last question: the camera settings (1 / 60 f4-ISO-800) were chosen without a flash and then added later.
The flash is used used as a filler (fill in) or as a main light.
Thank you for enlighten me as a divine light.
You are my only source of clarity in the picture.
Edy Trigona Genoa Italy
Neil,
That looks more broad lighting than short one to me.
John.
With bounce flash it is often an approximation since we don’t have the absolute control we have in a studio setup.
So keeping that in mind – look at the gradient of how the light falls on her left cheek (camera right). If I had bounced to my right, her face would be very evenly lit on that side, ie, broad lighting. Instead there is more light on the right side of her face (camera left), than there is light across the entire left side of her face.
So while it might not be as specific an example of short lighting as the 2nd image in the article on bounce flash photography, this is not broad lighting.
Thanks Neil,
many thanks again for your wonderful explanation.
I’m doing advertising ‘to you and your site here in Italy and in the city nia’.
In the next six …. still so amazing !!!!!!
Edy
Hi Neil
Gorgeous image.
Im really sorry for the rudimentary question , but its the way I learn.
The first shot you took , Was the Flash on ? Meaning ( Just so I can get it straight in my head )
After posing Christine at the bottom the stairs , you set the camera the way you thought it should be
Aimed the BFT where you wanted the Light to come from took a frame and then adjusted .
Lou Recine
Neil,
I follow your blog using google Reader; instead of the images from the post the Reader shows a warning message saying “This image has been lifted from ….”; I can imagine this is a feature you introduced not long ago but it does not have a good effect for people using RSS feeds.
I follow multiple blogs, keeping track of the read/unread posts would be difficult without something similar to Google Reader.
Just FYI!
Neil, great photo.
You had flash on TTL. But to what extent was it really on TTL and what did the flash meter for since it was pointed away from your subject and did not know that it was the bride and not the room behind you that you wanted to light up? Was TTL just the best setting since you were moving around and in a variety of lighting situations?
Also, similar to other fan’s question re necessity of BFF when flash is bounced behind, does the flash cast any light on forward subject when it’s pointed behind or sharply to side? Without BFF I mean.
Also, the BFF is famous, not infamous.
Thanks, Jennifer
Thanks a lot Neil!
Hi Neil
Sorry I have one more rudimentary question I understand ” you set the camera the way you thought it should be
Aimed the BFT where you wanted the Light to come from took a frame and then adjusted ”
My question is if your test shot shows under or over exposure , How do you know weather you need to adjust the flash FEC or ambient settings?
Im still a little confused on this point.
Lou Recine