Tangents

photography tutorials, reviews & workshops

tangents photography blog
learn : discuss : share
  • Tangents
  • Tutorials
    • Flash Photography
    • Wedding Photography
    • Studio Photography
    • Posing People
    • Understanding Your Camera
    • Exposure metering
    • BFT
    • Best Photo Books
  • Reviews
    • Sony
    • Nikon
    • Canon
    • Fuji
    • Profoto
    • lighting gear
  • Workshops
    • Info: Workshops
    • In-person
      tutoring sessions
    • Online
      tutoring sessions
    • Workshops in
      New Jersey (NJ)
    • Workshops in
      New York (NYC)
    • Photo walks in NYC
    • Studio Workshop
    • Video tutorials
    • Workshop results
  • Books
    • On-Camera Flash (revised ed.)
    • Direction & Quality of Light
    • Off-Camera Flash Photography
    • Lighting & Design
    • On-Camera Flash (1st ed.)
  • Projects
    • Two Perspectives
    • B&W Infrared
    • Vintage lenses
    • Time-lapse photography
  • Info
    • About
    • Contact
    • My Photo Gear
    • Books by NvN
    • Join us on Facebook
    • Acclaim
    • Success Stories

directional bounce flash

August 28, 2009 Neil vN 42 Comments

directional bounce flash

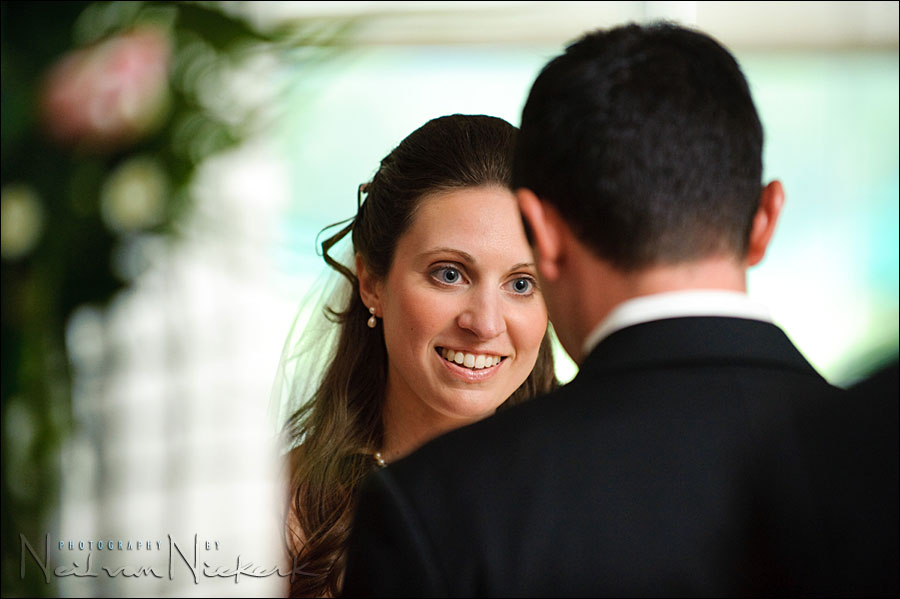
With this recent wedding – the same one as posted here– the ceremony was moved indoors because of the approaching thunderstorms.  The ceremony was going to be held in the large reception room in the late afternoon, under the chuppah.   I once again had no choice but to add flash to balance the shaded side to areas lit by window light.

I want to post this image as an example again of how I use directional light from my on-camera flash.  Instead of using a generic light modifier on top of my speedlight, I used The Black Foamie Thing.  I was using the 70-200 mm f2.8 to capture the bride’s expressions as she exchanged rings with the groom. Now, from my point of view where I was standing, I had more than a 180′ range in how I could rotate my flash-head to bounce flash to light up my subject.  I also had about a 120 degree angle in how I could swivel & tilt my flashhead from right behind me, over & above me, and even tilting the flash-head forward here.  So I really had a wide range in how I could bounce my flash.

But for me, only one direction really made sense …

I most often approach bounce flash photography as if I were in a studio and had to place the softbox to light my subject.

Which, with multiple bounceable surfaces like I had here with this indoors ceremony, meant that it just didn’t make sense to bounce my flash above me or even tilted forward.  I can’t off-hand think of any situation in a studio where I’d have a single softbox directly above my subject for a portrait.  It just doesn’t make much visual sense.  (However, if you can somehow make it work like that in a studio … great!  Knock yourself out!)

If I bounced flash behind me,  or even behind me and to either side of me, then the light would be very flat.  And I would light the back of the groom’s head better than any other part of the scene.  And again, that just doesn’t make visual sense.

How I actually ended up bouncing my flash – and this is a near-instant decision – was to point my flash-head to the  2 o’clock position, and tilted about 45′ or 60′ up.  In other words, my flash was pointed to my right and forward from the camera’s point of view.  And tilted upwards by 45-60′.   Not  90′ to my right, but instead, 30′ forward from that 90′ position.

The reason why I chose this angle, is that I wanted light to come from the side of the bride.  That way I get that directional quality to my light.  And this gives form and dimension to my subject.

I didn’t bounce to my left (10 o’clock position), since the chuppah’s structure was in the way.  But mostly because there was a room divider to my right.  A very easy surface to bounce flash off.

From this point on, it is just a matter of choosing my shutter speed, aperture and ISO so that:
– my available light registers to some degree,
– I have minimal depth-of-field,
– and at least a hand-holdable shutter speed with a stabilized / vibration reducing lens.

Settings:  1/250th @ f3.2 @ 1600 ISO

My flash was set to TTL, so that I could shoot fast, and not have to be concerned right there with getting the correct manual setting on my flash.   I am quite happy with allowing TTL flash technology to make my life easier under pressure.

Filed Under: flash photography, technique


Help support this website

If you find these articles of value, please help support this website by using these B&H and Amazon affiliate links to order your photo gear.

I also offer photography workshops and tutoring sessions, whether in person, or via online video tutoring sessions.

Please follow me on Instagram for more.

You can also join our thriving photo community in the Tangents group on Facebook, where we show our photos and discuss all things photography.

Thank you,

Neil vN

Books by Neil van Niekerk


42 Comments, Add Your Own

  1. 1Tam Vu says

    August 29, 2009 at 2:22 am

    The bride’s expression is priceless.

    Reply
  2. 2CHIEU LE says

    August 29, 2009 at 4:41 am

    Hi Neil,
    Thank you for sharing your work plus its description in details. This is an excellent angle, a great view in addition to other conventional compositions of exchanging vows or putting on rings.
    I already ordered your bounced flash technique book and can’t wait to read it.

    Reply
  3. 3Stephen says

    August 29, 2009 at 11:02 am

    Not that it’s important to the photo, but what’s the black shadow in the lower right? Was that a groomsman’s suit blurred out by the lens’s wonderful bokeh?

    Reply
  4. 4Neil says

    August 29, 2009 at 11:05 am

    Stephen, that black shadow is the shoulder of one of the groomsmen that were lined up there.

    Neil vN

    Reply
  5. 5john says

    August 29, 2009 at 11:08 am

    Neil
    yes you have captured the brides happness, and you can feel that in the photo great job.

    “I once again had no choice but to add flash to balance the shaded side to areas lit by window light.”

    Was the brides left side of her face more shaded? and was that a influance as to were you bounced.
    Thanks I was a little confused on this.
    thanks again for all your help. I have ordered your book also and am waiting.
    John

    Reply
  6. 6Neil says

    August 29, 2009 at 11:15 am

    John .. the bride had her back to the light streaming in from the windows behind her. So her entire face and front of her body would’ve been in “shade” compared to the rest.

    If I had chosen to only use available light, I would’ve had a high-key photograph with the background completely blown out to white. That’s cool too … but I prefer this result much more where there is some color from the window areas. And the only way to achieve that, is to lift the shadow areas of the image (ie, the bride’s face) to an exposure level where it compares with the bright background.

    Neil vN

    Reply
  7. 7Pat Bloomfield says

    August 29, 2009 at 11:18 am

    Great shot Neil.

    At first I thought the light coming from the bride’s right was your flash but from your description it sounds like you flash was the key light lighting her left side.

    Is it usual to allow use of flashguns during the ceremony in the states?

    The only wedding I’ve been given the go ahead to use flash was a registry office.

    Reply
  8. 8Neil says

    August 29, 2009 at 12:28 pm

    Pat,

    The light coming in from the bride’s right hand side (camera’s left), is mostly just the spill light from the bounced flash.

    re the use of flash during ceremonies .. this varies from denomination to denomination, and also the particular officiant at the wedding.

    When the wedding is in a church, I usually refrain from using flash. But with an indoors ceremony such as this one, taking place at the catering venue, I have little hesitation in using flash. The atmosphere at the ceremony is also different then compared to being in a church.

    Aside from that, when I do use flash during the ceremony, it is nearly always indirect flash. So it really isn’t intrusive at all.

    Neil vN

    Reply
  9. 9Chris Ramsey says

    August 29, 2009 at 12:54 pm

    Hey Neil, thanks for the great post!

    One question: you mention that your settings were 1/250, f3.2, 1600ISO… Did you choose f3.2 (or 1600ISO) for a specific reason? Just curious as to why you didn’t go right to f2.8 and shoot with a lower ISO…

    Thanks,
    Chris.

    Reply
  10. 10Neil says

    August 29, 2009 at 1:26 pm

    Chris .. no particular reason.

    But the difference between f2.8 / 1250 ISO .. and .. f3.2 / 1600 ISO is incremental.

    So no particular reason for the specific choice of f3.2
    I liked what I saw when I previewed the LCD for the initial shot, and that’s where I settled for that short while.

    Neil vN

    Reply
  11. 11Eileen says

    August 29, 2009 at 1:55 pm

    Nice work again Neil. I really like this natural and unobtrusive use of flash to help tell the story of the day. For me this is a good reminder to think harder about the direction I want the light to come from. Thanks for sharing!

    Reply
  12. 12Haw says

    August 29, 2009 at 2:21 pm

    Good Day Neil,

    Greetings from the Philippines!

    I was wondering how long did it took you to react from the moment they start exchanging rings till you get the shot and exposure you wanted? I would imagine it to be fast and almost instantaneous but it seems (reading your explanation) there was a lot to think about before taking the shot.

    Many Thanks,
    -Haw

    Reply
  13. 13Neil says

    August 29, 2009 at 2:50 pm

    Haw .. this is near instantaneous a decision. A second or two to glance around, and then start shooting. I might finesse a setting while shooting, but the entire thought process, as laid out there is fast. And it has to be.

    Neil vN

    Reply
  14. 14Mac Swift says

    August 29, 2009 at 3:28 pm

    Hi Neil,
    By pointing your flash forward of your position would the light not then becoming from the side and behind the bride? The catchlights in her eyes look like an umbrella to your right, above and in front of the bride a la studio lighting. I am lost as to how that is being achieved by bouncing the flash from behind her or is there some magic going on and large enough light source is coming back giving this look.

    Reply
  15. 15Neil says

    August 29, 2009 at 3:34 pm

    Mac .. I didn’t quite bounce my flash to that extreme, but I could have.

    It looks like you’re on the verge of an aha! moment there.
    That catch-light in the eye is nearly predictable if you bounce your flash like that.

    Have a look at the photo posted for the feedback about the Cork, Ireland workshop.

    As well as the link to the original post about the Black Foamie Thing. That catch-light is there without any Photoshop trickery.

    Neil vN

    Reply
  16. 16Jerry says

    August 29, 2009 at 4:24 pm

    Hi Neil,

    Again great post, thanks! I wonder if you use the zoom possibility on your speedlight in specific situations.

    Jerry.

    Reply
  17. 17Neil says

    August 29, 2009 at 5:04 pm

    Jerry … indeed, I’ve started to zoom my flashhead out to the maximum when bouncing flash, and it is more efficient doing it that way.

    Neil vN

    Reply
  18. 18Roy says

    August 29, 2009 at 6:10 pm

    Hi Neil:

    Thank you for sharing your wisdom with all of us. I would like to add my complement to your great work,

    I am also confused as to how you got such a great shot with light seems to come totally from right side of the bride and groom.

    If you stand slightly to the left of the couple (when the shot was taken), and you use on camera flash angled to your right as you mentioned, I would expect that the left side of the groom head would get the most light spilled from your flash?. How did you prevent this from happening? is it the black foamy thing that does the job?
    Thanks
    Roy

    Reply
  19. 19Neil says

    August 29, 2009 at 6:43 pm

    Roy .. yes yes yes! That’s it, the black foamy thing flagged the flash so that no direct flash spilled on the groom. It really is as simple as that.

    Here’s the key in trying to decipher this shot:
    Don’t think of your flash as being your light source anymore.
    The area you are bouncing off .. THAT has become your light source now.

    So with this in mind, you can place your light source more or less where you want, and thereby decide on the direction you want the light to fall in from.

    Whereas most people who tell you how to bounce flash, will bounce TOWARDS your subject, the principle here is the other way around. It is counter-intuitive perhaps .. but I throw the light towards the area that I want my light to come FROM.

    So in this photo, the “light source” was part of the room divider to the camera right … and the “light source” was equi-distant from both the bride and the groom. And that is why she is lit as brightly as she is in relation to the rest of the frame.

    I’m excited … the fact that you’re puzzled by this at this point, feels like there is another aha! moment about to strike. :)

    Neil vN

    Reply
  20. 20Anthony says

    August 29, 2009 at 11:45 pm

    Hi Neil,

    That’s a great shot!
    I understand that the exposure is set manually, but are you set to spot metering to control the TTL flash reading or are you riding the exposure comp?

    Thank you for such great information.

    Anthony

    Reply
  21. 21Neil says

    August 30, 2009 at 10:13 am

    Anthony, I mostly keep my camera set to Matrix / Evaluative metering, and then ride the exposure compensation.

    I am sure it would be possible to do a test image and use the flash lock feature, while using spot metering on the camera .. but for me this would be more clumsy than adjusting the FEC while continuing to shoot.

    Neil vN

    Reply
  22. 22Tricia Muehlbauer says

    August 30, 2009 at 12:26 pm

    Oh, Neil. YOu are the master! :) So loved taking your class in Denver a year ago. Come back! We’ll build a class for you. I am still using your flash techniques as is my sister. I want a second run through of your class, however, as i don’t always nail it….i feel like i’m experimenting at every wedding. THis shot you did is amazing. You make it look so simple and non-flash like, which is why i say you’re the pro! Come back to Colorado! Thanks for sharing.

    Reply
  23. 23Carlo says

    August 30, 2009 at 11:41 pm

    Thank you Neil. I learn a great deal from you. I will order your book today. :)

    Carlo

    Reply
  24. 24Gary Segler says

    August 31, 2009 at 12:32 am

    Very nice shot Neil. I don’t think you could’ve done a better job demonstrating the use of “on camera” flash and how good it can look if a little thought is put into it. As always, another excellent and unselfish post. /cheers.

    Reply
  25. 25Ernst says

    August 31, 2009 at 10:16 pm

    Hello Neil,

    Beautiful shot. I find it helps to read and re-read your posts over and over again.

    You’ve probably answered this one somewhere; do you still bounce flash with the Black Foamie Thing if you’re shooting in a room with bright red or yellow walls (or other vibrant color).

    Do you then resort to direct flash, perhaps with a Stofen or other modifier? Or shoot raw and try to correct later?

    Cheers.
    Ernst

    Reply
  26. 26Jerry says

    September 1, 2009 at 4:07 pm

    Hi Neil,

    This is a little off topic but I wonder if you use tungesten to daylight correction gels, for example in the case where the background temperature is a little colder than the flash temperature is. It crossed my mind when looking at the example pics on page 113 of your book. By the way, got your book last week here in Holland. It’s great! As is this blog. Thanks a lot for sharing your knowledge!

    Jerry.

    Reply
  27. 27Neil says

    September 1, 2009 at 6:18 pm

    Ernst … the black foamie thing is there mostly to flag my flash, and get that directional quality to my light from the on-camera flash.

    There are times though when bounce flash isn’t really an option, such as walls that are too dark or too deep a color .. then you have to make other plans such as off-camera lighting of some kind.

    Neil vN

    Reply
  28. 28eliud matos says

    September 1, 2009 at 10:52 pm

    Every time I come to this site I learn something. Thanks!

    Reply
  29. 29Dwayne Zimmerman says

    September 1, 2009 at 11:26 pm

    Neil,
    Shooting at the high ISO speeds of 800-1600 (+)with my D200 doesn’t that increase the issue of noise? How can I overcome that?

    Reply
  30. 30Dwayne Zimmerman says

    September 1, 2009 at 11:53 pm

    Hope you see this before you respond to my above question. You have answered the question elsewhere. Thanks.

    Reply
  31. 31Sheri Johnson says

    September 2, 2009 at 8:23 am

    As you are describing angles to choose from it reminds me of playing a game of pool (billiards), I imagine bouncing that ball off the edges. I know that analogy will help someone to think about it that way. Intentional directions. Physics anyone….

    Reply
  32. 32Max says

    September 2, 2009 at 5:39 pm

    Hello Neil,
    When you bounce your flash, do you use manual power settings or TTL?
    and how about the ‘zoom’ on the speedlite? If you do set them, how do you determine their setings?

    Thank You.

    Reply
  33. 33Neil says

    September 6, 2009 at 4:13 am

    Max, I mostly use TTL flash when I use the flash on camera. This helps in getting correct exposure when I move around, or my subject moves.

    When the subject-to-light distance remains constant, then manual flash is by far the easiest and most accurate. But for on-camera flash, this usually means TTL flash is the easiest and most convenient to deal with.

    As for the zoom setting – when I bounce flash, I usually zoom to the max setting to get the most efficiency from the flash.

    Neil vN

    Reply
  34. 34Elisaveta says

    September 9, 2009 at 10:58 pm

    Neil,

    I came across your website just recently and I thank you for all the information you have posted and continuing posting on photography. I like your style of writing and how you go in detail and give examples with pictures. You have been very helpful!

    I’ve been reading lately on bouncing the flash off of surfaces around me/ the photographer. And you do give great instances. But there are still a few things I couldn’t find answers to.

    I was recently at a wedding as a guest(but still took pictures) and there was a hired photographer who shot the event. I was paying attention when he was taking his pictures. Most importantly when he was shooting during the reception / party / dancing inside in a very low light room with high ceilings. His flash was tilted backwords with an able, away from the subjects he was shooting and actually blinded all of us who were behind him. I saw his final slideshow the other day and the pictures looked great – bright with color, no blur anywhere.

    My question is – if the ceilings were high, what was he bouncing his flash off of?? Those were dance floor shots, people dancing and moving fast, bounced flash, the action was frozen- no blur like I said. If he was using directional flash, I would not be asking this question… but it just seemed an open space above, how could he have reflected/bounced his flash??( he did not use the black foamy thing at all) And one more question: When shooting outdoors with no ceiling or walls around you, how do you bounce the flash??

    Neil, thank you so much for your time in advance!!

    Elisaveta

    Reply
  35. 35Neil says

    September 19, 2009 at 12:36 am

    Elisavita … What was he bouncing off? This is something that many photographers find hard to get their heads around .. that you can bounce your flash into a room (even a large room), and enough light will spill back for correct exposure .. if you choose your settings wisely.

    About him blitzing people in the eyes with his flash turned around, this is part of the reason why I use a piece of black foam to flag my flash.

    If you don’t have an obvious surface to bounce your flash off, then you either have to supply it in the form of something like a reflector held up behind you, or alternately go to off-camera lighting of some kind to get good results. However, you might be surprised at what you could actually bounce your flash off.

    Here are two postings where I discuss this a bit:
    – using bounce flash outdoors
    – bouncing off bricks

    Neil vN

    Reply
  36. 36Cicely says

    February 4, 2011 at 12:46 pm

    Neil,

    Do you ever use LED lights attached to the chuppah in addition to bounce flash? At my last Jewish ceremony, the chuppah “roof” was very low and I could not find a way to bounce flash and not get a shadow on their faces because the roof edge was barely taller than them. What would you do?

    Thanks as always,
    Cicely

    Reply
  37. 37Neil vN says

    February 4, 2011 at 4:33 pm

    Cicely .. you’re describing one of those impossible scenarios that we have to deal with during weddings. The low-hanging chuppah that keeps people’s faces in shade.

    I haven’t thought of anything like your work-around idea, but it sounds like it could work. We definitely need ways to get some light in there, often enough.

    Neil vN

    Reply
  38. 38Cicely says

    February 4, 2011 at 5:10 pm

    Thanks Neil, I just wanted to ask the flash master to make sure I wasn’t overlooking anything :-)

    Reply
  39. 39David Klein says

    May 2, 2012 at 11:12 am

    Neil,
    Great work and blog. Sorry I missed you at HV Click this past Sunday. I shoot with a D3 and sb-800. Dumb question but I don’t know the answer: how do you bounce flash off the right side (as in the top photo) when camera is in vertical mode (hot shoe / flash is on the left side)? Do you just hold the camera upside down (button on bottom) – not very comfortable.
    Thanks for all your knowledge and sharing.
    David

    Reply
  40. 40Neil vN says

    May 2, 2012 at 12:04 pm

    David .. that’s the uncomfortable (and unsteady) way of holding the camera, unless you use a flash bracket.

    Neil vN

    Reply
  41. 41David Klein says

    May 2, 2012 at 2:43 pm

    so these days I see you don’t use a flash bracket – how do you get the vertical shots bounced to the right (like the top photo, although the top photo is horizontal)?

    Thanks.

    Reply
  42. 42Neil vN says

    May 2, 2012 at 3:14 pm

    By holding the camera awkwardly.

    Neil vN

    Reply

Leave a Reply Cancel reply

Your email address will not be published. Required fields are marked *

categories

Articles & Tutorials

  • • About myself & this site
    • Books by Neil vN
    • Best photography books
    • Black foamie thing
    • Photographers’ success stories
  • • Flash Photography Techniques
    • Natural looking flash
    • Flash + Ambient light
    • Dragging the shutter
    • Bouncing your flash
    • On-camera flash outdoors
    • Exposure metering
    • Flash exposure compensation
    • Bounce flash examples
    • Which is the best flashgun?
    • Flash brackets
    • Off-camera flash photography
    • Flash photography basics
    • Using video lights
    • Flash photography tips
  • • Photography workshops NJ / NYC
    • Models @ photography workshops
tutorials:
flash photography
Photography
Workshops

All rights reserved. Copyright © Neil van Niekerk 2025 · Customization by The Traveling Designer

Copyright © 2025 · NvN on Genesis Framework · WordPress · Log in