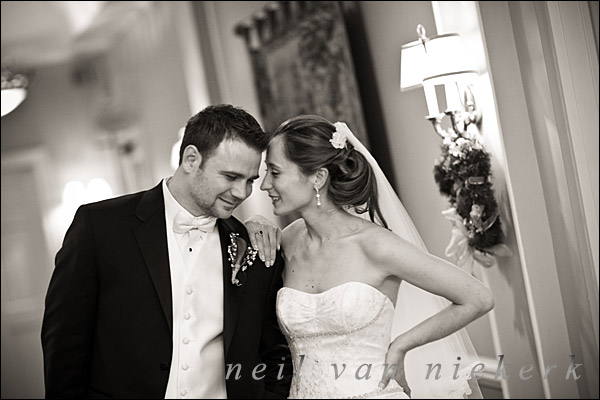
1/100 @ f1.6 @ 1000 ISO
“Dragging the Shutter” is a term used to describe the technique of using a slow enough shutter speed to allow a measure of ambient light to register when using flash.
This term originates from an era when photographers would determine correct flash exposure for on-location photography by :
– setting the ISO speed according to the film used,
– setting the aperture according to subject distance (depends on flashgun’s guide number),
– then using the shutter speed as the ONLY way of independently allowing more ambient light in, slowing the shutter speed far lower than max sync speed when shooting in low light.
(This worked fairly well for color negative film, because the labs took up the slack in exposure miscalculation when printing the images.)
However, with TTL flash on a D-SLR, you have more flexibility than this. And I’m of the opinion that the phrase “dragging the shutter” is archaic in the era of TTL flash photography.
As explained here – manual flash vs TTL flash – TTL flash exposure will follow your chosen aperture and ISO.
This means that your choice aperture and ISO effectively becomes ‘transparent’ to your flash exposure.
Hence you can equally well use your aperture and your ISO and your shutter speed, to allow more or less available light in, independent of your (TTL) flash exposure. (Obviously we have to work within reasonable ranges.)
So it would be of great benefit not to get locked into the idea of “dragging the SHUTTER” to control your available light, when you could equally well use any of the three controls when you use TTL flash.
Many photographers seem to have a hard time wrapping their heads around this idea – that with TTL flash it isn’t only the shutter speed that you can control, but that you can now use all three settings (shutter speed, aperture, ISO), to control how your available light registers .. and still not affect your flash exposure.
Let’s look at all of this in relation to some images:
1/100 @ f1.6 @ 1000 iso
Canon 1Dmk3 / Canon 85mm f1.2 II / Canon 580EX
.
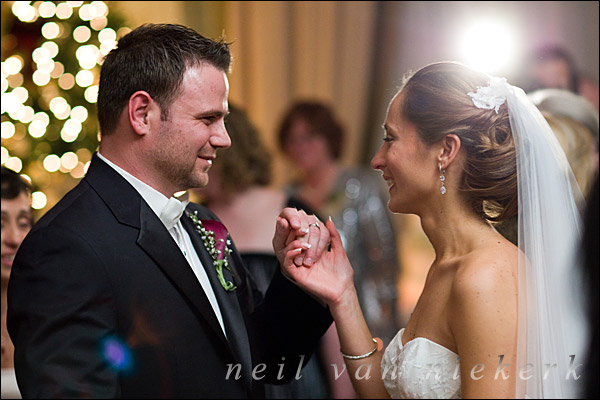
1/100 @ f2.0 @ 1600 iso
Canon 1Dmk3 / Canon 85mm f1.2 II / Canon 580EX
.
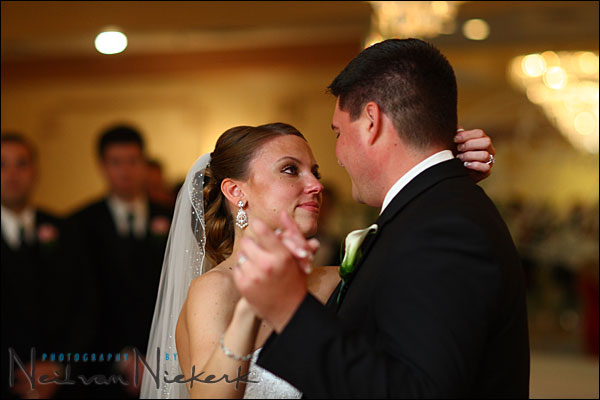
1/160 @ f1.8 @ 1600 iso
Canon 1Dmk3 / Canon 85mm f1.2 II / Canon 580EX
If you look at my settings for all three images, my shutter speeds weren’t all that slow, BUT if you look at the images you’ll notice that the available light most definitely did register. And this was because of my choice of aperture and ISO. With a wide aperture, and a high ISO, I allowed ambient light to register, and give context to my photographs. And then I added TTL flash to it, and exposed correctly for my subjects, opening up shadows and controlling contrast and cleaning up skin tones.
I didn’t need to specifically “drag my SHUTTER” to get to this point.
What is at the very heart of this, is the idea that you get better results with on-location flash photography, when you make sure your ambient light registers to some extent – whether you use your aperture, ISO or shutter speed.
So in trying to understand this technique, don’t stare yourself blind against the idea that shutter speed is the only thing which allows you to independently control your ambient light, separate from your flash exposure. With modern (ie, TTL) flash photography, this technique has become a lot more interesting and versatile.
Neil, this is a great addition to the work you have already done on explaining the use of flash and ambient exposure together. Instantly, I can see a lot more flexibility, and solutions to problems I have experienced and found difficult to overcome.
Thanks a million, I am always excited to see planet neil come up on my RSS reader!
Cheers,
Ken Donnelly
Neil.
I found this blog/site of yours to be of great value.
I do like the way you use the flash, in a very smooth and tender way :)
Let me make a little comment about the photos you have exposed here.
You work with high-end equipment. Fine. That’s great.
I use a 20D and L lenses and I am an amateur. I use the center point for focusing and I feel that sometimes I miss the focus because or a little movement or whatever and I get a blur picture.
Here, also within reasonable ranges, the material is important. I sometimes use a 350D and I can see that the focus system is not so perfect as with the 20D … :)
Changing ISO is a clever issue. Gives more flexibility. Thank you. :)
Soon I will make some experiments with this super tip.
Have a nice working week.
Great tip Neil, thanks for your sharing!
Quick question here, were you using a direct flash at the couple in those images or were you bouncing them off the ceiling?
I have seen yesterday but I forgot to mention that the blue spot in the last picture, reflection inside the lens of the flash back there, is a minus in the picture.
May be you could clone it …
And I dare say that I would like even better the picture if that flash in the background was behind the bride’s head. and not as it is.
:)
Am I forgiven ? To be so bold … Me, just an amateur …
Glad you posted this because a problem I have is underexposing the background especially in dim light situations such as reception halls. The result is a very “muddy” looking background. To this end, I recently purchased a 50mm 1.8 lens for my Nikon D80 in order to let in more light. My thinking was to try to keep the ambient light within 2 stops so it doesn’t get too underexposed and make it much easier to light the subject with the SB600 flash.
I am just an beginner in photography and have no intention of becoming a pro at anything, including wedding photography. I just want to take better pictures. Your blog here has helped me understand flash better than most photographers out there, and I thank you for the time you have taken to write these lessons.
Neil, your only fault is not posting enough of these tips!
Following what you did, (high ISO, wide aperture) even using the built-in flash (-ve compensation) allowed me to register ambient lights which did wonders for the pictures I took recently.
Of course, by attaching my SB600 and bouncing of walls (never direct and on the ceiling!), you made me look more competent than I truly am :)
Neil,
Once again some great posts here on your website, which are extremely informational and easy to understand. Thank you for taking the time to post this!
I dont see very much noise in the images posted, even at ISO1600. I seem to remember another post where you explained that you dont post-process much with noise reduction software (maybe I dont remember correctly). On my EOS 400D I find that I get a lot of noise at even just ISO 800, and I dont consider ISO 1600 usable.
Is this just the difference between the MkIII and the consumer models, or do you post proces?
Thanks again for the good site.
Jakob
Thank you very much Neil. I’m not new to photography, but I am new to flash photography, and this tutorial has helped me immensely in beginning to understand how to properly use this big expensive flash module I bought today. ;)
*Bookmarked!*
Thanks again.
Hi Neal, thanks a lot for your great article on flash photography. You have made me spend a lot of my “after office hour” just to explore this technique :))
However, I would like to ask you whether this technique only work with the official brand. I use Nissin Di-622 to work with my Nikon D70s, and I found the flash exposure compensation didn’t work. In TTL mode set up at the camera and flash, I tried to dialed down or up the flash exposure compensation button (on the left side of the built-in flash house), but still the exposure unchanged.
Please advise accordingly. Thank you very much Neil..
Neil,
Thanks for taking time to comment on the comments, I really appreciate it. -And will start saving for the eos5D or the big brother when it comes out.
Cheers,
Jakob
I find your site very informative and makes great reading and I’ve just one question.
Nikon appear to have spent a lot of time and effort on their balanced flash system and I’d be interested in hearing what you think of the system and what, if any, benefits it has.
Cheers and keep up the good work.
(please, excuse my poor english, I’m french)
Dear Neil, I first want to thank you for the general quality of this website.
I want to thank you too for making me consider my strobe as a friend and not as an enemy.
I did not read before such a clear and accurate explanation of flash photography.
Very very very good writing. Awesome.
Now I’ll explore this new universe without doubt nor fear. Guess I’ll now be able to produce far better photographs for my friends and family.
Neil,
I first read your pages on shutter drag about 2 1/2 years ago, while prepping for my first evening wedding shoot. I can safely say that the images I got on that day are still some of the very best wedding photos I have ever taken! I was using a Rebel G film camera with a generic flash, a Demb Flash Diffuser and ISO 200 and 400 colour neg film. I now use an XTi (400D) with a 580EXII flash and the technicque comes in really
This update just reconfirms to me that I gotta get me that 5D this year ;)
It didn’t really register with me that I can actually maintain higher shutter speeds by keeping my ISO up and controlling the flash output manually. Duh! ;) I know that now ISO 1600 won’t be a limitation on my future shutter-dragging escapades.
Incidentally, what fast wide prime would you recommend for Canon SLR?
Hi Neil,
I can’t get enough of this website and article. I am a newbee [do they call it?] on wedding photography and yet to cover a full-day wedding photography soon. And I can assure you that I would definitely dare try these techniques there, of course, after practicing it at home and somewhere else first.
I have been reading postings at Photo.net for the past 2 or 3 months now and pretty much everyone would mention your name when it comes to such issues. You are indeed a great asset to photography and photographers, so please keep up the good work! Thank you very very much!
how about we call the technique “dragging exposure” from here on out?
(the term “dragging” not to be taken too literally, of course…)
and let me join everybody else in saying “thank you.” even though i’ve only actually used it once so far, i’m nevertheless quite fond of and impressed with this technique (whatever you want to call it), and i appreciate your helping me to understand it better. that’s a valuable insight, that it’s not all about the shutter. that realization opens up all kinds of interesting possibilities.
So if I understand correctly from your invaluable pages, one way that I can achieve lighting up my background is by user shutter priority and selecting a shutterspeed lower than what I would have normally done (certainly lower than the camera’s default setting) and using TTL on my speedlight. Is this use of the shutter speed what you mean by “dragging the shutter?”
Raphael .. not quite.
With flash photography where you use the flash as the main source of light, ie, where you will have correct exposure from the flash regardless of the ambient light … the idea is then to ‘drag the shutter’ so that you allow more ambient light it.
Exposure would still be correct, but you have more of the mood of the scene. You retain more of the sense of place than if you only use flash.
By using shutter priority and forcing a slow shutter speed, you’d get the same effect. But personally I would still prefer controlling every setting.
Re your white balance question … here is how I approach it.
and for my next question, how do i do my white balance with this technique? Normally I use a grey card with my flash, would this still work?
So if I want to start to learn how it works, shutter priority will give me the effect that I want. I agree that working manually is the best way, but since I’m an amateur, it will be many months or years before I can look at a scene and say, “for the correct exposure, I need 1/60th at f/2.8”.
What you are basically saying is that the flash is going to fire at 1/500th (or is it 1/60th) of a second regardless as to what shutter speed I put on my camera. So when I’m firing my flash at the subject, it will take into account the sync speed of my flash and my aperture (and I guess my ISO), but my camera will still leave my aperture open for a longer time allowing my background to be illuminated more?
Neil,
Aha! I think I finally got it :-)
In the past, the sweet spot for my D200 in a dimly lit hall is ISO 400 – f2.8 – 1/30th. I always “drag the shutter” to catch some ambient light. Now if I need more speed, let’s say @ 1/60th I have to bump my ISO to 800. And if I need more speed 1/125th I have to bump my ISO to 1600. All these three settings should give me approximately the same results without overloading my flash.
I will definitely try this one out. If it works, I’m no longer limited to 1/30th. Thank you, thank you, and thank you!!!
Eli
Neil,
Can you go into more detail about how you point your flash? This is as important as the camera settings. It is not clear to me how you are aiming your flash. Over your shoulder? Does that mean your flash is pointing backwards??
Thanks!
Must be nice, I only get 1/13 second ISO 3200 exposures in the places I get to shoot receptions in.
From what I call myself as an advanced amateur photog or namely a photog who works mainly non-pfrofitable, your info is clearly stellar especially for those of us just coming to grips with the proper use of artificial light/ambient light. Nice work sir. I have you and your articles in my favs.
Jim
NIce work Neil. You have a great approach to teaching what a lot of us have pulled hairs over trying to figure these ambient/artificial light issues. I personally own 8 Nikon speedlights and have had my ‘demons’ trying to make them work as I want them to. You should be calling this the Art of Bounce.
Mahalo from Honolulu,
Jim
Neil, after reading through your exposure and flash pages I’ll be holding you responsible for me buying an SB-600 flash this Christmas :)
Wonderful work you’ve posted here; I completely agree with your angle on flash, that it shouldn’t be apparent that flash was used in a shot (with exceptions of course) – I love shooting available light (having only ugly onboard lighting is the main reason) but after finally moving past that I’m starting to read about flash lighting. Maybe I just don’t want to take ‘ok’ pictures and would love to be competent shooting flash of friends and family.
Thanks for posting these tips, I never thought about bouncing off a wall behind (due to no flash unit) but hopefully I’ll start out correctly when I do –
I’d rather master that than buy a Fong Tupperware product :)
very good article, thank you.
I’m surprised that so many people make their equipment responsible for bad pictures. The new camera you’re saving your money for will still not make the photos on its own.
Remembers me of the story where a cook says to the photographer “you’ve made so great pictures, I guess you have a very good camera”.
The photographer responds “You’ve made such a delicious food, I guess you have very good pots”.
Neil, let me echo all the praise you have received. Your sharing of knowledge is priceless.
I want to urge some of the Canon people who are asking you questions to read this article
It is the quintessential literature on understanding how the Canon EOS flash system works. I have read it 3 times in the past and it is the sole reason (besides experience) of my EOS flash system understanding. I would not understand much of your techniques if I did not first read the article. The main point of the article being that with a Canon body in Av or Tv mode, the flash will only act as a fill-flash. Although, in manual mode when you set the aperture and shutter speed the flash will attempt to output enough light to expose the scene correctly if your other settings cannot achieve the proper exposure.
When I shoot weddings/events I usually shoot wide open with a shutter between 1/80 – 1/250 to achieve relative sharpness. My flash is always set to TTL. When I drop below 1/60 I consider myself to be dragging the shutter, usually in order to brighten up the backgrounds.
I believe Neil is pointing other ways to achieve this.
Thank you Neil for your very informative and easy to understand tutorials! It is very generous of you to offer your time and talents here in these articles.
I have poured over your site this past month and have learned a load of information. My flash is nearly always on my camera now!
THANK YOU!!!
Maybe this is a silly question, but when you’re setting your camera mode, are you just leaving your flash on auto (ettl), or are you adjusting it at all in manual mode.
Hi Neil,
You are great.
Thanks a lot for your effort in teaching us.
It’s really huge help to read your answers to all readers questions.
I hope i can use the Nikon D300 with high ISO as you do ..
Hod Negev
On the top picture, with settings “1/100 @ f1.6 @ 1000 iso” which focal length did you use? I’m just amazed that at such a small aperture, the couple is in focus.
I love you Neil!
That is all.
Let’s call it dragging the light, or dragging the exposure.
Unfortunately I live in Belgium and can’t following your photo session, but I have read your site over and over again and learn a lot from it, although I’ m only an amateur photographer.
Thanks a lot
Thanks Neil for very helpful tips.
One question though. In all your discussions about flash and ambient light, do you have the flash set to slow-sync/rear-sync?
Thanks again
Neil, Thanks for replying. I guess this shows how “newbie” I am. I do have a followup question if it’s ok.
In your sample where the shutter speed is 1/20s or 1/30s, when did you fire the flash, as soon as the shutter opened therefore before capturing ambient light? Sorry If I;m not too familiar with manual flash. I’ll try to catch your class in Dallas Tx.
Thanks again
Neil amazing site. This may seem like a really basic question but do you make sure that your camera meter shows the correct exposure or doesn’t it matter as the flash will responding to the reading and giving the correct amount of flash regardless of whether the original image is exposed correctly?
Thanks
Good day Neil,
I am new to flash photography and very eager to apply this knowledge. You are a generous person, thanks.
Dan
Hi Neil,
Thank you for these great “lessons”. Having been a landscape photographer, being asked to do a friends wedding seemed very daunting. Now equipped with my flash units etc and reading what you have posted up makes me feel much more comfortable after practicing on teddy bears(yeah best subject i could find that was willing).
Thanks for taking tiem out to write these sorts of articles.
Craig
Ok – I think I finally have it! With TTL flash, when the flash is the only source of light on your subject, you choose basically whatever settings you want and the flash will supply the appropriate amount to light your subject (based on your settings and distance to subject) Your settings then (iso, aperture, shutter speed) are based on either the amount of depth of field you desire, or the amount of ambient light you want to register for the background?
Essentially, regardless of what your aperture or shutter speed settings are, the flash will respond with what it believes is the right amount of light? And the subject will be properly exposed. Is it really that arbitrary? So you choose your aperture and shutter speed not based on the meter but based on aesthetic reasons?
I guess I still don’t get it… how will you know that your exposure is going to be right? Is it that it doesn’t matter what the meter in the camera is telling you – It does not know that you will be adding light to the scene – so if the room is dark, the meter will call for a slow shutter speed so things will record. But you should ignore that because you know that 1. you will be adding light with the flash and 2. a slow shutter speed will cause camera shake/motion blur. I must be missing something.
I have been struggling with flash for quite some time. I understand how to bounce, how to use flash to lift shadows… but I cannot grasp how to use the flash in a dark(ish) room. Where do you begin?
I know that when using flash to add to the ambient light you first get a good exposure (meter your subject – taking into account relevant white tones, etc) and then bounce flash into the scene/subject to reduce contrast.
Thanks for any feedback.
Thank you Neil! I’m liberated… I think :)
Great site, I always looked at a flash as an uncontrolable piece of equipment. Not any more. This weekend I am doing a shoot with a master/slave setup.
Thanks for sharing yourknowledge!
Robert
hi neil, i`m daniel from indonesia.
i`m a big fan of your flash photography. but i have difficulties on balancing ambient light with my old SB28dx on my nikon d90.
what i want to do is using my flash as fill.. but as we know the sb28dx is all about manual flash when paired on shoe with nikon d90, how can i shoot wide open at f2.8 + high iso and add “fill” flash with manual flash. it`s easy when my subject was standing still. but when i take candit and moving along i had trouble adjusting my flash power..
i hope you can give me your best advice fot this kind of situation.. its easy when using TTL flash, but when using manual flash.. oh… :p
sorry for my bad english.
thanks.
Neil,
Great info. Thank you so much.
Let me ask you this in a way that may help me grasp this better.
Let say you set your shutter at 1/160 and your aperture and ISO at fixed settings at a fixed distance from your subject , the camera will produce an appropriate “pop” to correctly expose the shot.
Now, lets say everything remains the same except we slow the shutter to 1/30.
Does the camera produce a slightly less intense “pop” (because your allowing more light in) to correctly expose the shot? Or, based on just your aperture and ISO and distance, it produces the same intensity “pop”?
Neil,
Do you get quicker recycling time benefit shooting at f1.8, 1600 ISO as opposed to shooting at f6.3, ISO 400, or is the benefit negligible?
Hello Neil
Iam a Big fan of your Way of Photography i got a Question How do you normaly underexpose the Background? with a Negetive Exposure compensation or a Higher shutter speed and use Flash to Highlight the Subject? From My expereience i understand Applying a negetive Exposure compensation on camera Body and Using a Positive FEC on flash cancel each other is it true? how can we solve that isse?
thanks
Anoop
Neil,
I am shocked and thrilled that you answered my question. Thank you.
Another one comes to mind. This one is prompted by the varying results I sometimes get while “dragging the shutter”. Some shots, perfect exposure, some blown out.
I have a Canon 550EX.
Since the flash appears to be making some decisions, would it not produce a bigger “pop” for a group wearing all black outfits as opposed to a group wearing all white outfits?
Frankee
Hi Neil,
lots of great and extremely helpful advice!
Maybe you should mention that changing the shutter speed isn’t the only way to control ambient light when using manual flash either. You can also choose a higher ISO setting and/or a different aperture in order to avoid slow shutter speeds and still get a correct flash exposure by reducing the flash power (or changing the distance between the flash and the subject, but that would require off-camera flash, and the quality of the light would change, too). Of course this is way more complicated than using TTL flash, but it does work. Probably the biggest difference is that this way you have to do all the thinking yourself instead of relying on the camera and/or flash software.
Hi there Uli ..
You are completely correct – all three controls do and will affect ambient exposure, regardless of whether flash is used, or not; and whether the flash is TTL or manual.
It is implied there with the statement that shutter speed is the only independent control for ambient light. But it is more thoroughly explained in the main article on dragging the shutter.
Hi Neil, on all of the picture, did you intentionally underexpose the ambient light by 1 0r 2 stop since in this situation the subject and background have about the same kind of light? The other thing that I do not understand is: when you measure the ambient light, let say you get 1/250th f1.8 iso 1600 and everything is properly exposed both the subject and the background, then why do you still want to use flash in this case?
Adi .. your questions are thoroughly answered in this article on balancing flash with ambient light.
Yoghi asked for exposure compensation with a D70s and Nissin Di622.
It is not possible to make exposure compensation in the flash itself; I have a Nikon D60 and a Di622, and FEC can be done IN the camera: it means the camera controls FEC of the Di622. And it works.
If you wanted more power and plenty of controls, get a Nissin Di866, which is full compatible with Nikon SB900, SB600 and CLS from Nikon.
Neil, this is far the best resoure for flash fhotography I found in the Web. Thanks for that.
Carlos.
I thank you for this informative site, thank you for the time to do this and I am one of the people who learned a lot from here.
because there is people like you that willing to share…. May God bless you…
Daniel