Tangents

photography tutorials, reviews & workshops

tangents photography blog
learn : discuss : share
  • Tangents
  • Tutorials
    • Flash Photography
    • Wedding Photography
    • Studio Photography
    • Posing People
    • Understanding Your Camera
    • Exposure metering
    • BFT
    • Best Photo Books
  • Reviews
    • Sony
    • Nikon
    • Canon
    • Fuji
    • Profoto
    • lighting gear
  • Workshops
    • Info: Workshops
    • In-person
      tutoring sessions
    • Online
      tutoring sessions
    • Workshops in
      New Jersey (NJ)
    • Workshops in
      New York (NYC)
    • Photo walks in NYC
    • Studio Workshop
    • Video tutorials
    • Workshop results
  • Books
    • On-Camera Flash (revised ed.)
    • Direction & Quality of Light
    • Off-Camera Flash Photography
    • Lighting & Design
    • On-Camera Flash (1st ed.)
  • Projects
    • Two Perspectives
    • B&W Infrared
    • Vintage lenses
    • Time-lapse photography
  • Info
    • About
    • Contact
    • My Photo Gear
    • Books by NvN
    • Join us on Facebook
    • Acclaim
    • Success Stories

editing an image to simplify it

September 12, 2009 Neil vN 13 Comments

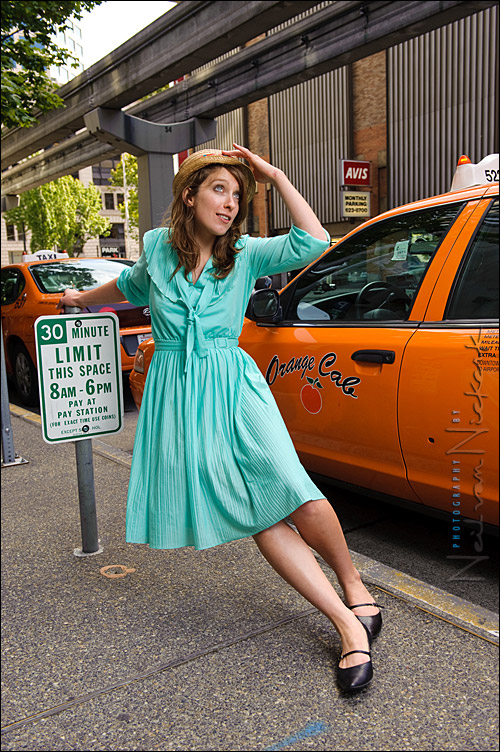
With this image from the workshop in Seattle, we were working outside the hotel and the city scene there wasn’t all that hip and urban.  It was visually quite cluttered.  So when I wanted to use this image, my first thoughts were to simplify it a little since there is a LOT going on in the background that doesn’t add to the image and just detracts from our model Julia.  The leading lines of the cars, overhead train lines and the pavement all do help to give a more dynamic composition .. along with Julia’s crazy body angles.  But the image definitely needed some work.

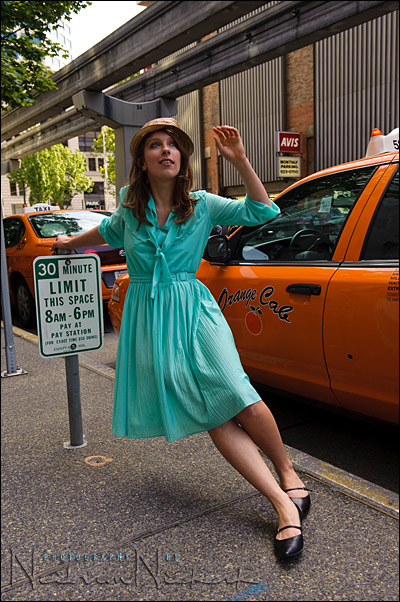
Here is the image without any editing done to it, aside from my default raw settings applied ..

You can see that my first thoughts were about how to reduce the visual distractions, and hopefully make it a stronger image.  The setting isn’t ideal, but we can improve it considerably in post-processing.

I removed the marks on the sidewalk .. the writing on the cab and even the sticker in the cab window.  With that the light on top of the cab also had to go.  The sign post on the left in the image also had to disappear.  The numberplate of taxi in the background also had to be cloned out.  The neon sign of the car rental also had to go … and there you can see a little bit of sloppiness in the cloning … but I don’t think it would be really visible in the edited image unless you had the original to compare.  So I could let that fly. The red marking on the wall behind Julia’s head had to be toned down.  And then I also reduced some minor clutter in the image that would only really be seen when enlarged.

That was the start.  And then I punched the image up a bit by increasing the contrast and saturation, and adding some softening to our model, but also increasing the local contrast.  You know .. that sprinkling of Photoshop fairy dust to make the image that little bit better.

Lighting was with a softbox and a speedlight which was held at a 45 degree angle from me to my right.
Camera settings were:  1/200th @ f5.6 @ 200 ISO
The speedlight was set to manual, to give me  f5.6 @ 200 ISO .. which then balanced fairly well with the available light.  The flash was metered with a Sekonic flashmeter, to give me the correct flash exposure for those settings, and the specific distance the light was going to be held at in relation to our model.  (The other variable being the flash’s power setting.)

The lighting made a huge difference in the final image.  Here’s a comparison image with only the available light at the settings that were chosen to be used with flash:

.

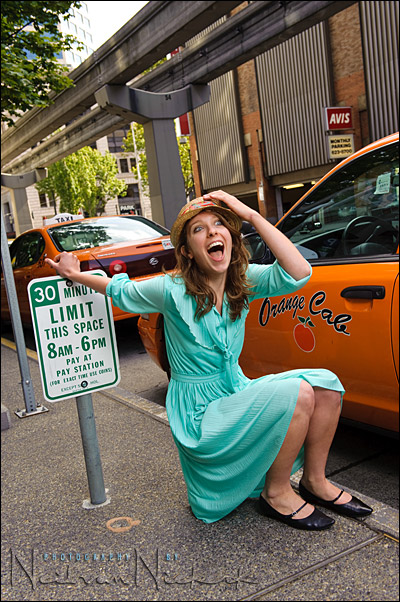
And a few more of the delightful craziness that is Julia ..

Filed Under: digital imaging, flash photography, lighting


Help support this website

If you find these articles of value, please help support this website by using these B&H and Amazon affiliate links to order your photo gear.

I also offer photography workshops and tutoring sessions, whether in person, or via online video tutoring sessions.

Please follow me on Instagram for more.

You can also join our thriving photo community in the Tangents group on Facebook, where we show our photos and discuss all things photography.

Thank you,

Neil vN

Books by Neil van Niekerk


13 Comments, Add Your Own

  1. 1john says

    September 12, 2009 at 7:25 am

    Neil
    It looks like your having to much fun!!
    Why did you use manual setting on your flash here as aposed to ttl. any reson
    john

    Reply
  2. 2Mac Swift says

    September 12, 2009 at 12:43 pm

    I am guessing Neil chose manual due to the static nature of the situation. The model isn’t moving from that location and her distance to the flash isn’t going to vary by much so manual would yield the most consistent exposures. As Neil varies the image compositionally tones in the image are changed and that effects TTL metering which may yield varying subject exposures. Correct, Neil?

    I am wondering about your un-flashed images. I seem to always feel the need to add light when I am outdoors to make better images in terms of subject (face) exposure. How much did you underexpose the scene by? I am wondering if you had proper exposure for her face if her dress along her left leg would have overexposed. I am anal about not overexposing highlights but trying to retain them often leads to an underexposed subject. Am I delusional in always thinking I need to be dragging lights around with me?

    I tell you though, Neil, since I have been following your writing I have not used my studio lights outdoors near as much as I am adopting the use of speedlights and Nikon’s CLS – even for my nude work these little things are proving to be quite effective and oh so easy to take out and about. Now if I could just tame the wind a bit so I could use modifiers more often…

    Reply
  3. 3Neil says

    September 12, 2009 at 5:11 pm

    Mac has it correct there as to why I chose manual flash this time.

    The moment you work with a subject that is static in relation to your (flash) light source, then manual flash becomes easier to use in that it gives you more consistent results than TTL flash.

    Mac, as for your questions .. how much did I under-expose by. That I don’t quite know in a quantified way. I under-exposed by “just enough”. Enough so that I could add manual flash by a measured amount to finally give me exact exposure.

    So my starting point wasn’t metered with specific thought to the tonal values of my subject. I simply wanted my ambient exposure to be under by a certain amount .. around 1 to 2 stops is usually preferred. For this a test shot like this one below, where I used my camera’s built-in meter to get a rough idea of the light levels, and then confirmed it on my camera’s preview. This is often a sufficient starting point. And THEN I add flash. : )

    Neil vN

    Reply
  4. 4Tam Vu says

    September 12, 2009 at 10:58 pm

    Neil used manual flash as fill-flash to lift shadow details. TTL is not needed since flash isn’t the main light source.

    Reply
  5. 5Neil says

    September 12, 2009 at 11:21 pm

    Tam .. actually, whether the flash is merely fill-flash or a dominant source of light, (or something in between), has little to do whether manual flash or TTL flash is used.

    Most often, I’d say, the decision between manual flash vs TTL flash, depends on whether the shoot is static or fluidly mobile.

    When your subject is continually moving around in relation to your light (whether on camera or off-camera), then TTL flash is simply the easiest (and best) option.

    When your subject remains in the same spot in relation to your light (whether on camera or off-camera), the manual flash is usually the easiest (and best) option.

    However, for a touch of fill-flash when I am using on-camera flash, and I remain more or less static in relation to my subject .. then TTL flash at -3EV or so, is more convenient to use.

    Neil vN

    Reply
  6. 6loren neal says

    September 13, 2009 at 1:05 am

    This question may be off topic, but how do you do your watermark.. ie the “Neil van Nickerk” with raised transparency?

    I’ve been eyeing that for quite a while now..

    Reply
  7. 7Roy says

    September 13, 2009 at 8:40 am

    hi Neil:

    You mention, Quote: ‘You know .. that sprinkling of Photoshop fairy dust to make the image that little bit better.”

    can you enlighten me as how and where I can learn how to do this fairy dust effect on photoshop??.

    As always, you have been an inspiration to me, and I am sure to many others. Thanks for sharing your wealth of photographic knowledges to all of us.

    Roy

    Reply
  8. 8Neil says

    September 13, 2009 at 10:34 am

    Roy .. Photoshop fairy dust” is my generic naming of various Photoshop tricks and filters and plug-ins that I use, whether individually or combined. I intend adding more articles about post-production in the future, so keep checking back. Thanks!

    Neil vN

    Reply
  9. 9Boris Glazyrin says

    September 13, 2009 at 2:26 pm

    Hello!
    Nice shot, as usual.
    Few questions:
    Did you used gels on flash?
    Was it cloudy or fair ?
    Boris

    Reply
  10. 10Stephen says

    September 13, 2009 at 5:20 pm

    Hi Neil,
    Thanks for presenting the before and after photos. I didn’t realize that there were so many distracting objects in the scene, besides my initial estimate of the cab details. It definitely makes a significant visual difference by removing the distracting elements.

    –Stephen

    Reply
  11. 11Neil says

    September 13, 2009 at 5:29 pm

    Stephen .. I have a very strong preference for simple, clean uncluttered images. Even when an image is “busy”, there is usually a simplifying theme, such as a repetive pattern.

    Therefore even the edited image above isn’t entirely ideal for me, and I’d love to do an actual photoshoot with Julia.

    Neil vN

    Reply
  12. 12Mac Swift says

    September 14, 2009 at 10:20 am

    Neil,
    Do you find the images come out much darker on the computer than when you saw them on your camera LCD? I find that an image that looks good on the LCD is often 1-2 stops underexposed on the computer (I use a D3). I have read elsewhere that that is indeed the case. So when you are underexposing for the ambient do your use the LCD or the meter as your guide? I just shot a bride last night and the ambient looked OK on my LCD but when I got back to my machine, as usual, the ambient is way darker than I thought based on my LCD. I do remember looking at my meter and I believe I was 2 stops down, but the LCD sure doesn’t reflect that level of underexposure. Do you have similar experiences? I am starting to think I need to go by the meter as opposed to the LCD preview.

    Reply
  13. 13Neil says

    September 19, 2009 at 12:07 am

    Mac .. I don’t have a problem with my D3 images appearing darker on the computer than on my LCD.

    However, in addition to looking at the image on the LCD preview screen, I also use other methods to check my exposure, such as using the histogram. These methods don’t rely on us judging the brightness of the image on the screen.

    Two stops sound pretty extreme in terms of image brightness being off. Maybe you could post an image or two on the Flickr group? That might help in figuring this out.

    Neil vN

    Reply

Leave a Reply to Boris Glazyrin Cancel reply

Your email address will not be published. Required fields are marked *

categories

Articles & Tutorials

  • • About myself & this site
    • Books by Neil vN
    • Best photography books
    • Black foamie thing
    • Photographers’ success stories
  • • Flash Photography Techniques
    • Natural looking flash
    • Flash + Ambient light
    • Dragging the shutter
    • Bouncing your flash
    • On-camera flash outdoors
    • Exposure metering
    • Flash exposure compensation
    • Bounce flash examples
    • Which is the best flashgun?
    • Flash brackets
    • Off-camera flash photography
    • Flash photography basics
    • Using video lights
    • Flash photography tips
  • • Photography workshops NJ / NYC
    • Models @ photography workshops
tutorials:
flash photography
Photography
Workshops

All rights reserved. Copyright © Neil van Niekerk 2025 · Customization by The Traveling Designer

Copyright © 2025 · NvN on Genesis Framework · WordPress · Log in