wedding portraits: finding something to bounce your flash off
One of the frequent questions that come up, is what to do when there is nothing to bounce your flash off. When working indoors and there are bounce-able surfaces around me, my first instinct is to use on-camera bounce flash. It is easy to use, and the results can look surprisingly good, especially if you consider the minimal effort that went into it. No extra gear to carry around and set up. But when there is nothing to bounce flash off, you have to adapt your technique …
With wedding photography, when I photograph the formals of the bride and groom and their families, it is easier though to set up proper off-camera lighting. I usually try that we photograph the formals outside or at the reception venue or somewhere else, but quite often the couple wants the formal photos inside the church. No problem … 1 or 2 flashes with umbrellas set up next to you, and fired with radio slaves, and you’re all set. Of course, manual flash in this instance!
Sometimes a couple wants their photos done elsewhere, but at the last moment decide on a few images inside the church of themselves. Instead of running to my van to fetch my lighting gear and take the time to set it up, I’ll rely on what I have on hand … on-camera flash. Inside the church though, it is tough to get a decent ISO and aperture for formal portraits, if you’re relying solely on bounce flash. Churches are usually just too large for that, and often have walls and ceilings that aren’t white.
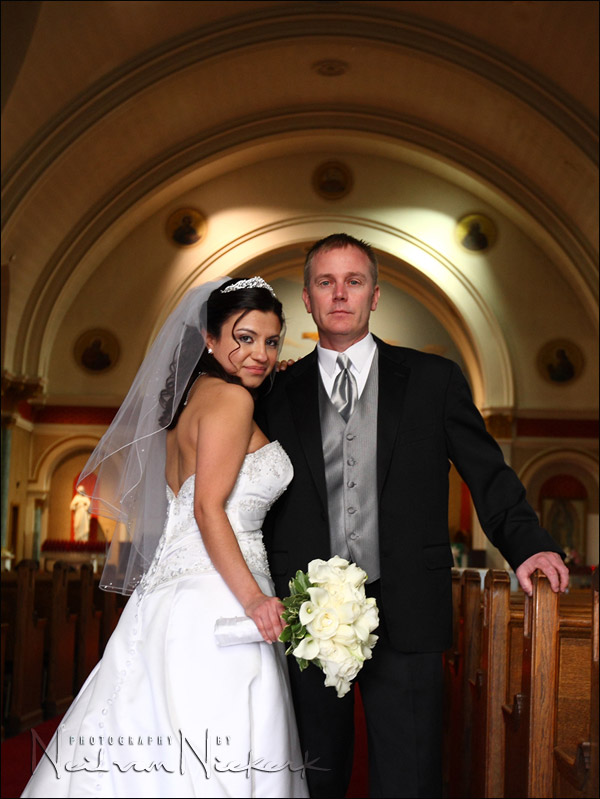
So … time to adapt. I have to find someplace to bounce my flash off. Here’s a neat trick I often use during this situation. Instead of photographing them right there up at the altar, I’ll move them all the way down the aisle towards the main door, until I have a wall behind me that I can use for bounce flash.
Then I base my exposure on the background … think of the piano player photo! it’s exactly the same deal … and then in manual mode on my camera, get the exposure I want for my background. Then I will use TTL flash bounced off the wall up and behind me to get great light on them. Simple and elegant, and the results look great.
camera settings:
In this example, my settings were: 1/40 @ f3.5 @ 800 ISO
TTL flash (on-camera)
While I could’ve had a lower ISO because the wall behind me was fairly close, and my bounce flash could’ve reached 400 ISO for that aperture, I was limited by the available light that I was exposing for.
I wanted detail in the background … and 1/40 was as slow as I wanted to risk it. Flash freezes movement and camera shake if the ambient light is 4 stops or more, under the flash exposure. But with this example (of which I don’t have an ambient-only test shot), there was enough available light around that I really didn’t want to go below 1/40 hand-held. (My tripod is in the van along with my Quantum flashes that I use for off-camera lighting.) f3.5 is a good aperture here, giving a bit more ‘bite’ to the image than f2.8 would, and 800 ISO isn’t a scary high ISO anymore.
So that’s about where I decided to balance my settings to get the ambient light to register on the background … 1/40 @ f3.5 @ 800 ISO.
equipment used (or equivalents)
- Canon 1D mk III;
- Canon 35mm f/1.4 EF USM (Amazon) / Nikon AF-S Nikon 35mm f/1.4G (Amazon)
- Canon 600EX-RT Speedlite (Amazon) / Nikon SB-910 Speedlight (Amazon)
- Canon CP-E4 battery pack (Amazon) / Nikon SD-9 battery pack (Amazon)
While this was shot with a 35mm lens (on a 1.3 crop sensor), I had to straighten the image in Photoshop, so the image is tighter than a straight 35mm shot would be.
related articles
- list of tutorials on wedding photography
I used best man’s shirt on a number of occasions to bounce off, or a tri grip Lastolite… or anything else really :-)
There’s ALWAYS something to bounce of off.
Just my two cents…
Bogdan
How about…
1) Bounce the flash off the non-white wall anyway, and fix the WB in post-process? I normally do this. (RAW files, of course)
2) Use a Lastolite 8.6″ softbox on a SB-900 held with my left hand for some off-camera lighting? I have considered this, but I have not tried this yet (mostly because I forget…)
I only know that very dark walls (i.e. dark wooden walls) and mirrors are bad bounce surfaces.
I was recently stumped by this very problem, but only had my one iTTL flash with me for the event.
As mentioned by Stephen, I ended up fixing the WB issues in post as I was bouncing off either beige walls or a white/blue ceiling.
Lesson learnt? Take more flashes … just in case ;)
Thanks once more for another great post Neil!
Hi Neil, little bit off topic, but I’m curious where did you place your focus point in this photo. Are you using focus & recompose technique in similar situations ? Usually the outer focus points are less sensitive and with the center one I’m often loosing the focus plane and the faces and eyes are not sharp. Pls, advise. Thnx. Roman
I always focus on their eyes.
But you will notice most of my compositions are quite central. So I most often use the central focus point, and do a little bit of focus-and-recompose. But if it is too wild an arc that I swing the lens in, then I know my plane of focus can shift. I’ve been bitten in the arse by that before!
Neil,
Great idea. Way to think quick in a pinch, and I think that makes for a more unique shot than your typical alter shot.
PS, are you switching back to Canon, or is this an old shot? I’m seen Canon listed more and more listed in the specs lately, and I know you just picked up the 5dII.
Steve … nope, I’m not switching back to Canon. Unless Canon are willing to send me an apology note for the 1D mk III.
So this is an older image that was helpful in illustrating this thought-process of finding places to bounce your flash off.
But back to me using Canon, I did indeed upgrade my classic 5D for a 5D mk II, and I am using it occasionally for shooting personal work. No real reason to, other than I feel like it on a particular day. Like with this impromptu photo session.
It’s always best not to fall in love with your gear though.
Love hearing the thought process on this one Neil! If you are working with an assistant, would it be even easier to have her hold a reflector behind you for you to bounce into? I have been thinking about trying this at receptions with very high ceilings or colored walls that may introduce color casts. Any thoughts?
Jason, a reflector would’ve been handy as well.
it’s agreat image, and a brilliant thecnic to pull away BG from the altar, i should try this next time :)
Hi Neil,
You mentioned that as long as the ambient light is under exposed by at least 4 stops compared to flash exposure, the image will come out sharp (provided the original focus was correct) since flash will freeze any motion blur.
Do i have this consept correct: Ambient light is under exposed by 3 stops from center (using in-camera built-in meter). Taking a picture with ETTL flash, at 0 exposure compensation will not eliminate camera shake because the ambient light, in relation to the flash exposure is not at least 4 stops under.
Keeping the same ambient exposure (3 stops under), i crank flash exposure compensation to +2 to the right (add more juice). The difference is now 5 stops and the image should come out sharp since flash will act as dominant light source and will freeze all motion.
Similarly, ambient exposure of -5 and flash exposure of 0 compensation, will also freeze provide a sharp photo since the difference between ambient light and flash is greater than 4 stops.
Do i have this concept correct?
Thank you!
Mike, I could say yes, that is generally true, but it would be too simplistic an answer.
>> Ambient light is under exposed by 3 stops from center (using in-camera built-in meter).
Keeping in mind that you can’t simply point your camera at something and zero your needle and assume you have correct exposure, or a zero’d exposure meter reading.
>>Taking a picture with ETTL flash, at 0 exposure compensation will not eliminate camera shake because the ambient light, in relation to the flash exposure is not at least 4 stops under.
You’re thinking of absolutes here now … 3 stops under = blurry, while 5 stops under = sharp.
It’s too strict a way to consider this. Hang in for the explanation.
>> Similarly, ambient exposure of -5 and flash exposure of 0 compensation, will also freeze provide a sharp photo since the difference between ambient light and flash is greater than 4 stops.
Here’s an example where this would be too simplistic an answer if we strictly consider this as an absolute “truth”.
You’re photographing a kid jumping in the garden. The exposure on the kid is 5 stops under. You use flash to freeze the action … but you’re shooting against the evening sky. And you’ll see subject blur because of your subject’s movement against the brighter background, even if the flash froze their movement.
So back to the idea of 5 stops being some kind of cut-off point.
(This explanation is one that Frank Doorhof elucidates very well.)
consider 18% grey.
If you double your exposure you get to 36% grey
double it again, and you get to 72% … and then you can’t double it anymore, or you’ll be brighter than white.
So around 2.5 stops up from 18% grey, you have white.
So back to 18% grey, and we go down in full stop increments:
one stop down … 9% grey (we halved our exposure)
two stops down … 4.5%
three stops down … 2.25%
four stops down … 1.15% grey
five stops down … now we’re in “negligible” kind of territory.
The available light is just not going to register this low down on your film or sensor.
So if your subject is moving around a lot … and you’re under-exposing by only 2 stops, you’re going to see some ambient smear.
Drop your ambient exposure to 5 stops under, then the flash will most likely freeze the action, since your available light just doesn’t register at this point.
But this isn’t absolute point where it becomes yes / no.
It’s a sliding scale down as your progressively under-expose.
Your choice of shutter speed, and how well you hold your camera, and how energetically your subject is moving … all these will factor in how sharp your subject is, and how much ambient light affects this.
I hope this makes more sense now.
Hi Neil,
Thank you for the terrific reply! I never thought of ambient light as a scale of grey and how it all relates to proper exposure. This is a fantastic explanation that put so many things in place for me!
I recall a blog entry you made about correct exposure for bridal dresses, and how you varied ambient exposure and flash output to nodge your histogram to the right (to the right of the middle of the 5th bar, if i am correct :)). Do you use the 18% grey sliding scale to your advantage in those situations? Do you find that once you picked the right settings on your camera in manual mode that it is easier to nudge the flash exposure to achieve “white” than to change camera settings (app, iso, sp) without adjusting the flash output in TTL to achieve the same effect?
Thank you!
Some people might get a little confused by Neil’s explanation above about gray shades. Just keep in mind that what is referred as an 18% grey card is actually a surface that has 18% spectrally neutral reflectivity. So as you go up in percentage, you’re not increasing gray “quantity” (which would make the card actually darker) but rather increase the reflective quality of the card, so the surface becomes lighter.
Hope this clears a bit of the confusion for some. :-)
Cheers!
Bogdan
Hi Neil.
I’m really curious what you do to blend the color of ambient light with the flash. I’ve often struggled with this issue. In fact, it’s not uncommon to walk into a room lit by a mix of various color florescent bulbs, tungsten and maybe even a halogen or two.
I’d hazard a guess that the church lighting was tungsten. Did you simply gel the flash with a CTO? How do you evaluate the light color in a particular room and how do you translate to gels for the flash?
Dan, my default gel when working indoors with some incandescent lighting, and various other sources, is the 1/2 CTS gel.
And then of course, it is imperative to shoot in RAW.
Hi Neil.
Enjoyed your presentation at Pocono Photo Club last week. You mentioned “black foam”. Just what is the material and where can I get it? I am going to my granddaughter’s wedding this weekend and it may be a good idea to be prepared.
Thanks…JOHN
John, here is more info about the black foamie thing. I buy it from art stores like Michaels.
I realize that this is a really old thread that I hadn’t read. I didn’t see mention about doing a behind the camera bounce off a reflector held by an assistant or volunteer- a technique promoted by David Ziser. Do you ever use a reflector bounce for on camera flash?
Yes, I do sometimes have my assistant hold a reflector or an umbrella behind me for on-camera bounce flash.
Hi Neil,
Your book & Tangents are wonderful! Thank you! Here’s a problem I find occurs frequently. How do you deal with dancing at an event when the ceiling is sooo high and the nearest wall is probably 30 feet from the central dancing and you can’t move the subjects(not just the couple, but a crowd of dancers)? Also, how would you deal with same situation and the couple are picked up in chairs? I usually switch off shooting the couple in chairs from a ladder to getting down into the crowd in order to vary my shots.
Thanks so much!
Julie, then you’ll either have to accept how the direct on-camera flash looks, or find a way to get use some additional lighting.