
Flagging your back-lighting flash with the black foamie thing
My favorite on-camera light modifier, the black foamie thing, is of course, nothing more than a very affordable (and flexible) way to flag your flash. This helps control how the light from your on-camera flash spills. (It’s not a flash diffuser!) I also keep one on hand when I use off-camera flash, to flag any direct flash – whether to control it from flaring the lens, or from spilling onto my subject.
When I did the photo session for the review of the Canon 600EX-RT, I had to flag the one speedlight so it didn’t spill on our model. So it has other handy uses other than just for on-camera bounce flash.
During a recent personal photography workshop at my studio, we photographed Aleona in a freight elevator for that gritty urban look. We added a speedlight behind her to have the rim-light create some separation between her black outfit and the dark silver wall in the back. However, it spilled to the sides, and we had to control the light better …
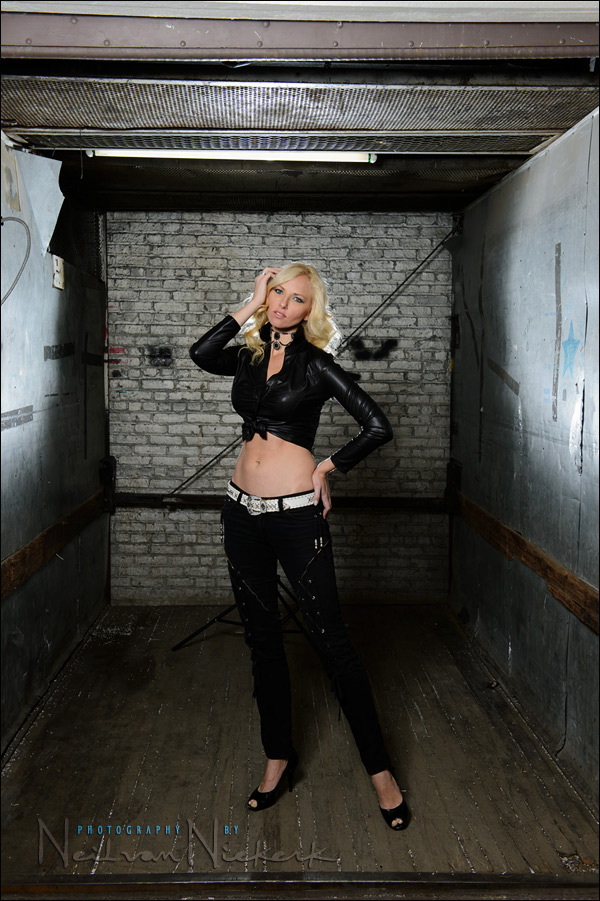

The first image of the two here, shows how the back-light spilled on the walls of the elevator. But adding the black foamie thing as a half snoot, the light was contained and didn’t hit the sides.
The pull-back shot to show the placement of the main light:
a speedlight in a Westcott Rapidbox – 26″ Octa Softbox (affiliate).

And the detail of the flash in the back, showing how it was flagged.
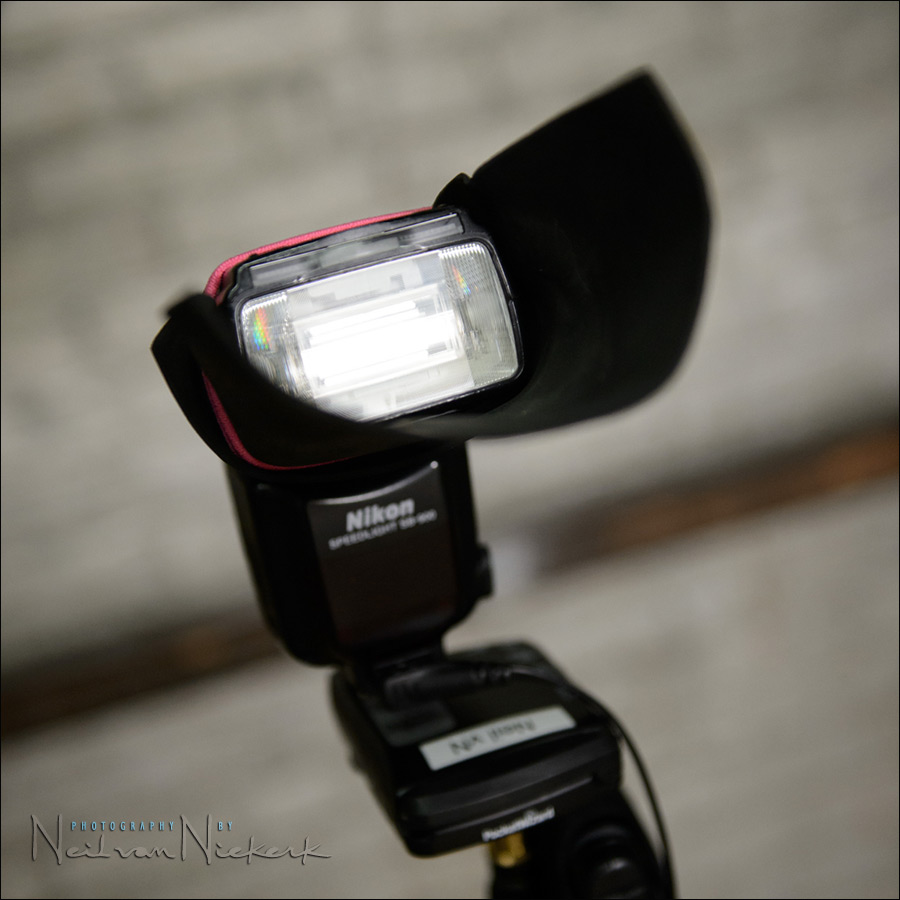
A simple solution, but it helped control the light.
camera settings: 1/200 @ f/5.6 @ 400 ISO, and manual flash
Photo gear (or equivalents) used during this photo session
- Nikon D4
- Nikon 24-70mm f2.8G AF-S / Canon 24-70mm f/2.8L II
- Nikon SB-910 Speedlight / Canon 600EX-RT Speedlite
- Nikon SD-9 battery pack / Canon CP-E4 battery pack
- Westcott Rapidbox – 26″ Octa Softbox
- Manfrotto 1052BAC – medium light-stand
Related articles
- Two speedlight setup for back-lighting (model: Anelisa)
- Off-camera flash – adding dimension with back-lighting (model: Lea)
- Camera & flash settings: what do you want to achieve? (model: Ulorin Vex)
- review: Westcott Rapid Box – 26″ Octa Softbox
- On-location corporate headshots – aiming for efficiency and speed
- Photography workshops
- NJ photo studio
A little bit of homework
We were shooting inside a warehouse, and not battling against bright light, so what would be possible reasons for having the shutter speed relatively high?
To get smaller depth of field and/or darker background.
Regarding the homework, the only reasons I can think of for a shutter speed of 1/200th are to lessen the chances of camera shake and to eliminate ambient light. Decreasing the shutter speed shouldn’t change the flash exposure. Great post as always!
A high shutter speed would help in killing that fluorescent light above her head.
First off, I see what looks like fluorescent light in the top of the elevator. My guess would be your were hammering those into submission with the shutter / aperture combo. That would be my personal instinct.
Well, this was way too easy … yes, the shutter speed was high to help kill the ugly fluorescent lighting. Often we would drag the shutter speed lower to allow some of the ambient light and feel of the place … but not with ugly fluorescent lighting.
There was also some room to play with iso to kill the fluorescent light and allow wider aperture if needed, maybe you started with wider aperture, and then while reducing aperture you increased iso to help the flash battery and recycling?
Neil, I am now confused between rim-light and back-light,I don’t even know how this is called in my language, at least I need to know the difference in english :)
I don’t even know what problem the spilled light onto the walls caused.
The problem wouldn’t be apparent in the tighter shots, such as in the leading image, but would be a problem with wider images.
Correct me if I’m wrong, but even tighter shots might be negatively affected by an unflagged speedlight used as a rim light if the walls are close, like here, AND a funky color because it would create an undesirable color cast when the light bounces off the walls.
Still trying to find the black famine thing material inexpensively. On line the shipping cost is more than the actual product costs.
I just went to the local Michaels and got the thin black foam sheets, couldn’t have been more than $2-3 bucks.