Gelling flash for Incandescent light / Tungsten light
The color temperature of the light from a flash / speedlite is around 5400K. While the actual numerical value might have little meaning to many photographers, it does mean that light from a flashgun will look a lot cooler than the light from an environment would with tungsten/incandescent light. That warm glow of tungsten light, which is around 2800K but varies a lot in actual value, makes the flash appear too cold, or too blue. However, if you simply adjust your white balance so that the flash appears neutral, your background will go a murky orange.
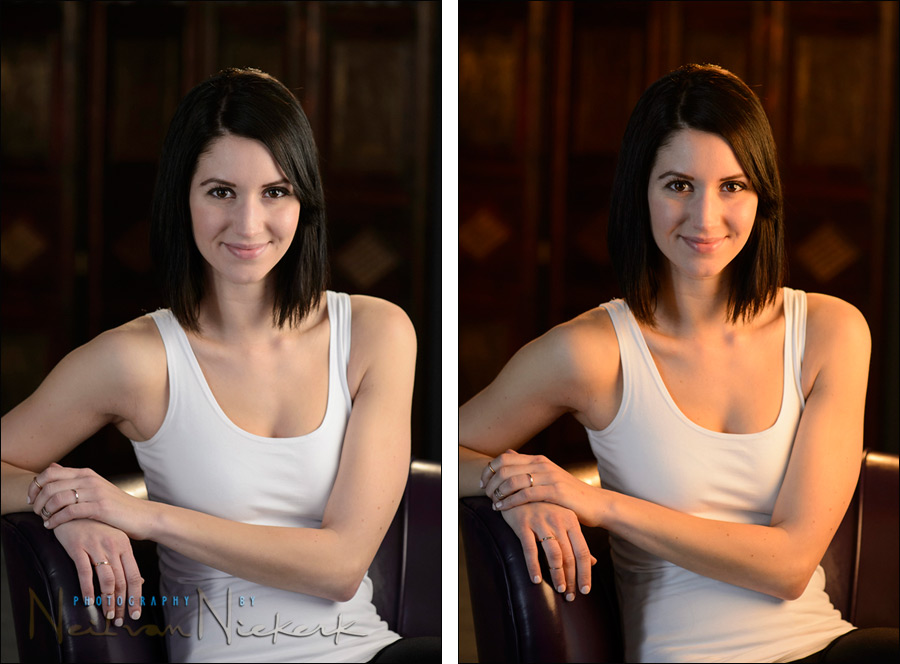
Here is a sequence of photos using a model, Adrienne, that will illustrate the problem of using flash when your subject is partially lit by Incadescent / Tungsten lights. This is a problem you will encounter while photographig corporate events or red carpet events, or weddings – very uneven incandescent light on your subject.
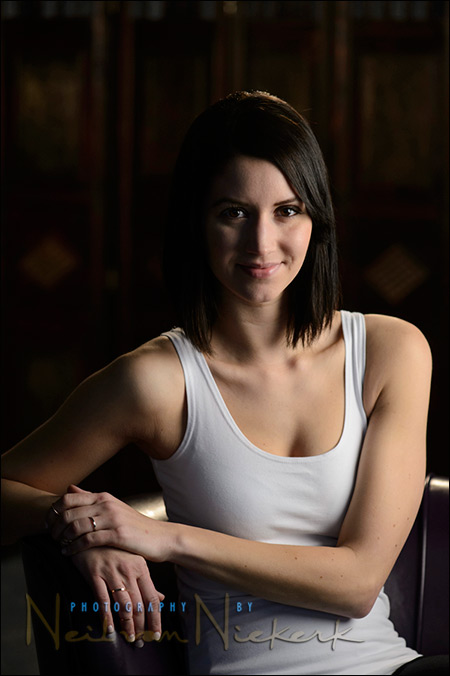
Incandecent ambient light,
No flash.
In this example, we have unflattering ambient light with deep shadows that we need to sweeten with flash.
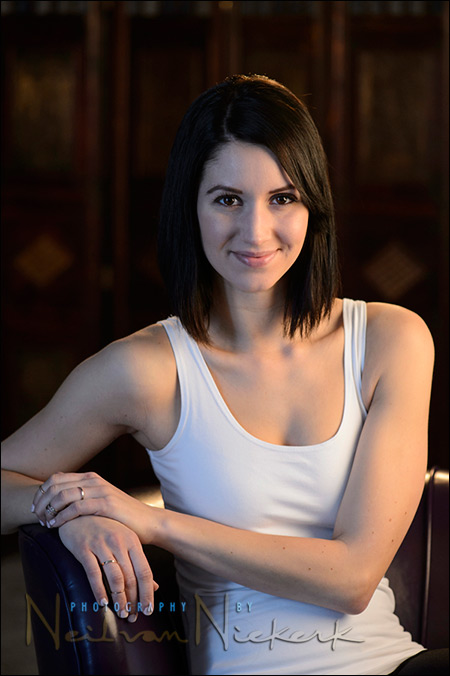
Incandecent ambient light,
Flash gelled with full CTS gel,
RAW file adjusted to 3050K in post.
Here we gelled our flash – bounced from camera left – with a full CTS gel to bring the flash much closer to the ambient light. The skin tones look quite good, without any weird color shift.
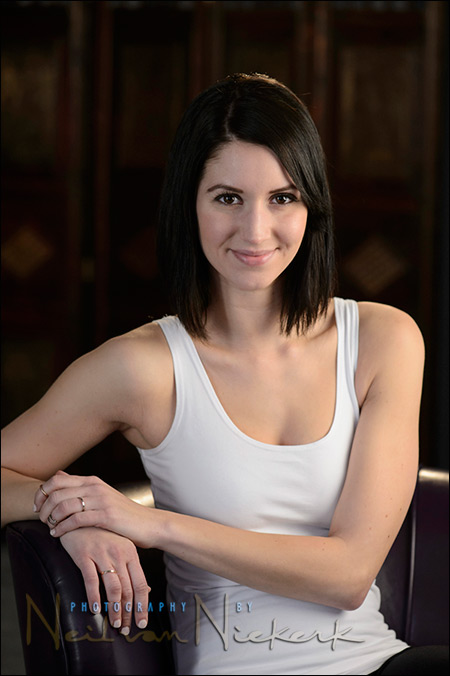
Incandecent ambient light,
Flash without gel,
RAW file adjusted to 3500K in post.
With this and the next example, no gel was used on the flash, so there is that uneasy mix between the warm tones of the incandescent light, and the cold colors of the flash.
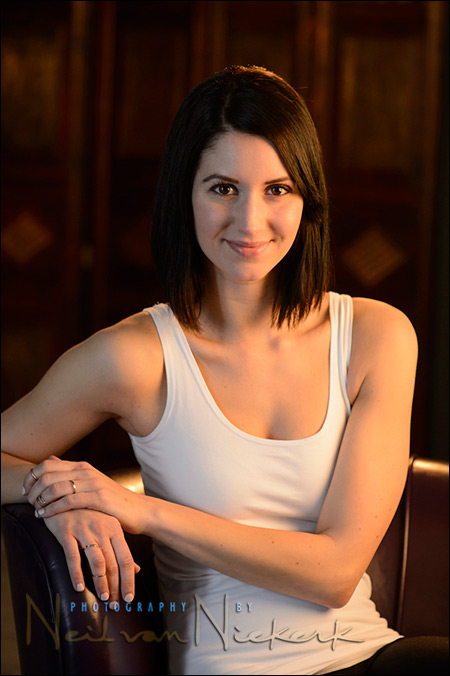
Incandecent ambient light,
Flash without gel,
RAW file adjusted to 4650K in post.
Regardless of how you shift the WB in post, there will be that huge jump between the two colors, as shown in this and the previous image. These will serve as good examples of how the WB was shifted in post, but there is either a large patch of light which is too cold, or a large patch that is too warm.
The only way to get rid of that jump in WB, is to gel your flash!

On-Camera Flash Photography – revised edition
This book is explains a cohesive and thorough approach to getting the best from your on-camera speedlight.
Particular care was taken to present it all with a logical flow that will help any photographer attain a better understanding of flash photography.
You can either purchase a copy via Amazon USA and Amazon UK, or can be ordered through Barnes & Nobles and other bookstores. The book is also available on the Apple iBook Store, as well as Amazon Kindle. Also check out the Amazon Kindle store.
Learn more about how the cover image was shot.
Summary
Gelling our flash is the easiest way of balancing out the disparate white balance that exists between flash and incandescent light. In this example, we used a full CTS gel – Rosco Cinegel full CTS #3441 (affiliate). My default however, when I photograph events, is usually the Rosco Cinegel 1/2 CTS #3442 (affiliate), since even the partial correction helps a huge amoung in giving more natural color to my entire scene (when my subject is lit by the gelled flash.)With this example, I wanted to clear much of the jump between warm / blue tones from the portrait of Adrienne. Hence, I used the full CTS gel.

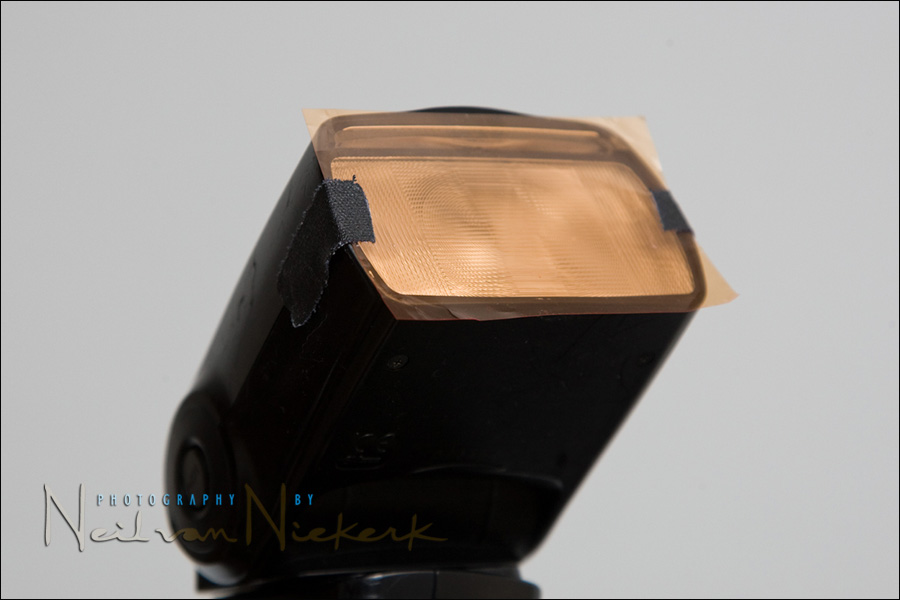
These gels come in kits, but you could as easily buy a larger sheet, and cut it yourself. The gel sheets are not expensive. A large sheet should last you a very long time, for a minimal outlay of money.Most of the larger speedlights come with gels nowadays. By gelling your flash like this, you have effectively turned it into an Incandescent light source.
I normally tape them down on my flash with gaffer’s tape. When I am not using the gel, I keep them taped to my lens hood – out of the way, but conveniently close at hand.
To re-iterate:
The 1/2 CTS gel still allows for a warmer background. This is why the 1/2 CTS gel is usually my default, since even the partial correction helps a huge amoung in giving more natural color to my entire scene (when my subject is lit by the gelled flash.)
The full CTS gel will remove even more of the warm tint to the image, as it makes the flash WB warmer – which is then better balanced against the Incandescent / Tungsten background. A full CTS gel turns a 5500K daylight source into a 2900K light. The half CTS gel, turns a 5500K daylight source into a 3800K light.
Ultimately, it is your choice, but it is a good idea to have both gels available in your camera bag.
This, and other essential info about flash photography, is thoroughly discussed in the revised edition of my book, On-Camera Flash Photography.
Related articles
- Using flash with incandescent / tungsten light
- Dealing with the videographer’s light
- Flash and tungsten lighting
Hi Neil, I’ve read your books, they’re awesome. A newbie question: I can’t tell if I have fluorescent (CFL), incandescent light bulbs or mixed. So I use a white card and in-camera WB to check light color, then I gel my flash and check again, and set WB. Is this the right approach? If you’re moving around in a large hall where light quality changes, what do you do?
Hi Neil,
Great article. What’s your advice when the tungsten light is actually a CFL bulb that emits some green. Usually fluorescent bulbs need a 33 color correction which is achieved by the plus green gel. I find that the smaller CFL bulbs are less green but still enough green to leave a color cast. What’s your advice?
Thanks.
Albert & Eric
Fluorescent tubes have a WB that can vary with make and design, as well as age. The older industrial type Fluorescent lights were disgusting green, and difficult to correct for.
These days, I opt for a 1/2 CTS gel, or no gel at all, depending on whether the FL light is warm-tinged, or “Daylight”. It varies.
Ultimately, I am not that concerned with exact correction … I’m more concerned with hugely reducing the problem. A 1/2 CTS usually does that.
Hi Neil – thanks, as always, for posting this info. I’m new to flash photography, and a couple things seem unintuitive for me. In the two examples with ambient light and flash with NO gel attached, I would expect the photo with the higher WB number (4650K) to look warmer than the photo with the lower WB number (3500k), but it’s presented as the opposite. I may be confusing warm vs. cool with overall brightness somehow.
If I understand the objective of gelling the flash correctly, it seems I would add the gel to increase the warmth of my flash to better match the ambient light, and that when I make white-balance adjustments in post (as needed), the ambient and flash lighting move more consistently and I won’t see the contrast between them. Do I have it right? ;-) Thanks again!
Mark .. Assuming the same Incandescent light source – if your WB is 3500K for example – if you set your camera to 3500K, the colors will be neutral. If you set your camera to 4650K, the colors will be very cool.
Remember, the bottom two photos are without gels.
Thanks Neil. This is awesome! I know you shared what you adjusted your white balance to in post, but where I get confused is what WB to set it in while shooting with gels. I know, I know… it’s raw so I can adjust later. But bear with me because I try to get my starting point as close to correct as I can. If the flash is gelled, what would be the best shooting WB to choose in these examples you shared?
If you know you are dealing with primarily tungsten light sources, then if you gel your flash with 1/2 CTS, set your camera’s WB to approximately 3700K-3800K. If you gel your flash with full CTS, set your camera’s WB to approximately 2700K-2900K. You are configuring your camera to shift its WB to closely match the WB of the gel on the flash. This results in the subject and background looking more pleasant in the light.
Jes .. you set your WB to your dominant WB.
In other words, if you slap a full CTS or full CTO gel on your flash, you set your WB accordingly.
This of course relates to what light source (i.e., WB you are using) to light your subject.
It’s a relatively easy decision from there.
Thank you for the simple easy to understand information and the illustrations. For the longest time I couldn’t wrap my brain around this, but I got tired of dealing with processing mixed color temps and started trying this in the past year or so, it makes a huge difference!
Hi Neil, was just wondering what are you thoughts regarding the use of CTS rather than CTO? Is it just a personal preference or are you happier with the yellow tint versus the orange tint on skin tones? Thanks!
Steve … the achieve the same thing – balancing your flash’s WB with your surroundings.
I feel I get better skin tones out of the CTS than I did with the CTO gels.
I agree Neil – the 1/2 CTS is subtle, but enough to make the shift. Personal taste, but I’ve found full CTO a bit too warm.
You switched me onto using the 1/2 and full CTS gels in an earlier post Neil and I’ve used them ever since when the occasion demands it. Yes, Canon includes gels with its 600EX-RT flash units but they are fiddly to use and apparently the gel holders don’t quite work if used with non-Canon gels. Anyways, taping the plain gel over the front of the flash – as you suggest – is, like the black foamy thing, a beautifully simple way of working around a problem. That you so sell these ideas to us, and make our lives so much easier, is all credit to your good self!
Great article Neil. Question: If you are only doing a small number of Portraits could you Brush the appropriate White Balance on to the ‘Flashed’ side of her face and body using the Adjustment Brush in Lightroom or Camera RAW ? Thanks. Darren
This will always be much more work than sticking on a piece of gel ONCE during that shoot. No tedious masking or other careful Photoshop work needed.
Thanks Neil. I agree. It would be a last resort if there was no gel available for whatever reason.
Thanks – this article prompted something I’ve always wondered – Are gels additive? Are 2 layers of 1/4 CTS the same as a single 1/2 CTS?
I also wonder if the gels are additive. My gut tells me that “two halves do not equal a whole”. I have a huge sheet of 1/2 CTS, and would like to combine two pieces to make a full CTS, but I don’t think it works that way.
I’ve played with it a few times. Two 1/2 CTS gels aren’t quite as strong as a single full CTS gel. But they do add up somewhat to make more difference than just a single 1/2 CTS gel. More scientific info than that, I don’t have.
I would like to ask how lens filters fit. To get a warmer look than ungelled flash, would using a warming filter on the lens yield ansimilar result?
The filter on your lens (whether colored or not), has no bearing on the technique of gelling your flash.
Think about it this way – gelling your flash affects your SUBJECT which is lit up by the flash, and hence, affects the color difference between your subject and the background.
Or, as in this example shown here, the gelled flash affects the color / white balance of our subject which is lit by Incandescent light. If we don’t match our flash to that of the existing ambient light, we get a weird mix between the cold and warm light sources.
Alternately, let’s consider what a colored filter on your lens would do – it would add a different color / WB to everything in the scene – subject and background. This is fine for shifting the white balance when shooting slide film – for example, adding an 81A warming filter on overcast days. But this has less relevance when shooting digital, where adjusting the overall WB is done in the blink of an eye.
Therefore, adding a filter on your lens, doesn’t do the same thing at all, as gelling your flash.
Thanks Neil for most useful reply. The everything in the scene vs. subject mostly. I really appreciate your help.
By the way I shoot slide film now as you suggested to me previously in a different forum thread. I have developed mine at home and it is great. Have to try it with flash now :)
If possible, increasing your shutter speed would cut down or totally get rid of the tungsten color so no gel is needed, correct? Where I shoot I found a shutter speed of 1/100 does pretty good and 1/125 almost totally wipes out the tungsten without gelling but the darker the background is a trade off.
Charles, that’s correct. Just like when balancing the light levels between flash and ambient, you can choose to completely kill the ambient if you so wish.
So having no ambient register in the exposure, will also mean that whatever the colour temperature of that ambient you just cut out completely, will also not register in the image.
Gelling is only necessary when balancing two light sources of differing colour temperature.
Thank you. I hate gelling, sometimes I don’t have enough time to put on a gel, shoot a while, then take it off when moving outdoors, then put it back on when coming back in, etc. It is easier for me to turn the dial and shoot than mounting and dismounting gel.
Charles – this means your background will become darker, and you could end up with that black-hole background unless you use additional lighting in the background … which brings a whole another level of complexity to the game which gelling your flash doesn’t.
I rely on the ambient light to give me context, and enhance the mood of the photo. Gelling your flash is the simplest technique to do this with some nuance.
That is true. So far (knock on wood) I have never had the black background like that but I know now I’ve said it, it is in my future. I just mean it is what I choose to trade off with. It is easier for me to turn the dial a few clicks than take my camera down, mount a gel, go back to shooting, then take it off when I have to and go back to shooting. The small weddings I have to do, don’t leave much time for that. I YEARN for a few high end weddings where they will give me time to be creative so I can gel and do what needs to be done.
From here,
to here,
And back to here,
shouldn’t take you longer than 5 seconds, irrespective of how crazy-busy or high-end your wedding is.
Anyone is free to follow my advice, or not. Or adapt it. I don’t care. I’m not prescriptive about this. Well, I am prescriptive about shooting in RAW. But your reasoning that you are too busy to rip a piece of gaffer-taped gel off your lens-hood and place it on your flash, and back again … just doesn’t make sense. Five seconds.
Personally I would think gelling to be easier rather than ‘turning the dial’ only then maybe having to compensate on the flash as well.
5 seconds, yep, literally that time or a tad less to whip off a gel stuck on my lens hood and drop onto top of flash and away you go.
But the biggest thing is the end result anyway, much prefer that rather than the blue/warm skin tones that sometimes can come about.
In a fast moving small wedding sometimes that is too much. Granted 5 seconds is a great thing to do but if I’m shooting at 1/60, two clicks on my dial I’m at 1/125, there – no gel needed. But I do agree about Raw. Even if I have the rare chance to shoot in a studio I still shoot raw. At a wedding I shoot Raw +jpeg. If I had a better clientele that care about quality, things would be slower paced where I could slap a gel on. But your idea of put it on a lens to carry around never occurred to me, I always had it in a pocket. My first very small wedding is in May so I’ll try it then and see what happens, it is a deaf couple so things should be slower. Is that gaffer tape? Shooting at 1/125 ends the warm tones as far as I can see.
Charles,
I think your logic in going from 1/60 to 1/125 ‘ending warm tones’ negates the reasoning why the gel is on in the first place as that 1/125th is not ‘the magic number’ to suddenly make it all go away, as ambient is determined (as you know) on ISO/fstop first up, then you need to have a decent shutter speed for less movement/shake.
If you are shooting with that such a fine tolerance for ambient, it meant you had to have a play of at least 25+ seconds to get to those settings since shutter is not the sole factor in determining your ambient, therefore the correlation of just using a ‘couple of clicks’ to end the warm tones, means to me that you don’t have a decent background as all venues differ in ambient, and also along with the Kelvin range of that lighting.
If you do set such a fine leeway in your ambient settings, then you certainly have time to gel the flash, and not only will you have a nice ambient, but correct colour on people.
In fact in a post above you were talking about going from 1/100 to 1/125 which is such a small difference it does not matter unless you have the background almost black for the flash to do all the work to negate those colours on skin.
Gelling gives the background a less harsh orange since you have to drop Kelvin in camera when you gel a bit so the skin is not overly warm. 1/2 CTS you are working in the 3800 to 4000K range instead of having to be up in the 5300+K range to warm up the skin from a flash, and when working on that K range obviously any colour in the background is also going to be warmed up, hence the use of a gel to ‘even’ it all out a bit.
Another benefit of gelling is if there are any of those blue fairy lights or other, by dropping the Kelvin to counter the gel, you get a richer blue to pop out.
It also depends on what type of surface you are bouncing from, so by the time you figure it all out, those ‘5 seconds’ are so insignificant as to what you need to do it’s not a factor anymore.
But what IS a major factor is the final end result of your image with ‘context’.
If shot like that, very dark background, it gives no depth/feel/atmosphere and contextual meaning to an image, so you do need to see that even if really blurred by an f2.8, like dinner tables, people, dance floor, whatever, to inject one’s feelings of being there.
99% of the time, I will walk into a venue with a set lot of values, ISO 1600, 1/125th, f5.6, already dialed in and a couple of quick shots (no flash) to check ambient, maybe then drop to f4 / f3.5 / f2.8 or up the ISO to 2500 and I am ready to go. Also my flash head already has the gel on since I put it on before leaving the last location, so not even 5 seconds time.
Obviously the need to gel is one’s own choice but the reasoning of time to gel being a factor is a moot point to me.
Yes, that is gaffer tape on the gel, I have the same with one end of a piece folded back on itself so the whole strip is not stuck to the lens hood or flash head, and a quick grab/lift/drag it away is minimal so as not to be trying to ‘pick’ an end.
Kind of a DIY thing, but with warming gel, is there a pantone color to associate it with? Reason I ask is because I am an ink technician and the company I work for prints on clear film (flexible packaging). I can create pretty much any color I want. I’ve done some testing with various colors, one thing I found (because of my inexperience is that the whole image fills with whatever color i put on. How do i keep it from doing that?
This article discusses how to balance the different WB better, between Incandescent-flavored light, and the flash.
I suspect that for what you want to do, you’d be better off using a Color Checker Chart, and working according to that. I’m not sure how this would related to a pantone color.
Hi Neil,
I know this is about how to balance between Incandescent and flash.
I just wondered, do you gel when shooting outside during the golden hour and if so what would you use.
I did a shoot the other day with OCF as mostly fill but I ended up with some really funky colours.
Joe .. I’ve gelled my flashes then. Try using a 1/2 CTS for something more gentle than a full CTS / CTO. Maybe that’s all you need – just a touch of warmth on your subject’s skin … assuming they have their backs to the sunlight? Then let the background go warm as you more or less correct for good skin tones.
Hi Neil, I’m a devotee of your bounce technique, thank you for enlightening us, but I’m currently wondering if the Canon 600ex and exIIs have a colder colour temperature at full power than the 580exII, for instance? I’m just wondering if we need to add more gels now to balance with tungsten light ie. 1 1/2 CTS or even 1/4CTS to balance tungsten.
Also, I’m looking for confirmation that it’s probably still more consistent and accurate to use gels instead of the seemingly, less professional, AWB and the plastic diffuser cap that comes with the speedlite. I also don’t want one falling off onto the floor during a ceremony when I’m moving the BFT around. Also, I’m guessing that AWB is a nightmare in post and only useful when one doesn’t have time to measure light properly.
Do you find yourself using a colorchecker or iPhone color meter much?
So mainly just wondering what gels to tape on to the 600s. Thanks!
Hi there Tommy
I am not aware of such a WB discrepancy between the Canon flashes. Have you read something somewhere, or experienced this?
I still prefer to tape either a full CTS or 1/2 CTS gel to my flash.
Two reasons for this: I prefer the CTS gel (Color Temperature Straw), over the CTO gel (Color Temperature Orange) … because I have an easier time getting good skin tones with CTS or 1/2 CTS gels.
The other reason – gels that I tape on are very cheap, and expendable.
I don’t use a color-checker chart with bounce flash, since the WB often changes as I move around and the light from my flash hits various surfaces.
Hi Neil
I have been asked to take photos at a place that has red lighting. What colour gell should I choose for this event?
According to the color wheel, GREEN is the opposite color of red. So in theory, you’d need some level of green light that you need to add to you’d subject or scene. But the intensity of the red light you find yourself shooting in, will determine how much you’d gel your flash … but this is a near impossible task to guess. I also doubt anyone would be able to perfectly neutralize such a red tone to the photos. In the end, I suspect you’d have to accept the colors as they are.