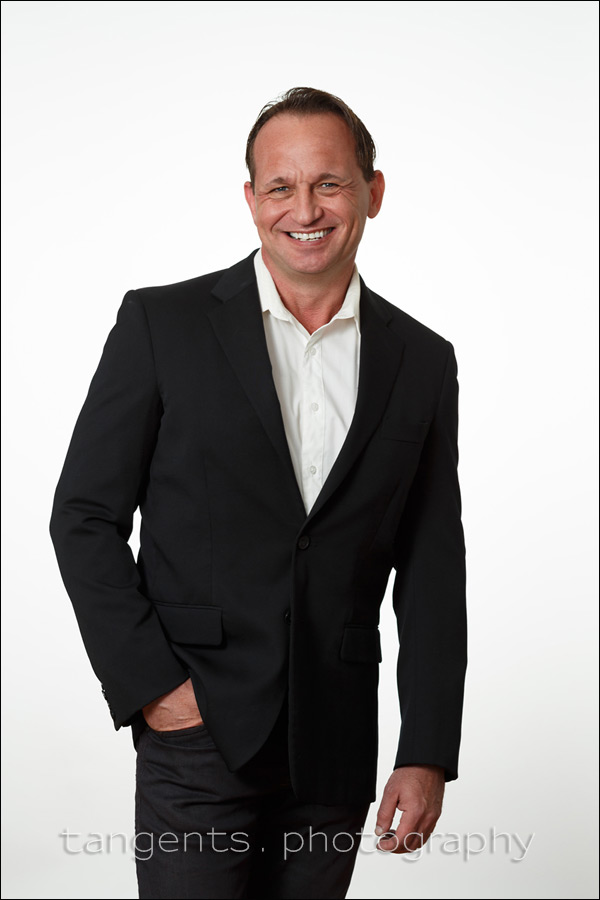
A home-studio setup with speedlites
With the article on lighting a white seamless studio backdrop in the studio, the question came up how you would do that in a home-based studio where there is less space. The answer? In pretty much the same way. This tutorial video on how to set up a small home studio using speedlites, will show you that the techniques remain the same, whether it is a speedlite, or a powerful studio light.
A few notes about this video:
- For this video, I ended up going with B&W images only of our subject, Matt. I liked the result. It worked very well with the white backdrop. However, the skin tones and colors looked fantastic in the color images. You can see two examples further down in this article.
- I used a white paper backdrop here to show how I would make sure it is white with no detail. You could as easily use a color backdrop, or a grey one.
- As I explained in that previous tutorial, I like to start with the white background, getting my exposure for that, and building up from there. You could as easily (and sensibly) start by lighting your subject first. There is no specific single way of doing this. What matters are the results. So adapt from this what you need.
In the end, this video hopefully shows that getting nice, elegant results is easy, and well within anyone’s reach. It takes two speedlites and a few accessories. You can do this!
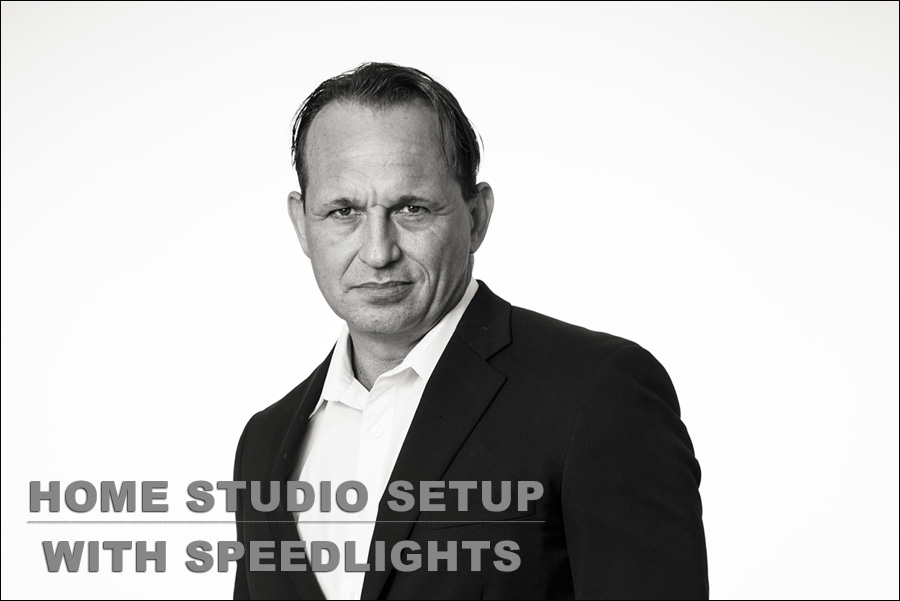
Photo gear mentioned in the tutorial video
For the background
- Savage seamless background paper (Amazon)
- Manfrotto 2983 Adjustable Background Crossbar (B&H / Amazon)
- Any two light-stands would work to hold up the backdrop. I use Manfrotto.
The reflector
- Here I used the Sunbounce mini bounce kit (white / gold) (B&H / Amazon),
- however, in the studio where I have space, I prefer the the Eye-lighter (B&H / Amazon).
- Ultimately, any reflector or white board would work. It might not even be necessary in a smaller space where the walls are white.
The light modifiers
- To get a fairly even splash of light on the white paper backdrop, I used the MagSphere (B&H / Amazon)
- Shoot-through umbrella: Here I used the Profoto Umbrella 41″ Shallow Translucent (B&H / Amazon), but there are numerous choices available to you, such as the Westcott 45″ white satin umbrella (B&H / Amazon)
- Bounce umbrella: Westcott 45″ Bounce Umbrella (B&H / Amazon), Again, there is a wide range of choices available to you.
The lens
- Canon 100mm f/2.8 IS macro /equivalent Nikon 105mm f/2.8 VR macro
Color calibration tool / Color checker chart
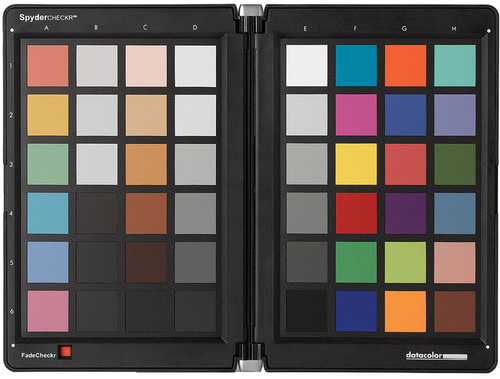
- Consistent Color Control for RAW Imaging
- White, Gray, and Gray Ramp Patches
- Color Target Includes Skintone Samples
- Works with Adobe Camera RAW (ACR)
- Includes Software for Mac and Windows

Camera settings for all images
- 1/160 @ f/5.6 @ 100 ISO
Credits
- Matt Locker – actor / voice over artist
- Erik Colonese – videographer
- music – Triple Scoop Music

Related articles
- Gear list – Starting out with off-camera flash
- Best photo umbrella for a home-studio
- Lighting a white seamless studio backdrop
- Lighting setup with speedlights & white seamless backdrop (model: Anastasia)
- Simple lighting setup for home studio photography (models: Anelisa & Aleona)
- Easy lighting setup for headshot photography
- For more videos, follow me on Vimeo / YouTube
Great review, Neil! I shouldn’t have learned anything from this but I did. Nice methodical way of setting the flash levels; your use of f/5.6 made me look it up and see that I’ve been wasting power at f/11 or higher. One question for you, though. Would you have been able to do full-length body shots with this same setup? My experience is that I run out of power and get a gray cast on the bottom of the frame. . .but I suspect there’s a way around that.
Frank … Distance will always be a limitation in a smaller (home-based) studio. I wouldn’t want to zoom much wider than say 50mm for a full-length portrait. Then it depends on how far back you can place your umbrella … and how large an umbrella you can place. So you’re looking at about a 12 ft distance from yourself and your subject.
Then if you want a white or colored background that you are lighting, you’re going to need additional distance on top of that just for the background.
Then, for an even spread of light, top-to-bottom, even more distance for the light at an angle behind you.
So all in all, you are going to need that one thing that is at a premium in a home-based studio …. distance!
Nice! As always. Great hands-on advice.
Great tutorial as always Neil. Just curious, any preference on one of those umbrellas over the other? What are the use cases where you’d choose a shoot through vs the other?
Thanks,
Mike
Mike, I have tried both in various situations, and though I haven’t done specific one-to-one comparisons, I haven’t discerned any real difference. I prefer the bounce umbrella in a smaller space, since the umbrella doesn’t protrude forward … the bounce umbrella is easier to jam into a corner.
I love speedlights for small spaces. You can have so many for the cost of one studio light! The problem is still the stands, they take up space no matter what sits on top…
Thanks for another informative well paced video Neil. I couldn’t see the reflector doing much on that angle or was that just the angle I was viewing the video from?
Chris … I doubt the reflector had much influence here because of the white walls and other surfaces around us. But it would be useful in a larger space, or a space where there are darker walls.
Excelent! Very good discussion about using histograms, umbrellas e little space! Good job!
Once again thank you Neil for sharing your knowledge! This time was a special treat for me because I happen to have very similar photo gear (with minor differences) and a similar sitting room. So I grabbed the opportunity to replicate as best as I could your improvised studio and the following are a few questions and ideas that arose from my effort.
1. Camera settings at 5:11 show that WB is set at A2,M3. My guess is that there was too much white and you needed a warmer color on the skin. Am I right?
2. I followed your procedure for setting up the power for the background speedlite and for the main light, then I measured the light hitting the front and the back of subject’s neck with a Sekonic SE L-308 S Flashmate: 5.6 front, 4 back. The light and the subject stood at 4 feet in front of the background. If you had an exposimeter, would you have maintained a one stop difference?
3. I have no MagSphere, so I decided to use the background speedlite with no modifier, with the bare speedlite head set in a vertical position in order to better fit the figure and eventually provide a smoother light fall off
4. I was not able to change the color of the background in a meaningful way by gelling the flash. I tried with different power settings for the background unit but I had no success: too much light from the main light?
Hi there Marco
The specific WB settings that I shoot with, aren’t of great importance since I shoot in RAW, and will adjust the WB in post.
The difference between the exposure for the white background and subject, should be fairly similar – we want to blow out the white a bit by keeping the exposure on the edge of the histogram. But we don’t want to have so much light on the background that it causes ‘bleeding’ and affects the edges of your subject. So perhaps 1 stop difference, perhaps less.
To change the color of the background, you will find it easier with a darker background such as a dark or medium grey. Then the colored light will show – whereas with a white background we are already at maximum exposure – there’s not much wriggle room to add color.
Love your video tutorials Neil, another great one that shows what can be achieved with limited space and gear.
Tony
That was a very informative lesson. Goes to show you how things like this can be done quite simply without a studio and tons of fancy, expensive gear. Thanks, as always.
However, I’m curious about one thing. There seemed to be quite a bit of daylight coming in through the windows. You were apparently so unconcerned about all that light streaming in, that I didn’t notice you mention it on the video or in the text.
This is not about the white balance, but about possible interference with shaping the light on your subject with your speedlights and modifiers by filling in too much from the windows.
I’m going to assume (something I should never do with you) that your camera settings, f8 you said, with the flashes turned off would have left the room, the background and the subject quite underexposed therefore, giving you freedom with the speedlights.
I also noted that the video camera’s settings were just right for the existing light to get a perfect exposure on you and everything else in there while you lit up your headshot just the way you wanted it.
So… have I answered my own question or am I way off track and making something out of nothing?
* fingers crossed
Excellent video with really good use-anywhere advice. I really appreciate the methodical way you approach your work and how concisely you can explain it.
Great explanation thanks, Neil. A couple of questions:
1. I presume you used the 100mm lens (vs 70-200mm) because of space/convenience? Assuming this wasn’t an issue, are there any circumstances where you’d choose the 100mm in preference to the 70-200mm?
2. Any particular reason for the umbrella vs say a softbox?
Thanks
Dave … no real reason to use the 100mm lens instead of a 70-200 zoom. The 100mm lens was on hand, is lighter to handle.
With the umbrella there is one advantage over a softbox – which wasn’t utilized here – you can move an umbrella right against a wall or into a corner, and thereby get a longer distance between the light and your subject.
In this case again, the umbrella was on hand. Also, it is very affordable compared to most softboxes. So that is in line with making all of this within reach of most photographers.
I just stumbled upon this by accident. Really well done and thanks for sharing your knowledge Neil. How much of an impact was the natural environmental light playing with this?
I should have posted a comparison photo without the flashes to show the existing light had minimal effect. What you are seeing in the photos are just the light from flash.