Gear list – Starting out with off-camera flash
You can get great lighting with just on-camera bounce flash when shooting indoors, as shown in this related article – Lighting with bounce flash. But at some point you might want more flexibility and consistency. Or you might run into problem scenarios with bounce flash, such as colored walls and ceilings. Or you might run into a situation where you can’t use any bounce flash at all, and the available light isn’t ideal. Then it is time to step it up with off-camera flash.
Starting out with off-camera flash photography might seem daunting for the newer photographer who hasn’t dipped a toe in that yet. But it isn’t that scary. A very basic off-camera flash setup need not be expensive – and even that basic lighting setup can take you far before you have to expand into more sophisticated or flexible gear.
I’d like to show you how to build up a very basic off-camera flash setup that doesn’t cost much. An easy and inexpensive entry into an area that can really elevate your photographs.
This list of gear isn’t definitive – there are so many different ways to build up a lighting kit. I think this might be why it is confusing to the aspiring photographer – an overwhelming array of possibilities. But I am confident that the gear listed here will be solid, good choices.
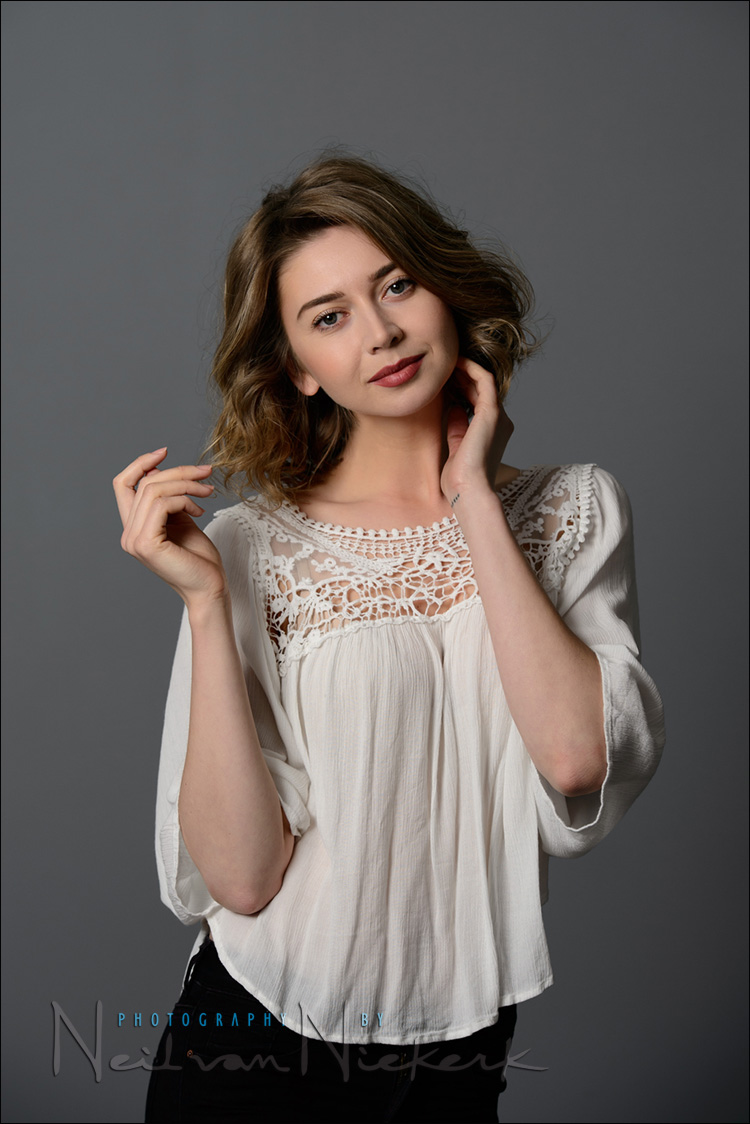
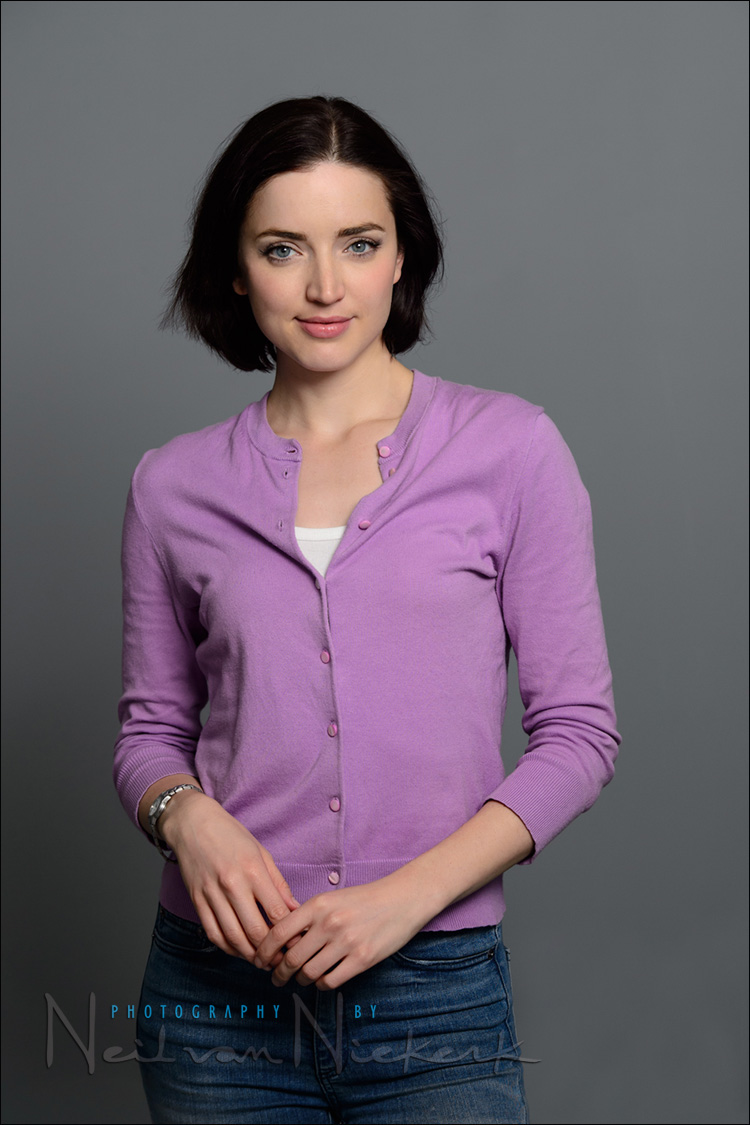
The photo at the top of Claudia, and the photo below, of Anelisa, where taken with this basic setup. You need not get the identical setup, but you’d need something similar. Let’s look at what you’d need.
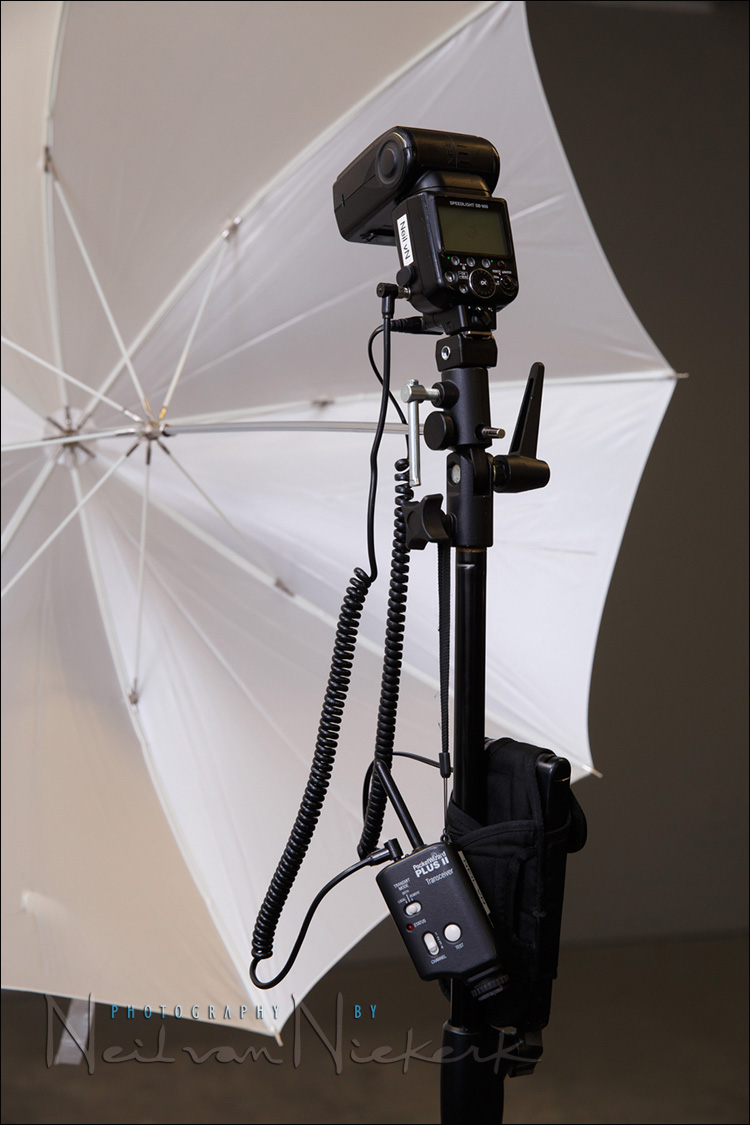
- Most of all, you need a flash / speedlight – it need not be very sophisticated. But ideally it needs to have some power.
- Two wireless triggers to allow your camera to fire the flash. One is on your camera, the other connected to your flash.
- An umbrella or a softbox to diffuser the flash and create flattering light.
- An umbrella clamp (or spigot) to attach the flash to the light-stand, and to connect the umbrella to.
- A light-stand to hold everything up.
- Possibly a battery pack, to help with recycling time of your flash.
That’s it. That’s all you need to start out.
Let’s start with the easier items first:
1.) Light-stand:
Working indoors, the light-stand we use need not be that heavy. But we would still benefit from a light-stand with a big enough foot-print. Working indoors, we don’t need a light-stand as sturdy as the C-stand (which is often recommended.) We want a light-stand that is not too heavy, not too flimsy. We want the Goldilocks option – it should be just right!
There are so many options for light-stands, but I really like the Manfrotto stackable light-stands. The medium sized one (1052BAC) is fairly light (2.65 lbs), but still tall enough (7′ 7″), and it has a footprint diameter of 43′ … while the larger version (the 1004BAC), is 12′ tall at its highest, and has a footprint of 42″ and weighs 6.6 lbs. Sturdy, but heavy.
This then is more or less the specs I would look at when comparing other light-stands. You want something similar to that medium-sized Manfrotto – a light-stand taller than 7′ and with a decent footprint so it doesn’t topple easily, and a weight of around 3-4 lbs. Just right.
Reviews of the Manfrotto light-stands:
There are other brands available such as Avenger and Impact. But I like these Manfrotto light-stands because they clip together – it makes them easier to carry and easier to store.
2.) Umbrella Clamp:
This might be the simplest choice to make – an umbrella bracket by Neewer (affiliate), might be the best choice – inexpensive, and it gets the job done.
3.) Umbrella / Softbox:
There are such a huge variety of ways to modify and sweeten the light from your flash – the best choices to start out with would definitely be a softbox or an umbrella. For outdoors work, I find a softbox is more easily controlled than an umbrella – the wind tends to easily scoop an umbrella. The two softboxes I use with speedlights: Lastolite softbox (B&H / Amazon), and Westcot Rapidbox (B&H / Amazon).
Related articles about softboxes:
- Softboxes with speedlights
- review: Westcott Rapid Box – 26″ Octa Softbox
- review: Lastolite Ezybox 24×24 softbox
For indoors work, I do think an umbrella would be your best choice – inexpensive, fast to set up, and compact when collapsed. In the end you will get a softbox or two as you progress as a photographer, but an umbrella might be your best starter option.
Now your choice is whether you should get a 45″ bounce umbrella with a black backing (B&H / Amazon), or a 45″ white shoot-through umbrella (B&H / Amazon). The black backing on the bounce umbrella can be removed if need be, so it acts more like a shoot-through umbrella.
If you’re going to mostly shoot indoors such as in homes and venues, then I think you would do well to pick a white shoot-through umbrella. It acts like a light bomb as it lets the light from the flash scatter in all directions, which then bounces off the ceiling and walls to create soft light. The photos shown here were done with a white shoot-through umbrella. So as a starter light modifier, I would suggest keeping it as simple as that Westcott 5″ white shoot-through umbrella (B&H / Amazon). Other brands are good too. You have choices, and they need not be expensive.
4.) Wireless triggers and the choice of Speedlight / Flash
Now we get to the more tricky part of the shopping list – the speedlights and the wireless triggers. There are levels of sophistication here, as well as differences in how the wireless triggers and flashes combine as a system. For this reason, I am going to discuss our options here with that in mind – building a system. Two things will have to be balanced – cost vs features. Also, the proprietary brand names (Canon / Nikon) will be more expensive than the off-brand options.
With the wireless triggers, there are two ways that the transmitter and receiver communicate – radio-frequency signals, or optical signals. With the optical signals, you have to rely on line-of-sight, which can cause problems with range and position of the flashes. The best then would be proper radio-frequency wireless transmitters of some kind.
Let’s carefully step through all this and see if we can figure out where the best choices would be:
You will have to make an important decision from the outset here about the direction you want to go with off-camera flash. You will have to decide whether you want to opt for:
– a more simplistic manual-only flash setup, or
– a more sophisticated setup which allows additional features such as TTL control, and high-speed flash sync.
With the two main photos shown here, there are the pull-back and detailed shots. For these photos, I still used a Nikon SB-900 flash, and the older PocketWizard II units. There is no intelligent communication between the camera and the flash with this setup – it is entirely manual. So you can get superb results without having to chase the technology immediately. A basic setup can get you far, even though you lose TTL flash control, and high-speed flash sync.
For recommended speedlights / flashes, check this article: Which is the best flashgun?
Using this basic setup, and metering for the flash
The next big question after you’ve acquired the basic gear, will most likely be – now what? How do I use this?
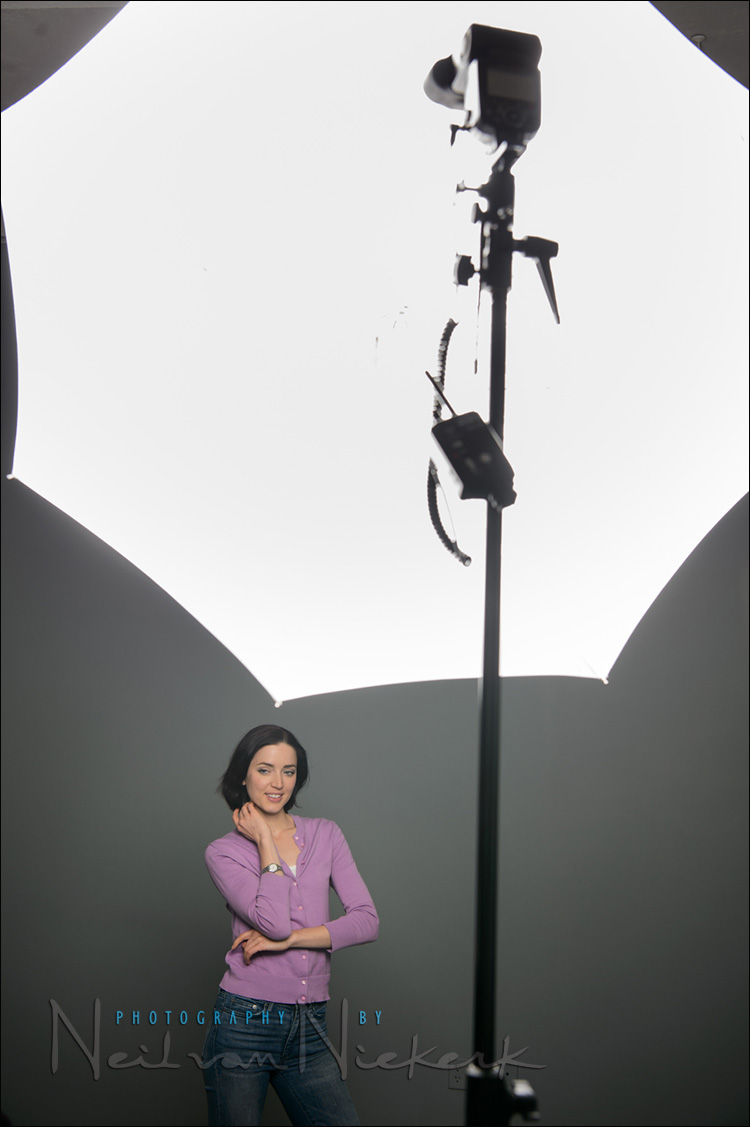
In terms of positioning the umbrella – go for a conservative position – about 30 degrees to your side, and about 20 degrees above your subject’s face, with the shaft of the umbrella pointing at their chest. There’s no real precision here – we are giving a wide swathe of light.
The next step – exposure metering. How do we set the flash power? Many of the speedlights listed above, are TTL. But for a static, studio-type setup, we would most likely go to manual mode on our flashes. Then it becomes a matter of getting proper exposure for our manual flash. This is a really simple procedure, explained through this (and subsequent articles)
The simplest way of metering for the flash would be with a handheld meter. I would suggest looking at the used gear market first before buying new. The Fred Miranda Forums is a good place for this.
I also often use the histogram to determine exposure. It works very well with manual off-camera flash.
Both of the main images shown here where shot at: 1/125 @ f/5.6 @ 250 ISO
Related articles
- A simple lighting setup for photographing the wedding formals
- Simple lighting setup for home studio photography
- Simple lighting setup with speedlights & white seamless backdrop
- A home-studio setup with speedlites
- Best photo umbrella for a home-studio
- Off-camera flash: short lighting vs. broad lighting
- Off-camera flash – change your position, change the direction of light
- A first-steps guide to using a light meter with manual flash
- More articles about Off-camera flash photography
Summary
Radio-frequency wireless trigger systems have become a hotly contested area of flash photography over the past few years. We are sure to see more entries in the market, and ever increasing sophistication. We really have it so good with so many options.
If you see anything here that is incorrect, out of date or incomplete, please let me know. I would like to keep this up to date to help everyone.
Excellent post Neil – this article would have save me a lot of research before I bought my gear.
Are the colours of the side walls in your studio white or grey? If white, how does much does the light scatter from the shoot through umbrella affect the exposure?
The colors of the side walls in my studio are grey / blueish grey. You can see some of my studio, and the size of it, in this video clip where I review various on-camera modifiers.
The grey background, and shooting distance and positioning is pretty much the same as I used with the photos in the article on Lighting with bounce flash.
Very informative post, thanks Neil.
You asked for input on the article – I just took delivery of a Yongnuo YNE3-RX Receiver. It works with the 600EX-RT flashes and Transceivers (both Canon and Yongnou), plus extends to the Canon 580 EX and 430 EX flashes, giving full ETTL capability etc.
The reason I bought it was to give me wireless connectivity to my old Metz 60CT2 (to be used as back lighting in particular) and obviously only in manual and not ETTL.
How far you placed the umbrella and what was the zoom on the flash..? Whenever I tried this the light is more hard and I always add plastic bouncer on the top of the flash to soften it.Kind regards
The umbrella was 8-10 feet away, if I remember correctly.
I zoom the flash-head until a test shot shows that it is nearly covering the entirety of the umbrella. No plastic diffuser.
Hi Neil. Hope you are doing fine. This is fantastic stuff, thanks heaps! Really takes the confusion off the bewildering array of choices for newbies like me. For starters, I got the Yongnuo YN-568 EX TTL flash for Nikon and your flash books :). I need to see if I can source the light stands and brackets for cheap here in Australia. Any Aussie photogs here who can help me find my way around cheap gear? Cheers Neil and thanks again for your wonderful site and generosity.
I can vouch for the Yongnuo kit, I have two of the YN560-III’s and a YN600EX-RT for TTL off-camera. This is controlled by a Canon 600EX-RT, which I wouldn’t want to use off-camera due to the cost of the unit. The YN600EX-RT has been used many times at weddings and has always performed superbly.
The beauty of the yn560-IV (and yn560-III’s), is that the YN560-TX allows you to control your speedlights from the camera for less than $50. I have used this system for 1000’s of frames and it works perfect. It also works with the older rf602 and rf603 systems as well.
Dear Neil van Niekerk
You are my master on all photographic matters. Therefore this: I am on the verge to use off camera speedlights And I do want to have a softbox. Now you were using and still use the Lastolite Ezybox, then you propagated a Westcott Rapidbox and further I see that you use now a Protofoto Strip Box. I need your input what you would suggest to use. I live in Zürich and there reside all providers. To whom shall I turn. I thank you.
Felix, my reply is the same as the one where you posted in the thread on Softboxes for speedlights.
You really can’t go wrong with any product by one of the main manufacturers. The quality of light you’ll get from them will be pretty similar. So look at how easy they are to set up, and how easy to break down and carry.
For me, the Lastolite EZYbox wins here in ease of setting up … except that they don’t make the small pouch anymore, but it is a large rectangular bag. The Westcott Rapidbox has a handy carry bag, and it collapses to a fairly small size.
So go to your local camera store, and see what they have.
Hi Neil,
Thanks for those last articles as this is most of the time the first step that matters as you say ! ;-)
Just two questions Neil.
First one simple and maybe stupid but I ask it anyway : I’m shooting indoors in my living room as I have no other large room available at the moment, and therefore, depending on the season, I somehow need some light to set the studio, 2 x lighstands, umbrellas, and my flashes as well as my camera (D700 with Nikkor 85mm f1.8D, and 2 x SB900).
Should I shoot without taking into account the light bulbs light on the ceiling (LEDs in fact), or should I dim the light as the color balance and temperature may be affected ?
Another question : during my last shooting session I had a hard time setting my flashes properly next to the subject and couldn’t get a contrast for both sides of the face, one slightly in the dark the other with ambient light.
The light was too even and therefore too flat !
Should I only position the lightstands ; one closer to the subject, the other closer to me with the approximate angle mentioned in your article; and/or adjust one of the flash output to get a more contrasty image through FEV ?
I shoot with TTL mode by the way.
Thanks a lot again for your enthusiasm and the valuable knowledge you freely share !
Kind regards,
Philippe.
Hi there Philippe
Whether the ambient light has an effect, depends on the difference between your flash exposure, and what would be correct ambient-only exposure. More than 3 stops difference, then the ambient exposure has less and less effect.
If you don’t have enough contrast, try using only one umbrella instead of two. Then you should get that gradient of shadow on the side that isn’t directly lit. But so much light might be bouncing around the small room, that it might still not be easy to get a contrasty lighting setup.
My strong suggestion – when you are shooting with a studio-style lighting setup, where your subject is static, then you would do better with manual flash than TTL flash.
Hello,
I have been wondering about upgrading my wireless triggers from yonguo to pocket wizard. You have suggested the flex tt5 and ac3 controller for Nikon. I was wondering about the plus iv, can you advise what the difference is between these configurations. I need tt land high speed sync as I would use them for mountain biking and indoor ski races.
I have a few Yungnuo 603 C II triggers (designed for Canon) which also work very well on my Fuji X100T (the contact pattern si similar )
What type of cables are you using to attach the flash to the pws? I don’t think you mentioned it anywhere. I’m guessing that they are more sturdy than the default cables that came with the pws? Thanks!
Sarah, what you (most likely) need, is a screw lock PC to 3.5mm male jack sync cable.
You can order it from Amazon or B&H.
Just for the sake of updating, given the plethora of Yongnuo comments here, I point out that over the last five years Godox gear has supplanted Yongnuo as the budget choice for a beginner, because it has vastly better expansion options. Yongnuo makes three separate incompatible radio triggering systems (the 60x/560 manual system, the TTL/HSS 622 system, and a Canon RT clone system; which can cause you to rebuy everything and makes keeping the model numbers straight a PITA), mostly only has speedlights in the system (aside from the YN-200 ministrobe), and only supports TTL/HSS for Canon and Nikon, without that support working cross-brand. But, like Yongnuo, customer support is zero, and you’ll be relying on the retailer for warranty coverage.
Godox has a single 2.4 GHz radio triggering system that encompasses both its manual and TTL/HSS lights. The system includes speedlights (both manual and TTL/HSS), AC-powered manual monolights (e.g., $110 300 Ws MS300), and li-ion battery powered TTL/HSS ministrobes (AD100, AD200, AD300 Pro) and monolights (AD400 Pro, AD600) all the way up to a 1200 Ws pack and head (AD1200) and an AC powered 2400 Ws pack and 2 heads (P2400). And the TTL/HSS support is good for Canon, Nikon, Sony, Fuji, Olympus/Panasonic and Pentax. Which works cross-brand. And all the speedlights have built-in transceivers (can be either transmitter or receiver) and all the strobes have built-in receivers. No need to cable/attach a receiver to the light, which makes for a faster/simpler/more robust setup. IOW, Godox is the poor man’s Profoto. :D
A good basic speedlight to get started with (for everyone but the Pentax shooters who don’t get them) in the current (2021) system is the $110 TT685 TTL/HSS model. 360º swivel. But if you’re willing to ditch TTL, there’s a $60 TT600, which can do HSS (but only as a radio off-camera flash). And these two models work together with the same transmitters, in exactly the way a Yongnuo YN-560 IV and YN-968 don’t. If you want something with a 3x longer battery life and slightly faster recycling, the li-on versions ($180 V860II for TTL, $140 V850 II for manual) are also out there [though rumored to be replaced by Mk III versions sometime this year]. The only functional difference from the AA-powered “TT” models is that they don’t have a battery pack port. If you want a poor man’s Profoto A1 :), there’s the Godox V1 round-head li-ion flash that takes magnetic modifiers directly. For mirrorless shooters who want a mini speedlight, there’s the TT350 and V350, but these only swivel 270º, are a stop less powerful, and lack a sync port, recycle beep, and battery pack port. But they’re tiny (TT350 runs off 2xAA).
If you want to use an existing speedlight or strobe together with the Godox gear, there’s an X1R receiver, but it only supports TTL/HSS in Canon, Nikon, and Sony versions. But Adorama also makes (exclusive to them) a Flashpoint R2 (their rebranding of the Godox system) single-pin (manual) radio transceiver that can be cabled or attached to the foot of a speedlight, similar to a Yongnuo RF-605 (allows for group on/off control).