Lighting an on-location photo session – Home Free
I had another opportunity to do promotional photos for Home Free, the A Capella group. Some of the previous photo shoot was described in this article – On-location lighting problem solving. This time we met at another location – a farm which also doubled up as a reception venue. This offered us some outdoor areas, as well as a more barn-like area.
From the art director and manager’s description of what they wanted, as well as photos of the location, I knew that if I flat-lit this with large light sources, it would lose some of the dramatic feel of the shoot. With this, I decided that gridded stripboxes would be my main light modifiers – these offer me soft light, but a lot more control than a large (ungridded) softbox or umbrellas would.
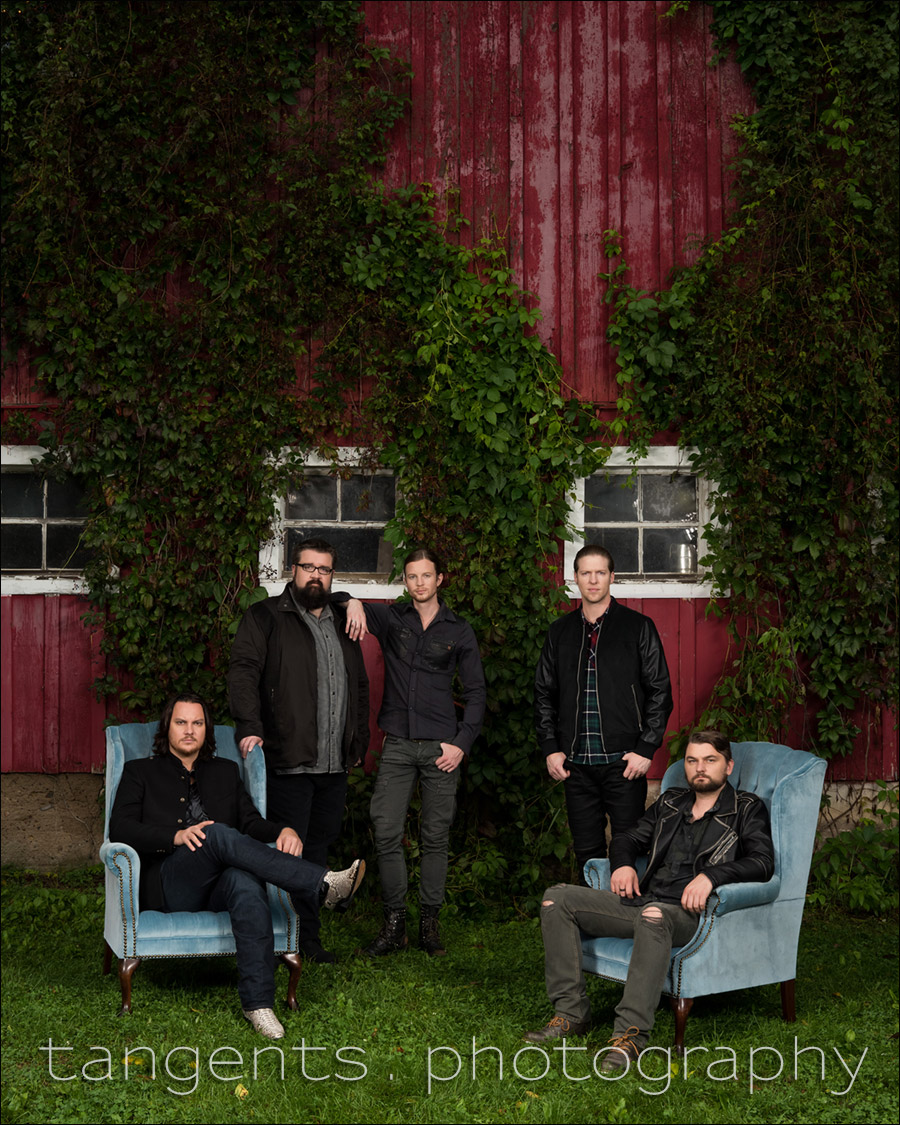
The specific need for these gridded stripboxes are visually explained better in the 2nd part of this article – but I wanted to start with some of the final part of the photo session which was outdoors during a brief respite from the rain.
The photo above is largely straight-out-of-camera, except for a slight crop, and the usual exposure and contrast adjustments of the RAW file. The light was over-cast, and I wanted to add some punch to the images – softly accentuating the group, highlighting them over the surroundings.

Camera settings and photo gear used for this photo
- 1/125 @ f/11 @ 640 ISO
- Nikon D810
- Nikon 24-70mm f/2.8E VR /equivalent Canon 24-70mm f/2.8L II
- (2x) Profoto B1 TTL flash (B&H / Amazon)
- Profoto 1’x4’ gridded strip-box (B&H / Amazon), with a 50 degree soft-grid
- Profoto 1’x6’ gridded strip-box (B&H / Amazon), with a 50 degree soft-grid
This pull-back shot reveals the way the lights were positioned. The Profoto 1’x6’ gridded strip-box on the left is aimed to the group to camera-right. Similarly, the Profoto 1’x4’ gridded strip-box on our right, is aimed to the group on camera-left.
The grids contain the light so that the grass in the front (and the upper part of the building isn’t as well lit as the group. Of course, in the main photo, a simple edit of the RAW file using the local correction brush can be used to darken the grass in the front.
The specific use of the gridded softboxes will be even more apparent with the explanation of the setup of the first part of the photo shoot. If you’re not familiar with the results from a gridded stripbox, also check out these two related articles:

Building up lighting with Profoto gridded stripboxes
With the photo above, the intention was to have dramatic light, yet with enough detail in the shadows – all with the idea in mind that there is leeway for the photo retoucher to easily work some magic. For this photo, the guy in the background, second from left, should ideally have had more light on him. Similarly, I would’ve like the ground in the front to be less well lit. But there is enough here for the retoucher to play with.
We had several arrangements with the five men in Home Free, changing their poses and positioning. And for every major change, I would adjust the lighting. There is one limitation here in finessing the lighting – it had to be good enough. If I spent too long in-between each setup to really finesse the lighting to be perfect in-camera, I would lose their attention and enthusiasm. So what might seem slightly sloppy here, is with the goal in mind of having a shoot overall that is successful, even if at the expense of perfection in lighting. There’s enough to work with here as a starting image. Nothing really that needs fixing, with retouching only needed to enhance the image.
That said, I would like to show how I set up the lights for the initial sequence where we had three guys on the left, and two on the right. (See the pull-back shot below.) I wanted soft, directional light on both groupings.
In getting to my camera settings, I dropped the shutter speed fairly slow, and worked with a mid-range ISO … so that we had some detail in the fireplace. I worked without a tripod here, but the ambient light was so low, that camera shake wouldn’t have registered. On top of that, I was using the stabilized Nikon 24-70mm f/2.8E VR (affiliate), so I was quite safe with a hand-held shutter speed of 1/40th.
Here is the pull-back shot to show the lighting setup, and the relative positioning of the lights:

Photo and lighting gear used during this part of the photo shoot
- 1/40 @ f/11 @ 400 ISO
- Nikon D810
- Nikon 24-70mm f/2.8E VR /equivalent Canon 24-70mm f/2.8L II
- (2x) Profoto B1 TTL flash (B&H / Amazon)
- Profoto 500 Ws D1 flash (B&H / Amazon)
- Profoto 1’x4’ strip-box (B&H / Amazon) with a Profoto 50 degree soft-grid
- Profoto 1’x6’ strip-box (B&H / Amazon) with a Profoto 50 degree soft-grid
- Westcott 7’ Parabolic Umbrella (B&H / Amazon)

I switched the left-hand light (Group A) on first.
The Profoto 1’x4’ gridded strip-box on camera left, was pointed at the two guys on the right. I could rotate and swivel the light to have most of the light fall on their faces.
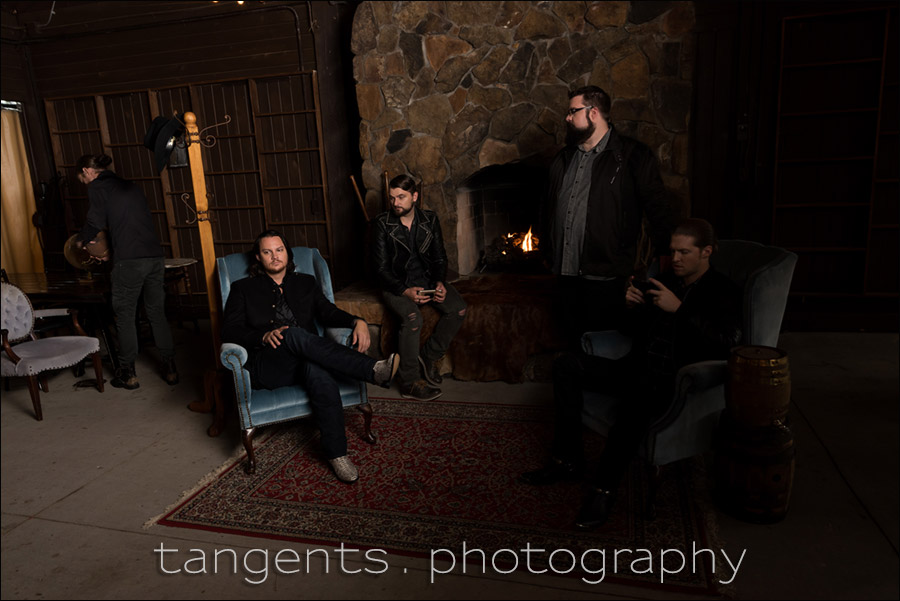
Then I switched on the light on my right (Group B), which was pointed to where the three guys on camera left, would be positioned. Again, I would move, rotate and swivel the light until I was happy how the light spread.
Here I had the longer Profoto 1’x6’ gridded strip-box (affiliate), since I would have to cover three guys on the left. Just to reiterate again, this light was set up to camera right, pointing to the left-hand portion of the group.

Combining the lights by switching both main lights on, I had to also make sure there wasn’t strong overlap in the middle causing over-exposure. Then it was back to rotating and swiveling the lights until the light spread from both lights were good.
Looking again at the pull-back shot, notice the large Westcott 7’ Parabolic Umbrella (affiliate) standing behind where I would be. I had this light (a Profoto D1 studio head) set up as group C, and it is with this light that I controlled the over-all contrast of the scene. I could give the shadows just a bump more in exposure, as needed.
Summary
This should all give a good visual idea of how the two main lights were used to build up the specific spread of light. The grids on the softbox are essential in giving us that particular kind of control.
Related articles
- Dramatic portraits of kids – Lighting and intent
- Lighting an on-location Fashion shoot
- Photo shoot: On-location lighting problem solving (Home Free)
- Using a gridded stripbox as the main light (model: Claudia)
- Using a big gridded strip-box / soft-box (model: Anita DeBauch)
A little bit of homework
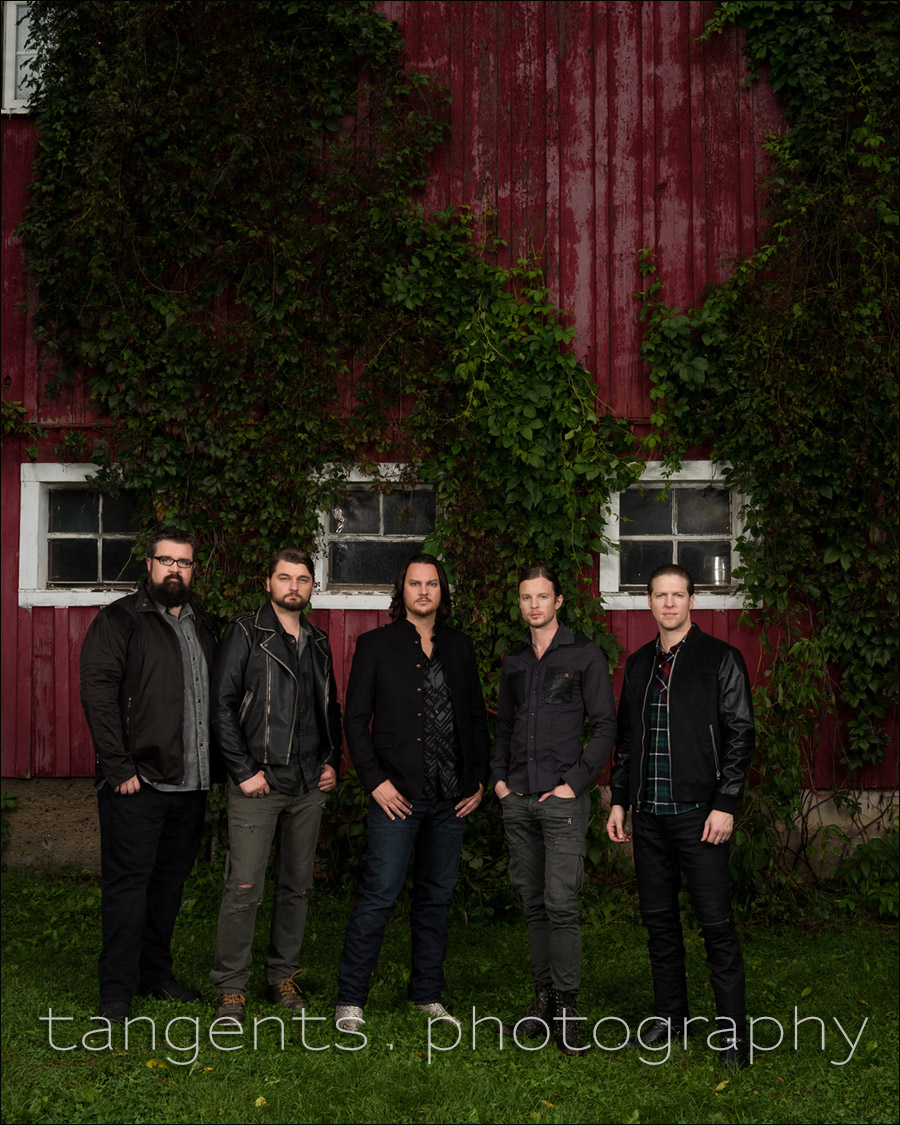
The camera settings for this photo is the same as the seated one, shown at the start of this article.
- 1/125 @ f/11 @ 640 ISO
See if you can give a break-down of why I used those specific camera settings while using the two Profoto B1 flashes. There’s a certain logic to this.
Great post; thanks. Now I see why the crossed lights: the V-formation. Totally with you about the need to work fast to keep their attention (or enthusiasm, at least). I haven’t had much success with shooting slow like that; at 1/40th, bringing the ambient up, don’t you risk a little ghosting if they move? Not that you did (or you weeded those shots out) but I probably would. Of course, my hyperactive rockers might be the difference. Again: thanks for the free tutorial!
This is the ambient-only test shot. With such low light, combined with the static pose, there was little risk of subject movement causing motion blur.
Great.. Really explains the need for the lighting decisions, yet keeping the band from losing interest… Beautifully balanced.. #Envious
Homework: I think you used a shutter speed slower than you usually do because it was overcast and you needed more light on the background. That’s also why you used a fairly high ISO. Plus you needed this shower shutter speed and ISO to balance the ambient light on a gray day with your flashes. I higher shutter speed and lower ISO would have made the photo too “flashy”, especially since you used softboxes that cast more narrow light in a targeted specific way, not in the more overall way bigger softboxes would have. I think you chose f11 to get the nice detail in the barn and ivy. And in the first photo the band members are staggered such that you needed an aperture that would ensure they’d all be in focus.
Why no fire in the fireplace?
Look closer, and read the text.
You have chosen f11 to ensure that all the persons were in focus as the picture is shot with the camera in vertical position. You likely locked the focus on the guy in the middle and then composed the picture, and to compensate for this shift of focus, f11 will provide sufficient depth of field to maintain all the persons in focus.
The shutterspeed has been chosen to ensure that handheld shooting will not be affected by camera shake.
Then you have increased the ISO to compensate for the lack of light at f11 with the chosen shutterspeed to avoid the background to become dark as the flashes will light the persons properly.
^^^ as simple as that.
I never actually used grids, and always had in my head that it’s to create less spill on backgrounds, so seeing how you’ve used it here is a great way of explaining gridded sofboxes! Thanks for sharing Neil, much appreciated.
And here is the image they chose as the cover art for their new album!