Tangents

photography tutorials, reviews & workshops

tangents photography blog
learn : discuss : share
  • Tangents
  • Tutorials
    • Flash Photography
    • Wedding Photography
    • Studio Photography
    • Posing People
    • Understanding Your Camera
    • Exposure metering
    • BFT
    • Best Photo Books
  • Reviews
    • Sony
    • Nikon
    • Canon
    • Fuji
    • Profoto
    • lighting gear
  • Workshops
    • Info: Workshops
    • In-person
      tutoring sessions
    • Online
      tutoring sessions
    • Workshops in
      New Jersey (NJ)
    • Workshops in
      New York (NYC)
    • Photo walks in NYC
    • Studio Workshop
    • Video tutorials
    • Workshop results
  • Books
    • On-Camera Flash (revised ed.)
    • Direction & Quality of Light
    • Off-Camera Flash Photography
    • Lighting & Design
    • On-Camera Flash (1st ed.)
  • Projects
    • Two Perspectives
    • B&W Infrared
    • Vintage lenses
    • Time-lapse photography
  • Info
    • About
    • Contact
    • My Photo Gear
    • Books by NvN
    • Join us on Facebook
    • Acclaim
    • Success Stories

photo session – vintage pinup style (on location)

August 23, 2011 Neil vN 30 Comments

vintage pinup photo session

photo session – vintage pinup style (on location)

When the hot-rod show which didn’t offer as much in terms of photography as I had hoped, Jill and I moved over to the pier in Brooklyn. Having a model in a retro sailor-suit type outfit … well, it just seemed to good an opportunity to waste. I thought of perhaps using the Ice Cream Factory there as a backdrop to a straight-forward pinup photo, but ultimately decided the Hudson River waterfront would work better as a setting for the photo.

Then we just had to add some simple but dynamic lighting, and give the final image a vintage flavor with the post-processing …

Here are the two starting images:


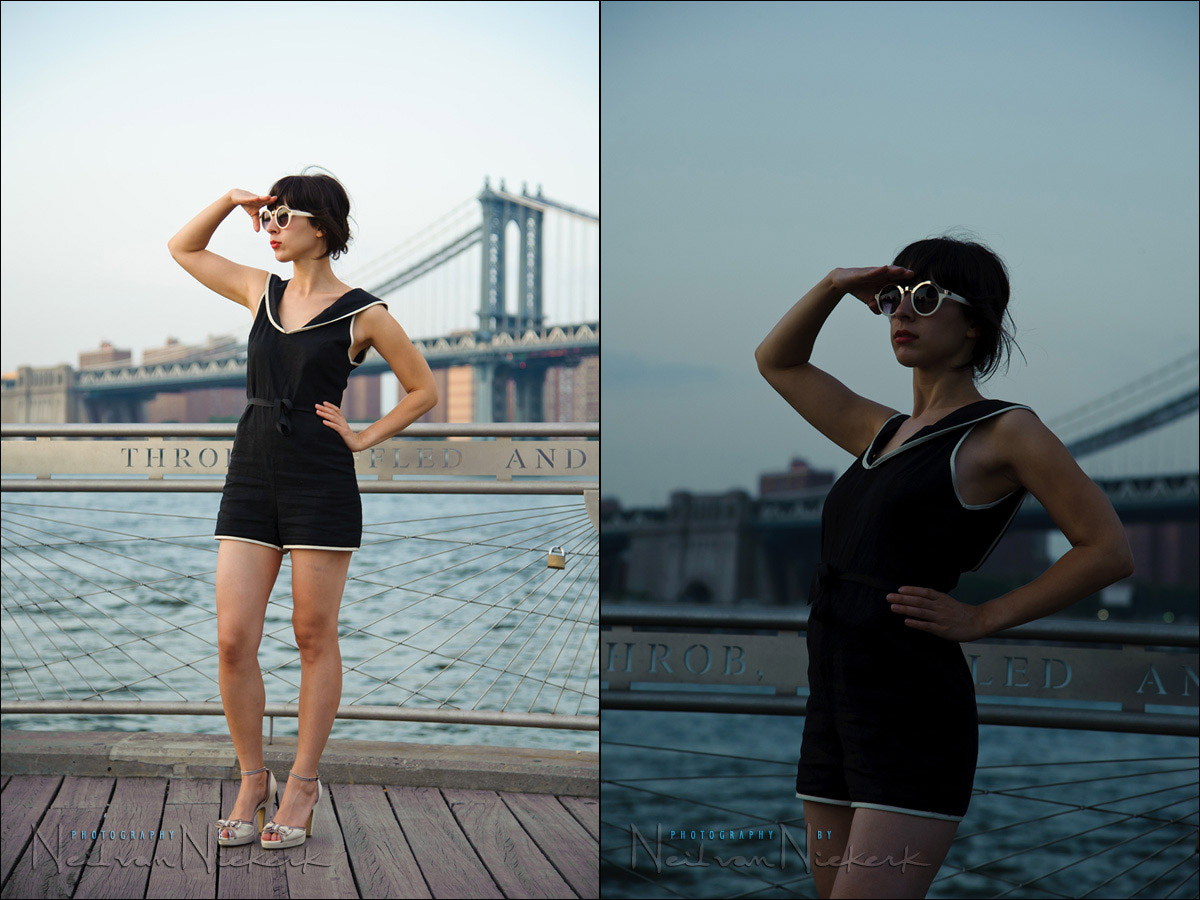
The first one with the camera settings so that I have correct ambient exposure. But the image looks bland. There’s no punch to it.  (1/200 @ f4 @ 400 ISO)
The next image was with the camera set to where I wanted the background exposure to be – darker and with more mood.  (1/250 @ f6.3 @ 400 ISO)

Why those final settings? Simply because I liked the way it looked on the back of my camera. Turns out to be 1.7 stops under the regular proper exposure. Sounds about right.

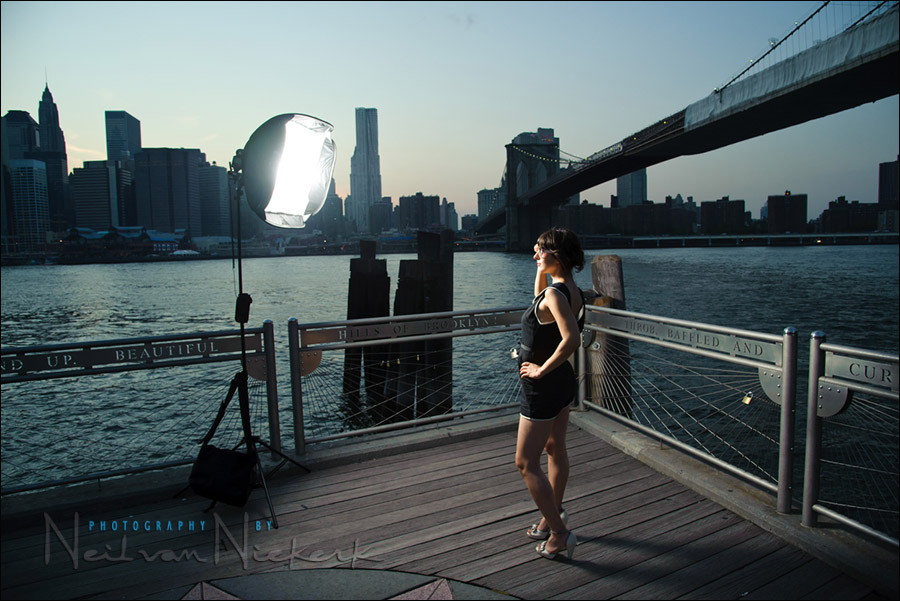
Then I had to add light. My setup was simplicity itself, resorting to my usual on-location lighting setup when working with an individual subject such as a model:
Lastolite EZYBOX Softbox Kit (24″x24″) (B&H), with the speedlight,
which is controlled by two PocketWizard FlexTT5 transceivers (B&H)

I used the flash in TTL mode, triggered via the TT5 units.

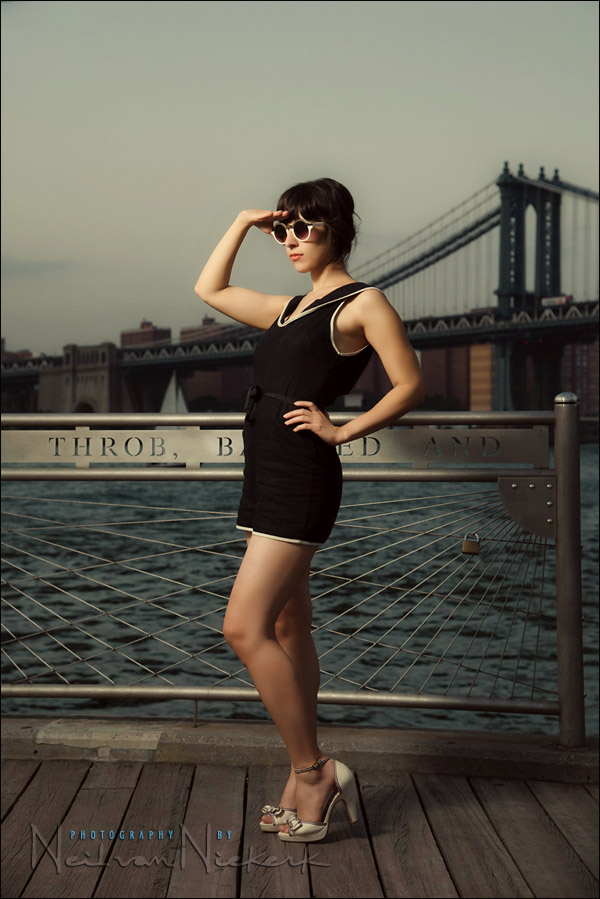
Here is the out-of-the-raw converter image on the left, with the final processed image on the right:

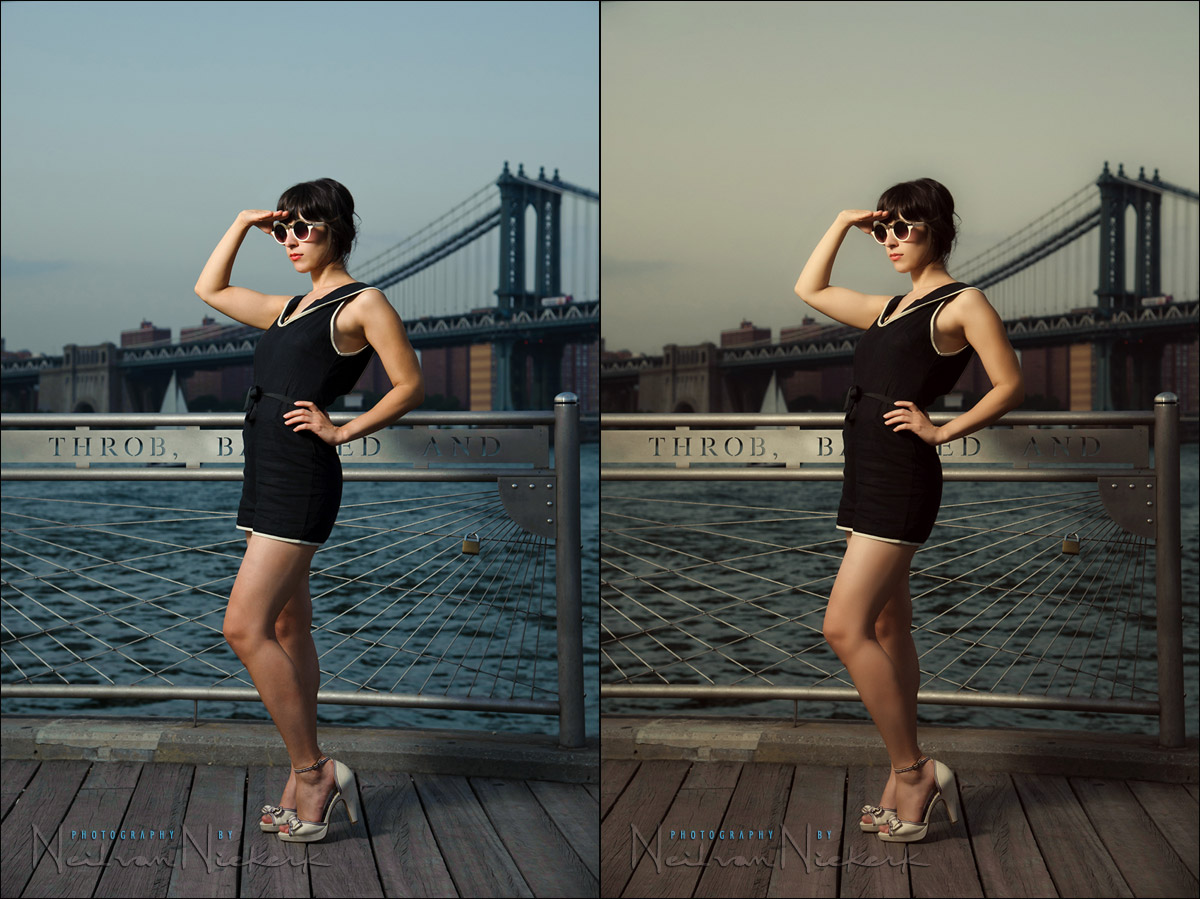
I wanted the look of the image to have a warm retro feel to it, so I used a Photoshop action to give it a warmer, more vintage-y look:

vintage pinup photo session

image settings:
1/250 @ f6.3 @ 400 ISO … TTL flash  (FEC not recorded)
Nikon D3;  Nikon 24-120mm f/4 VR (B&H) .. used at 70mm

Here is the pull-back shot to show the relative placement of the softbox.


Camera gear used during this photo session

Nikon D3;  Nikon 24-120mm f/4 VR (B&H)
Lastolite EZYBOX Softbox Kit (24″x24″) (B&H)
Manfrotto 1004BAC light-stand (B&H)
Nikon SB-910 Speedlight controlled by PocketWizard FlexTT5 & AC3 Controller
or alternately, the Canon 600EX-RT Speedlite controlled by Canon ST-E3 Transmitter

Filed Under: digital imaging, flash photography, lighting, photo shoot, Photoshop, Uncategorized Tagged With: retro pinup style photo session, vintage photo session


Help support this website

If you find these articles of value, please help support this website by using these B&H and Amazon affiliate links to order your photo gear.

I also offer photography workshops and tutoring sessions, whether in person, or via online video tutoring sessions.

Please follow me on Instagram for more.

You can also join our thriving photo community in the Tangents group on Facebook, where we show our photos and discuss all things photography.

Thank you,

Neil vN

Books by Neil van Niekerk


30 Comments, Add Your Own

  1. 1Bob Rossi says

    August 24, 2011 at 12:55 am

    Very nice work Neil. Reading your posts for the past few years, has done wonders for my use of both on and off camera flash, particulary in twilight conditions. I actually can think in terms of how to plan and set things up. Before, it was a just a bit of a mystery.

    The ability to reduce the ambient light and still expose correctly for your subject really makes many pictures pop.

    This looks like it could be used for an ad for “Boardwalk Empire”.

    Thanks again.

    Reply
  2. 2ron lemish says

    August 24, 2011 at 4:53 am

    It appears that more often then not you are using the pocket wizards. Especially out doors

    Reply
  3. 3Belinda McCarthy says

    August 24, 2011 at 5:29 am

    I really love the processing on this shot – it’s beautiful and so in keeping with the styling.

    Reply
  4. 4Jazz Guy says

    August 24, 2011 at 9:53 am

    Nice shot. Why the choice of the 24-120mm vs. the 24-70?

    Reply
  5. 5Neil vN says

    August 24, 2011 at 10:11 am

    I wanted to travel lighter than my usual 24-70 and 70-200 combination. And I knew I wouldn’t need the f2.8 apertures.

    Neil vN

    Reply
  6. 6Andi says

    August 24, 2011 at 12:21 pm

    You make this sound so easy! :-)
    Great shot and many thanks for sharing!

    Reply
  7. 7Andrew Beveridge says

    August 24, 2011 at 12:43 pm

    nice OCF, but I particularly like the processing on this … very nice !! :)

    Reply
  8. 8Barry Frankel says

    August 24, 2011 at 3:25 pm

    Aloha Neil,
    I am using the Pocket Wizards with pretty good success now, but not so much in TTL mode. Was wondering if you are relying on TTL vs. manual with consistently good results.
    Cheers, Barry

    Reply
  9. 9Jay says

    August 24, 2011 at 6:18 pm

    Once again you make it look so easy, Great shot!!! The only thing that i wish wasnt there was the padlock and the rail.

    Reply
  10. 10Neil vN says

    August 24, 2011 at 10:17 pm

    Jay … I know! That padlock really bugs me as well. But by the time I had finished writing the article and edited the image it was past 3am and that simple edit was past my abilities so late at night. So I just left it at that point.

    (The time-stamp of the blog posts aren’t always an indication if when I write them, since I often pre-date the post to late the previous night.)

    Neil vN

    Reply
  11. 11Vintage says

    August 24, 2011 at 10:34 pm

    Can anyone tell me how to make a Vintage feel, without using actions etc?

    Reply
  12. 12Trev says

    August 25, 2011 at 12:20 am

    Desaturate the colors a bit via Hue/Saturation adjustment layer [30-50%] use Photo Filter adjustment layer, Warming Filter 51 around 50%.

    It will give a pseudo effect, just play with photo filters and saturation on adjustment layers so you can re-adjust to taste.

    It does depend on the type of image, if you have a lot of greens/trees, etc. may not work as well, you need the type of image Neil shot, clean uncluttered lines.

    Trev

    Reply
  13. 13Ross says

    August 25, 2011 at 12:32 pm

    Hi Neil, great article.

    Quick question about when you are doing on location portraits particularly in locations like this when you are close to wind and water spray. Do you use any sort of filters on your lenses for protection? If so, do you prefer UV filters or one of the clear protectors such as the Nikon NC filters. Do you have a brand you would recommend? Lots of questions. Sorry. Love your website.

    Ross

    Reply
  14. 14Neil vN says

    August 25, 2011 at 1:46 pm

    Ross, I do indeed use filters. But I also take them off as needed. As mentioned in that linked article, I use Nikon NC Clear filters (on my Nikon lenses) and B&W filters (on my Canon lenses). The Nikon / Canon split is for no other reason that I already had B&W filters on my Canon lenses, and got Nikon filters when I expanded my Nikon lens line-up.

    Neil vN

    Reply
  15. 15William Ng says

    August 26, 2011 at 2:41 am

    I didn’t even notice the padlock at first until I read the comment. I was captivated by the image itself. Us photographers are such perfectionist :-) I bet the average person will not even notice the padlock. I often find clients picking photos that didn’t look ‘perfect’ to me.

    Reply
  16. 16Mark Lovett says

    August 26, 2011 at 11:06 am

    Neil,

    What happened to your AcuteB 600R pack and head, and your profoto beauty dish? Still have and use them?

    Do you like the results from your speedlight for this type of shot as much?

    Reply
  17. 17Neil vN says

    August 26, 2011 at 12:26 pm

    Mark … I still have the Profoto AcuteB 600R set, but don’t use it often, and only when the speedlights or Q-flashes won’t suffice. It’s just simpler usually to take speedlight or two with you.

    In a case like this, the speedlight easily offers enough power.

    What would’ve made a huge difference though, is that with the more powerful Profoto kit, I could’ve used a 2×3 or even 3×4 softbox for a huge light-source … and that would’ve changed the look of the final image. Actually, now I’m just tempted to use the Profoto more often again.

    Neil vN

    Reply
  18. 18Carol Beuchat says

    August 26, 2011 at 12:32 pm

    Still love this location and that wonderful rail! In this shot I like the lines in the fence drawing the gaze to the bridge. And “Throb”, perfectly positioned. :-)

    Reply
  19. 19Omari Blythe says

    August 26, 2011 at 1:31 pm

    Neil, using CLS with this shot, did you have to take a test shot first with it enabled and modify EV or did the first shot come out perfectly?

    Reply
  20. 20Ross says

    August 26, 2011 at 4:08 pm

    Thanks for the info on the filters, Neil. Keep up the great work.

    Ross.

    Reply
  21. 21Neil vN says

    August 26, 2011 at 6:43 pm

    Here is the sequence of images as I shot them, starting with the correct exposure .. then finding the exposure I like, and then the shot with flash. In that sequence, there is one image missing according to the numbers. I deleted it. Not sure why … most likely bad exposure or the model changed expression or something. The shot wasn’t useful even as a reference shot. Deleted.

    Aside from that image that is missing in the sequence, there is the entire flow. I got the correct exposure without skipping a beat. (I think.)

    Reply
  22. 22Rob Henry says

    August 30, 2011 at 9:59 am

    Hi Neil! Thank you so much for sharing so much of your knowledge and experience with the world and to those (me) who need real situations such as this to better understand the techniques needed to achieving the desired results.

    After you have manually determined your under-exposed ambient background exposure and you decide to use TTL flash for the subject, are you spot metering for the flash or using matrix for the camera to determine the correct flash exposure for the subject?

    I would love to see more posts on your techniques for the PW Flex triggers. For me, it has been hit and miss and for that reason, I am almost always using the manual setting on my PW Flex.

    Reply
  23. 23Neil vN says

    August 30, 2011 at 10:25 am

    Rob, I mostly just stay with Matrix / Evaluative metering on my cameras, even when using TTL flash. I allow the camera to determine correct flash exposure, and then if I disagree with it when I look at the camera’s preview image, I fine-tuned it with FEC.

    I’ll continue adding articles as I keep shooting. There is that compulsion. ; )

    Neil vN

    Reply
  24. 24Phill Adams says

    August 30, 2011 at 10:40 am

    Thanks as always for your post Neil. I am currently devouring both of your books in order to develop a more complete repertoire for my fledgling business and very much appreciate the insider tips that you gift us each week. Thank you.

    Neil, I have one techy question though to ask your opinion on; I have just bought the TT1 & TT5 combo and have only just noted the bad press they have with regards to being coupled with a 580exII. Do you have any bad experience with regards miss-firing or burnt out 580EXII flash guns using the PWs? I’m a little apprehensive about burning out my only gun on a wedding shoot using these beauties but am a little heartened to see that you use them also. Do you have any (TTL)light to shed on my dilemma?! Thanks in advance..

    I’m really

    Reply
  25. 25Neil vN says

    August 30, 2011 at 11:00 am

    Phill, the new PocketWizards have a hard time with the Canon 580 EX II because the speedlite emits so much radio-frequency noise. (It’s something that Canon silently fixed with the 430 EX II.) To overcome this, PocketWizard posted a lot of info on their site how to overcome this. I’ll also post something in the next few days regarding my experience with this.

    Neil vN

    Reply
  26. 26Minh Nguyen says

    August 30, 2011 at 11:50 am

    Hi Neil, how far away was your flash and what zoom setting did you set your flash at? Can you control the zoom setting from your camera with the PWs or do you have to manually adjust zoom on your flash head? Did you set any EV Comp with your ETTL setup? Thanks Neil!

    Reply
  27. 27Neil vN says

    August 31, 2011 at 5:31 am

    Minh … you know, I did actually prep a pull-back image to post here, but somehow neglected to insert it into the article at the time. I’ve done so now. It will give you more of a visual clue where I placed the softbox.

    I keep the flash zoomed to around 35mm when in the double-baffled softbox. And no, you can’t control the zoom from the camera.

    As mentioned in the article, I didn’t record whether I had FEC set for my flash here.

    Neil vN

    Reply
  28. 28Rob Henry says

    August 31, 2011 at 6:41 am

    Thanks Neil! BTW, when I do buy my gear from B&H, I usually use the links from this site. One of those purchases was on Monday for the B+W 77mm #103 Neutral Density (ND) 0.9 Filter. That should arrive today and I will use it as per your post with flash in bright conditions. I’m anxious to see the results. Thanks again, Neil!!

    Reply
  29. 29William says

    August 3, 2012 at 4:15 am

    hi, Neil, sorry for posting on a old , post, i hope u reply me haha.. i just started investing in cheap softboxes along my 580exII… trying to work out the settings , mind telling me how u set up your flash after u got the exposure u want?

    what zoom range u set, did u pull the wide angle flipper down? whats the initial power to start experiment with ?or is there a way to calculate the light needed based on the last exposure shot?

    Reply
  30. 30Neil vN says

    August 3, 2012 at 11:14 am

    William,

    I set the flash to 35mm or 28mm zoom setting. No diffuser necessary since that is the task of the softbox, and the softbox does it so much better.

    Initial power … you’re guided by previous testing and shooting.
    Manual flash exposure is consistent = aperture / ISO / distance / power (incl diffusion) …

    So those 4 factors influence manual flash exposure. If you’re used to working with the flash at a certain distance, and getting certain results, then you more or less have your settings.

    You can calculate this with a lightmeter or with the histogram method, or just look at your camera’s preview.

    Neil vN

    Reply

Leave a Reply to Neil vN Cancel reply

Your email address will not be published. Required fields are marked *

categories

Articles & Tutorials

  • • About myself & this site
    • Books by Neil vN
    • Best photography books
    • Black foamie thing
    • Photographers’ success stories
  • • Flash Photography Techniques
    • Natural looking flash
    • Flash + Ambient light
    • Dragging the shutter
    • Bouncing your flash
    • On-camera flash outdoors
    • Exposure metering
    • Flash exposure compensation
    • Bounce flash examples
    • Which is the best flashgun?
    • Flash brackets
    • Off-camera flash photography
    • Flash photography basics
    • Using video lights
    • Flash photography tips
  • • Photography workshops NJ / NYC
    • Models @ photography workshops
tutorials:
flash photography
Photography
Workshops

All rights reserved. Copyright © Neil van Niekerk 2025 · Customization by The Traveling Designer

Copyright © 2025 · NvN on Genesis Framework · WordPress · Log in