
Photo shoot: On-location lighting problem solving (with Profoto)
When I photograph on location, many of my decisions on the technical stuff like camera settings and lighting, are based on common sense algorithms. Max flash sync speed, choice of aperture, and direction of light. That forms the basis of decisions, but just as often we, as photographers, have to adapt and go into problem-solving mode. Here’s an example during a photo shoot where I had to come up with a different way of using my off-camera lights.
It was a big deal for me when I was asked by the management of Home Free, an a cappella Country group, to do a series of promotional photos of the group. I flew out to Minneapolis to meet up with them there.
One of the locations we shot in, was this large event space which had this metallic wall. This was a tough location because the metal wall easily reflected the flash … yet, I wanted to have the lighting look as natural as possible – as if it were all found light. This was a bit of a challenge.
I had two Profoto B1 flashes (B&H / Amazon) with me. Powerful workhorse flashes that I’ve come to rely on. With 500 Ws they deliver a fair amount of power, yet they are compact enough to travel with. I also had a bunch of light modifiers with me – umbrellas, sofboxes, gels and grids. I had to pack enough gear to be able to meet any challenge, but not kill it with overweight fees with the airline. A delicate balance.
I’d like to step you through how I lit this scene above. In the end, it was a fairly simple lighting setup, but it took several steps to come up with it:

While everyone was setting up the scene, I tried various setups with the two Profoto lights. But no matter what I did, there were these large hotspots of light that revealed the flash.
The room was L-shaped. I even tried to use the two Profotos with white shoot-through umbrellas, hidden around the corner so that they just spill a lot of indirect light into the main part of the room. But the light from the flash lit up the wall opposite the metallic wall … and created a large flash hot-spot.
I scurried around to try and make this work, and the manager of the group said to me that they don’t have to use that wall if it isn’t possible. But I wasn’t willing to let go of this yet. Maybe a bit of pride, but mostly because this would be such a good setting for the group. I worked fast, and didn’t delay the shoot – by the time they were set up and ready, I had come up with a solution!
Since we didn’t have enough ambient light streaming through the windows on this rainy day, I thought that I could mimic this by bouncing flash onto the walls and windows. Regular followers of the Tangents blog will know exactly how I bounced the flash … you bounce flash into the direction that you want the light to come from. And that’s what I did – I bounced my flash off the windows and walls where I wanted the light to come from.
The Profoto B1, even with the flat front of the flash, spreads the light very wide – too wide for what I wanted to do here. Fortunately, I also brought along two sets of the Profoto OCF grids (B&H / Amazon). With these I could contain the spread of light to exactly what I needed here.
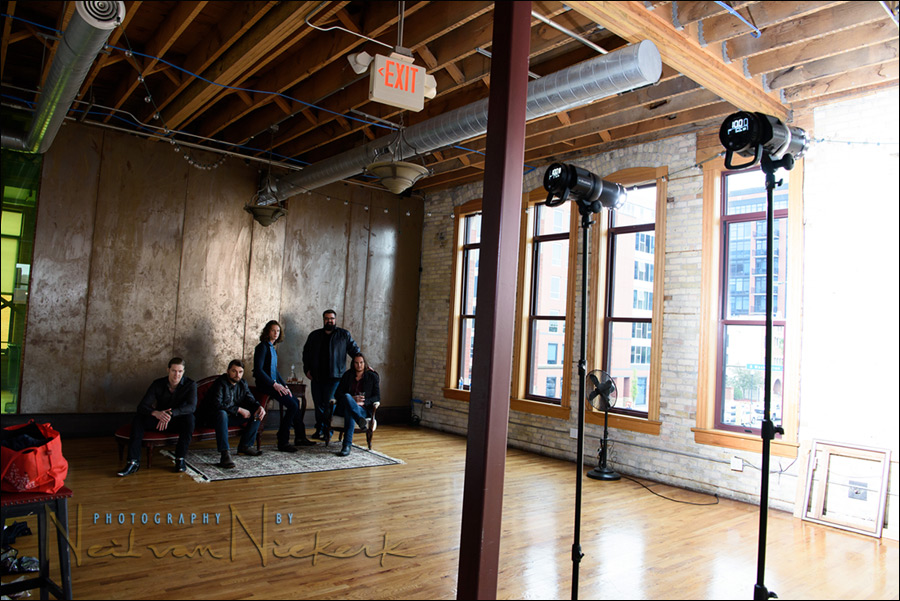
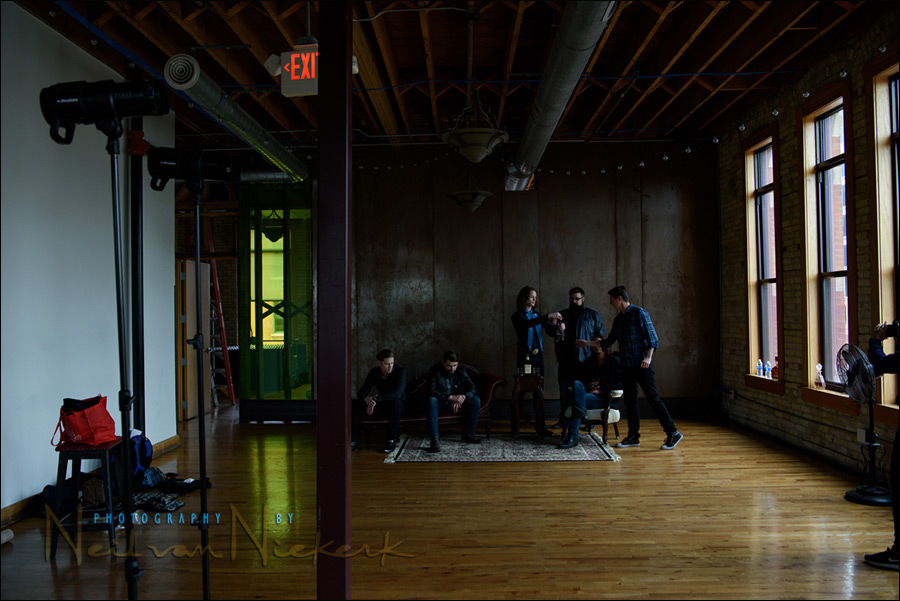

The four photos above show the positioning of the lights, and the available light at the chosen camera settings. I wanted some of the available light to still register …. and I was also at the extreme end of what the two Profoto B1 flashes could deliver here, so the camera settings were: 1/50 @ f/5.6 @ 1250 ISO
The stabilization of the Nikon 24-70mm f/2.8E VR (B&H / Amazon), allowed me to move around a bit and shoot from different angles and different height.
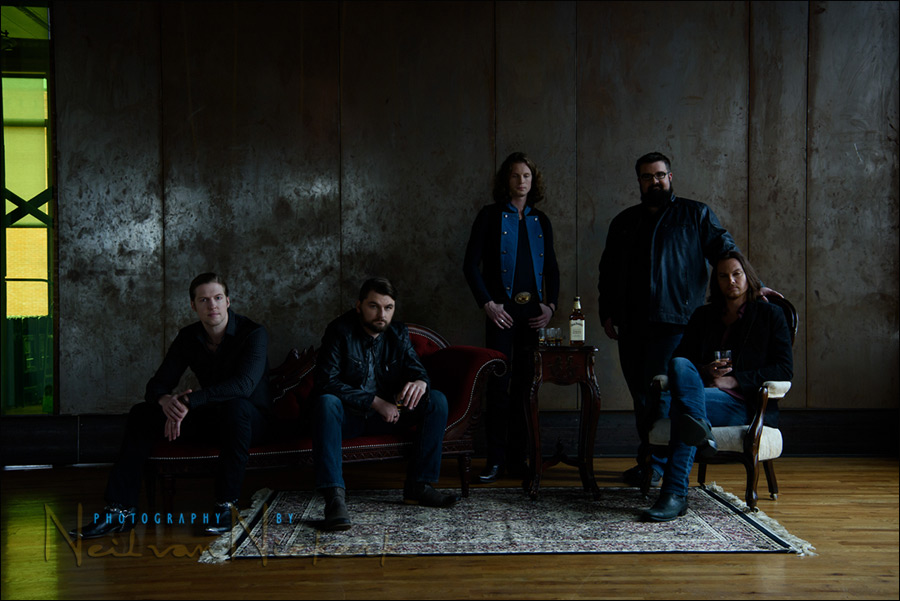
In the end I was really happy with the results – it looks natural enough to not reveal that flash was used. A slight bonus is the way the flash is reflected from the windows, creating patterns. The main photo at the top, and this wider image, are both straight out of camera – meaning that the few hot spots there could still be diminished in post-production if needed.
Photo gear (or equivalents) used during this part of the photo shoot
- Camera settings: 1/50 @ f/5.6 @ 1250 ISO
- Nikon D810
- Nikon 24-70mm f/2.8E VR /equivalent Canon 24-70mm f/2.8L II
- (2x) Profoto B1 TTL flash (B&H / Amazon)
- (2x) Profoto OCF grids (B&H / Amazon).
Related articles
- Lighting an on-location Fashion shoot
- Dramatic portraits of kids – Lighting and intent
- Lighting an on-location photo session – Home Free
- Photographing a vintage motorbike on location with Profoto lighting
Great problem solving! Well done.
Thanks Neil, this helps as I’ve had similar problems. I like your solution for the positioning of the B1’s. I’ve just got the OCF grids for my B2 heads, as controlling light spill will definitely improve my images in camera.
Flashes on TTL or Manual Neil?
Full manual power for both flashes.
Thanks Neil!
Looks great. Very much like available light.
Neil, could you explain any further how you determined you needed the OCF grids to contain the spread of light? Did you just know from experience that this would be better or did you fire the flashes and see that the light was too all-over-the-place? Did you look at the back of camera to see how the light fell? How would the picture have been different if you hadn’t had the grids and had to do the same set-up without them? Or, how was the picture better because you used them? Thanks.
From this experience, I already knew how wide the B1 spreads the light. Therefore I had to add the grid.
I don’t have comparison photos.
Thanks Neil.
Thanks for the exposition. I guess you could not have achieved this with profoto B2s unless you had opened up your aperture by one or two stops?
With the two Profoto B1 flashes here, with the way I used them, the B2 would have been under-powered.
I’m already at the edge of what I would like my camera settings to be …
1/50 @ f/5.6 @ 1250 ISO
… so there isn’t much leeway.