
Photographing wedding portraits in bright sunlight
Hard sunlight overhead is some of the most difficult light that you can find yourself shooting in. When you aren’t able to position your subjects, then your options are limited – fill-flash or working with the RAW file in post-processing.
However, when you’re able to move your subjects, but don’t have the opportunity for off-camera lighting, then your best two options are:
– have your subjects turn their backs to the sun,
– use the light from the sun so that there are no harsh cross-shadows.
Here are typical examples of working with a bridal party in hard sunlight on the beach. With their backs to the sun, I had the bridal party walk towards the beach area. This way their faces and nearly every part of their dress are in open shade, lit mostly by the light reflected from the sky and sand. Open light. The sunlight will now be a kind of (irregular) rim light on them.
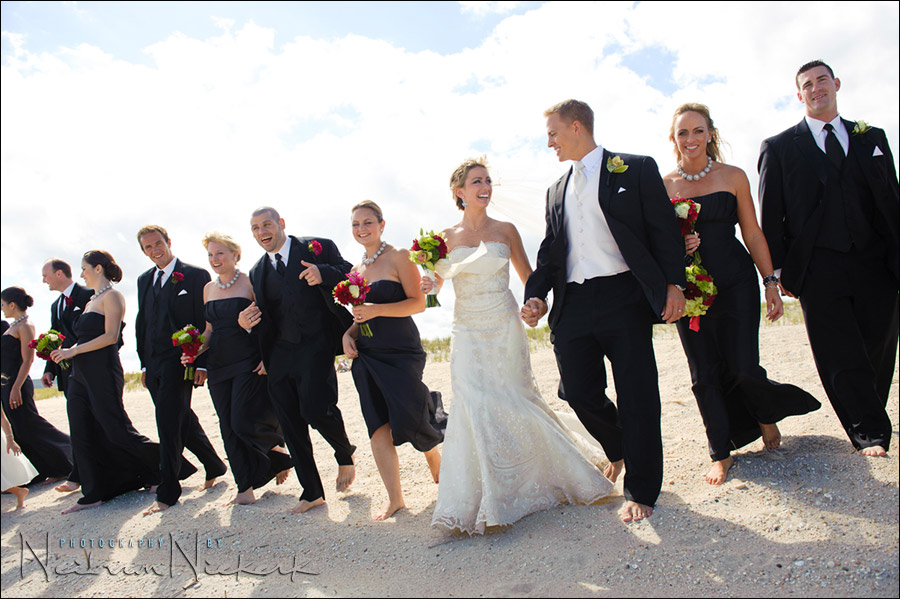


You will lose some detail, but this is inevitable with a shoot like this that isn’t entirely controlled. I’d rather go for the spontaneity and fun, than have a few photographs which are perfectly lit as if with on-location studio lights. Especially since that option isn’t entirely practical on a beach, especially with large group of people moving around. Fun & spontaneity!
Camera settings for the three images directly above:
1/400 @ f5.6 @ 200 ISO .. on-camera TTL fill-flash
The other option is to actually USE the full direct sun. The main problem here is that people would squint if they looked into the sun or at the camera. Their eyes would also be shrouded by the hard shadow. The only way around this (when off-camera flash isn’t an option), is hard direct flash … and this rarely looks flattering under these circumstances.
Here the bridal party wanted to jump. I set the Nikon D3 to continuous drive, firing it at the full 9 frames a second for three such jumps. Camera settings: 1/1000 @ f5.6 @ 200 ISO …. at this distance; and at 9 frames a second; and in HSS mode, the flash wouldn’t have had any effect. So, no flash.
With such a large group there really is no ‘Decisive Moment’, and machine-gunning it is the easiest way. Then on the Monday morning with your feet on the desk, having your cup of coffee, you can select the images which work. Here they wore sunglasses, so eyes in shade isn’t an issue. Even if they hadn’t worn sunglasses, this isn’t a concern at all, since photos like these are about movement and expression and gesture, rather it being a nuanced portrait.

For the portraits of the bride and groom – Bridget and Matt – I continued to work in full sun, but with a touch of fill-flash to lift the shadow detail. But I had the FEC turned down so that the flash would just be the subtlest of light to lift the contrast a bit. In posing them, I make sure that they don’t have to squint into the sun. That’s never attractive. I also posed them such that the light on them is as even as possible.
Camera settings for the next two images, and the photo at the top leading this article:
1/4000 @ f5 @ 200 ISO .. with a hint of on-camera TTL fill-flash


The image above and the image below were taken within minutes of each other, at very close to the same spot. They show how the two approaches described here – working with the full sun; and posting the couple with their backs against the sun.

And then a few steps up the wooden ramp, we found some shade, and took a few portraits with them looking at the camera.
Camera settings:
image above: 1/1000 @ f4 @ 200 ISO .. subtle on-camera TTL fill-flash
image below: 1/250 @ f5.6 @ 400 ISO .. subtle on-camera TTL fill-flash

This approach also works for group photographs. The sun was getting to be quite low here, and if I had shot at 90 degrees to the sun, I would’ve had to deal with very harsh shadows. If I had shot with the sun, everyone would’ve squinted with tears in their eyes from the bright sun. Having the sun behind their back is the only really practical solution. Then of course, there was the low wall handy to help stagger the group. Some detail will be lost to flare where some guests are throwing their hands in the air. (Nice rhyme!) But this is acceptable to me .. especially when a photo like this is once again more about the fun and the ‘having been there for the photo’ element for the guests.

Hopefully the images here will clearly show the way that I deal with bright sun. It is a simple approach, but it usually gives the best results when you are strapped for time, and don’t have the opportunity for grander off-camera lighting setups. This approach works, and it is efficient!
Also check out this previous post about an engagement photo session where I only used the available light. No flash. The technique remains consistent.
Equipment used during this photo session
Related articles
Neil,
Thank you so much for your teachings. I’ve been following your site over the past year learning, and re-learning photography. You’ve insprired me to step out of the box, and become far more creative – thanks!
I have a wedding next weekend at sunset. I will be taking a group shot of 20+ at the end of a peer during sunset in NC (around 1830). The group will face North. I have the option of using two off camera speedlites triggered via RF, or my on camera 580EX II. Any suggestion you have is greatly appreciated.
Tony Wooten
Neil,
Excellent advice! And what’s more: this is useful for the Joe Average Photographer (like me)…
Most of my pics are from my kids during outdoor activities, sports, etc. But I’m often faced with the same situation: harsh light during the day. The result is often: ok background in combination with (too) dark faces.
I should ride the Exposure Compensation more often, I guess… (sorry, no manual mode for me as my kids run faster from sun to shade than I re-set my exposure)
Met beste groeten,
Roel
Hi Neil
A very interesting, useful and practical read above. One question if I can, when you mention a hint of subtle TTL fill flash on camera, is this ‘bare’ unmodified straight flash?
Thanks
Nigel
Neil
Why 200ISO for such a bright situation? I would of thought ISO100 would of been perfect, you didnt need to worry about ss
I think 200 is D3’s native ISO. Selecting ISO 100 when 200 is the native ISO would cause problems with dynamic range; especially in a sunny situation like this. I guess that may be the reason.. :)
Neil,
I am glad you posted this wedding to the blog. I was already admiring the images on facebook. I think you handled this perfectly and now reading the details about what you did with the shots provides some inspiration to not worry as much about trying to do stuff you don’t always have time for on wedding day (like big lights). I like these so much, I wish they were photos from my wedding :)
Hi Neil,
Thanks for posting this article as a follow-up to your last “in bright sunlight” article from 2008. I forgot about that article (which also was in your book).
Neil, Beautiful work. Now if only I had the opportunity to photograph a beach wedding here in England … were you sans shoes as well? I know the advice is transferrable to any location so thanks for that – we just need to rediscover the sun!
Hi Neil,
I have been waiting for this topic. Thanks mucho for going into it in some detail. It is very much appreciated.
Best wishes, Peter, Spain
Neil,
As always, great photos and very clearly explained technique. Just one question about TTL FEC: How do you know if you’ve hit the lower limit of the flash power? If you dialed it down as far as it would let you, the flash may still be too bright and overexpose the photo. It this just a judgement call based on blinking highlights on your screen? Would you then crank the aperture smaller and try again?
Thanks
Lee
Neil:
GREAT article as always! I deal with this situation constantly as I live in Florida. One question, you synced your flash on all of these shots on HSS? – even at 1/4000sec? I wonder if there is a limit or threshhold or if all systems are able to sync at such high shutter speeds – I have never tried it (at least not so high).
Thanks for sharing – your work is so inspiring!
Suse
Great shots! It’s nice to have the fill light from the sand – not so easy in a more typical setting when it’s grass. (not so many beaches here in Colorado, but snow will do an even better job!)
Neil
I am a big fan of your BFT technique. I understand the fill flash using FEC. My Question is how did you Use Shutter speeds such as 1/400, 1/500, 1/1000, when Max sync speed is 1/250. If you did not use FP mode. It does not say this Which might confuse some folks?
Great stuff as usual, Neil — bright sunlight, welcome to my world.
Neil,
Which is better when taking photos of backlit subjects : Increasing exposure compensation or dialled down fill in flash?
When all else fails, ride the Fill Light slide in Lightroom. =) Saved my bacon this weekend shooting a street fair at high noon.
Hi Neil, how do you know what your FEC settings were once you’ve downloaded your images into the RAW converter of your choice? I shoot Nikon, but Lightroom is only showing me what the camera EC setting is, not the FEC. I took a good number of test shoots in a park this morning only to find I couldn’t find qualitative data for the comparisons (the FEC settings between images). I googled EXIF, but didn’t find a location for FEC, only EC.
Hi Neil, loved your book and website over the last year. I want to thank you for all the insight you have shared. I did have a question about shooting in midday sun though. Do you gel you flash in these midday situations? I know that the native flash is around 5000k but thought about adding maybe a 1/4 CTO gel.
Hi Neil
I have been using Nikon TTL flash (mainly off-camera)with camera in manual for around 2 years now, and due solely to the frustration of inconsistency in the flash firing/not firing and exposure issues, I have recently reverted back to manual flash, using a cheap but incredibly reliable ebay style radio trigger.
In previous posts you rightly suggest picking a system and sticking to it in order to gain the experience and knowledge to predict the results. With that in mind I am in the process of ‘learning’ aperture to flash power settings for a given distance. My question is, in this situation, would it be fair to say that 2 stops below the given aperture to flash power setting for ‘correct’ exposure would be about right for a touch of fill?
Thanks
Nigel
Hi Neil!
Once again a very helpful write-up! I have one question though, do you ever use filters — like a CPL? I noticed on the opening photo where the blue colors are retained despite of the harsh sun OR you exposed for the background and controlled your flash output for the couple?
Thank you again for your tips. I’m really learning a lot.
Angelo
beautiful pictures.
im wondering what would the couple image(on the beach) be without the fill flash
thanx for sharing
Thank you Neil for your reply. Now that makes me wanna go out and shoot and try this for myself.
More power to you, Neil.
Thanks a bunch!
Angelo
Hi Neil,
Thats an excellent write up. Wondering if you have done any thing different if the group were different skin tones (darker).
I try to take my kids pics at the beach while playing.. And I am struggling to get their faces lit against the sun with my SB 600. I try to stay with in my D90’s HSS but then have to go down around f11 / f16
Simply turning the couple sideways so that that they are evenly lit is such a simple way to grab some images in full sun. Thanks again Neil.
Hi Neil,
when photographing your weddings, do you always meter of the brides dress no matter what the situation? indoor/outdoor? thank you!
thank you Neil! this type of shooting situation sometimes happens to be very tricky and it makes me wonder, how to solve it. So I always appreciate the good points and advices, which help me understand better how to take advantrage of that harsh light.
also- going back to your newest newsletter: congrats on the book publishing in Poland!!! I just moved here and will be looking for it in bookstores!
:)
I continue to be AMAZED at the quality of information you provide to us regular folk.
Thank you!!!!!
Another excellent article, thank you !
Thank, thank you, you are my savior. I’ve mentioned in some of your other posts about doing a beach wedding after Labor Day on NC. Its at 11AM! Let’s just call it High Noon. I have struggled with planning, especially since I can’t get there until the day before. (I will be there by 10AM and plan on grabbing the groom and some of the wedding party to see how the light goes.)
My only regret about your site is I wished I had started reading it when I first heard about it about a year or so ago. I like the way you admit some shots (like the last shot above late in the evening) just aren’t going to be perfect; capture the emotion and don’t turn it into an engineering (physics) exercise.
Thank you again. This doesn’t solve everything but it takes care of an awful lot!
There is an old saying: “Misery loves miserable company”.
We all say: “Where is the shade to shoot the wedding photos”?
I was faced with this problem on 8 August 2011 at 12:00 noon. Not a drop of shade on the site. Beautiful site layout but no shade any where. Lucky for us, we had the off camera Quantum T5D for fill flash. I positioned the people according to the best leading lines in the area and shot away. The bride was very pleased.
To see you also are having this problem and we both did the same techniques, makes my heart feel good.
One photographer had an idea of shooting at noon, place the couple with the sun behind them and with a dark background (the trick is to find this location). He then used a 200 mm and shot away. Worked great.
I feel like printing your lens flare and having it to show my customers that even the “greats” have difficulties under these conditions.
thanks Neil for sharing, not only the good but the difficult ones as well.
Hi Neil a very interesting and informative article. Over here in the UK and especially in the winter we have a lot of low sun and like you suggest I usually shoot in to it when doing large group shots. Most of pictures end up pretty much like your final picture and to be honest I have at times been a bit dissapointed thinking there must be a better way to do it. it’s therefore been reassuring to know thats just how they are going to look, whoever takes them. Many thanks.
I’m so happy I found this blog – it’s an inspiration to me. This article in particular since, having managed to avoid weddings for 3 years I find myself booked to do 3 in the next 4 weeks from people who either know me or like my style… and one is in Crete and I just know that the sun is going to be shining strongly there at this time of the year!! I’m from the UK so we’re not so used to dealing with it – I usually find myself pushing the D700 in dim light rather than the other way round.
I love your style and it’s something I hope that even if I can even slightly emulate some of the natural look of these I’d be ecstatic.
I also realised that the book cover for your On camera flash techniques book was familiar and I realised that it’s been in my Amazon wishlist hoping for a Christmas purchase since Nov 2009…LOL I have rectified that right now and added it to my basket.
So thanks very much for the inspiration!
Hi Neil Love your work i have been trying your style .but i have one problem the picture you have of the bride and groom where you shoot at 4000@ 5f ISO.200 with a hint of ttl how did you manage that i set my camera to the same setting in manual what i got was 250 f5 200 with flash which wash out the picture .so plese how do i get around this even when i set the flash in manual it still the same result
kind regards
denzil
Neil,
You’re right, working in direct sunlight is the hardest challenge in wedding photography. I use the D700 and SB900, to get me out of jail in situations like this… and sometimes a couple of SB600s off camera (held by assistants when possible). I think having to work in an open space at midday, all in direct sunlight can put the fear of God into even the most experienced pros!
Hence me having a look around to see what others are doing!
You can see some of my images (all shot with a D700 (perfect for weddings) here:
No one’s managed to block the sun out yet!
Exactly the info that I have been looking for. Very helpful! Thanks – and same goes to David Tong (kind of indirectly led me to find your site and check out what’s going on).
Great article, I always look forward to this moment “Then on the Monday morning with your feet on the desk, having your cup of coffee, you can select the images which work”
Hi – thanks for this article it’s really useful and your pictures are lovely. I am photographing a friends wedding in three week’s time and the challenge I have is their ceremony takes place at a window whilst the sun shall be in full glory behind them! I have already managed expectations with them and explained the shots will be tricky. What advice would you have for me? Many thanks
Mads … this is where you either accept the background will blow out, or you can use off-camera flashes set up towards the back that will help lift the exposure for the interior.
Hi Neil,
So helpful. And gorgeous work. For the shots above, what kind of metering mode did you use?
Thanks!
I use Matrix / Evaluative metering most of the time.
However, I do meter selectively.
In that way it is more about the technique of exposure metering and the thought-process, than a specific metering mode.
Go through these two tutorials and see if it clicks for you.
– Which exposure metering mode to use
– exposure metering for the bride’s dress
The wedding ceremony I have is at 4:00 in the afternoon. The position of the sun is to the side of the face. It is hard, bright light. It gives a split lighting effect. No flash will be used during the ceremony. I am using AV mode, evaluative metering with -1exposure compensation to prevent blowout of the gown and skin. Do you have any other suggestions? I have done everything I know but the lighting is awful. This the only part of the wedding that is stressing me. Please help with any suggestions. Thank you very much!
Hey would you mind sharing some of your wedding photos from this location? Would be interesting to see the results.
Great article! Just one question. Why, when having a 2.8 lens, didn’t you use a bigger aperture not even in portrait close ups? Wouldn’t it look nicer getting a little bit more dof?
What great advices and walk through! very helpful