recap: Photography workshop – Brighton, UK (2009)
I must say I am pretty amazed myself at being able to come to the UK to present workshops, and that there was such interest in having me come over. So here we are .. the first workshop just took place, and it was in Brighton, the well-known tourist and holiday resort. As usual, part of the program included working outdoors with softboxes and manual flash .. and for this we went down to the colourful promenade.
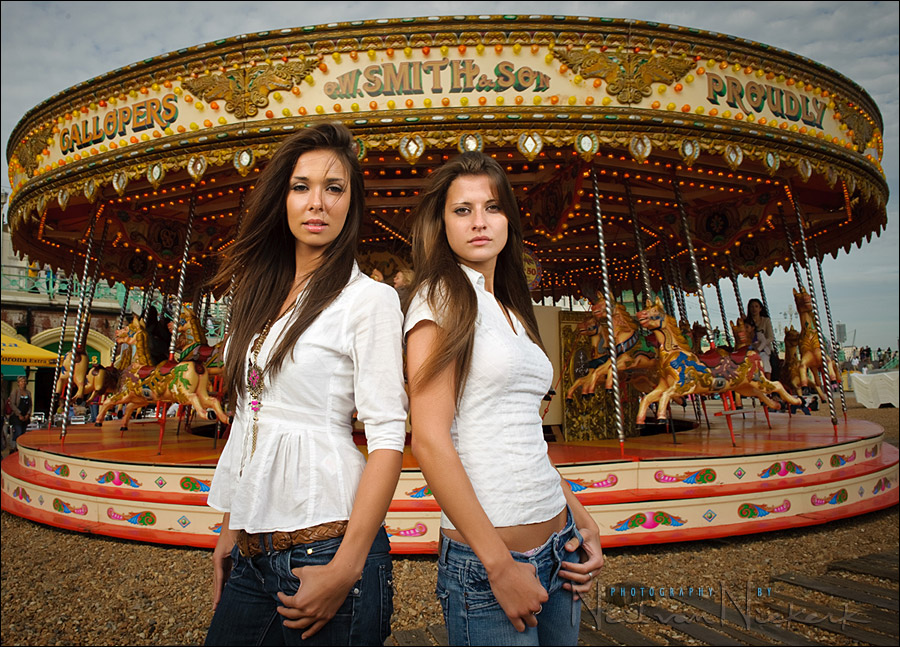
The image above has our two models, Amy and Francesca, at the merry-go-round on the promenade. Some technical info about that photo:
The two models were lit with flash, using two softboxes with an SB-900 each, with the speedlight set to manual. The softboxes were held up on either side of the camera at about 30′ off from me, at equal distance to each model.
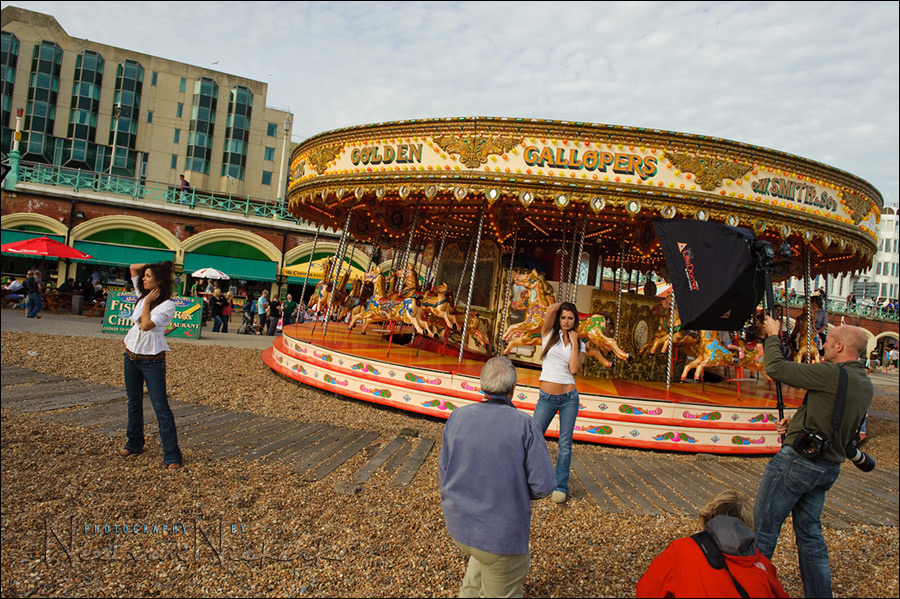
The camera was set to 1/250th @ f11 @ 200 ISO .. and as you can see from the following image, that underexposed the ambient by about a stop.

Then we used the flash to pick up the slack on the exposure, and thereby have the two models stand out from the background. The speedlights were set to give us f11 at the particular distance the softbox was positioned in relation to each model.
Back to some basics:
Manual flash exposure is controlled by aperture, ISO, flash power setting, and distance from the light source to the subject. In this case aperture and ISO are determined for us by the ambient light. That just leaves us having to find a combination of distance and power so we can get correct exposure on our models for our chosen aperture.
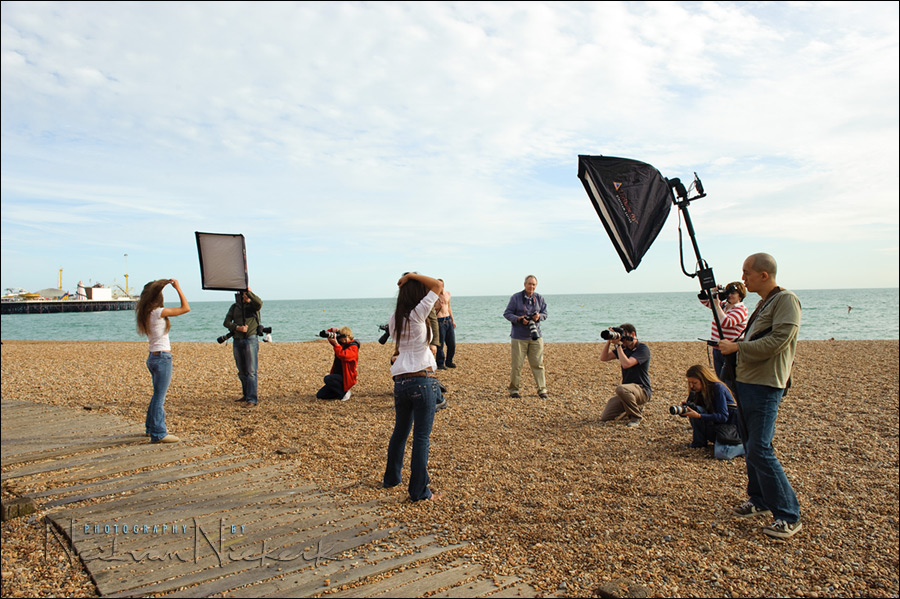
Two more photos to show everyone during the photo session on the beach ..
Thank you to everyone who attended, and thank you to our two models who helped make the day!
Photography workshops
- More info about upcoming photography workshops.
- Recap of previous photography workshops.
Catherine wrote a very nice review of the workshop on her blog.
I especially liked hearing this: “All I can say is that it was completely invaluable, Neil made everything so simple – it was almost like, really? Is that it? Wow!”
… because that’s the intention with the workshops. To have those aha! moments where things become easily grasp-able. (Is that even a word?)
Thanks Catherine!
Great workshop; definitely worth attending.
Glad your visit to Brighton was a success. You have a lot of followers here in the UK.
As a keen amateur I would have loved to have been able to attend as I have already learnt so much from your site, but sadly finances wouldn’t allow (I was recently made redundant).
I hope the weather held out for you lol!
Enjoy the rest of your vist to the UK and Ireland.
The workshop was a great experience, Neil: I learned a great deal from you, the models were great, and it was good to share experiences with the others and learn from them also. I will post a few pics on Flickr soon, and look forward to seeing yours and others also. It’s really interesting when shooting with other photographers to see how everyone has a slightly different take on the same subject.
Hi Neil,
Did you use your Sekonic light meter for this shoot (you used it at the workshop I attended in 2008)? It sounds like you just used the camera to meter the scene at your desired aperture, shutter, and ISO, and then adjusted flash power and distance until the exposure looked good.
Stephen, in this case we had metered for the flash at a previous set-up … but since we hadn’t changed the power setting, and kept to the same distance … I knew that I could shoot at those settings.
Neil,
To clarify, then you did use a Sekonic at some point in your workshop. In the photos above, you are saying that you set your flashes using a Sekonic in a prior set-up of the workshop, so you didn’t need to use them for the above shots. Correct?
Yes, we did use flashmeters to meter for manual flash.
Thanks for the reply. I think I got confused by “light meter” vs. “flash meter.” I looked up “flash meter” on google and came up with this link: using your flashgun’s guide number.
I had no idea that the strobes have a built-in meter similar to the way a Sekonic light meter works. This is handy when one is not carrying a light meter.
Stephen .. most people just talk about a flash-meter, instead of a light meter. Most modern light meters are also flash-meters. In other words, a flashmeter can measure flash and / or ambient light.
So I think it has become standard to just talk about a flashmeter. Or when someone mentions ‘light meter’, they are probably talking about a flashmeter being used just to measure available light.
I’m a little lost about what you mean when you say that strobes have a built-in meter?
Hi Neil,
I think this is my misunderstanding of photography terminology.
In your 2008 workshop, I only heard you used the word “lightmeter.” You demonstrated the usage of the Sekonic L-358. Thus, I became accustomed to associating “lightmeter” with “device that measures light.” So, if I go into a store and ask to buy a “lightmeter,” I would expect it to meter flash and ambient light.
For some reason, I never heard of “flashmeter” until you mentioned it in this blog entry. I became confused and thought “flashmeter” was something entirely different. It sounds like “lightmeter” and “flashmeter” are interchangeable these days.
As for my “strobes have a built-in meter” comment, according to the Strobist link I mentioned in my previous post, the article said, “on just about any hot-shoe strobe capable of manual, there’s a guide number calculator built in.” You dial in an aperture and ISO into the strobe (via the camera’s settings), and then change the manual flash power on the strobe until its flash-to-subject distance meter closely matches your actual flash-to-subject distance. That reminded me of the way you used your Sekonic in the workshop (you dialed in an ISO, took a shot, and the Sekonic gave you an aperture value), so I thought the strobe had a built-in meter.
After re-reading the Strobist article, the strobe obviously doesn’t have a built-in meter. My mistake. The strobe is not metering off any light hitting it. Instead, the strobe has a calculator that indicates the flash-to-subject distance for a given ISO, aperture, and flash power. The Strobist article uses this calculator in a different manner (change the manual flash power until the strobe’s flash-to-subject distance meter closely matches your actual flash-to-subject distance).
Sorry about the confusion. I’m the one that is not current with the photographic terminology.
Yup .. since manual flash gives a consistent output, you can inter-relate the combination of aperture / ISO / distance / power .. to a figure called the guide number.
This makes it easy to compare flashguns as well in how powerful they are. But the moment you use any kind of light modifier such as a softbox / umbrella, or bounce your flash, then the Guide Number means very little in calculating the manual flash exposure.
Then a flash-meter comes in handy.
Hi Neil:
I have a practical question for an amateur like myself in regard to taking a good shot with regular flash that is attached on the hot shoe on my camera in almost the same setting.
So I am in open space like the above amusement park where you can not bounce the light of my flash to anything around me. There is off course no soft boxes and no deflector with me. To make the matter worse, it is at night. The subject is close to me about 2-3 meters away.
The ambient light of the amusement park consisted of lights of the marry-go-round and light from other rides and stands. Sky is totally dark already.
I metered the background (ambient) to get a good background exposure( adjust to high ISO, speed and apature), turn my flash on with PTTL mode, apply EV compensation to -2 ( the max minus EV), I point the flash about 45 degree upward facing the object, I got a terrible overexposed subject, with Ok background.
My question are:
1. how do you use your flash in this situation, do you point it out directly to the subject (since there is no wall around you?), do you use flash modifier like your black foamy thing or other? How Do you angle the flash?
2. My subject is not lit with any light around . How do I get a good exposure of the subject with good background. What did I do wrong? Is it possible that my flash is too powerful for the distance of my subject?
3. When I meter the ambient light with ISO 1250, F 4, my speed is only 1/30 to 1/15 sec, which is too slow (i get some blurr on the subject). Do I have to underexposed the ambient by 2-3 stop, to overcome the problem? what is the general rules to set the 3 variables (ISO, apature, speed) in this setting? If I meter according to the camera, I got terrible picture
your comment is certainly appreciated.
thanks
BTW, I learn a lot from your blog, you are amazing !!
Hi there Roy …
My answer(s) would still be very much as I had replied to you in this previous post – ambient exposure with TTL flash.
But to summarize some of the answers here again:
No, I would ideally not point my flash directly at them if my flash is my main source of light. It makes for ugly lighting. If you have no other option though (such as bouncing into a reflector, or something similar to give you off-camera lighting), then you have to accept that it will be what it will be.
I can’t use the black foamie thing in your scenario, since there is nothing to bounce the flash off. The piece of foam only has use in flagging the light from the flash.
There is no other way to angle the flash really in the scenario you describe, since there is nowhere to bounce the flash off. You might tilt the head up slightly so that the immediate foreground isn’t over-exposed.
It seems to me though, that you want me to give a different answer than is possible within the narrow constraints you describe.
As for why your flash over-exposed, I explained that already in the previous post.
Hi Neil,
Can’t believe I missed your visit to the UK, when are you planning another visit as I’d love to attend one of your courses.
Do you cover flash lighting in difficult indoor enviroments ie wood panelled rooms, low beamed ceilings etc, I seem to come across these a lot in the wedding work I do.
Thanks Helen
Hi Neil,
First, thanks for your great tips and for being so willing to share your techniques. Just a quick question…you said that these were shot at f11 through a 24×32 softbox, I’m guessing with the internal baffle attached. Is the SB900 really powerful enough to give f11 through a box?? Or is it because you used 2 boxes and each was kicking out f8?
Thanks.
Bill
Bill … the SB-900 wouldn’t be strong enough through the double baffle. We needed the two boxes.
If that hadn’t been successful, we could’ve removed one of the baffles .. and finally, accepted direct off-camera flash.
Many photographers get great result with a light-stick (ie, a speedlight on a monopod), but I will always try for a softbox first for the softer light.