
portrait session – Steinway pianist
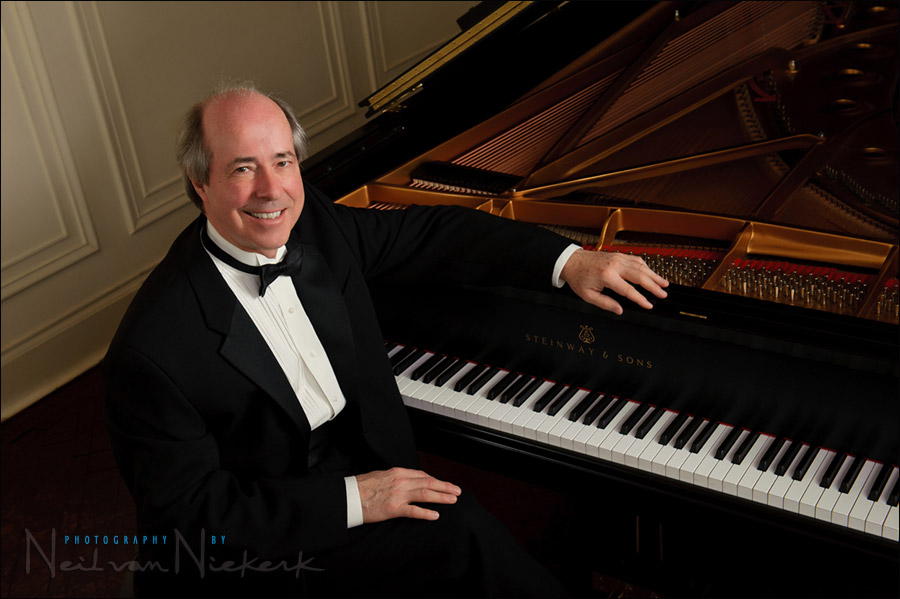
I had the opportunity recently of photographing Robert Wyatt, a pianist affiliated with Steinway, at the Steinway offices in New York. This photo was taken as we were set to leave after the photo session was already done. I was immediately drawn to the symmetry of the architecture and the lavish foyer below. The pose and framing was deliberately centered.
For this lighting setup, I quickly pulled out the Lastolite softbox again, and used it as a single light source. It was all that was needed for a simple portrait here. But earlier on, for the actual photo session with Robert, I used multiple off-camera speedlights and different light modifiers to get portraits with impact …
multiple flash setup, controlled by PocketWizard FlexTT5 units
Here are two of the set-ups, using three (Nikon SB-900) speedlights, each fired by PocketWizard FlexTT5 transceiver (B&H) – all controlled by a FlexTT5 and speedlight on my camera, acting as the master controller.
All flashes were set to manual output. With black surfaces – tuxedo & piano – being so predominant in the final composition of the portraits, TTL flash would’ve just made it more difficult. It had to be manually controlled flash. This is where the new PocketWizards made the shoot so much easier. I could control the power of each flash from the on-camera speedlight (via the on-camera FlexTT5). All without worrying about line-of-sight problems.
The pull-back shot here will explain the lighting set-up.
The light on the right-hand side here is a speedlight, bounced into the large room. This flash was there simply to lift the contrast. By pulling this speedlight’s power up and down, I could open up the shadows. Or not. I had this set as group C, and it was around 1/4 full power for most of the shoot, but I did vary it, taking it down to 1/8th power, and even up to full power for some photos.
The light on the left-hand side is a speedlight in a Lastolite EZYBOX Softbox Kit (24″x24″) (B&H). It was there to create a soft fill-light from the right-hand side. It was set to around 1/8th power, and at that distance. I controlled this as group B.

I wanted control the spill from my main light. It had to be soft, but still be concentrated on my subject. I wanted less light on my subject’s surroundings, than on my subject himself. An umbrella or a large softbox would’ve given to wide a swathe of light. To control the light, I used a gridded softbox. The softbox still gives soft light, but the grid will more narrowly direct the light. The specific light modifier here was the Creative Light 1×3′ Recessed Softbox (B&H) with the Creative Light 1×3′ Softgrid (B&H)
Changing the pose, but keeping the lighting setup fairly similar …

The edge of the gridded softbox can be seen in the top right of the frame, and could easily be cloned out. I decided not to, since I feel that small black triangle there helps with the composition, containing the geometric patterns within the frame.
Out of sight here to the right of the camera, is the speedlight that bounced light into the rest of the room to help control the contrast.

I chose to work with speedlights here (instead of the Quantum flashes or Profoto kit), because of how much control the new PocketWizard FlexTT5 allows me. Being able to change the power of each flash from my camera, made the shoot easier … and it makes me look so much more in control and cool in front of a client, when I’m not moving around, hurriedly adjusting my flashes’ individual outputs throughout the session.
more articles about off-camera flash …
equipment (or alternatives) used for this photo session
Nikon D3; Nikon 24-70mm f2.8G ED AF-S (B&H)
Nikon SB-910 Speedlight controlled by PocketWizard FlexTT5 Transceiver & AC3 Controller
or alternately, the Canon 600EX-RT Speedlite controlled by Canon ST-E3 Transmitter
Lastolite EZYBOX Softbox Kit (24″x24″) (B&H)
Creative Light 1×3′ Recessed Softbox (B&H);
with the Creative Light 1×3′ Softgrid (B&H)
connected with the Creative Light speedring (B&H)
Very informative article – speedlights do the job again!
Neil you said – it makes me look so much more in control and cool in front of a client, when I’m not moving around, hurriedly adjusting my flashes’ individual outputs throughout the session –
Have you ever considered that if you make it look too easy they might not want to pay you so much……!
Neil,
What a great implementation of the piano as a prop. I’ve tried to photograph a pianist before as if they were playing the piano and I never liked the way it works out. You either don’t see their hands or you have to shoot a profile from the side
The shot of him bending over the piano from the side is genius!
Cheers!
HI Neil,
Does that Creative Light softbox come with a speedlight mount? I clicked the link to the B&H listing, and the product doesn’t seem to come with a mount. I guess you were using this as the mount?
I guess it would be tacky to put a gelled flash INSIDE a steinway, huh?
Although, I get a feeling that if Joe McNally were around he wouldn’t hesitate ;)
BTW, I think you’ve sold me on the flex/mini thing. It’s pretty ridiculous to have to run around a room powering up and down the whole time.
Neil, do you have any shoots that would show how you manipulate contrast with the flash bounced off the wall?
Hi Neil,
Oops, silly me. I didn’t read all the way to the end of the article. Reading is fundamental!
Great shots. I’m really surprised that you didn’t get more specular highlights on the gold on the piano hinges. Did you do any post work on that? Plus, I’m guessing that you brought apretty good sized ladder for one shot. As usual, the difficult made to look very simple.
You love the flex zone stuff. Can’t all of the same stuff be done with Radio Poppers? Or, maybe can you use some in TTL and some in manual with the Pocketwizards? That’d be cool. Thanks again…
thx Neil, it would be nice to see how to you manipulate the contrast with flash
Long time reader but first time poster.
Very informative post (as always)!
I finally bit the bullet and got those new PW for myself as well. I actually use an SU-800 on the transceiver on the camera to control the output of the remotes. With the exception of the occasional head scratching glitch, the setup works pretty well.
I should not read this blog anymore …. makes me buy stuff all the time :)
Cheers!
Bogdan
Hi Neil,
could you please tell me what sort of Ezybox Hotshoe plate you use?
The normal Ezybox Hotshoe plate (2414)is a little bit to short ( especially the Rail of the Adapter)for to fit both, the SB 900 and the PW TT5 beneath!? :-(
Great Blog i read every new Post!!
Thx from Germany
Regards Frank
Frank,
I can only speak for the U.S., but the “LL LS2414” plate has been redesigned to fit both a SB-900 and a PocketWizard FlexTT5 unit. The shaft of the softbox ring has been made an inch longer. I had to buy a new “LL LS2414” part to replace the old part on my Ezybox. which had the shorter shaft.
Yes Neil, you’re right. It took me an afternoon to figure that out. And shutting down has to follow the same order :-). I also find powering the remotes first helps reliability as well. There’s still the occasional glitch here and there, they are not as bulletproof as the old ones yet.
I’ll write about them a bit in my “opinion” blog as well shortly ( after I test how well they work with older flashes, in manual of course)
Thanks for your reply!
Cheers!
Bogdan
Great post as always, Neil — thanks!
Quick question: Is there a specific reason you chose to use an on-camera flash to control the power of the remote flashes, as opposed to the PW Zone Controller?
But the AF assist is a bit high, right? I wonder if it is a way to “tilt” my SU-800 forward so the pattern goes back where it should be…
Kind of re-aiming the guns on an old WW2 aircraft for convergence :-)
Hi Neil,
How many photos did you end up taking and how many did you use?
Great article once again!
Beautiful shots! Thanks for the pull back shots. It’s always nice to visually see the set up.