Tangents

photography tutorials, reviews & workshops

tangents photography blog
learn : discuss : share
subscribe today
  • Tangents
  • Tutorials
    • Flash Photography
    • Wedding Photography
    • Studio Photography
    • Posing People
    • Understanding Your Camera
    • Exposure metering
    • BFT
    • Best Photo Books
  • Workshops
    • Info: Workshops
    • In-person
      tutoring sessions
    • Online
      tutoring sessions
    • Video tutorials
    • Workshops in
      New Jersey (NJ)
    • Workshops in
      New York (NYC)
    • Studio Workshop
    • Workshop results
  • Books
    • On-Camera Flash (revised ed.)
    • Direction & Quality of Light
    • Off-Camera Flash Photography
    • Lighting & Design
    • On-Camera Flash (1st ed.)
  • Reviews
    • Nikon
    • Sony
    • Canon
    • Fuji
    • Profoto
    • lighting gear
  • Projects
    • Two Perspectives
    • B&W Infrared
    • Vintage lenses
    • Time-lapse photography
  • Info
    • About
    • Contact
    • My Photo Gear
    • Books by NvN
    • Newsletter
    • Join us on Facebook
    • Acclaim
    • Success Stories
    • Photoshop Actions
  • Forum

Reflector for portrait & headshot photography: Eyelighter

January 3, 2017 Neil vN 8 Comments

Reflector for portrait & headshot photography: Eyelighter

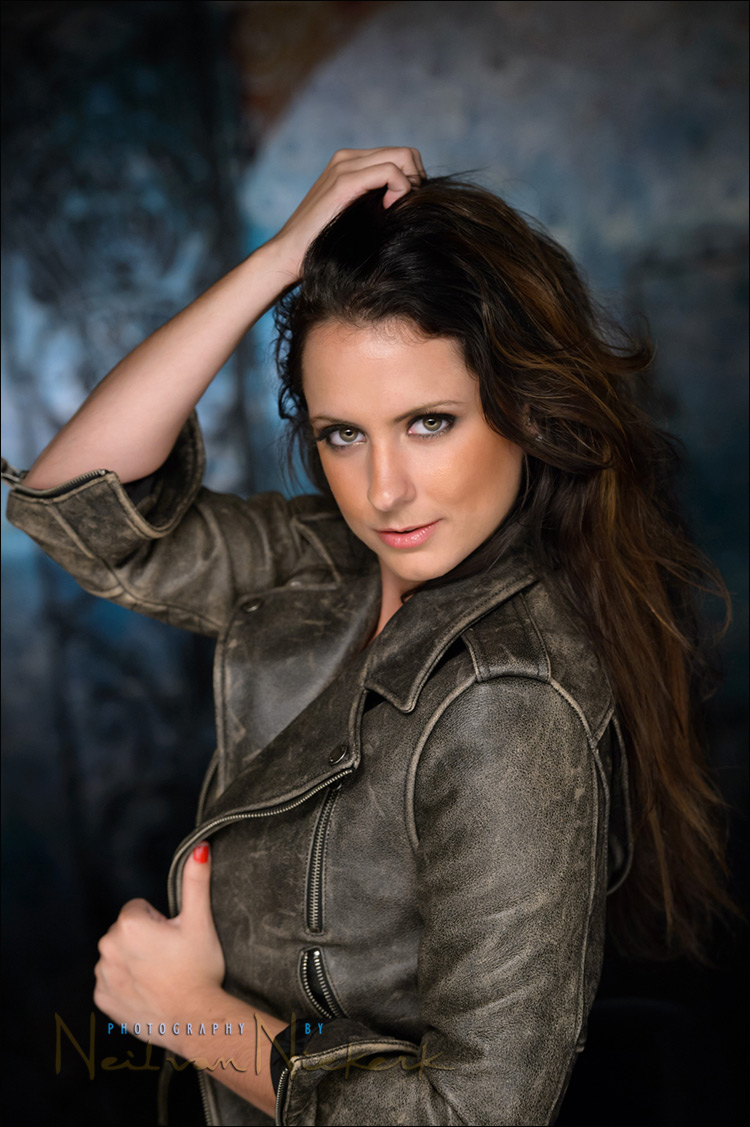
I’ve mentioned before how much I like using the Westcott Eyelighter for headshot photography. The first time I encountered the Eye-lighter (B&H / Amazon), was at the After Dark Edu photography conventions, and I was fascinated by this lighting device and the results it produced.

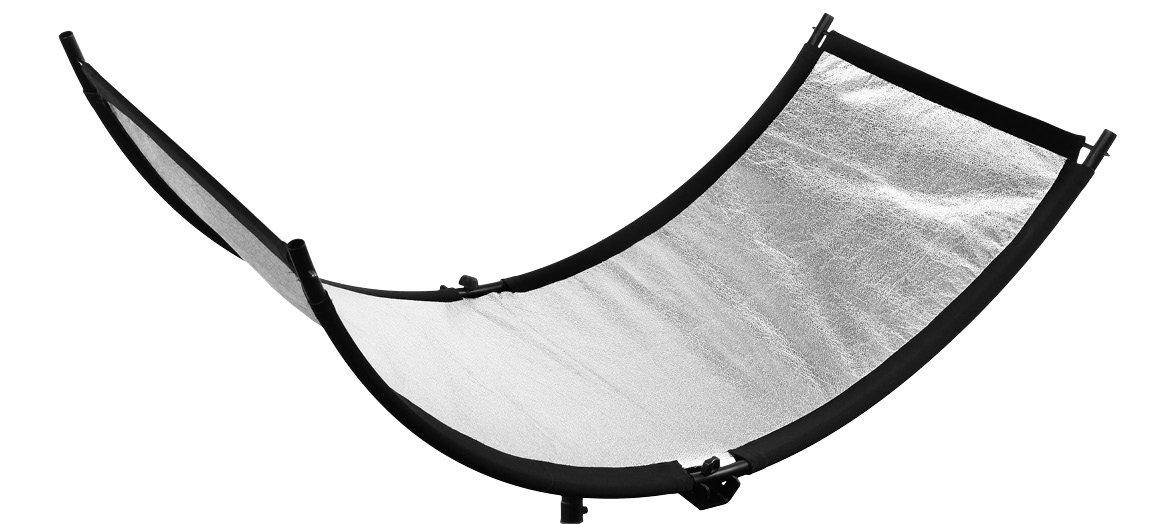
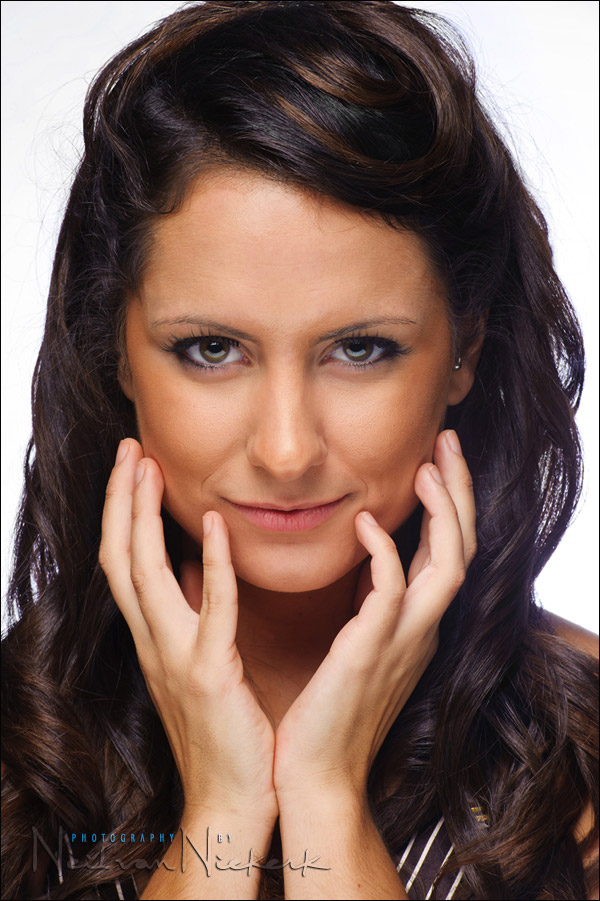
There is a distinctive curved high-light that it gives to the bottom part of your subject’s eyes. How much of a reflection, will depend on how you rotate and position the Eyelighter.


  • After Dark Edu  –  Charlotte, NC  –  May 2012

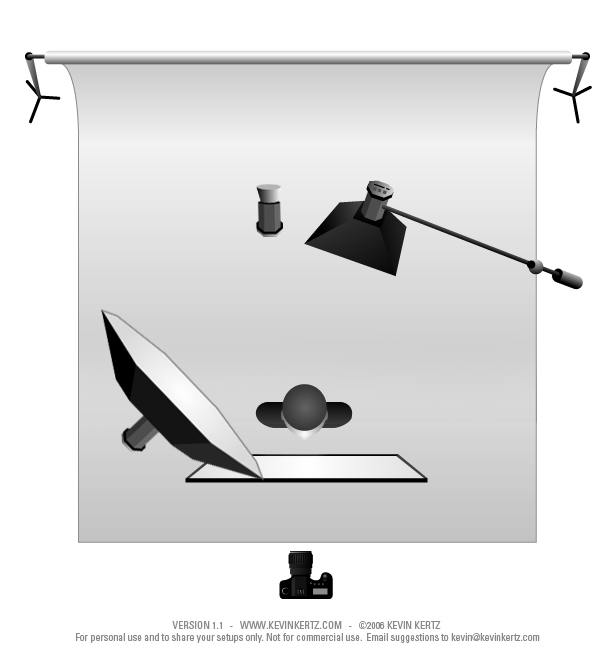
The lighting diagram: The main light is a large softbox to camera-left, with the Eyelighter, below our subject. Then there is the usual configuration of a (mild) backlight, and a light for the backdrop.

What makes this light modifier / reflector so versatile, is that you can swivel it around its axis where it is mounted on the light stand. You can have it parallel to your subject, or you can swivel either the right-hand side or left-hand side closer to give more modeling to your subject’s features. This article has examples of this: Westcott Eyelighter for headshot photography.


Also at one of the After Dark conventions, I photographed Madison with this setup. We added a beauty dish and an  Westcott eyelighter reflector (affiliate) , and a gridded softbox for a kicker light behind and to the side of her. Another light was for the background. Here’s the pull-back shot to show the lighting setup.

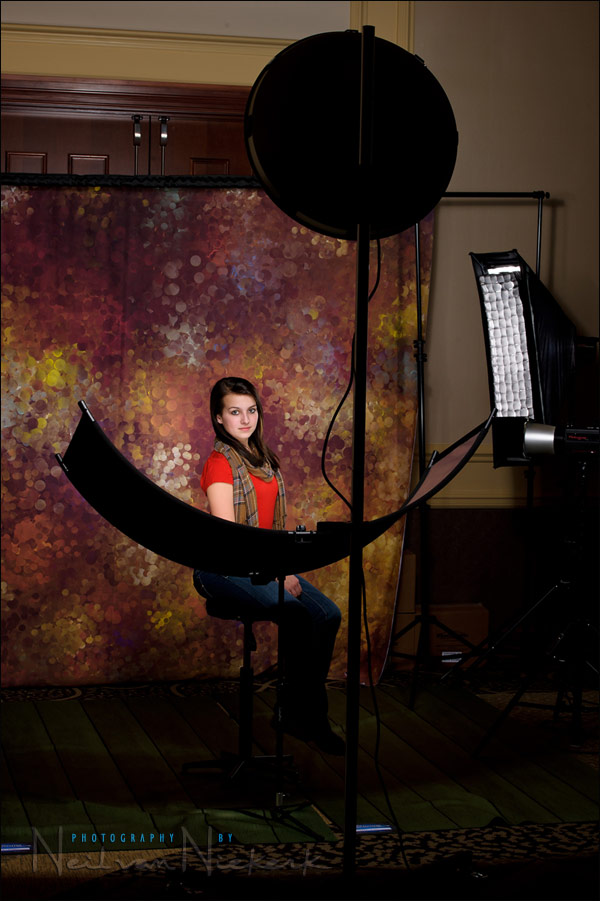
  • After Dark Edu  –  Dallas, TX  –  Feb 2012


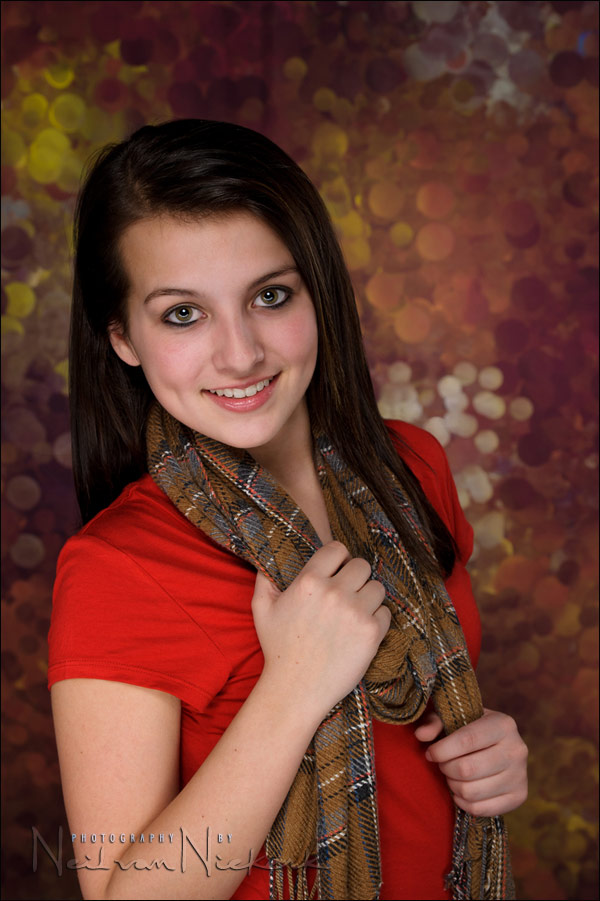
Another example, using clamshell lighting here – a large softbox in front and slightly above Megan, our gorgeous (and patient) model. The Eyelighter below her, acted as the fill-light.

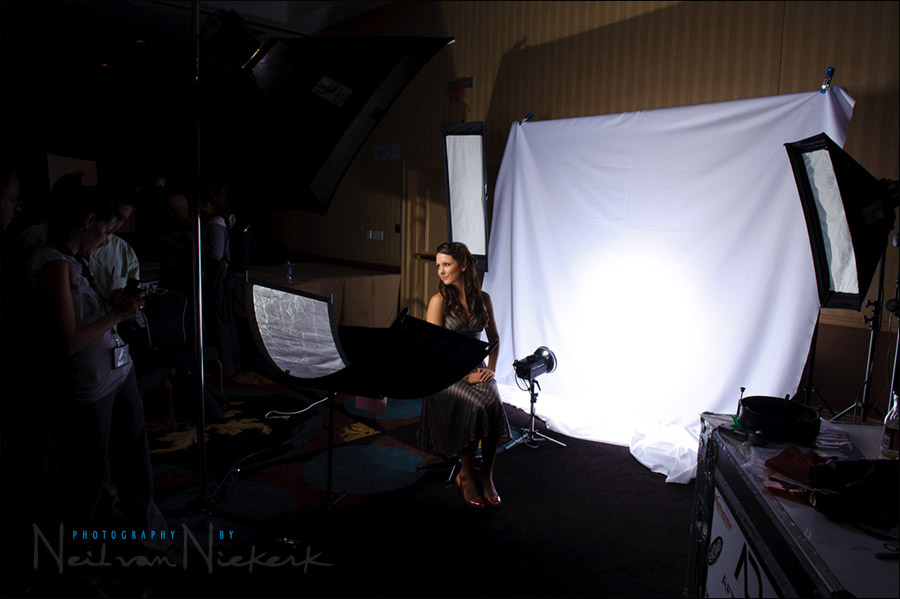
  • After Dark Edu  –  Charlotte, NC – Sept 2011


Related articles

  • Headshot photography: Studio lighting – Westcott Eyelighter
  • Headshot photography – Clam-shell lighting setup
  • Photo gear & logistics: Corporate headshots
  • Headshot photography lighting setup


Filed Under: After Dark Edu, equipment reviews: lighting gear Tagged With: studio lighting, studio lighting setup


Help support this website

If you find these articles of value, please help support this website by using these B&H and Amazon affiliate links to order your photo gear.

I also offer photography workshops and tutoring sessions, whether in person, or via online video tutoring sessions.

Stay informed via the monthly newsletter.

Please follow me on Instagram for more.

You can also join our thriving photo community in the Tangents group on Facebook, where we show our photos and discuss all things photography.

Thank you,

Neil vN

Books by Neil van Niekerk


8 Comments, Add Your Own

  1. 1Dustin says

    January 3, 2017 at 5:18 pm

    Hi Phil,

    I guess the Eyelighter only works with single person shootting and not group picture, correct?

    Thanks,

    -Dustin

    Reply
  2. 2Neil vN says

    January 3, 2017 at 5:24 pm

    Yeah, I think you’d have to do a really tight hugging portrait of two people if you wanted to use it with more than one person.

    Reply
  3. 3Johan Schmidt says

    January 4, 2017 at 4:56 am

    I think the effect is personal taste – when the eyes are bright, I like the effect, but when the eyes are dark, it looks a bit like an alien.

    Reply
  4. 4Ed Shum says

    January 9, 2017 at 8:54 am

    So in effect, this is basically like tri-fold reflector, but doesn’t have the joins, so the catch-light isn’t in 3-parts, so to speak?

    Reply
  5. 5Neil vN says

    January 9, 2017 at 11:47 am

    Essentially, but I think the Eyelighter will give a smoother continuous highlight.

    Reply
    • 5.1Ed Shum says

      January 10, 2017 at 8:59 am

      Thanks Neil, yes, I agree. I just wanted to make sure I wasn’t going insane – ha!

      Reply
  6. 6Reto Kohler Tamburini says

    September 20, 2017 at 3:03 am

    Dear Neil

    I am a long-time follower and big fan of your blog: as a small reward for what you so for all of us, I have also bought all your books – and will continue to do so!

    Short question: Don’t you think that with the channeled lighting of the eyelighter the bottom gets a little too bright and hence takes away the focus from the most important parts – the face?

    Thanks again for all you do – cheers from Switzerland, Reto

    Reply
  7. 7Neil vN says

    October 5, 2017 at 4:10 pm

    Reto … there is actually strong chance that the reflected light could be too strong. When I see that, I pull the reflector more towards me, away from my client.

    Also, Westcott offers a white material cover for the Eye-Lighter: (Amazon / B&H)
    This will lessen the specular nature of the reflector.

    Reply

Leave a Reply Cancel reply

Your email address will not be published. Required fields are marked *

categories

Articles & Tutorials

  • • About myself & this site
    • Books by Neil vN
    • Best photography books
    • Black foamie thing
    • Spinlight 360
    • Photographers’ success stories
    • email newsletter
  • • Flash Photography Techniques
    • Natural looking flash
    • Flash + Ambient light
    • Dragging the shutter
    • Bouncing your flash
    • On-camera flash outdoors
    • Exposure metering
    • Flash exposure compensation
    • Bounce flash examples
    • Which is the best flashgun?
    • Flash brackets
    • Off-camera flash photography
    • Flash photography basics
    • Using video lights
    • Flash photography tips
    • Photography books
  • • Photography workshops NJ / NYC
    • Models @ photography workshops
tutorials:
flash photography
Photography
Workshops

Recent Comments

  • Pat: Right up front, I’ll say I would NEVER buy a Sigma lens. That out of the way, and referring to these...
  • Stuard Santana: Poor Garret Shaw! he should know better, lol I got another one today with the same exact wording and...
  • Mohd Zamri Mohd Zan: In my country are even worst, most guest asking professional photographer to take their photo...
  • HenkW: Thanks for this review – one of the very few I could find on this most interesting topic. So, the...
  • Rachel Abi: Thank you so much for this guide!! There are some many options and you made this really clear :D

All rights reserved. Copyright © Neil van Niekerk 2023 · Customization by The Traveling Designer

Copyright © 2023 · NvN on Genesis Framework · WordPress · Log in