
Studio photography – Image projection effects for creative backgrounds
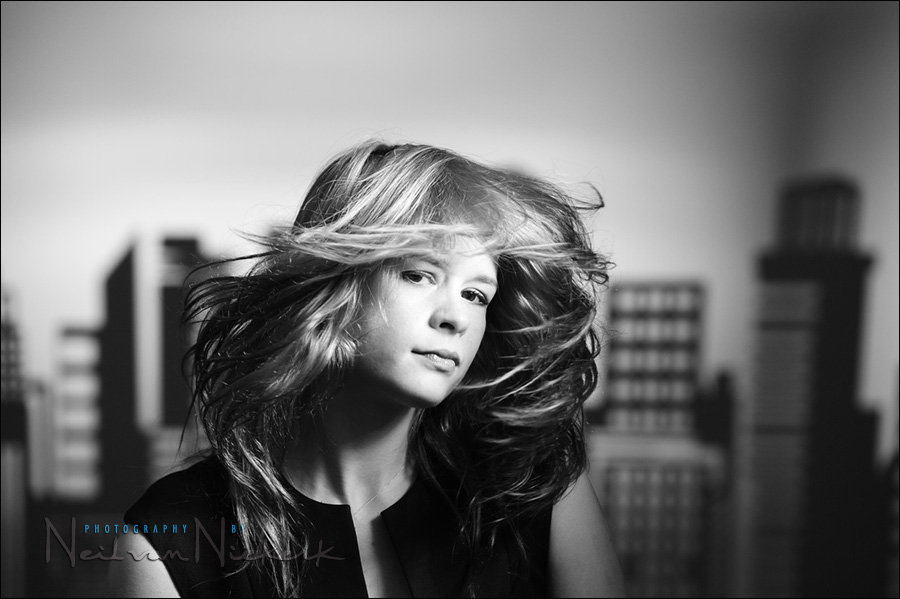
Working with an idea in mind in the studio – a moody B&W portrait with a stylized cityscape as background. Using the Light-Blaster again in the studio, this final image was a progression of that idea. I knew I wanted to use the cityscape background of one of the metal gobos that came with the Light-Blaster kit.
Because I wanted the final photograph to be black and white, I set my camera to Monochrome so that I’d have a good idea during the shoot what the final image would look like. Since I shoot in RAW, the image would pull up in color the moment I start my post-processing. Then I reverted it to B&W again, and edited it for contrast and for the vignette you see in the final image at the top.
The first step of the shoot was to set up the Light Blaster, then get the exposure, and then figure out the lighting on our model, Priscilla.

For this series of photographs, I again mounted my Nikon 35mm f/1.4 since that was the wider lens that I had accessible in the studio at the time. The Light Blaster comes with a Canon mount, so you need an adapter to mount your Nikon lens to that.
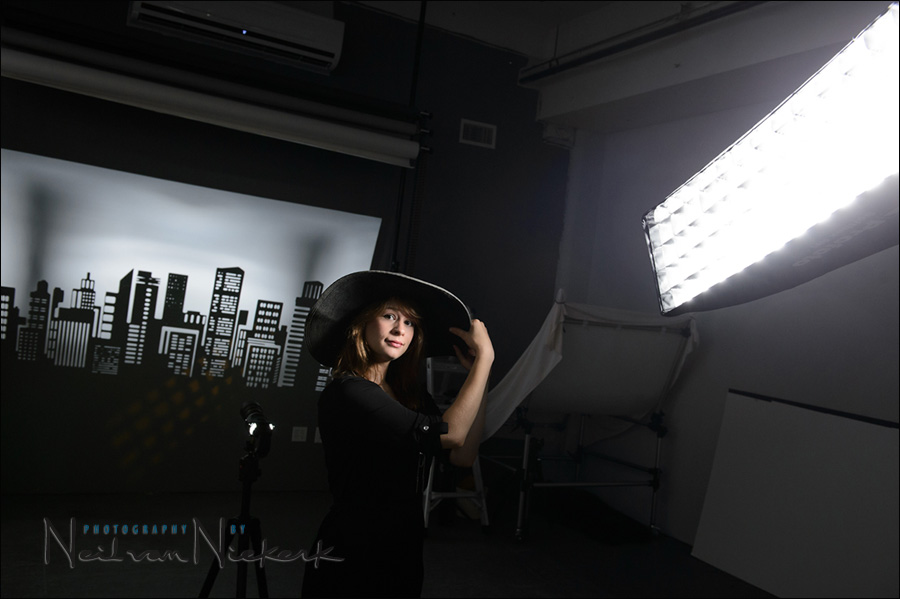
Lighting equipment used for this photo session
The pull-back shot shows the lighting setup. The main light on Priscilla was a Profoto D1 Air 500 Ws Studio light (affiliate), diffused by a Profoto RFi 1’×3′ softbox (affiliate), with a Profoto 50 degree 1×3 grid (affiliate) to control the spill. Yes, the gridded stripbox really was angled away from her light that at nearly 90 degree angle.
I wanted to be very specific about lighting up her face only, and not her hands (for other poses), so I angled the light away from her. I feathered the light away from her so that only part of the light from the stripbox caught her. This gave me what I wanted – soft light, but controlled.
The light on the background – the city scene, was then of course done with the Light-Blaster.
1/200 @ f/4.5 @ 800 ISO
The camera settings were determined by the background exposure with the Light Blaster and gobo. Then I had to match the studio light for those settings.
Here is the straight-out-of-camera shot for comparison. It is the JPG extracted from the RAW file.
Summary
Again, I’m quite impressed with the Light Blaster. It gave me a unique image directly from my camera, very close to what I had wanted.
Oh, how did we get Priscilla’s hair to flow so perfectly around her? This was about the 40th frame we shot where she gently shook her head side-to-side. There were a few nearly-there images, and then we hit this image and decided we were done. We had it.
You can order the Light Blaster kit from these affiliate links
- Light Blaster – (B&H / Amazon)
- Nikon-EOS Adapter – (B&H / Amazon)
- Creative Kit – Gobo kit – (B&H / Amazon)
- Creative Kit – Effects – (B&H / Amazon)
- Creative Kit – Backdrops – (B&H /Amazon)
- Creative Kit – Wings – (B&H / Amazon)
Related articles
- Photography: image projection effects in the studio (model: Olena)
- Dramatic lighting effects for portrait photography (model: Jessica Joy)
- Light Blaster: in-camera special effects with gobo projection (model: Viktoria)
- Light Blaster – official website.
Neil, would it be possible to add a color gel to this setup? I’m curious if the skyline slide could be used with say an orange gel. Looks like an interesting device, thanks for sharing.
You could easily gel the flash.
Cool, thanks Neil. I may have to get one of these for a project I’m doing later in the summer.
I got one of these – will take some work for good results; working out the distance from the background, focusing the image, getting into position correctly, triggering the flash and strobs (I may try an eye next time), etc. Any tips would be great. Your results are very nice.
Since it is a controlled lighting atmosphere, wouldn’t it be better to shoot in jpeg and you get exactly what you set your camera to produce instead of shooting in raw where you have to convert it to B&W again?
Perhaps, if the assumption is that I would want exactly what the camera produces. This time I didn’t. In fact, I don’t often want exactly what the camera produces.
Then there’s always this:
https://neilvn.com/tangents/post-processing-workflow-deal-color-banding-photographs/
And this:
https://neilvn.com/tangents/review-fuji-x-t1-camera/
… which means that shooting in JPG just isn’t an option for me.
Understand.
Seems there’s some issue with this device infringing on an older devfice called the, “the image fulgurator”. I know little of it, but some of the reviews on another site were blasting this item as a mere newer copy/idea on something. I don’t think I’d personally have a use for it, but like the idea of it. Seems to have uses in certain areas.
Hi Neil
I am a ardent follower of your blogs and writings. I have this light blaster, but seem to have a very tough time keeping the spill from the main light off the background. In some cases, the BG seems to be way too dim for having a good background. Can you explain what your typical settings on the flash and lens you use for the light blaster and also what sort of background material best suits for the light blaster (grey, plain wall, white etc).
Thanks for your advise and the great service you do for all of your followers.
Regards
Suresh
1.) The light on the model is based on getting a good exposure for the background. Start there. Make sure you nail that exposure first.
2.) The main light on her is gridded, so that no light from that spills onto the background, washing it out.