
Studio photography – Creating sun-flare images
One of the sequences I photographed of Anelisa for the video clip of a photo session in the studio, was to create this kind of sun-drenched flared image. I wanted it to look bright and airy and summery.
There was a studio flash behind her to (partially) create the flare. I had to keep adjusting my movement just so that the flash-head wouldn’t be entirely hidden, or entirely revealed.
There was a total of four flashes used, and the pull-back shot shows their positioning.
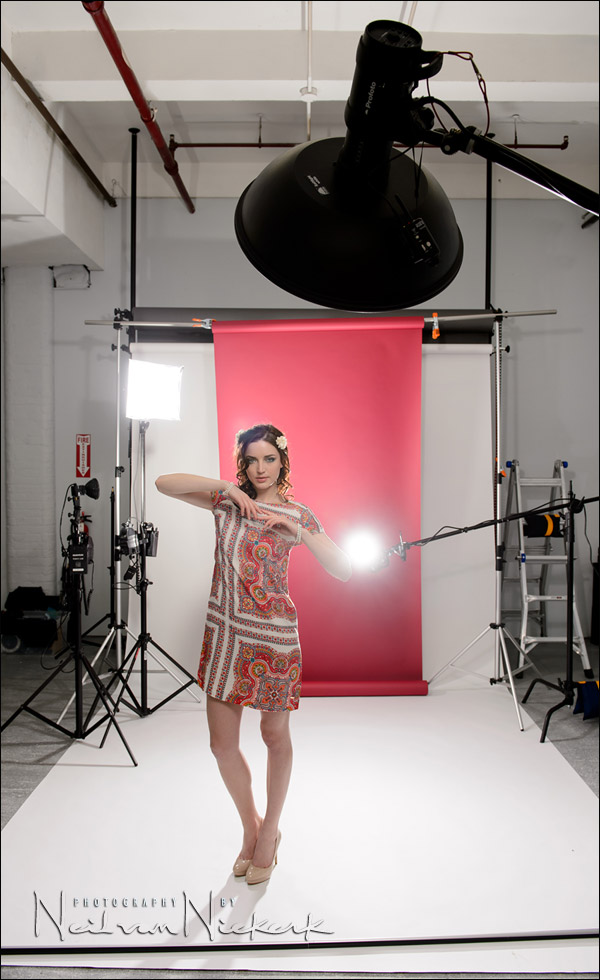
There was one Profoto D1 Air 500 Ws studio light (affiliate) and the Profoto beauty dish (affiliate) as the main light on Anelisa.
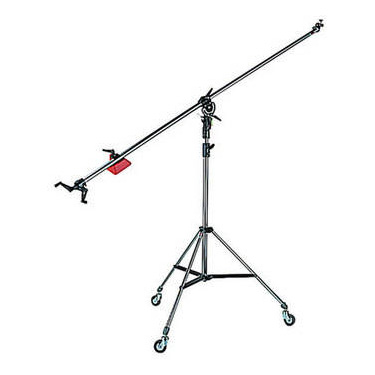
The beauty dish and light were mounted on a Manfrotto 025BS boom w/ 008BU stand & casters (affiliate) which offers coaxial geared controls at the one end. So now it is possible to adjust the positioning of the light such as the beauty dish in this case, without relying on a tall model on high-heels to adjust your lights for you.
There was a bare Profoto D1 Air 500 Ws Monolight (affiliate) behind her. This flashhead had the Profoto frosted glass dome (B&H / Amazon) on it to help spread the light, since the D1 has a flat disc for the head, instead of the usual bulb-like flash-head that you’d expect.
Then I used two Quantum flashes – one to light the background, and the other (with a 12″ x 12″ softbox) to provide rim-light on Anelisa.
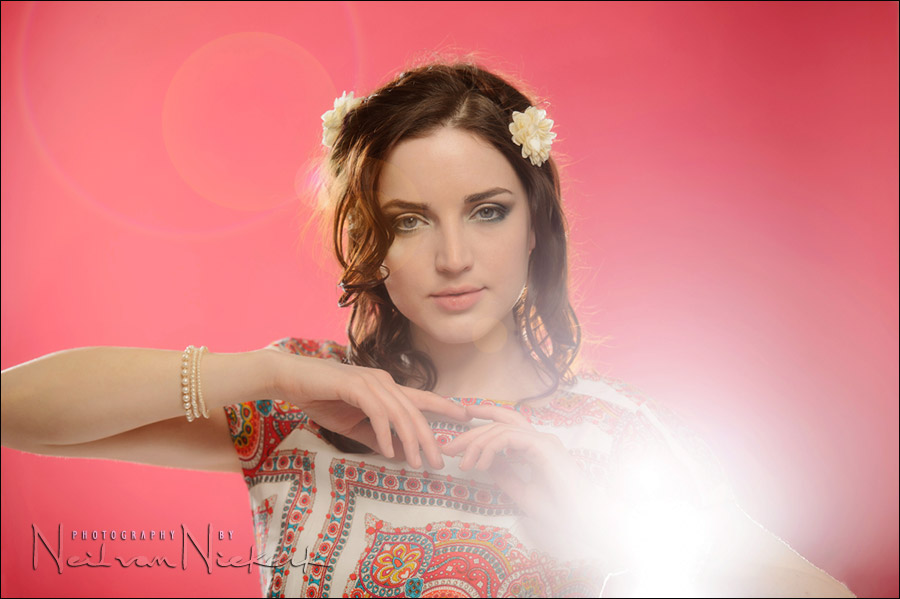
The flare from the flash-head wasn’t quite enough, so for both these main images, I used the Lens Flare filter in Photoshop.
Camera settings and gear used (or equivalents)
- 1/200 @ f/4 @ 100 ISO
- Nikon D4
- Nikon 70-200mm f2.8 AF-S VR II / Canon EF 70-200mm f/2.8L IS II
- (2x) Profoto D1 Air 500 Ws studio light
- Profoto beauty dish
- Manfrotto 025BS boom w/ 008BU stand & casters
Related articles
- Studio lighting: Smaller light source = harder light = dramatic light – model:Anelisa
- Video clip: photo session in the studio – model: Anelisa
- Lingerie photo session: Video light & studio flash – model: Olena
- Behind the scenes video – photo session with Ulorin Vex
- Other articles on using video light for photography
Beautiful final photo. The final photo looks very dreamy yet very vivid.
Quick question, what material do you use for your backdrops?
I’m getting a studio set up but from the looks of it you’re using vinyl.
Thanks and all the best.
I think your photography is wonderful, Neil and I follow all your posts. But I never understood the appeal of having sun-flare in pictures. Especially wedding photography. These images actually hurt my eyes to look at them… I wonder if I am alone in feeling this way.
Sun flare is personal preference. It’s like how someone might prefer to put salad dressing on their salad and another person not.
Personally I think that sun flare can add to some photos.
Aloha Neil,
Just wondering how you were able to trigger all of the flashes…Are the quantum’s fired remotely or thru IR?
Thanks as always. Barry
I was wondering, how much space was there between the model and the red backdrop, since you opted to light the background using one bare studio light with reflector on it. I have a home studio in a 4/4.5meters room, and I have no more than 1.4meters between the model and my gray background. I am trying very hard to light my background and make it white. I am using 2 lateral 600w lights @ full power, with strip softboxes and grids, positioned such as each one lights the other side of the gray paper. My only problem is that using that scheme of lighting, my model stil has some spill light on the sides of the face, from the stripboxes used to light the background. I am thinking of using black foams (Gobos) to prevent the light spill, but I don’t know how to position them and not to block the background illumination…
I have a suggestion Alex, why not try shooting low key to escape the problem all together (meaning no backdrop light).
I can imagine that it’s very hard to shoot hi key in such close shooting quarters so I’d try to be creative with low key lighting.
When sunflare or any other light points towards camera there is an automatic risk lens flare (reflections/dispersal) within the lens array itself. Colour contrast also suffers, but can appear enchanting. Photoshop is sometimes a better and more versatile solution. An empty layer with paint blobs, any colour, can be blended in softlight blend mode and blurred to suit whatever flare looks best. This will avoid the right “hole thru the arm” and lens flares on the left cheek bone and right chin.