Wedding photography – Tips for detail shots of the wedding rings
In photographing the detail images of the wedding rings, there are a few things to aim for:
– context within which to place the rings,
– a few images with different angles,
– great lighting which is easily achievable.
Then we also have to take care of the depth-of-field and the tricky focusing …
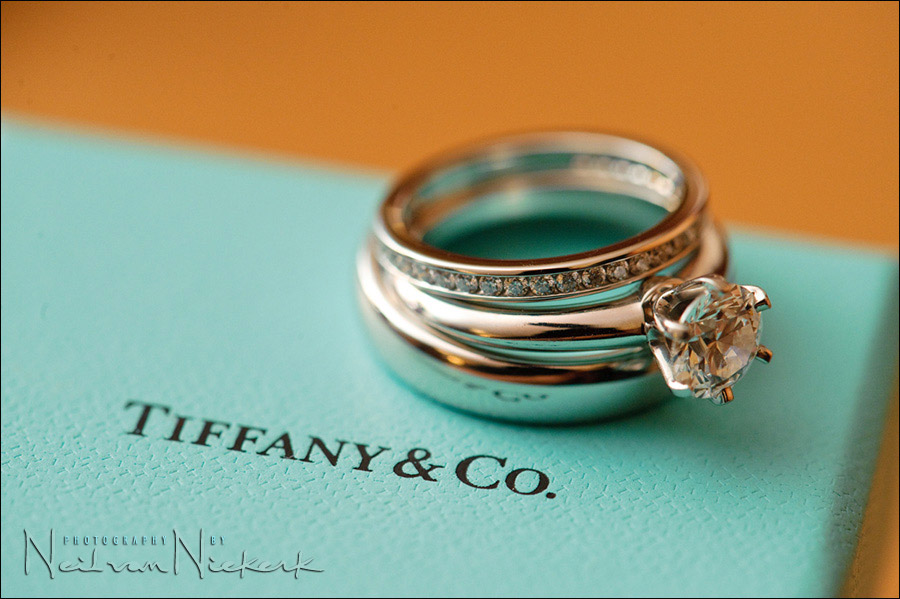
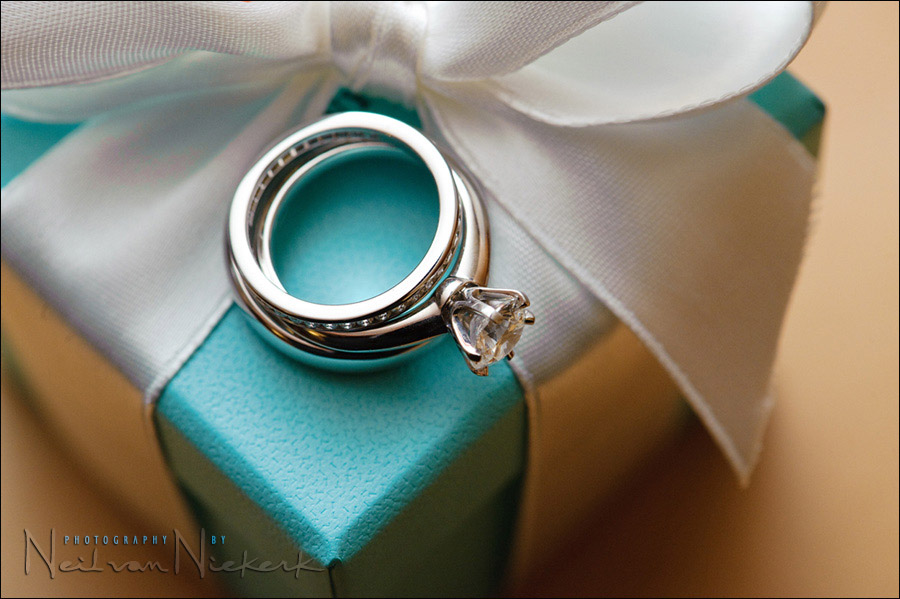
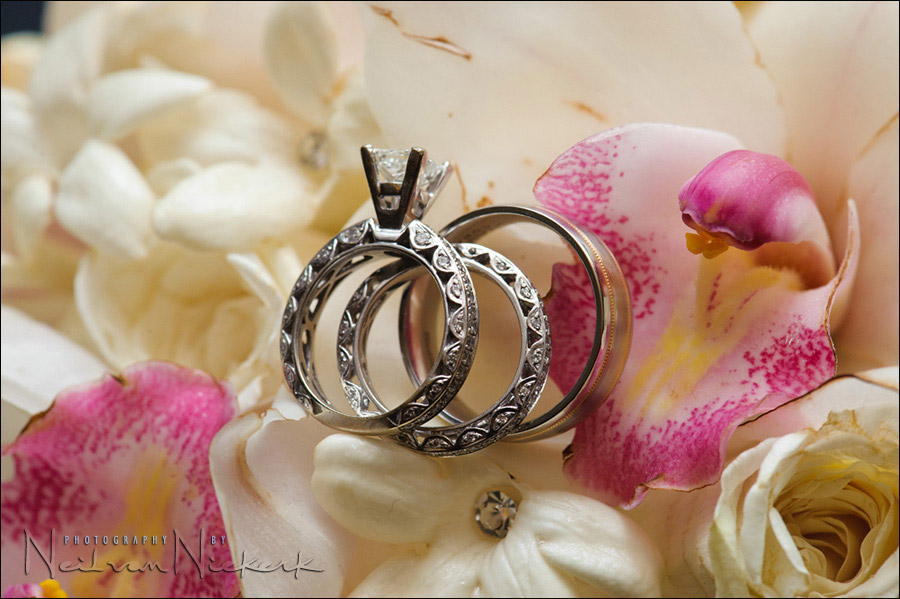
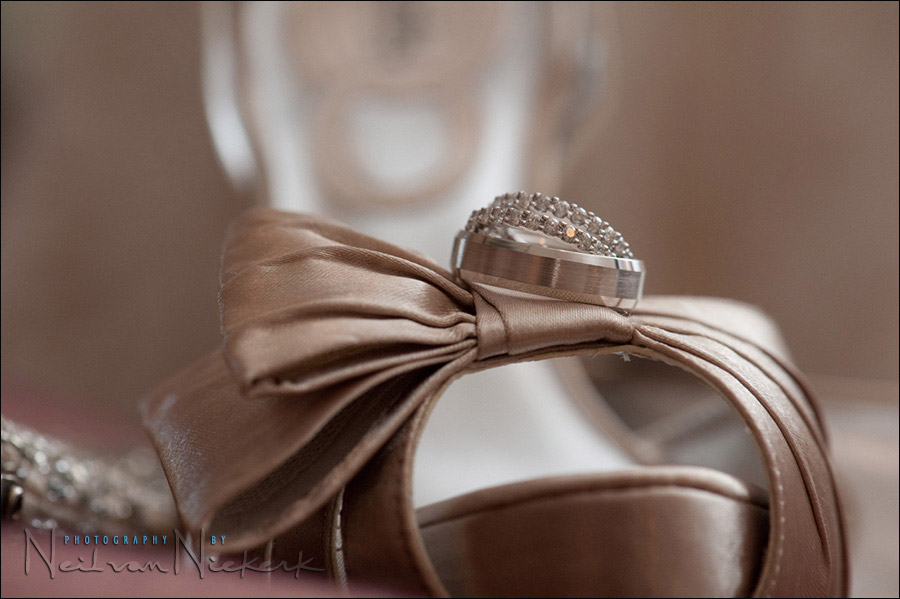
Context can be photographing the rings with the boxes it came in, especially if there is a (well-known) logo. Or photograph the rings with some other element of the wedding day, such as the bride’s flowers or shoes. With the image at the top, I also placed the rings on the box so that the brand name could be seen. This also gives me a different angle of the rings.
Variety through different angles and different backgrounds
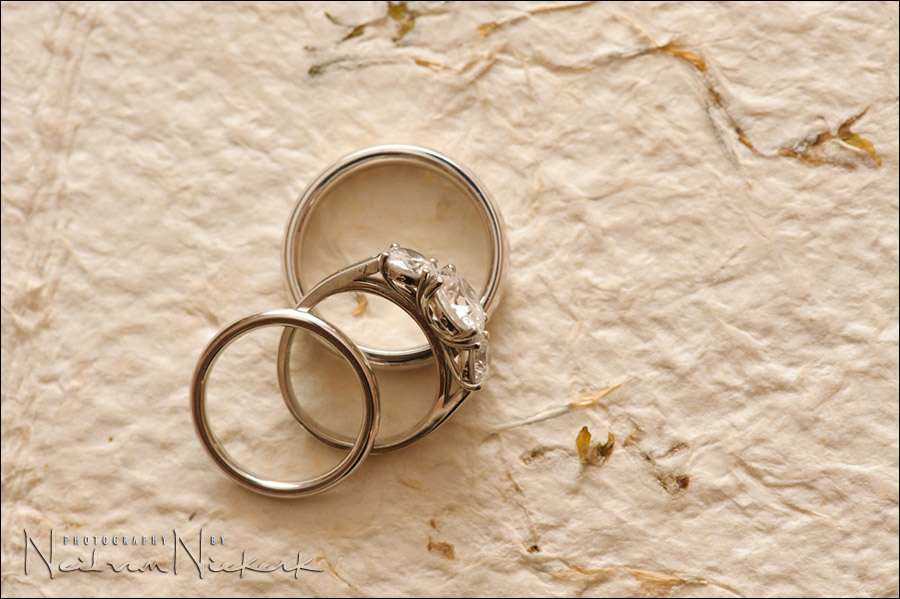
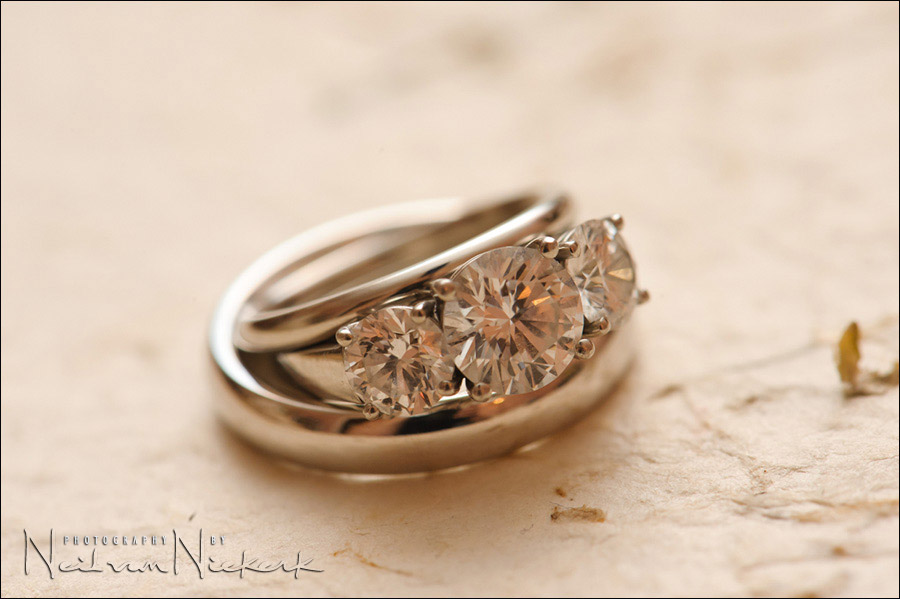
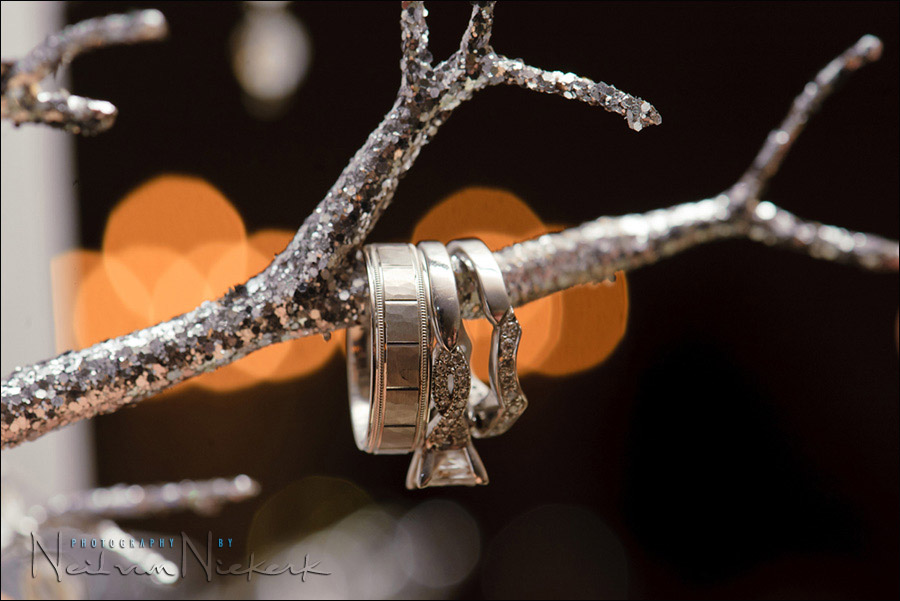
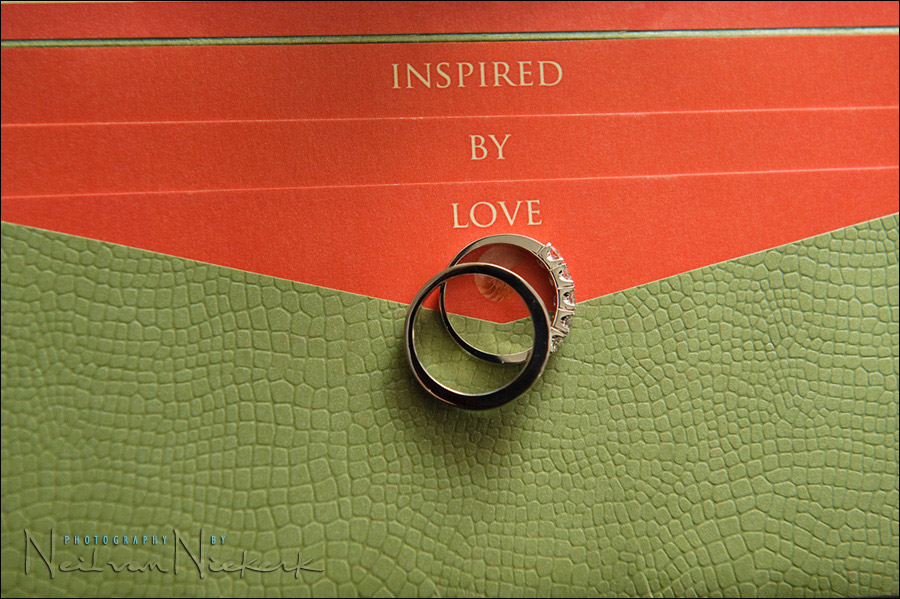
The next three images are of the same pair of rings. Different angles, different environment in which I photographed the rings – all in an effort to bring variety to the images.

With the image above, I wanted to show the brand name again. With the next two images, I placed the rings on top of a photo album that was laying on a coffee table in the bride’s living room. It isn’t a wedding album, or wedding related, but I liked the texture of the album cover.
Which brings us to lighting. All these images were taken with just an on-camera speedlight, with the black foamie thing to flag my flash.
Positioning your flash
Since I am usually pointing my camera and lens down at the rings, my flash is in an upright or near-upright position so that it points to the wall ahead of me. I want the light to come in at an angle nearly parallel to the table or object that the rings are on. I don’t bounce up into the ceiling since that would give me very flat light. I want the light to come in from “ahead” of me. From a position forward of me so that the light skims the surfaces and the rings.
I am am pointing my lens at an angle downwards at the rings, I bend my speedlight’s head forward so that it points towards the wall ahead of me. The black foamie thing then flags the flash and stops any direct flash from hitting the scene. (If any reader of this blog wants to create a diagram of this, please feel free.)

This brings us to another piece of equipment – the lens. All but one image here was taken with a 105mm f2.8 macro lens. For me, this type of lens is essential to get close enough to objects as small as rings. More about the specific lenses at the end of this article.
With this next image, I did bounce my flash off the ceiling, but forward of me.
On-camera flash modifier – the black foamie thing

The BFT is held in position by two hair bands (Amazon), and the BFT is usually placed on the under-side of the flash-head.
The linked articles will give clearer instruction, especially the video clip on using the black foamie thing.
Tips on working with macro lenses
Since macro photography is done at such close focusing distances, the depth-of-field becomes incredibly small. So I do expect some part of the rings to be out of focus. But as long as the important facets of the ring is in focus, then the shot works. It does mean working at apertures of around f11 on a 100mm / 105mm lens. This small aperture, with bounce flash, usually means working around 800 ISO.
Auto-focusing on weddings rings can be really tough. The camera tries to focus on the various facets of the diamonds which act like tiny reflective mirrors. This completely throws the camera’s auto-focusing if you only use the one AF point. The trick to this that I’ve found, is to focus on the ring as well as you can – perhaps part of the ring to the edge of the stones, where the camera can actually grab focus. Then I lock focus, and slowly rock to and fro so that the rings come in and out of focus. When the rings look sharp in my viewfinder, I take the shot. This does imply several attempts to get a shot that is sufficiently crisp across the important parts.
The next photo is the only image here taken with a 24-70mm f2.8 zoom (used at 70mm). For close images though, the macro lens is essential to the task.
Recommended macro lenses for detail photos
I favor the 100 / 105mm focal length when it comes to macro lenses. This gives me a comfortable working distance on a full-frame camera. And it also doubles as a portrait lens if I need to.
The best choice here is the Nikon 105mm f/2.8 AF-S VR or the Canon EF 100mm f2.8L IS macro lenses (affiliate links).
If you are using a crop-sensor camera, then there are other good choices which would effectively give you a similar focal length (if you frame the image the same).
Related articles
- Wedding photography – detail shots, bounce flash & macro lenses
- Using the black foamie thing for bounce flash photography
- Wedding photography – using video light for macro detail photos
- More articles about wedding photography
- More of my work: New Jersey wedding photographer
Very valuable tips, especially the lighting direction, appreciated.
What about manual focus,where you can pin point where you want the viewer to look at?
Hi,
I’m just wondering if a Tele. 70-200 f2.8 would do the job for you? I always used a Tele. lens to take a detail shot, since I never owned a macro lense. Does it make a big difference?
Thanks.
Gracious
Great article Neil, thanks. I recently picked up the Nikon 105 macro and it’s a great lens for detail shots like the rings, in fact it’s one of the few things I use it for at weddings. I was using a manual focus 50mm Zeiss makro, great lens but the 105 is a much better choice for this type of work IMO. I also use the rocking back and forth technique to get my focus nailed, much quicker than setting up a tripod.
Neil, these are all great tips. The one thing I am trying to figure out is what to say when asking to photograph the rings. Do you normally shoot them before or after the ceremony?
Hey Neil,
Could those images be captured with the canon 85 1.8 or 24-105. or does it have to e a macro lens to get that result?
I would suggest using a (good) compact camera like Panasonic LX-5 or Canon equivalent with raw capability.
With good light, ISO100 and F4.0 and due to the (much) shorter focal length you get more or less the same depth of field as in a DSLR + 105 mm macro, ISO 800 and F11.0. Also, image quality is good enough (at ISO100, of course) for that purpose.
If I remember, Neil wrote about that before.
At a wedding I shot earlier this year I used the 50mm f/1.8 with the 12mm extension tube behind it. Both the rings and the flower on the lapel of the groom came out sharp though – like as mentioned above – I moved myself in order to hone the focusing.
Great post, Neil. I’ve been trying to perfect my macro work for months, and while I’m happy with my results, this has completely changed my approach. Thanks very much for this detailed look into your workflow! Any advice on what apertures you’re usually working at for these kinds of shots? I’d love to see some EXIF data on the above shots. Some people love an absurdly shallow depth of field, but I think using my 100L at 2.8 for macro shots of a ring is a bit excessive!
Hi Neil,
Great tip….Love the site/book
I happen to own the 105 marco and was happy to see your review of it.
I did see you mention in your post the 24-70 2.8 (also in my bag)
do, you prefer one over the other for portraits. I’m typically taking pictures of the rings
before I even take my first picture of the bride…..would you suggest leaving the 105 macro on the
camera if I’m going to take some portraits of the bride right afterward?
What about a +1 or maybe a +2 macro lens (the kind that screw into the front of the lens like a filter) as a lower-cost alternative — and one that keeps the bag lighter?
I love, love, love the subtle lighting on the lead shot (ring on tiffany box). How did you set that one up?
Thanks,
Ron
NEIL,
HAVE YOU SEEN THE NEW nikon 40mm micro?? its half the price of the 60mm….what do you think about the 40mm on a d7000?? would the 60mm be useful as a macro AND as a portrait lens on the d7000?? is the 60mm worth twice the price? thanks
While only an amateur, who very much enjoys your site and the way you convey information, I appreciate this post in particular. I’d like to make better use of my Canon macro lens, but have never been quite pleased with the lighting. I was, unfortunately, bouncing my flash off the ceiling and thus getting that flat look which you describe.
Thanks for the sound advice on how to better use the flash. Great stuff to know and pass along to us sir!
Long time viewer of your blog, first time posting. I admire your education in photography and hope to start practicing what you teach with the black foamie thing. I am going to take photos of a wedding reception in a few days. My only lenses that I have are the Tamron 18-270mm and a Canon 50mm 1.8. The couple know I am not a wedding photographer, but are willing to let me take photos anyway. Is it reasonable to believe I may be able to get some good images? I recently purchased a Nissin Di866 MarkII that seems to be a very good flash.
Usually when I use a macro lens to go close enough to small details like rings. I see my images come out blurred because of camera shake. What is the recommended shutter speed must haves for such photos ?
Yep, recommend that Canon 100mm IS L f/2.8 macro beauty! Purchased it last Friday, used it – and fell in love with it – the next day… It is stellar in its performance and that IS is really brilliant! No more 50mm f/1.8 and extension tube for me….
In your first “positioning the flash” shot, there appears to be a diamond in one of the flowers. Was this intentional?