Getting the most power from your flash / speedlite / speedlight
This might be obvious, but the most power (or light) that you’re going to get from your flash, is at full output in manual. Then the flash dumps everything it has. Full power. You could of course zoom your flash-head a little tighter and get more power / range, but essentially, you’re at the limit.
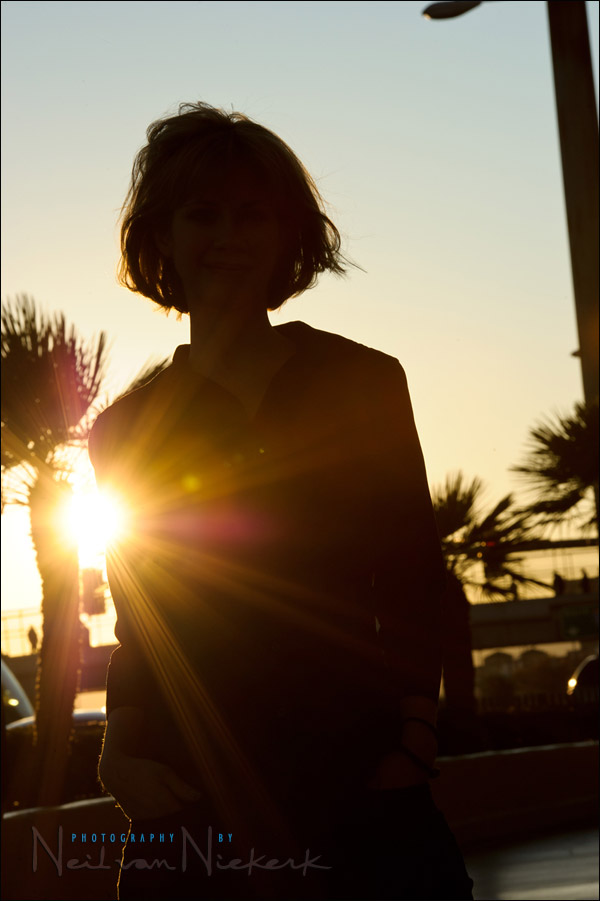
This is useful to know when you’re balancing flash with bright sunlight. With this portrait of Shawna, out on the Las Vegas strip, I wanted that sun-flare look … but I also wanted to balance the super-bright background with flash.

Direction & Quality of Light
I wanted to distill the essence of what we, as photographers, work with – light! Before we can truly grasp on-camera flash and off-camera flash, and really, any kind of photography, we have to be aware of the direction and quality of light. We need to observe the light that we have, and then decide how best to use it, or enhance it.
With this book, I try my best to share those “aha!” moments with you, and I do believe this book can make a difference to your photography.
The book is available on Amazon USA and Amazon UK, or can be ordered through Barnes & Nobles and other bookstores. The book is also available on the Apple iBook Store, as well as Amazon Kindle.
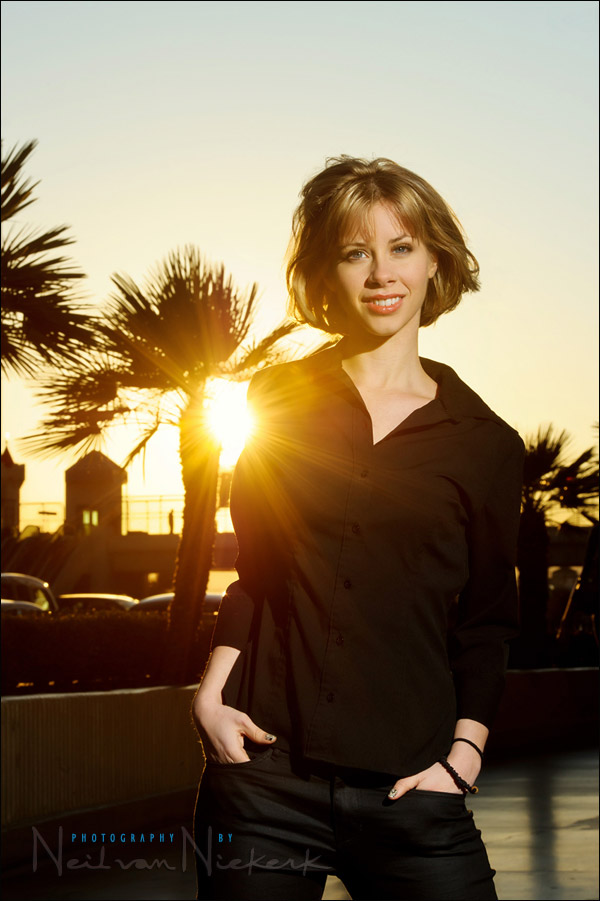
Working with direct off-camera speedlight
Since we were using only a single speedlight, a softbox wouldn’t have worked. The softbox cuts down too much of the flash’s output. So we used direct, unmodified flash. But we used it off-camera, instead of on-camera, so we could get more interesting light than direct on-camera flash would’ve allowed.
The technique here is essentially the same as when we photographed Shawna earlier on, inside the hotel room, using on-camera bounce flash. (See: bounce flash portrait – a consistent technique )
- find your background that you’d like to use in the image;
- since we’re using flash in very bright light,
we’ll be at our lowest ISO, and using maximum flash sync speed; - now we just have to find our aperture to give us correct / good exposure for the background;
- now, for that aperture, find the distance for which the flash (in full manual output), will give you correct exposure.
That last sentence there might need a bit of explanation:
Manual flash is controlled by 4 things: power, distance, aperture, ISO
Of those 4 things,
– we have our ISO (lowest ISO since we’re in bright light);
– we have our power … full manual power so have have the max output!
– aperture … how we want to expose the ambient light
– we now need to find the appropriate distance!
Fortunately, most of the larger, better speedlights will show the distance for that aperture / ISO combination.
With this image above, our settings were:
1/250 @ f10 @ 200 ISO
(since this is the Nikon D3s I was shooting with, and the base ISO is 200.)
for the Canon 5D mk2, the equivalent settings would’ve been:
1/200 @f8 @ 100 ISO
(With Canon D-SLRs, the base ISO is 100.)
With the off-camera Nikon SB-900 and SB-910 speedlights, you could go into the menu of the flash to set the ISO setting, and read the appropriate distance for the aperture you enter. But that’s a mission.
With the Canon 580EX II speedlite, you have to set Custom Function 5, to value “3”. Then you can set the aperture and ISO readings on the flash.
A quick method to calculate which distance to keep your flash
With that off-camera flash ON your camera, (so it can read the ISO and aperture you set), look at the scale at the back of the flash.
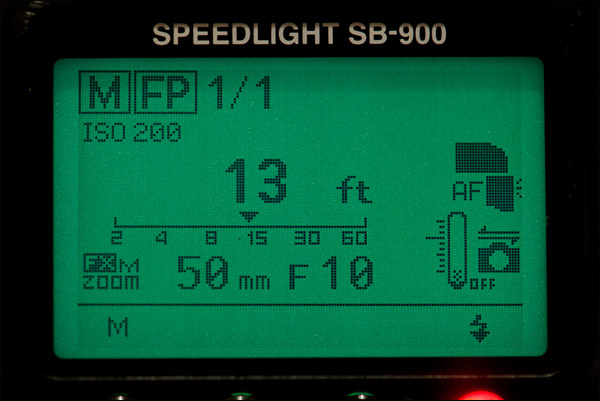
Note that I kept the flash zoomed to 50mm. So for full power from the Nikon SB-900, at 200 ISO, I have to be 13 ft from my subject for the flash to deliver f10 worth of flash.
For the Canon 5D mk2 equivalent, the display would’ve looked like this on the Canon 580 EXII speedlite:
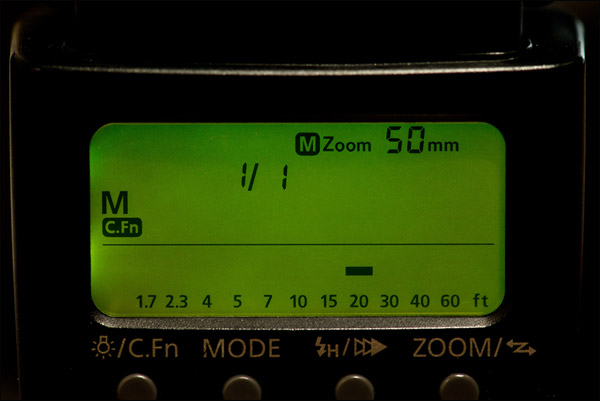
Again, for 100 ISO, I have to be around 20 ft from my subject to get correct exposure for f8
The 580EX II only displays the aperture setting when the flash is in E-TTL mode. It’s an odd quirk.
Don’t make too much of the difference in distance shown here. The Canon speedlite’s display is more ambiguous about the specific distance. Also, the various manufacturers tend to be slightly optimistic about the output of their flashguns. So you DO need to check the back of your camera to see if your exposure is correct. Or close enough to correct.
That’s the process … find the aperture you need for your ambient exposure (at max sync speed and lowest ISO), and then for that aperture, find the distance on your flash when set to full manual output. Simple, really.
Now, shooting against the bright sun like that, all cameras will hesitate in their focusing. ALL cameras. What I do then, is rely on the depth-of-field of shooting in the f8 to f11 range as in this case, and then I focus on my subject’s feet.
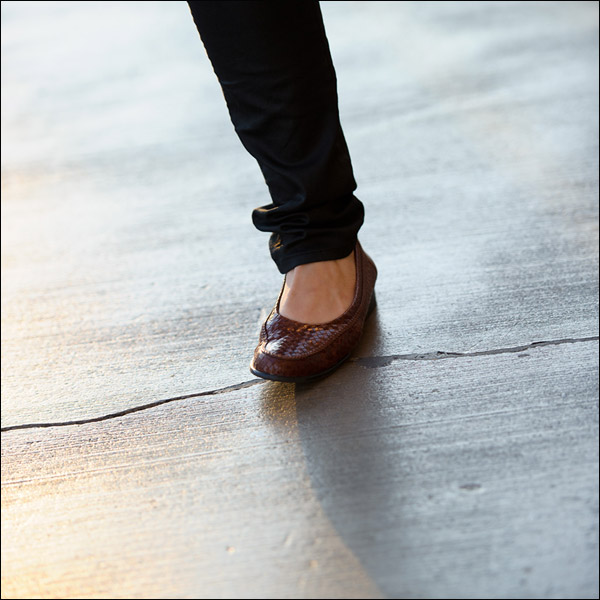
No strong back-lighting to contend with, and I can lock my camera’s focus … and then get the shot.
Related articles
- Tutorial: How to use the guide number of your flash (model: Shawna)
- Applying the Sunny 16 rule and the flash Guide Number (models: Yulia & Anelisa)
- Practical tutorial: Controls for manual flash exposure (model: Hannah)
Great tip about focusing on the feet, since you have a small aperture. I’ll have to try that. I’ve always just fought with it or gone to maual focus. Your way is probably better. Thanks.
Great tutorial, as always!
A few questions/comments:
Did you use a full CTO cut here? Setting sunlight is very warm, and it looks like you’ve matched temperatures well here. But the CTO eats about a stop of light, no?
Setting focus on the feet and shooting at f/8-f/11 is a great workaround for any issues that crop up due to focusing into a strong backlight (i.e. the sun). Of course, this does eat a lot of flash power.
Also, 20ft (for correct exposure at ISO 100, f/8 with the 580EXII) is a very large flash-to-subject distance, and is contributing to the hard light you’re getting here
With these points in mind, would the following have worked?:
– f/5.6, 1/200, ISO 100 (one stop of extra flash output)
– 580EXII at full power, 10 feet from the subject (2 stops of extra flash output vs 20 ft)
– take the extra 3 stops you’ve gained and soften the light with a softbox or umbrella
As long as you’re back far enough, f/5.6 should give you sufficient DoF for your “foot focus” trick to work (totally stealing that idea, BTW), and your light would have been much softer (assuming that’s what you want).
Just curious. Great post, as always.
this is very helpful info as always
Wow! Thank you, what an eye opener this was for me!! Can’t wait to test it out!
Neil, great tip on the “foot focusing”. I’ve been following your blog for years and even when you’re re-hashing well worn (to me) topics, there’s always a new little gem of an idea embedded in there.
Your description about how to find the distance was something I hadn’t given much thought too. I certainly would’ve halved the distance and left my speedlight on 1/4 power to conserve my AA’s. And the process of “finding the distance” would’ve been trial and error. (pixel’s are cheap). It’s a good exercise to know how to get all the info up front from your equipment. Keep up the good work!
Neil,
So the room for focus error @ f/11ish is that small that you are able to focus on the feet and recompose for the head? I’m assuming that has to do with the distance to the subject as well, correct?
Kevin
Neil,
Opening up from f/8 to f/5.6 increases the flash (and ambient, of course) exposure by one stop (i.e. you can lower the flash power to 1/2 OR possibly add a modifier, and still get the same flash exposure). That’s all I meant.
I was just thinking of ways that would have allowed you to use a modifier, and thus get softer light. Opening up to f/5.6 and/or moving the flash closer to the subject are two possibilities.
Interesting that you didn’t use a gel.
Dumb question: How do you lock focus?
1) Hold the shutter button halfway down while focusing on the feet and recomposing the image?
2) Something else? (FV lock button? – I never used this button before).
This article and other like it seem to show that one doesn’t need a lightmeter to get started on manual flash. The shortcuts are enlightening.
One more question Neil,
As far as the distance settings, would you say its fair to assume that you can apply this to bounce as long as you “guestimate” the distance from flash to bounce and then add that distance to the subject?
http://www.pocketwizard.com/inspirations/technology/hypersync_fpsync/ works too:)
also, since the 5D Mark II goes to 50ISO, you would gain some more power from the flash since you can open up the f/stop by one full value
@Stephen
There are several ways to “lock focus”. One is to set up your camera to do exposure only on half-press of the shutter button and assign a different button to do focusing… this is easily done on the Canon 5D MkII (and I suppose also on the Nikon). That way you can focus with one button and unless you press that button again, the focus will remain “locked” to the prior value.
If this is not possible on your particular camera, then I would simply focus on the feet with the shutter button, then simply move the focus switch on the lens from AF to MF so that the focus point wouldn’t change.
Carlos
Hi Neil,
I have a question about this sentence from the post :”Now, shooting against the bright sun like that, all cameras will hesitate in their focusing. ALL ”
->does it mean that the focus in bright sun light is wrong ? So a portrait in bright sunlight at f2.2 for instance is more difficult in bright light condition?
And, a side question, is focusing a subject at f2.8 or wider all the more difficult when the distance to the subject is increasing?
@Carlos, on Nikon cameras, that would probably be the AF-ON button.
https://neilvn.com/tangents/nikon-focusing-modes-d300-d700-d3-d3s-d3x/
That seems to be what he has done here.
That tip to focus on the feet is gold! Thanks!
I’ve just finished reading Bryan Peterson’s book on flash and he goes on about how easy it is to use manual flash just as you described, by consulting the display on your flash. But what if you’re using an older/lesser flash Iin my case, the SB600) that doesn’t have the flash distance guide? Is there a chart somewhere or something I can print out? A website? An app? I don’t want to upgrade to an SB-700 or 910 *just* for this feature.
And thanks for your tutorials — I’ve been reading for a few months and learn something every time I come here. :)
Right, but how can I transfer the guide number into the ISO/shutter speeed/distance equation? The only place I haven’t looked is in the flash manual. Sorry if this is a dumb question, I’ve been stuck on this for weeks!
That would be AWESOME! Thanks! :)
Hi Neil,
Ugh! Why did I write FV lock? lol It’s funny that I wrote about the AF-ON button later. But it looks like you didn’t need the AF-ON button for this photo. In that case, I should do what I have been doing previously. :)
Neil,
I always learn so much about staging the model and the equipment from your “pull back” shots. Do you have one for this image that you’re willing/able to show us?
Regards,
Here’s a grabshot over my shoulder while I was shooting the sequence above. It’ll give you and idea of where we were.
Neil vN
I was there! I learned so much in the short time together. I love how you keep everything simple. Thank you Neil!
Ray
Hi Neil,
Could you please tell me if you noticed any improvement in the new SB-910 regarding the thermal cut-off?
What I hear is that the new thermal control only slow down a little the flash in order not to shutdown. I would like to know if the SB-910 can handle betther a massive usage with the thermal cut-off disabled.
thanks
Presumably one could have added a second or third speedlight to the end of the light pole (similar to your post here: https://neilvn.com/tangents/images/weddings/randa/_tangents/NVN_3501-lrg.jpg ) Would that have given you enough light to use an umbrella or soft box?
Thanks Neil for your great explanation !!
As every one say, you give very clear explanation !!
Merci Dany
Hello, Neil! Thank you very much for your work! I love your articles very much, there were very helpful when I started learning flash photography, I come back to them regularly. Is it possible to ask you for a permission to translate some of the articles into Russian and to publish them on my website with a link to your websource and any other information you wish?
Ok, I don’t want to sound like a creeper, because I’m not… but I’ve never fallen in love with a girl through her portrait before :-)
And thanks for a really great post. I’ll be using your technique tomorrow at the beach!
I have both a Metz 58 AF-1 and a Canon 580ex II. They appear to have the same GN. For the settings you provide in the example (ISO 100, f8), the Metz – which does provide distance info on its LCD panel without needing to be attached to the camera – it says 17 feet. That seems like a fairly wide margin of error, so I’m assuming the Metz will have a tendency to overexpose if one follows its distance numbers?
Thanks for this Neil. I’ve been struggling with balancing flash and ambient, and how to determine where/what I’m metering for, then adding flash. After reading several of your articles today…and re-reading certain points (lowest ISO, highest shutter (sync) speed then adding flash to balance) it seems so much clearer. Can’t wait to get out and try it all out tonight.
So Neil, you have been my mentor on flash photography. I have learned so much from you. But I have a really dumb question. How do you measure distance? I have viewed distance guides with mistrust because I am not sure what the difference between 12/15/20/30 feet is. Do you have a method?
Thanks,
Michael
If you consider 6 ft to the the height of an average man, then it becomes easier to judge the distance by imagining people lying on the ground, feet-to-head. 6 ft / 12 ft / 18 ft / 24 ft.
Ultimately, the exact distance isn’t that of a big deal, since you are going to adjust your flash / aperture by looking at the results of a test shot or two.
Great article Neil, I have always wondered how to use the distance scales on my SB-26’s. I can only run them in manual as no TTL with these on a DSLR, even when on the camera. Using the distance scales makes that first exposure so much easier to work out. I can then just tweak to taste.
Thanks
Darren.
Hello Neil,
Firstly I would like say how great it was to stumble upon your website a few weeks ago. Straight away I bought your book “Off Camera Flash” and have started to eat it cover to cover.
As this article is a few years old I apologize if what I state here is out of date. You state above “With the Canon 580EX II speedlite, there isn’t a way to directly set the aperture and ISO readings on the flash.”
I was racking my brains with this very issue and was just about to give when I found this video showing the exact tutorial. https://www.youtube.com/watch?v=37iTQC8Q3gk
the only problem I have now it that with this Custom Function engaged there’s no way to power down/up the flash if required…I think, I still learning!
Mahalo,
Trevor
Trevor .. thank you! This is something I should’ve known.
I’ve amended the text now with the correct information.
Neil,
I may be missing something. When I set my 580 EX II Custom Function 5 to value3, I do indeed have the ability to set aperture and f/ stop as well as flash head zoom which it would seem no longer matches needs to match the lens focal length, and it displays the flash range/subj distance.
BUT now I have an E in the upper left corner of flash LCD and an M in the lower left corner. I understand this to mean I am now using the external automatic flash sensor but not TTL. source: http://www.learn.usa.canon.com/resources/articles/2011/speedlite580exii_article.shtml
i.e. the 580 EX has two options for auto exposure: TTL and external Senor. The M on the LCD it would seem does not mean Manual. It feels more like a semi-auto camera mode like Aperture Priority than Manual mode.
Do you have a preference between these two auto modes? When would you use this rather than TTL or do you suggest this just as a mean to get the distance?
Thanks,
Jim K
Neil, you state that manual flash is controlled by four things: power, distance, aperture, ISO. Can zooming the flash head also be added to this list?
Changing the angle of the beam (i.e., zooming the flash-head) would fall under ‘power’. Similarly, using a light modifier of some kind would be affecting the power in this equation.
Thanks, Neil! I appreciate the quick reply.