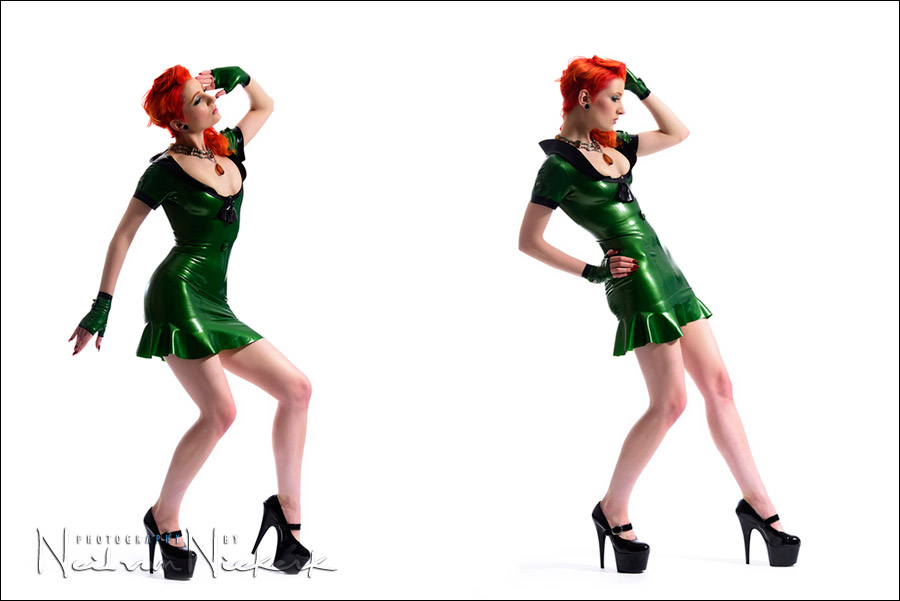
Photo session with Ulorin Vex – BTS video
The video clip is a behind-the-scenes view (with some techie info) of the photo session with Ulorin Vex. This photo session was also the first time I tried out the Nikon D800, and I also got to play with my Profoto D1 studio light (500 Ws) (affiliate), for the first time. An exciting day.
A few comments about the video clip.
– I refer to “Air” twice, meaning the Profoto Air wireless trigger system.
– My comment about how huge the files are, is about the massive (and awesome) 36 megapixel files from the Nikon D800 (affiliate).
– When viewing the video clip, I noticed I say “perfect” too often. But then, I was photographing Ulorin Vex.
[ For more videos, follow me on Vimeo / YouTube ]
Other articles about this photo session
- High-key studio lighting / portraits
- High-key studio lighting / portraits (part 2)
- review: Westcott 7′ Parabolic Umbrella
- Studio photography: Low-key lighting variations
Photo gear (or equivalents) used during this photo session
- Nikon D800
- Nikon 70-200mm f2.8 AF-S VR II / Canon EF 70-200mm f/2.8L IS II
- Westcott 7′ Parabolic Umbrella
- Profoto D1 studio light (500 Ws)
- Profoto RFi 3’x4′ softbox
- Profoto beauty dish with a 22″ sock for a beauty dish
- Profoto RFi 1’×3′ softbox with the Profoto 50 degree 1×3 soft-grid
- (2x) Nikon SB-910 Speedlight / Canon 600EX-RT Speedlite
Amazing video. It brings everything to life. It is like a moving pull back that shows how you put it all together in your studio location
PS. Loved the video. Please provide more from time to time in the future
Very nice, Neil!! I have been following these studio sessions of Ulorin, here at Tangents, but this clips really gives us a excellent overview of how everything was put together.
Cool video Neil. I really enjoyed that and learnt a thing or two. I like your nice, relaxed style.
Gosh, she is perfect indeed! Thanks for the video, very enlightening.
What a fantastic model! Ulorin’s poses are just great and seems like such a professional to work with.
How much of that posing was her, and how much was your direction?
nice work both of you!
Hi Neil
Love your work (always look forward to your posts) as has been mentioned really good to see the pull backs
You mentioned that the files from the D800 were massive. Is there any chance you can put up on of the original RAW files to download and take a peak at? Wouldn’t mind comparing to the ones I get from my D300. I’m particularly interested in the amount of detail you get in the face/eyes.
Thanks
Mike
Hi Neil,
Interesting video!
When I replicated your initial setup of a single beauty dish for a key light, and attempted to light a full-length portrait as you have, under-exposure of the lower portions of the shot due to light fall off was a significant issue (as you briefly alluded to in your video) — and yet, you have examples of this setup producing flawless head-to-toe lighting.
This is even more perplexing when the beauty dish can be seen directing light to only the upper portion of the torso.
So I’m just wondering if the results we’re seeing are pretty much strait out of the camera, or has their been a significant inverse gradient applied in post-production to counter the light fall-off, or am I missing something here?
Kind regards,
Colin Southern
Keep two things in mind here:
– I used a sock over the beauty dish and that disperses the light more.
– I didn’t use the beauty dish at the “optimal distance”, but further away, giving a wider spread of light.
Thanks Neil – I appreciate the detailed reply. Interestingly, I used the same sized beauty dish – also with the diffuser. I was running a 1200WS light at full power, but shooting at F11.
Probably the biggest difference is that I was forced to have the dish closer to the subject (due to studio height restrictions), so I’m guessing that that was probably the main cause of the difference.
thank you for posting this video. I actually learned alot from seeing the difference in results from using a beauty dish and a gridded strip box.
Terrific video, thank you. Do you use Nikon Camera Control Pro 2 to shoot tethered?
Bill, I do have Nikon Camera Control Pro 2, but didn’t use it here. I had just done a clean re-install on my system when I replaced my MacBook Pro’s hard drive with a solid state drive, and this was one of the programs I forgot to reinstall at the time. So we just used Aperture to shoot tethered.
And yes, with the SSD, my computer is super-speedy now!
Ultra nice video, thanks! Always love your work!
On an aside… What are those stickers you use to decorate your lenses? :-)
Edgar … the stickers are Lens Skins, and come in all shapes for different lenses.
Real professional Video as always! Do you edit your own Videos? If yes, what software do you use for editing? Keep the videos coming please- love them!
Mike .. my assistant, Erik, who shot the video segments, edited this clip in Final Cut Pro X.