Flash Photography Techniques
Flash exposure compensation ~ Bounce flash examples ~ Which flashgun is the best?
![]()

More examples using bounce flash
How effective our bounce flash looks, depends largely on us being aware of the ambient light, and the direction of the ambient light … and then adding flash to it. Either as a fill, or as a main source of light.
In the photo above, the light levels in the room was very low. To have the images from this photo session be constantly sharp, additional light was necessary to lift the light levels – the least complicated, yet very flattering light, was on-camera bounce flash.
- camera settings: 1/100 @ f/2.8 @ 1000 ISO …. on-camera bounce flash in TTL mode
- more images from this photo session
We can finesse the light from our flash by specifically choosing the direction in which we bounce flash. We can add to the ambient light, or we can bounce from an opposite direction to lift the shadows a bit.
Any way we decide on it, the image will look better if we put some thought into it, instead of shooting direct flash .. or just as bad, in a 45′ bounce angle when it isn’t appropriate.
So here are a few more examples to explain the thought process behind some of this.
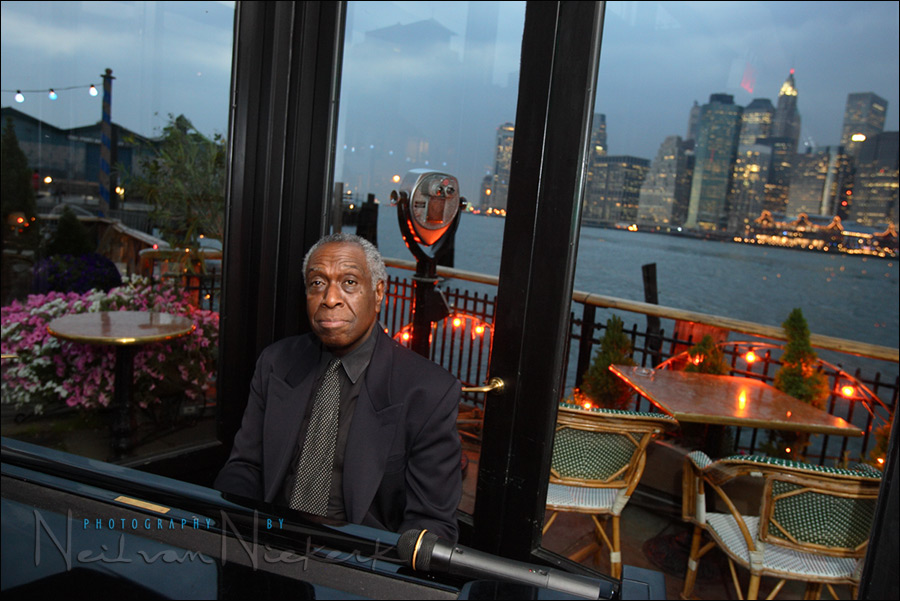
This photo was taken in a restaurant in Brooklyn, overlooking the Manhattan Skyline. The interior of the restaurant was dimly lit – and even with the rainy early evening skies, the outside was brighter than inside. Using my on-camera flash, I had to balance the two areas.
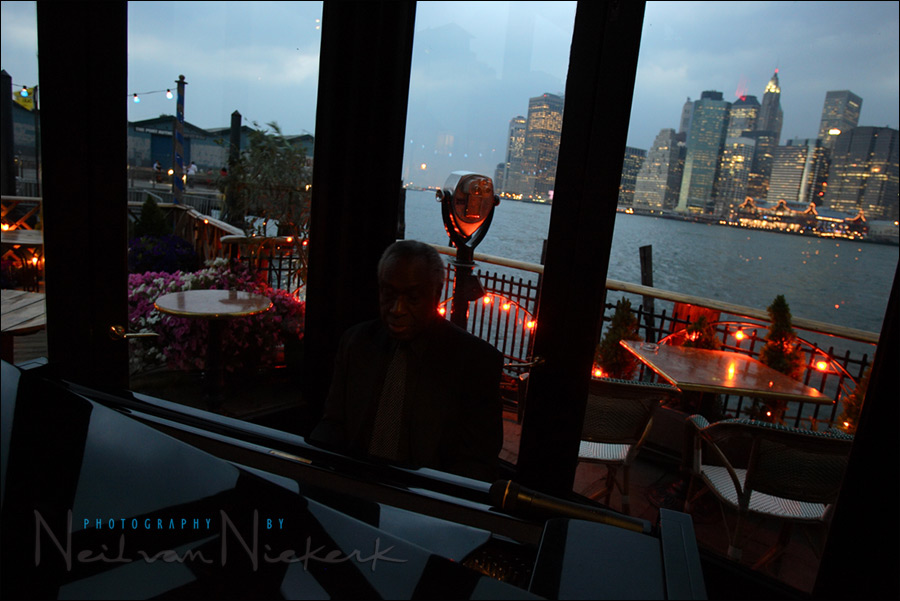
The next image shows my initial test shot – it will give a better idea of the effect of the added flash.
The method: I firstly metered for the outside, and double-checked with a test shot. I then added flash by bouncing the flash off the ceiling behind and to the right of me. A test shot (not shown here), indicated I needed to add some flash exposure compensation, and +0.7 EV looked about right.
- camera settings: 1/15 @ f/4 @ 800 ISO … TTL flash @ +0.7 FEC
- Canon 1D mk2N
- Canon 16-35mm f/2.8
- 580EX speedlight
Even though the shutter speed was low, I wasn’t too concerned with camera shake, because the piano player would be too dark (without flash) for camera shake to be noticeable if I handled my camera carefully.

Photographing the bride, Justine, against a Tungsten-lit background, I positioned her and myself so that I could get that warm halo around her. Bounce flash. Dead easy. Of course I used the black foamie thing to make sure the light from the flash was indirect, yet directional. It’s a simple but effective way to work with on-camera flash indoors.
I chose my camera settings such that the ambient light in the background registered, and then added TTL flash. The flash picked up the exposure to where it needed to be. I had to dial a positive FEC to compensate for the brighter tonal values dominating the center of the image.
- camera settings: 1/60 @ f/2.8 @ 1000 ISO .. TTL flash @ +1.33 FEC
- Nikon D3S
- Nikon 70-200mm f2.8 AF-S VR II / Canon EF 70-200mm f/2.8L IS II … used at 145mm
- Nikon SB-910 Speedlight / Canon 600EX-RT Speedlite

On-Camera Flash Photography – revised edition
This book is explains a cohesive and thorough approach to getting the best from your on-camera speedlight.
Particular care was taken to present it all with a logical flow that will help any photographer attain a better understanding of flash photography.
You can either purchase a copy via Amazon USA and Amazon UK, or can be ordered through Barnes & Nobles and other bookstores. The book is also available on the Apple iBook Store, as well as Amazon Kindle. Also check out the Amazon Kindle store.
Learn more about how the cover image was shot.

A challenge that I have with myself when photographing on-location portraits, is to look for options where there appear to be none. To work with what appears to be limited locations, and then pulling out something that is hopefully surprising. With Penelope, the cutest 2-yr old, I scouted the lobby of the apartment her parents lived, before I went up to meet them. I liked the retro-cool decorations in the huge lobby, and thought it might make an interesting backdrop with a fast short telephoto like the 85mm lens. Then the background would melt away.
- camera settings: 1/250 @ f/1.4 @ 800 ISO
- TTL on-camera bounce flash, gelled with 1/2 CTS gel.

To clean up the light on her, I used on-camera bounce flash. Since the light there was a warm color because of the fluorescent light, (similar in look to Incandescent lighting), I gelled my flash with a 1/2 CTS gel. This brings my flash’s color balance in line with that existing ambient light. (See the next section on gelling your flash.)
The right-hand image shows the existing light there (for the same exposure) as comparison to how much difference the bounce flash made. The left-hand image was the initial pull-back shot. Then we cleared out part of the lobby area to get a clean area to shoot, with a less cluttered background.
Most people walking past there wouldn’t have thought of the options here for a portrait of anyone – but it is there. With the specific choices of lens, aperture, background and lighting, there is potential in surprising places.
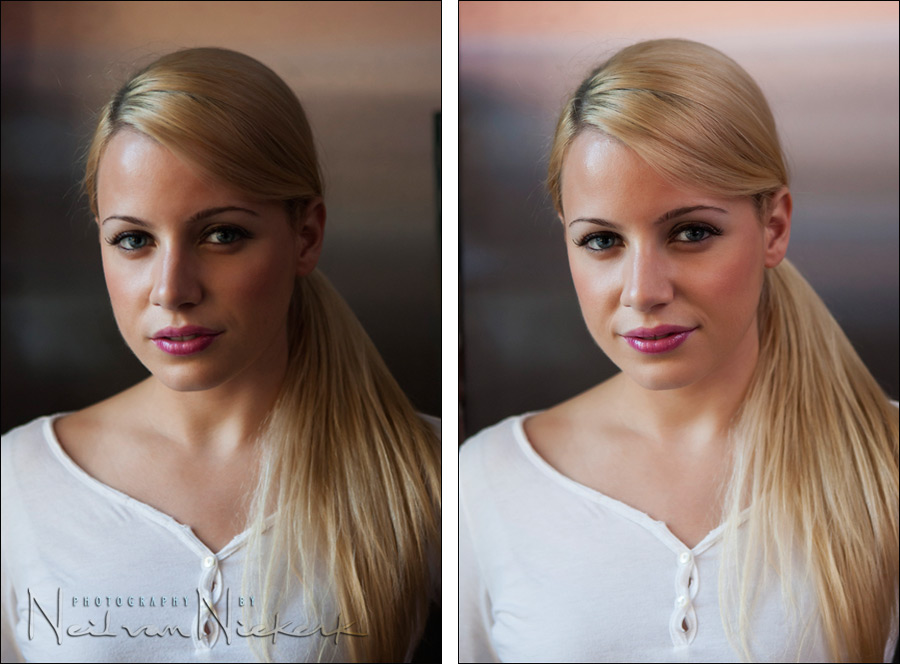
One more example of how we use flash exposure compensation to adjust our fill-flash. With these portraits of a model, Jamie, the ambient light was metered to be correct. (We used the histogram method, metering off her white shirt.)
Using fill-flash like this doesn’t really change the over-all exposure, but it certainly does change the contrast. In other words, the shadow areas are more filed with light. The spill light very often also changes the amount of light on the background, as seen here. The White Balance is also often affected as we add the colder light from the flash … which might have picked up other colors as it is reflected off the walls and other items in the room. The overall effect of the fill-flash can then be quite substantial.
Camera settings: 1/160 @ f/2.8 @ 800 ISO … on-camera TTL flash bounced to right
FEC for image on left: -2 FEC
FEC for image on right: 0 FEC
Notice how the change in FEC affected the exposure – as we bumped up the FEC, the flash became a more dominant light source. It also then helped make the image less contrasty, since the shadow areas were filled with more light.
Gelling your flash
Since I frequently gel my flashguns to turn the WB of my flash much warmer (usually for Incandescent light), I use these gels that I cut up and tape to the top of my speedlight’s head. One of these sheets (which aren’t expensive), will give you a lifetime supply of these filters. For me, these gels are an invaluable part of flash photography. Tape the gels down on your lens hood when not in use.

The Full CTS will bring your flash WB down to around 2900K, more or less neutralizing the look of the Tungsten light. The 1/2 CTS will bring your flash WB to around 3800K, which will leave your backgrounds still with a touch of the warmth of Tungsten lighting.
 next section: Recommended speedlights / flashguns
Help support this website
If you find these articles of value, please support this website by using these Amazon and B&H affiliate links to order your photo gear.
I also offer photography workshops and tutoring sessions. There are also video tutorials, which are online workshops on photography.
Join us on the Tangents Facebook group for further discussions.
Neil vN

Books by Neil van Niekerk
Hi Neil, i have found your pages very interesting. I have a D300 and a SB 600 flash and i am experimenting but find it hard to get the flash light to look soft. Your tips were very helpful.
Thanks again.
CAlum
Calum .. if you’re getting a hard flashed look to your images, it is because there is direct flash of some kind. It is most likely because you’re bouncing in such a way that, from your subject’s point of view, they can see part of the flashtube (or your plastic light modifier).
Neil,
I understand how I need to meter for the background and then use my speedlight. I have a SB-600 and I wanted to know what power level in manual mode should I start with? I usually have to take 10 test shots to get it right. I want to be faster at getting my settings right. Not all subjects want to wait that long.
Eleazer .. the simplest and most reliable way to measure manual flash .. is with a flashmeter. I use the Sekonic L358 when I do use a flashmeter. But I mostly just use the histogram.
Here is a tutorial on using a light-meter with flash.
Hi Neil. I am thrilled to have found your site which I truly believe is one of the best learning resources for photography on the internet. Such concise writing and great examples – thank you!
Regarding high-speed sync, if a camera flash sync speed is set fast (for example, 1/320 Auto FP mode on a Nikon), I understand this allows faster shutter speeds at the expense of some flash power due to the flash ‘pulsing’. For shutter speeds below the flash sync setting – for example, 1/125 – does the flash work in the normal way? That is to say, non high-speed sync / pulsed?
I know that settings for aperture, ISO, shutter speed and flash power must be fluid and changed according to individual situations. My question is whether choosing flash sync speed to a fast mode (Auto FP for Nikon) is one kind of setting that can be made and generally left at that value? Until a situation where it was needed to be slower (although I honestly don’t know what that might be!).
Hope the question makes sense. Thanks again. Andy
Andy, check out this page on the effects of maximum flash sync speed. It should answer your questions in more detail.
However, in short quickly .. yes, you could just keep your camera to the max flash sync speed, and it will operate in normal mode. The exception here is the Canon 5D and 5D mk2. (There may be others, but I’m only aware of those two cameras.)
But go through the article .. it answers your questions in more detail.
Neil, in the first photo you taken in a restaurant, how you can make decision needed to add some flash exposure compensation +0.7 EV that’s because when you test shot for the outside your metered show -0.7 EV?
Thanks Neil
Ivan .. not exactly. You have to consider the ambient exposure and flash exposure as two separate things to consider.
I start off by first getting the ambient exposure. In this case it is my background. I shoot in manual exposure mode on my camera, and therefore my settings are fixed. I decide how I want the background to be exposed.
Then I use flash to expose for my subject in the foreground. In this case I needed +0.7 flash exposure compensation. This doesn’t relate at all to my background exposure. Most cameras have a tendency to under-expose the TTL flash if there is strong backlighting. However, this is not the case here.
Also read the following article on how to balance flash with available light.
Hi Neil,
When you’re shooting in manual mode and you have underexposed the ambient by say 2 stops, and adjust your shutter speed to allow more or less light into the exposure for your own artistic preference — can’t I accomplish the same thing with TTL flash by putting the camera in manual mode again and then simply adjusting the flash exposure compensation up or down to taste to allow changes for ambient exposure.
Have I just oversimplified this or does that not make any sense what so ever.
Cheers,
David Robillard
David .. you’re nearly there.
The only thing I’d change in what you said there, is that you adjust your Flash Exposure Compensation to adjust your flash output – more / less – brighter / darker. It’s not (necessarily) in reaction to your available light.
The only time that I can think of that you’d change your flash output in relation to your available light changing, is when you need to have your flash not act as a touch of fill-flash anymore, but need it to be a dominant light source. THEN you’d change your TTL flash output to allow for changes in ambient exposure.
Other than that, you would change your flash exposure compensation to change how much flash you have in relation to your ambient.
Neil,
It’s the first time I write, because my English is very bad :P
I admire your site.
Perhaps the most instructive of all I have read on photography.
You are an excellent photographer!
My question is:
Why do I need to add flash exposure compensation when I bouncing, to obtain the correct exposure in TTL mode?
I know I have to do that.
But I do not understand why.
The flash should not realize that it need to send more light in the same way that it happens if I move it away from the model?
What happens inside the flash, to explain this?
Why it behaves differently when bouncing, and consistently underexpose the picture if we not add compensation?
Thank You!
Marcelo … I agree. In theory, the camera and flash should calculate the TTL flash exposure correctly, regardless of whether you bounce the flash. So, in theory, one should not have to add FEC when you bounce flash.
In practice though, many camera models do require a boost of the FEC to get correct exposure when bouncing. It’s just one of those things we need to be aware of and anticipate accordingly.
Hello Neil,
thanks for all your articels.
I haven’t found many websites with such good information about photography and using flash.
Keep up the good work!
Sven
from the Netherlands
Neil, Thanks for your concise, easy to understand tutorials. Highly appreciated here in Africa where we can do with a bit of flashing! Elize