Taking photos in bright sunlight
Taking photographs of people in hard sunlight will always be one of the more daunting lighting situations we can find ourselves in. Without additional lighting, or the use of scrims, we have a few basic ways of dealing with the harsh sun:
– pose our subject into the light,
– pose our subject with their back to the sun, or
– just suck it up and accept that our photos will look bad.
Well, that last option isn’t really the way to go if we have any pride in our work as photographers. Which leaves us with the two other options …
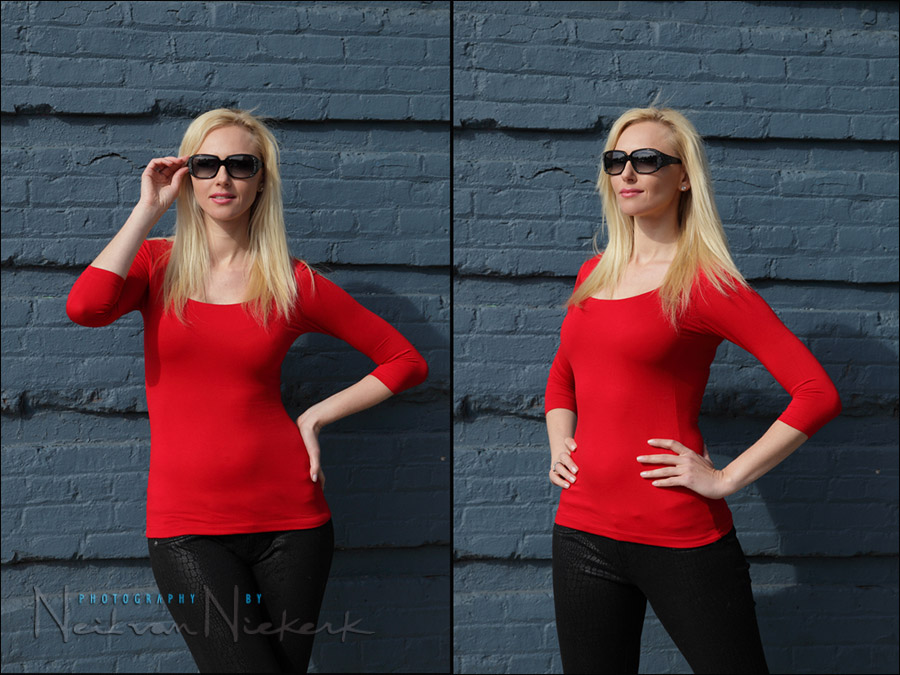
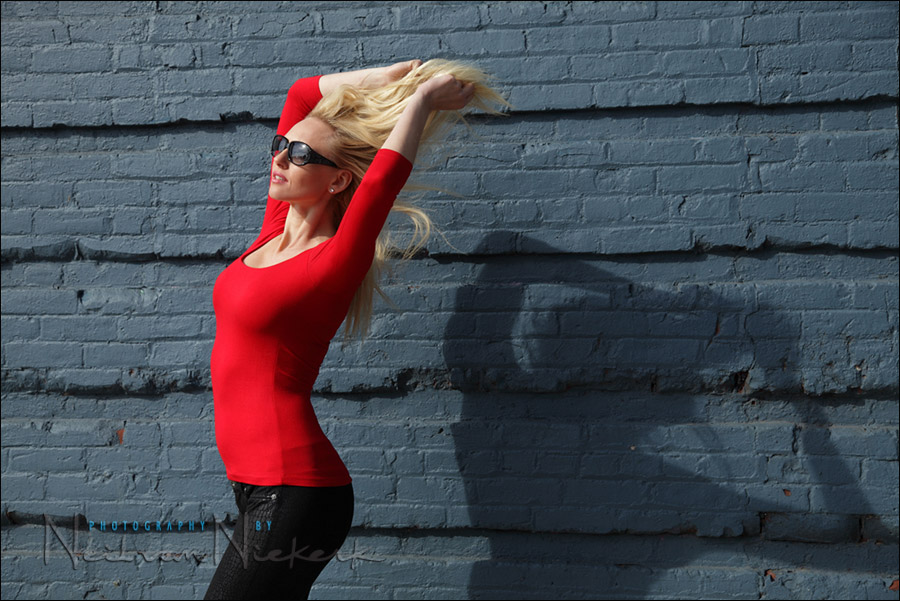
We had Aleona again as our model during a recent personal photography workshop in New York. During one of the scenarios we covered, we had Aleona in some seriously bright sunlight. Since I like her too much to have her sear her retinas, looking towards the sunlight, she wore sunglasses.
With these two photos, you can see how the lighting pattern on her face changes, simply by having her move her head towards the sun. Now add a dramatic gesture or pose, and we have an image like the one at the top here. Even better if we use the shadow as part of the composition.
It’s as simple as that – pose your subject “into” the light, and watch how the lighting pattern changes – especially, how the shadow of their nose falls.
Related articles
- Photography using the available light (Kristy & Tom)
- Photographing wedding portraits in bright sunlight
- Photographing in hard sunlight with on-camera flash (flower girls)
- Photographing in bright sunlight – find the shade! (Amy, maternity)
- book: Direction & Quality of Light

Direction & Quality of Light
I wanted to distill the essence of what we, as photographers, work with – light! Before we can truly grasp on-camera flash and off-camera flash, and really, any kind of photography, we have to be aware of the direction and quality of light. We need to observe the light that we have, and then decide how best to use it, or enhance it.
With this book, I try my best to share those “aha!” moments with you, and I do believe this book can make a difference to your photography.
The book is available on Amazon USA and Amazon UK, or can be ordered through Barnes & Nobles and other bookstores. The book is also available on the Apple iBook Store, as well as Amazon Kindle.
Exposure metering short-cut : shooting against the sun
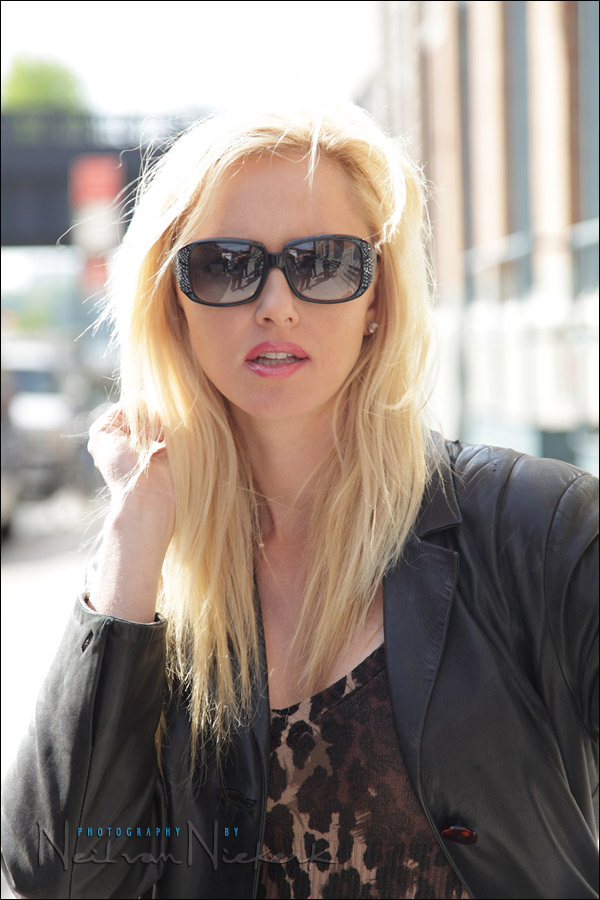
Still not using any additional lighting, the other way to deal with the harsh sun, is to simply turn your subject away from the sun. In this case we expose correctly for the shady side of our subject, and just allow the background to blow out. The sunlit parts of our subject will also blow out. We will lose detail, but depending on how high the sun is above us, the areas that are blowing out, will hopefully just be rim lighting that enhances our subject. Even if there are larger areas blowing out, it’s still better than having our subject’s face partially lit by sun, and partially in shadow.
Going about it this way, gives pleasant even light on the our subject’s face.
This photo isn’t much more than a test shot, to show a shortcut that I use to get to close enough to the correct exposure settings.
The shortcut is that I set my camera to 1/250 @ f/4 @ 100 ISO, and this is close enough a lot of times.
Using a Canon 5D Mark II with the Canon EF 70-200mm f/2.8L IS II (affiliate),
this photograph of Aleona was shot at:
1/200 @ f/4 @ 100 ISO
Let me explain how I got there:
Remember the Sunny 16 Rule … when you photograph something in bright sunlight, then your exposure settings are:
the shutter speed is the inverse of your ISO, for an f/16 aperture
For example, if you are shooting with a 100 ISO setting in bright sunlight, then the shutter speed is 1/100 for an aperture of f/16 … or 1/200 at f/16 for 200 ISO. Simple, round numbers.
Memorize these two combinations of settings:
1. Instead of setting 1/100 for 100 ISO at f/16, I usually go to 1/200 or 1/250 @ f11 @ 100 ISO
The higher shutter speed helps with subject movement and camera shake, and it also happens to be maximum flash sync speed for most cameras. Great for when we do want to use flash in very bright light.
2. Alternately, to get a shallower depth of field, I just take my camera to these equivalent settings:
1/2000 @ f/4 @ 100 ISO
In my experience, if you’re shooting in bright sunlight, then the shaded side is around 3 stops under the sunlit area. This of course, is a very rough guide. But these settings: 1/250 @ f/4 @ 100 ISO, surprisingly , will bring me close enough to correct exposure that I can nail the exposure with just one test shot to see how close I am.
The benefit of working like this, is that if I step out of a building into sunlight, then I have camera settings at hand that save me a lot of dial-twiddling:
for the brightly sun-lit areas:
1/250 @ f/11 @ 100 ISO, or
1/2000 @ f/4 @ 100 ISO
for the shaded area of my subject, I am usually close enough with:
1/250 @ f/4 @ 100 ISO
(which is 3 stops away from 1/2000 @ f/4 @ 100 ISO)
These settings give me a pretty good starting place.
While you could argue that you might just go to Aperture Priority or Program mode for the sunlight areas, with an extremely backlit photo like the one shown here as an example, shooting in Manual Exposure Mode is usually the easiest.
All of this a long explanation for a simple technique. But with these simple guidelines, we’re hopefully better able to cope when shooting in harsh sun.
Simple algorithm for flash w/ bright sunlight
If we decided to use flash to help us out, then we’d use this simple algorithm to get to our basic settings:
- Set your camera to maximum flash sync speed,
- Go to your lowest ISO, (without going to the camera’s extended ISO range),
- Find the aperture at which you’re not overexposing the brightest part of your subject. Now add aperture value’s worth of flash to your subject.
Further articles on using flash in bright sunlight:
- Flash photography: applying the Sunny 16 Rule & Flash Guide Number
- Photographing in hard sunlight with on-camera flash (flower girls)
- Overpowering the sun with flash (models – Sarah & Mark)
- Using direct off-camera flash (model – Lea)
- Photographing wedding portraits in bright sunlight
- book: Direction & Quality of Light
There are a couple of other ways we can deal with harsh sunlight. In the example above where the girls back is turned away from the sun, you could also expose for the highlights letting a portion of her face fall into darkness. It’s in that transition that we’ll find drama in our photos. Another way to deal with harsh light is to use it creatively. For example, you could place the groom in shadow and the bride in sunlight, you could find a bush or branch or fire escape that is casting a shadow and use that shadow to hide portions of your subject. If the sun is too bright for your subject, have them close their eyes. One of the things I love about photography is that we are only limited by our imaginations.
Thanks for the lesson my friend.Here on Curacao,we only have harsh sunlight ;-(…so this was very helpful!!
those rules for using flash in harsh light are an excellent lesson for beginners who easily get confused since youre only metering with one dial. shooting with the sun to someones back in harsh light without flash is a photographers nightmare! i would never do it. even you have blowouts, the shadows still look a bit off
For those of us that started photography back in the days, the Sunny 16 rule was an important starting point to outdoors exposure settings.
For the benefit of those who don’t know it, here is the more expansive version of this rule:
With a shutter speed set at 1/ISO(ASA) ~ i.e. 1/100 (or 1/125) for ISO 100
1. f/22 – well lit snow or beach scenes.
2. f/16 – normal sunny days: hard edged, dark shadows.
3. f/11 – slight overcast: soft edged, dark shadows.
4. f/8 – Overcast: soft edged, soft shadows.
5. f/5.6 – Heavy overcast: little or no shadow.
6. f/4 – Open shade.
As Neil usually does, once you get the basic exposure according to this rule, then you can alter the shutter and aperture settings to an equivalent exposure more in line with your creative vision of the shot.
– Carlos –
Neil, thank you for your post. Very helpful. I have done your #2 option above as sometimes that’s the look I want. While it often works, more times than I like, I end up with a photos with a lot of haze from the sunlight hitting the lense (I assume that’s what’s doing it). Other times I get too much glare. Then I end up fumbling to sort myself out. I suspect (and am waiting for a sunny day to test it out) that it might be only at those times when the sun is low in the sky and, therefore, hitting the subject almost directly from behind (as in I’m using their head to block out the sun), rather than on sunny days when the light is still up above. But I just don’t know for sure, and don’t know what other possibilities to consider. Any thoughts?
Lisa, it’s definitely a flare problem. You will have to figure out an angle to shoot at, where the sun doesn’t hit the front element of the lens. Also, make sure you remove the filter on your lens.
Lisa – there is also the option of using ND filters and strobes/speedlights to overpower the sun. The effect is rather cool (IMO). There’s a great video tutorial by Mark Wallace on AdoramaTV on Youtube that goes through the subject of ND filters for portrait work. Useful when you want to work at lower apertures for shallow DOF and your flash or the natural light is overpowering. Not sure if Neil has already discussed that option elsewhere in Tangents.
Lisa:
Getting rid of the lens flare from the sun hitting the front of the lens even when you have a hood on the front of the lens can be eliminated by holding your hand out in front and away from the frame to block the light or have someone stand off to the side between the sun and your lens to block the direct sunlight from hitting the front of your lens.
Thank you for keeping it simple, real, old school and relevant!
Thank you for some really vital info; with some outside shoots coming up for the first time I now feel that I have at least somewhere to start before I begin improvising!
One burning question that I have relates to your phrase: ‘Now add aperture value’s worth of flash to your subject’. While I’ve been practicing my use of flash in these conditions the amount of flash I have been adding has been a matter of guess work; could you explain further what an ‘aperture value’s worth of flash’ amounts to?
Thank you once again for the generous time in furthering us all!
You can either …
1. shoot with TTL flash
and let the technology get you there,
with perhaps a bump on the flash exposure compensation,
or
2. shoot in manual flash,
and then you get correct exposure, either by:
– using a light meter,
– using the guide number of your flash,
– guesstimating from how the image looks on your camera’s preview.
Great photo. Why doesn’t the backlit photo have that foggy, hazy steamy muddy low-contrast backlit look that so many backlit photos have? (A little different from flare.) In other works, the face is nice and crisp and clear. Did you shade your lens as it faced the sun?
A few factors perhaps played a part here:
I took the filter off;
pro-quality glass;
lens hood;
I got lucky.
Thank you Neil.
Im going to ask an incredibly silly but important question here,
Those first images, are those images in the “harsh” sunlight that you mention ?
Hard sunlight might be a better description. (I’ve changed the text now accordingly so that it is more descriptive.)
Neil,
when photographing in harsh sun, do you use some angle from which you make photographs ? Do you have some “golden rules” ? F.e. 45 degrees in relation to subject shadow ?
Direct sunlight is very contrasty, so I think you have to be precise. Do you have some starters ?
Look at how the shadow of your subject’s nose falls. Ideally, aim for Loop Lighting pattern.