
Available light vs Fill-flash
A question that popped up in my web stats was interestingly phrased: Do natural light photographers always use fill flash? The question curiously implies that you might not find natural light which is perfect. However, as photographers, that is something we’re constantly searching for: perfect light. It is out there, somewhere. So, resisting the temptation to just answer with a cheeky “no”, let’s consider an example of when you would not want or need fill-flash.
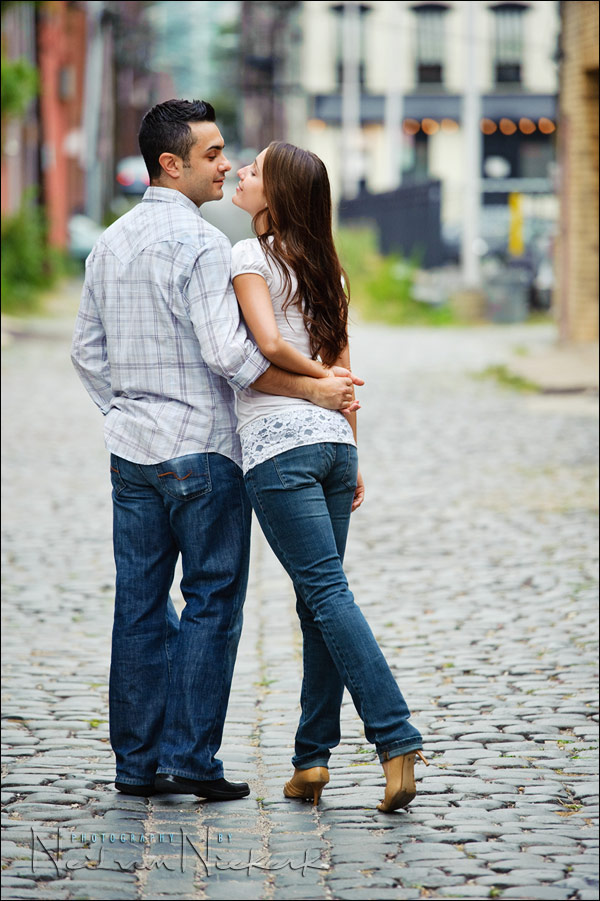
The thing with natural light, is that you have to look at it. You have to look at the direction of light. And see whether it gives you the quality of light that you need …
‘Quality’ here could mean a number of things, depending on what we need. Quality could mean how even the light is. As opposed to splotchy dappled light. Quality could mean the color balance. It really comes down to whether the natural light / ambient light is exactly what would make the photograph work.
With this photograph above, I was working with this couple under a high awning outside a train station. No light from directly above. Just light coming in from an angle to the side. Great. I then purposely posed Jessica so that the light comes in over her shoulder and lights up her face. Clean open light on her.
The approach here is a technique which can consistently be used. It is very much the same idea as described in the post on direction of light and choice of background.
![]()
I want to emphasize here that I didn’t just have the couple stand in a random spot. If they were half turned away from the light coming in from the side, then the light on her face might have been uneven, and her eyes might’ve been too shaded. The pose here is quite specific in regards to the direction of the available light. With that, we just didn’t need to augment the available light with flash. The light was perfect. But we had to control it.
Controlling the light here was much more easily done by directing how the couple was angled towards the light. Simpler than adding reflectors and softboxes and such. Or alternately, moving the sun and clouds around. You have to work within your capabilities.
Related articles
In this photo, my exposure for the couple was correct. I didn’t allow the brighter street scene or background to influence my camera settings. I based my exposure on the couple. The next step was adding fill-flash with my on-camera speedlight.
Since I shoot in TTL mode most of the times when shooting on the move, I simply dialed down my flash exposure compensation (FEC) to around -2EV or -3EV. Somewhere there. Adjusted to taste.
Understanding how to use FEC to adjust the amount of flash (in relation to the ambient light), is essential to understanding how to achieve the best fill-flash settings.
If I had used manual flash, I would approach it the same way. I’d set my manual flash to give me 2 or 3 stops less exposure than the aperture I am using. If I am shooting at f5.6 then I would set my manual flash to only give me f2.8 or f2 worth of flash exposure.
The fill-flash in this case is coming from the camera’s point of view – but since it is dialed down, it isn’t that noticeable. While off-camera lighting would look better, using on-camera fill-flash like this is definitely a good work-around, especially when we don’t have the means for off-camera lighting.
With this sequence of images in the alley, my camera settings were: 1/400 @ f3.5 @ 800 ISO … and FEC was set to -3 EV. Since I find my Nikon D3 and Nikon SB-900 tends to give more flash than I like as fill-flash, I am constantly dialing it down more. The high shutter speed had two uses here – to make sure I don’t get subject blur as the couple moved and danced there. The other side-effect of the high shutter speed was that I had bumped my flash into high-speed flash sync territory, and that cuts down tremendously on my flash’s output capability. This then helps me pull down the often-times too-strong fill-flash from the D3 and SB-900 combo.
Nice simple answer. Sometimes I’ll see photographers trying to *make* a particular outdoor location work for quite a while. Throw up shades, reflectors, softboxes… while these are all wonderful methods of lighting a subject anywhere, I find (as a solo shooter constantly without an assistant) that simply walking a little and finding a location with perfect natural light is more efficient.
Beautiful example of using of natural light!
Cheers
Hello there Neil,
Neil, how do you manage in situations that you dont have an assistant to handle the flash out of the camera? (I think this is the most common cenario)
Do you:
– Try to get your ideas with the flash in the top of the camera (easy to handle, but hard to give the exactly idea you want)
OR
– Use a tripod, to put the flash on the right position (good to manage the exactly position of the flash, but hard to handle.. – once you have to go.. change the position.. take the photo… change again the position.. take the photo..)
?
Best regards,
Victor Godinho
Neil,
Please allow me to challenge the Ph.D. of Lighting (?) with a daunting attempt to rephrase his entire post in a single phrase:
“If the natural light comes from the same direction, in the same quality and quantity that you would get when using flash, then the “natural light only”-way is definitely to consider”
Does it make sense to use this as a starting point?
Sorry but I’m a big fan of catch-phrases… ;-)
Best regs,
Roel
*scratches head*
*mumbles something about Ph.D.’s often being wiseguys…*
*mumbles something ’bout Ph.D.’s also often being damn right too…*
;-)
When does the flash become the main light as opposed to the fill in light?
i.e. if I’m shootin and boucing flash of a couple in a dark church but have measure ambient exposure – say 1/30 at f2.8 – I don’t want a shutter speed less that 1/60 – is it the shutter speed that determines when it becomes the main light/fill light? in this case do i ignore the ambient light and just fire the bounce flash using TTL?