bounce flash examples – wedding receptions
Over the course of the past year or so, I’ve made a steady attempt to move this blog away from being wedding-heavy, and take the material more towards general photography, and photographing people.
However, since the most of my work is as done as a wedding photographer in New Jersey, I still get a large number of questions which relate to wedding photography – and specifically, photographing the reception. So I thought I would expand a little on the techniques I use in photographing wedding receptions.
A few years back, I would regularly use additional lighting to add extra light to the reception room, in order to avoid the dreaded black background which everything faded into. But I rarely do so these days, and haven’t used additional lighting at a reception in more than a year.
Somewhere around the time I started using the Canon 1D mk3, I decided to forgo the additional off-camera flash setups at a reception. I could now really make use of the high-ISO capabilities of the camera to bring in the ambiance. And now with cameras such as the Nikon D700 (B&H) and Canon 5D and Canon 5D mkII (B&H), incredibly good high-ISO performance has become more accessible.
Other reasons for not using additional off-camera lighting at receptions usually have to do with the logistics and space, and shape of the reception room. Quite often there just isn’t space to safely put down a lightstand or two. Also, more and more receptions venues are lately using up-lighting. This already helps create a more colorful and interesting background, and additional flashguns would just destroy the mood.
To show some examples from weddings this year:
All of these images are with on-camera flash with the back foamie thing, usually bouncing the flash behind me or off to the side.
camera settings: 1/30 @ f3.2 @ 1600 ISO; TTL bounce flash
equipment: Nikon D3; Nikon 24-70mm f2.8 AF-S @ 24mm; Nikon SB-900
.
camera settings: 1/125 @ f2.8 @ 1600 ISO; TTL bounce flash
equipment: Nikon D3; Nikon 70-200mm f2.8 AF-S VR @ 200mm; Nikon SB-900
.

camera settings: 1/100 @ f4.5 @ 1600 ISO; TTL bounce flash
equipment: Nikon D3; Nikon 24-70mm f2.8 AF-S @ 24mm; Nikon SB-900
With a marquee tent, you have a bounceable surface behind you, where-ever you turn. In terms of using flash, it is one of the easiest situations to find yourself in.
.
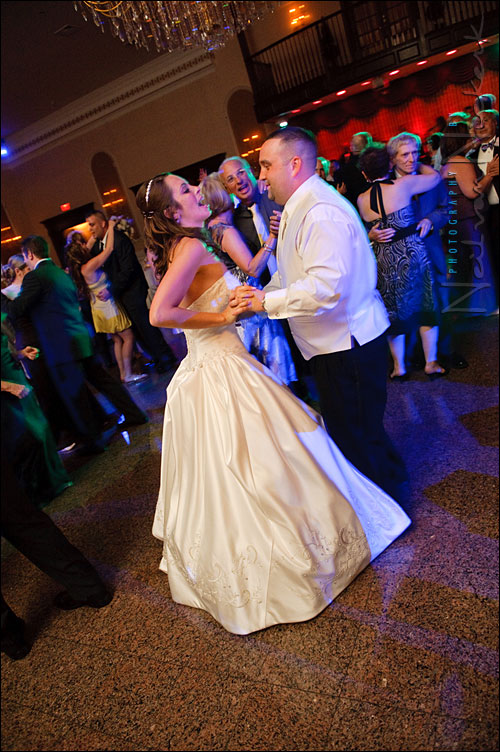
camera settings: 1/60 @ f3.5 @ 2000 ISO; TTL bounce flash
equipment: Nikon D3; Nikon 24-70mm f2.8 AF-S @ 24mm; Nikon SB-900
I quite often try to use the DJ’s lighting as a way of creating separation from the background, and especially to avoid a black background.
.
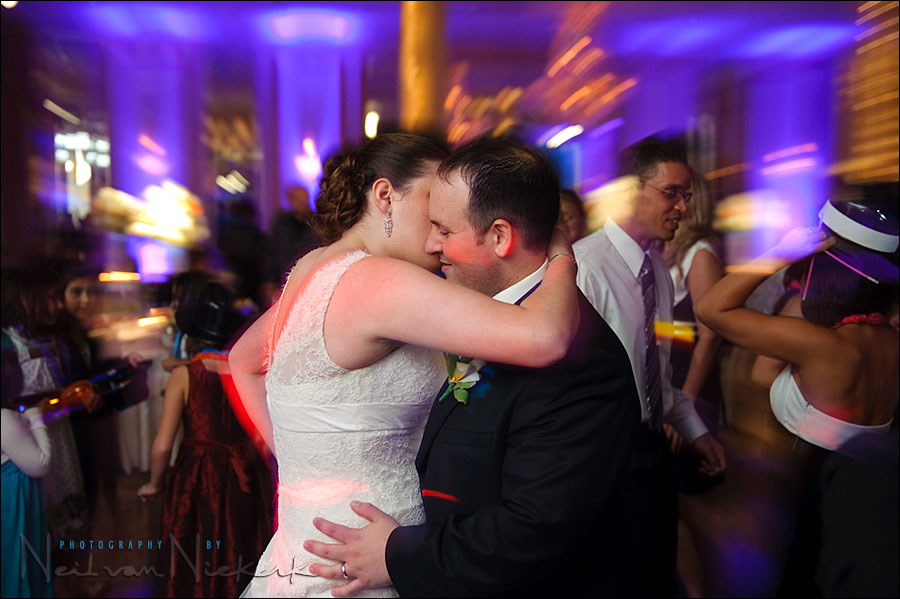
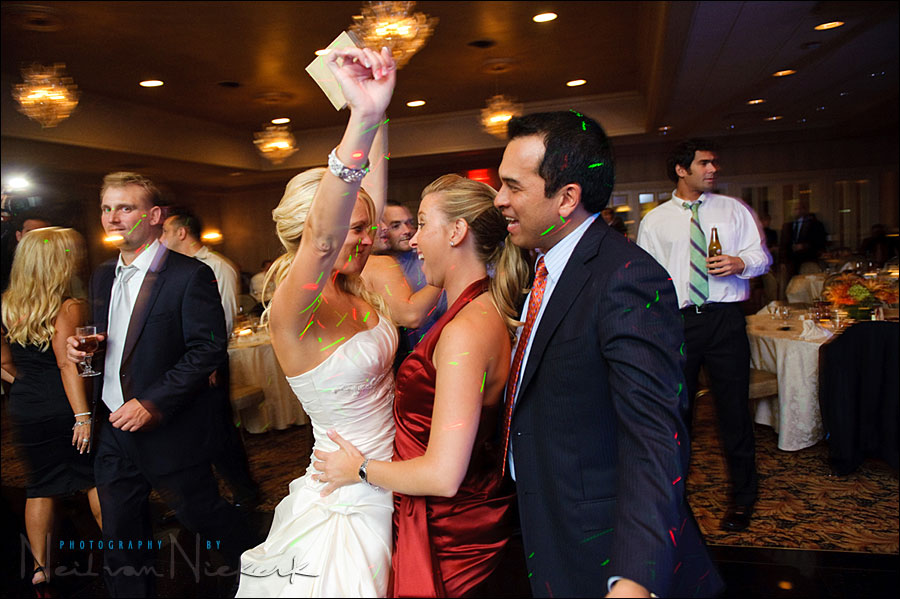
camera settings: 1/30 @ f3.2 @ 1600 ISO; TTL bounce flash
equipment: Nikon D3; Nikon 24-70mm f2.8 AF-S @ 35mm; Nikon SB-900
Using a slow shutter speed, I deliberately zoomed while tripping the shutter. It took numerous tries to get a few frames which worked. You really do need the most important part of your scene in the center where you have the least zooming effect. It’s a bit of a trick to keep the camera fairly static while twisting the zoom ring suddenly.
.
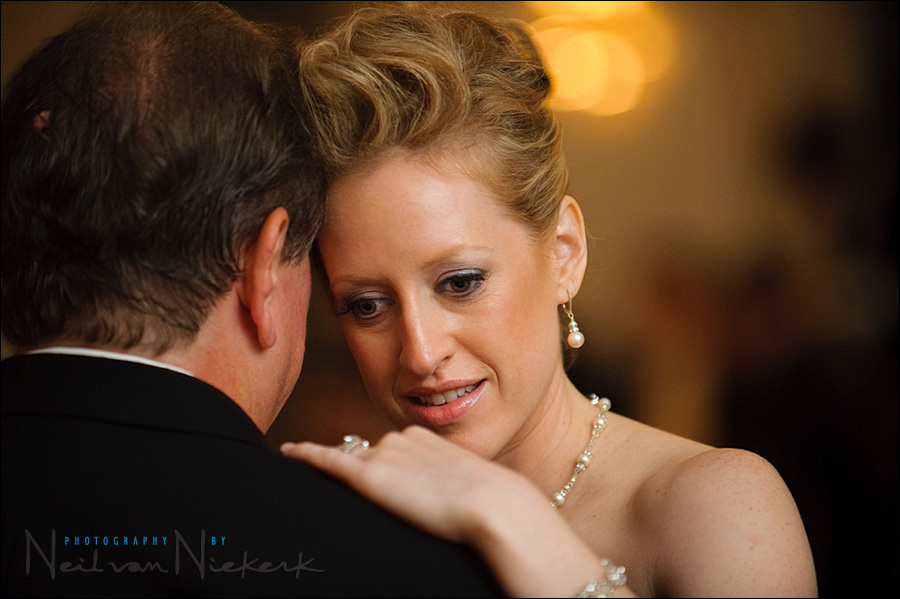
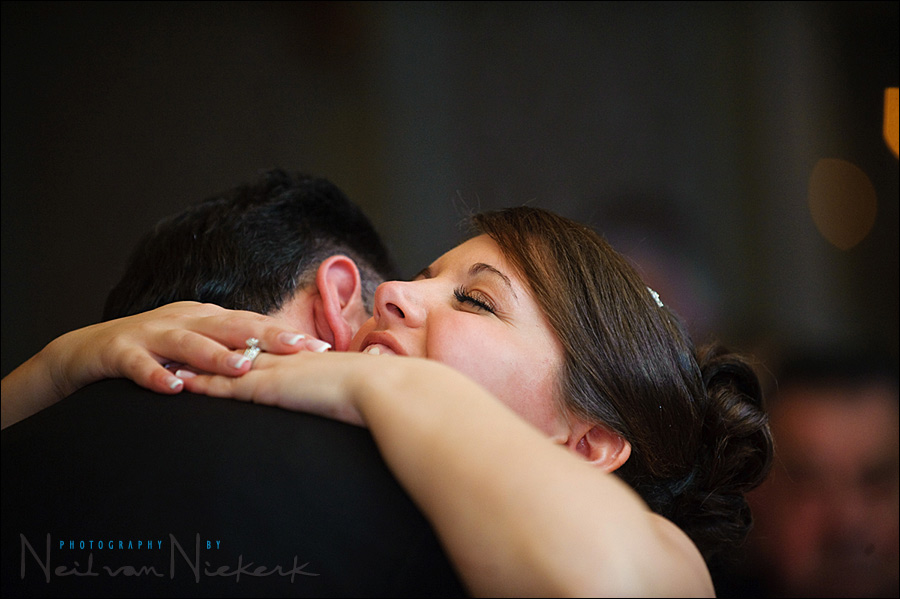
camera settings: 1/50 @ f2.8 @ 2000 ISO; TTL bounce flash
equipment: Nikon D3; Nikon 70-200mm f2.8 AF-S VR @ 200mm; Nikon SB-900
With the first dance and parent dances, I mostly use the 70-200mm f2.8 wide open and wait for the right expression. I positioned myself so that there are defocused highlights in the background to help create separation. The flash is bounced off to my right into the large reception room.
.

camera settings: 1/60 @ f2.8 @ 2000 ISO; TTL bounce flash
equipment: Nikon D3; Nikon 24-70mm f2.8 AF-S @ 24mm; Nikon SB-900
The black foamie thing clearly in effect here .. it allowed me to bounce the flash to my left, and even slightly towards the row of musicians. This is so that I can create a light-source equidistant to everyone .. and hence even light on everyone. This makes my post-production workflow simpler in that I don’t have to pull images into Photoshop to edit them.
.

camera settings: 1/125 @ f2.8 @ 1600 ISO; TTL bounce flash
equipment: Nikon D3; Nikon 70-200mm f2.8 AF-S VR @ 115mm; Nikon SB-900
This photograph has appeared elsewhere on this site, but I thought it would make a great example here. Once again, I positioned myself so that I could use a defocused highlight in the background against which to place my subject.
.
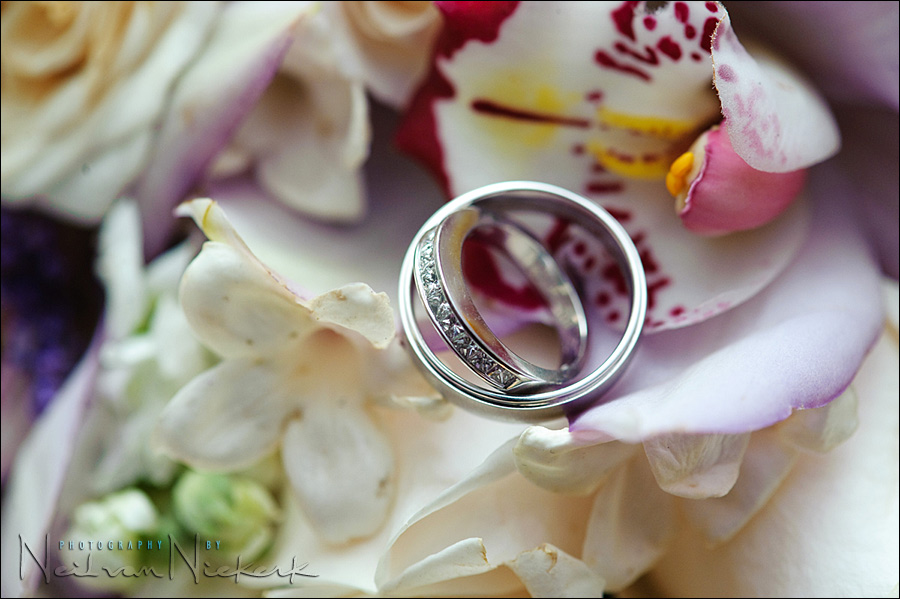
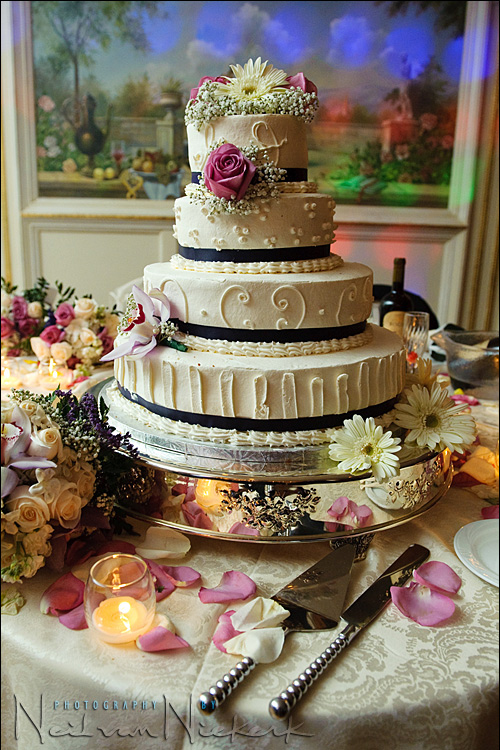
camera settings: 1/100 @ f5.6 @ 1600 ISO; TTL bounce flash
equipment: Nikon D3; Nikon 105mm f2.8 macro AF-S VR; Nikon SB-900
I use the same technique for detail shots, such as this photo of the couple’s rings. I bounced flash towards the wall opposite me. ie, the flash went “over” the rings, so that the light comes in from the opposite side of the camera. I used the black foamie thing again to flag the light from my flash so that there is no direct light from my flash falling on the rings and flowers.
And while we’re looking at detail shots – I alternate detail images between using the 85mm f1.4 wide open without flash, and on the other camera, use the 24-70mm f2.8 with flash. The flash is then bounced off to the side to give directional light.
camera settings: 1/80 @ f4 @ 1600 ISO; TTL bounce flash
equipment: Nikon D3; Nikon 24-70mm f2.8 AF-S @ 24mm; Nikon SB-900
.
And now the big question – one which regular readers of this blog will already know –
with these images, how did I meter for the flash?
other articles on wedding photography
how did I meter for the flash?
Well, there’s a lot of white and reflective metal in the cake scene, so you probably had to add some FEC. +2 or +3 by instinct, I’m betting?
Hi Neil
I absolutely love the photos above. They are so perfectly emotional.
I’m reading your blog since you started writing about the black foamie thing. What’s still not clear for me is why the BLACK foam should be better than a WHITE one? I’m using a ‘better bounce card’ for some time now and think it’s just better in cause of light effiniency. Why would I want to let the foam absorb a big part of the emitted light when I could use it to distribute the light even more? As you place the foam between the flash head and the object you’re going to photograph anyway why is it better using a black foam?
Thanks very much for all these insights
Sacha
Sacha, check this article for the reasons why I prefer a black object to flag my flash, instead of a white object.
Thanks for this one Neil. Thanks to a previous black foamie thing post I used your ‘shoot past the cake and bounce’ trick at last weekend’s wedding and got my best ever cake shots!
Neil, as far as I know your technique and you already indicated in the image captions, I’ll also guess you used TTL bounce flash with some FEC around +2 to compensate for the white subjects. And I think you used manual mode on camera to set the background exposure slightly below “correct”, to make the subjects pop a little more. Am I right?
I’ll opt for camera -1, FEC 0 or +1.
good stuff… that cake shot, done at the Tides, right? nice to see some of the same venues I shoot at on the blog pretty frequently
just a guess based on very little experience: Camera +0.7EV, Flash +1EV
I would guess that you under exposed the ambient and used your histogram to meter off the whites for your flash exposure, using your FEC to make the proper adjustments.
Thanks for all the awesome content you provide.
With flash off, meter the camera -2 stops in manual mode. This may push ISO up and shutter longer. Then, with flash on in TTL, shoot at 0. This approach ensures ambient light in background, properly exposed subject but no dreaded black background.
Thank you for sharing your information, with us, youcapture some wonderful emotion,in a candid style. Love your work, your book arrived last week, anyone who has not bought it, its a fab read. Looking forward to furthur reading.
Using Nikon gear, exposure compensation (=EC)also influences the flash exposure.
So normally you have to compensate with (for example)a + FEC, as soon as you dial in a – EC.
My question is: I´m always working in M-mode, where you don´t use EC but simply dial in a + or – “on” the light-bar. Do you also have to compensate the flash exposure in that case the same way, I mentioned above??
As per the availabe shadow area of the image there was not enough ambient light avaialbe to lit the image well. Hence, FEC should be increased to lighten the image. For the bounce flash, I am not sure what exactly you have increased on FEC…! same time, with the shutter speed used is helping to registering the background ambient light without distroying the mood…. look at the other side of the image like the bottle and a glass. bouncing flash reaching to them thru the other side. I feel nobody is going to notice the composition that you have used to utilize the bouncing flash flow unless and otherwise narrating it. thru the bounce flash the table top is getting the exact shape and adding depth to the image.
Neil, can you please expaing the flash metering?
Hi Neil,
From your past posts, it looks like you underexpose the background and then use FEC to bring up the foreground (the dress or the cake).
Cheers for the feedback Neil.
Neil,
I just want to re-confirm something. When you say “2 stops under” for ambient light, does that mean your exposure needle in the camera is at -2 stops when metering the scene? And then, you just take the picture and let TTL flash automatically handle the scene?
–Stephen
Hi Neil
thanks for a great post. And Nice pics.I was expecting something about the Use of Qflash at reception though.
Another question that I have is the same as asked by Sacha above “why the BLACK foam should be better than a WHITE one? Why would I want to let the foam absorb a big part of the emitted light when I could use it to distribute the light even more?”
Thanks in advance.
PS : I am reading your book for the 2nd time.
-MP
Mohanpreet, check out this follow-up article on why I chose a piece of black foam to flag my flash.
Hi Neil,
Regarding the “zoom” on your flash head in cooperation with the “black foamie thing;” do you zoom your flash head based on your distance from the object or wall you are bouncing off, or do you have a standard zoom setting that you typically use when utilizing bounce flash?
Cheers!
Trevor
The black foamie is used to kill all light coming directly from the flash. If you use a white anything, it will throw a bit of light forward on your subject, no matter how you orient the head. Black foam is used as a gobo to “direct” the flash on to the surface used to bounce AND kill any stray direct light that might spill on your subject.
Cheers!
Bogdan.
Don’t worry about posting too many wedding things. The lessons learned can apply to other disciplines easily. After all, what if one had to shoot an indoor Leapfrog competition?
The ring shot is beautiful and I hope you post more of those in the future. The technique is easily applicable to product and still life photography.
No such thing as too many wedding things. It’s the ultimate in flash control, and 99% of us will shoot at friends’ wedding (for fun) sometime. General photog can/are covered by many forums/blogs, but nobody does weddings like you!
Neil,
In the fifth photo of the series where you capture the picture of the dancing couple where you say that you bounce it to the large hall, do you have any specific surface at all or is it just an empty large hall?
Great post, love the multiple examples and the detailed explanations. Thanks a lot!
Neil Thank you for all the tips. In the future can you also post the focal length used in all your pictures, such as Nikon 24-70mm f2.8 AF-S @ 35mm.
I do see some pictures you already post the focal length like @35mm, but not all your pictures. It would be a big help to the community if you can post the focal length for all your pictures. Thank you Neil.
You are the God of on-camera Flash photography. I have never seen anyone that do it as well as you can, and can teach people in an easy to learn method.
Hi Neil, Thanks to you I will shoot my first wedding. I am really excited.
I read your website and your book too. But I have one question remaining.
Since lights takes over the color of the surface it reflects, I get a strong color cast if I use the technique in rooms with brown surfaces.
Do you still use the old techniques, with direct lighting, or is there an other soloution? Could you explain how you solve this?
The way you make everything to perfection, even sharing your knoledge is amazing
Hello Neil,
When shooting in such lighting conditions (where you bounce off TTL flash to the side or behind), do you have to rely on manual focusing or does AutoFocus still work on the camera? Do you rely on the assist light illumination to help with auto- focus in dimly lit dance floors? What setting of AF mode do you use? (for Nikon cameras?)
Thank you for your reply.
:) Mona
Neil, I often shoot at receptions where walls are FAR behind me. What would your suggestion be for bouncing flash in those situations? Do I just need to crank up the ISO / increase the FEC in that situation?
Yes! You crank up the ISO and open up your aperture.
(In theory you shouldn’t have to dial up the FEC, but this might be necessary. Adjust to taste.)
– manual on-camera bounce flash at a wedding reception
– TTL bounce flash at a wedding
Hi Neil,
I love how your images turn out for the web, how do you go about preparing an image for the web such as the above samples eg: sizing, sharpening, I note there are no colour profiles embedded in them.
Thanks.
Regards, Ade
Hi Neil,
Just like Courtney’s question above, I also would like to know what to do if the room is huge, perhaps dark, and would drain the battery juice really fast if you bounce the flash (if even possible). I’ve been in these situations where cranking up the ISO and use f2.8 are just not enough.
Cheers,
Leo Dj
I’m wondering whether it might be useful, when we dial back our ambient (background) by 2 or 3 stops, to think of this as the in-the-field counterpart to setting up for a low-key studio portrait. With flash to light the subject (and/or subject better-lit than background) and esp. if we can pick our angles, dark backgrounds are usually an option (although sometimes problematically so).
High key (white background, or nearly so) can be harder to engineer in the field, but can get “high key” in the field with a blown-out sky, or maybe indoors with a background that’s a lot brighter than subjects (or by making it so with off-camera flash).
And when Neil talks about choosing angles with interesting highlights or colors, maybe that’s the in-the-field counterpart to unrolling a mid-key background? maybe we should start to think of that as an in-the-field counterpart to going to our favorite online store and choosing which background fabric to buy, from a palette of alternatives. As in…
http://www.bhphotovideo.com/c/search?Ntt=background+muslin&N=0&InitialSearch=yes
really great, lot to learn. fantastic photos. thankyou very much.
Hi, I note quite slow shutter speeds for many of the above marvellousimages, are you using a tripod to get what appears to be great sharpness in your pics?ive found myself needing to go no slower than 1/160 (without tripod) to get good reasonable sharpness,but sometimes lighting won’t allow, high iso won’t allow due to noise etc.i work with Nikon d700.many thanks Caroline.
Hi Niel.. your articles have been such a great help! This may be a silly question but would you perhaps be able to show what this black foamy thing looks like?
Don’t be hesitant to click through on the links.
Neil,
give us some more little competitions like this one ;-)