Tangents

photography tutorials, reviews & workshops

tangents photography blog
learn : discuss : share
  • Tangents
  • Tutorials
    • Flash Photography
    • Wedding Photography
    • Studio Photography
    • Posing People
    • Understanding Your Camera
    • Exposure metering
    • BFT
    • Best Photo Books
  • Reviews
    • Sony
    • Nikon
    • Canon
    • Fuji
    • Profoto
    • lighting gear
  • Workshops
    • Info: Workshops
    • In-person
      tutoring sessions
    • Online
      tutoring sessions
    • Workshops in
      New Jersey (NJ)
    • Workshops in
      New York (NYC)
    • Photo walks in NYC
    • Studio Workshop
    • Video tutorials
    • Workshop results
  • Books
    • On-Camera Flash (revised ed.)
    • Direction & Quality of Light
    • Off-Camera Flash Photography
    • Lighting & Design
    • On-Camera Flash (1st ed.)
  • Projects
    • Two Perspectives
    • B&W Infrared
    • Vintage lenses
    • Time-lapse photography
  • Info
    • About
    • Contact
    • My Photo Gear
    • Books by NvN
    • Join us on Facebook
    • Acclaim
    • Success Stories

bouncing flash inside large venues

July 11, 2008 Neil vN 34 Comments

bouncing flash inside large venues – adding TTL flash to ambient light

One of the ideas that has been mentioned here previously, is when using on-camera flash indoors, to approach it with a studio mind-set where possible.  Instead of bouncing flash upwards towards the ceiling, or even simply behind you, the idea is to think “where would I have placed my softbox if this were a studio?”

Then it is simply a matter of pointing the on-camera flash in that direction, and flagging any spill light from the flashgun.  I most often use a piece of black foam to flag my on-camera speedlight.


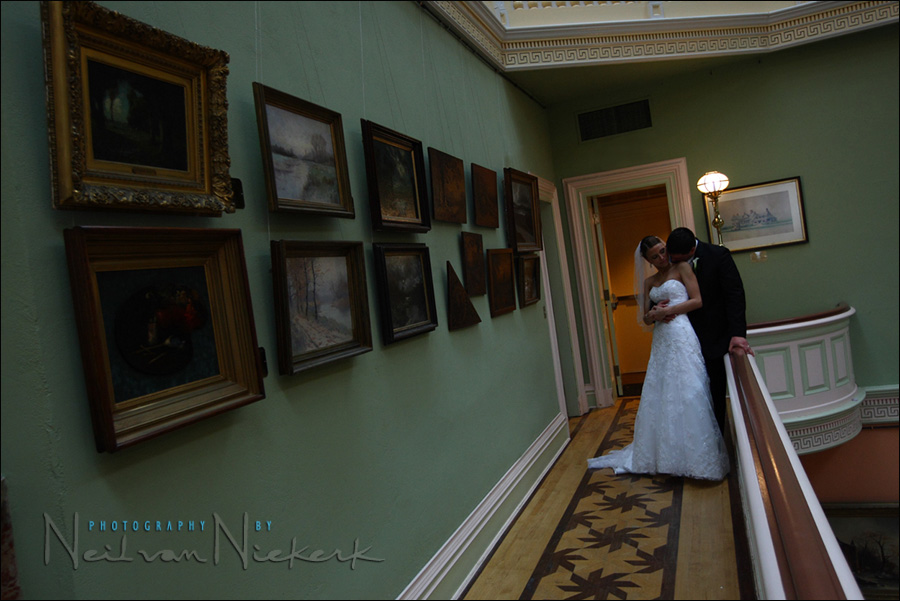
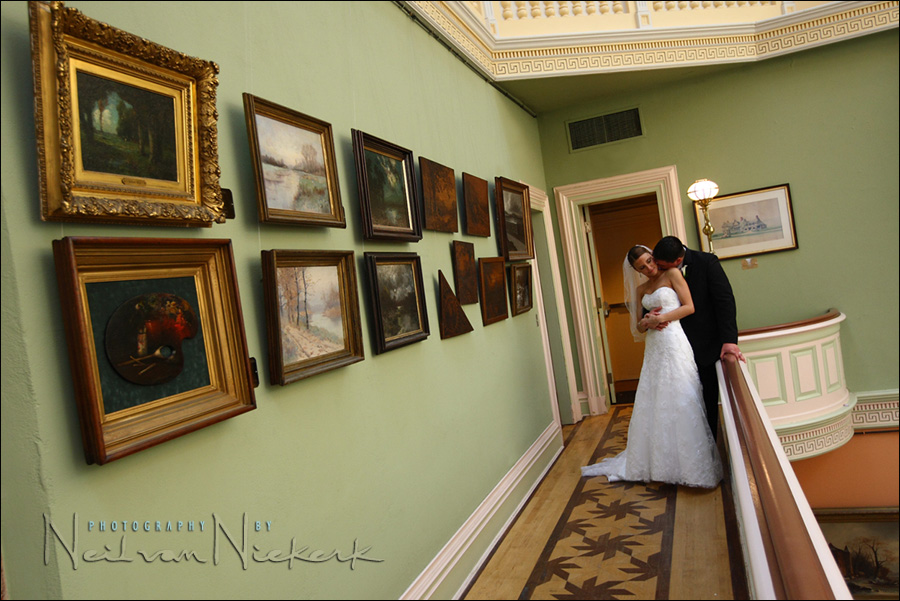
The image at the top is from the bride & groom’s portrait session in a museum.  And this is what the ambient light looked at those settings:
(which were 1/125 @ f3.5 @ 1000 ISO for all three these images)

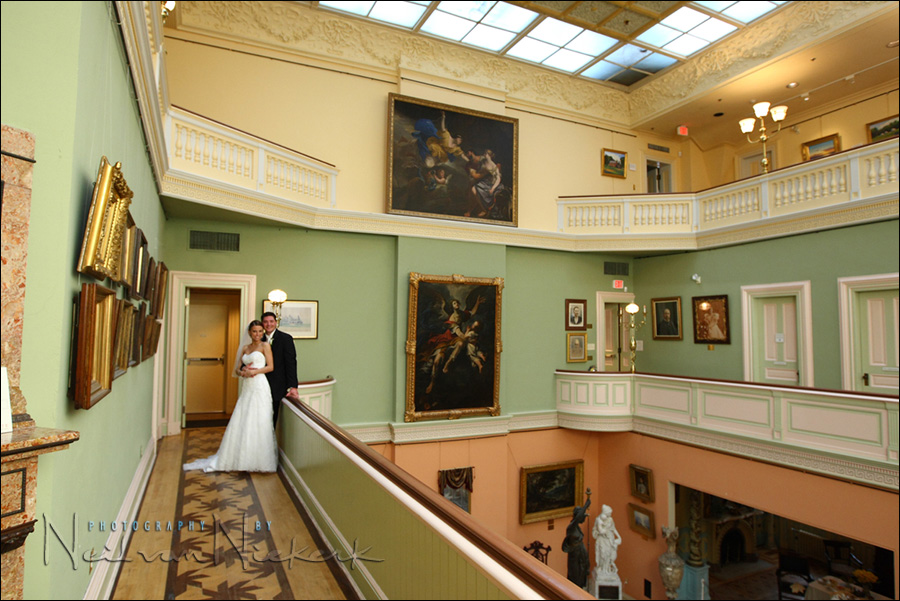
The difference is due to bouncing on-camera flash to my right and 45′ upwards into this area:
(and I used that black foam half-snoot to flag the spill from the flash.)

A little bit of flash will go a long way at the right aperture and ISO combination.


related articles

  • bounce flash photography & the inverse square law
  • bounce flash examples – wedding receptions
  • how to bounce flash

Filed Under: bounce flash photography, flash photography, technique, Uncategorized Tagged With: bounce flash photography, bounce flash tips


Help support this website

If you find these articles of value, please help support this website by using these B&H and Amazon affiliate links to order your photo gear.

I also offer photography workshops and tutoring sessions, whether in person, or via online video tutoring sessions.

Please follow me on Instagram for more.

You can also join our thriving photo community in the Tangents group on Facebook, where we show our photos and discuss all things photography.

Thank you,

Neil vN

Books by Neil van Niekerk


34 Comments, Add Your Own

  1. 1geoff says

    July 11, 2008 at 6:24 am

    Wow – a museum that let you:
    a. take a photograph and
    b. use flash

    I find this more interesting! :)

    was the fast-ish shutter speed (1/125) the only one you could select to reduce ambient light (when coupled with your chosen ISO and aperture) or was it to reduce shake induced by using a longer lens (camera-shake)?

    Reply
  2. 2Neil says

    July 11, 2008 at 6:25 am

    Geoff ..

    Yup, they allow you to use flash. They have to, since they make money off renting hourly slots to brides who want to have their portraits taken there.

    The fast-ish shutter speed is simply because I don’t want to risk camera shake or subject movement giving me soft images. I can correct for noise afterward in post-production, but I can’t correct for image softness. (Even though in this case I wasn’t using a long lens – I was using the 16-35mm f2.8 at 22mm.)

    Neil vN

    Reply
  3. 3Dave says

    July 11, 2008 at 8:04 am

    I can’t believe this is ONE speedlight?! Just ONE light on-camera? And it’s bounced, flagged, and gel’ed too?! (I’m taking a leap here and saying you gel’ed it because the tungsten bulbs look white). I would never believe one on-camera bounced speedlight could produce this much light, especially gel’ed down a stop or so, and forced to bounce all over the place. It’s just amazing. Can I also presume you’re probably around +2/3 FEC or higher? Looks bright and the dress is nice and white.
    Thanks once again. I keep shooting on-camera bounced and gel’ed and I keep seeing incredible results!

    Reply
  4. 4Neil says

    July 11, 2008 at 8:05 am

    Hi there Dave …

    Yes, just one on-camera speedlight.
    Gelled, flagged and the light bounced into that open area you see in the 3rd photo.

    The FEC was at 0 EV.
    The mk3 is pretty good at not needing the flash exposure compensation nudged up as a default setting.

    Neil vN

    Reply
  5. 5Dave says

    July 11, 2008 at 8:08 am

    Sorry, forgot to ask my question: Why does the ambient shot look underexposed? I thought an important point was to properly expose for the ambient, then use the flash to fill-in and highlight. This isn’t outdoors and there isn’t a big background seperation so I can’t see why underexposing the ambient by a stop or so makes much sense, especially when you’re forcing the flash to light so much area to begin with, why make it work so hard? What were your thoughts here?
    Thanks!

    Reply
  6. 6Neil says

    July 11, 2008 at 10:46 am

    Dave,

    The ambient-only photo *is* under-exposed.
    Playing with the RAW file now, I’d say it is about 1.5 stops under.

    Where flash is only used as fill, it is necessary to expose properly for the ambient light.

    But in a situation like this, where *I* decide that I want ambient light and flash in (more or less) equal quantities, I need the OVERALL exposure to be correct.

    See, here I am adding flash to the ambient light .. or if you will, I am adding enough flash to ride on top of the ambient light to give me correct exposure. So I don’t need the ambient light to be correctly exposed. But I do need it there so that the flash can add to the overall exposure, and finally give me correct exposure.

    If the place was very dark, or I had chosen settings like 1/250th @ f5.6 @ 400 ISO (and had used a much bigger flashgun / studio light), then the results would’ve looked very different.
    Then the light would’ve been pretty much all flash.

    Why am I making the flash work so hard?
    Because without flash and only using ambient light, I would’ve had to use settings like:

    1/80th @ f3.5 @ 1600 ISO
    (and then I am pushing the ISO too high for portraits.
    Even with the Canon 1D mk3, using 1000 ISO is about the limit of where I’d go with noise on an image that might be enlarged.

    or I would’ve had:

    1/40th @ f3.5 @ 1000 ISO … and the shutter speed would be too low.

    etc.

    So I used flash here to give me settings where I didn’t take much of a risk.

    Neil vN

    Reply
  7. 7Alireza says

    July 11, 2008 at 11:38 am

    Thanks for sharing this point. But I wonder why don’t you go for faster lenses in these situations? You’ve got a very nice 24mm f/1.4L in your gear. Is it because of the added directionality of light by flash or maybe because of the shallow depth of field?

    And one silly question: Could you bounce the flash to your left wall and gel it to get rid of the color cast?

    Reply
  8. 8Neil says

    July 11, 2008 at 12:55 pm

    Hi there Alireza …

    I do have the 24mm f1.4 wide-angle lens, but in a situation like this where our time was limited and I have to get as much variety as I can, it is easier for me to work with a zoom.

    With a wide-angle lens, I personally feel that it is less necessary to have a very wide aperture lens than with a longer lens. The narrow depth-of-field has a far more pronounced effect with the lenses from 50mm and up.

    Now, about the direction in which I bounced flash.
    No, I couldn’t have bounced into the wall to my left. I needed my light source to be equal in distance to the paintings on the wall, and to couple in the background. So I *had* to bounce my flash way off to my right into that large room.

    When you bounce flash, you have to think of whatever surface it is that you’re bouncing flash off, as being your light source .. and not your flashgun itself. And in that way, I specifically chose to bounce the flash to my right into that room, and also to flag it so that there is no direct flash.

    Neil vN

    Reply
  9. 9Dillan says

    July 11, 2008 at 9:08 pm

    I am an absolute amateur at flash photography, and I’d just like to say that I think you are a brilliant photographer. Your site is wonderful, and I value articles like this very highly. Without seeing your examples, I would not even know that such techniques were even possible. Your examples encourage me to put more effort into flash photography; without it, I would take the same uninspired photos using direct flash that everyone else seems to take. Thank you for opening up an entirely new world to me!

    Reply
  10. 10Ralph says

    July 11, 2008 at 9:11 pm

    Hi Neil,

    Would you get the same results if you used a full snoot rather than foam flag (half-snoot, if that;s the term)?

    Reply
  11. 11Neil says

    July 11, 2008 at 10:18 pm

    Ralph ..

    A full snoot would give (slightly) different results. But it would need a touch more work to direct the light so specifically.

    So I prefer the half-snoot black foam thing I have going there, because it is for me, a good combination of specific control of the flash’s light, but still spreading the light widely enough. Meaning, I can still work fast (ie, with a bit of slop), while still having control.

    A snoot is more to pinpoint the light source, but the half-snoot I have there works more as a flag to avoid light spilling onto the subject. But these definitions are also a bit limiting. It’s best just to use these things and get the photographs! Digital photography allows a fairly intuitive approach to light – if something doesn’t work, you adapt and adjust.

    Neil vN.

    Reply
  12. 12Allen says

    July 11, 2008 at 11:10 pm

    Excellent tutorial Neil and thanks for giving such in-depth answers to the follow-up questions :)

    Reply
  13. 13Mistie McDonald says

    July 12, 2008 at 9:12 am

    This is an awesome article…and will help me a lot when I’m shooting. I was wondering though -why have the ISO so high? I understand for action stuff, but why for portraits due to grain issues. I do know the higher the ISO the more light sensitive it is..but the grain/noise would be greater to. Anyway I am definatly checking out your other articles and its good to know this article was about a speed-light cause that’s what I have on my Canon. I love that flash…Great tutorial!

    Reply
  14. 14Neil says

    July 12, 2008 at 1:58 pm

    Misti …

    It was a high ISO that I used, but I do load the odds in my favor by using a camera that gives excellent high-ISO noise performance – the Canon 1D mk3.

    The high ISO was forced on me because of needing to bounce flash into that large area shown. There is no way I could have squeezed 400 ISO out of that small a flashgun (580 EXii), so I had to give myself a helping hand up, by using a fairly high ISO and a wide-ish aperture.

    I sometimes shoot family formals at 800 ISO with the 5D or the 1D mk3, if I am in a bind and don’t have my Quantums with me – but instead have to rely on bounce flash only for light. At 800 ISO, both those cameras (and the Nikon D3) give superb results.

    So I know I am fairly safe in going to 1000 ISO for an image like this. I do take into consideration what the end use of the photo will be. In this instance, I am shooting for a wedding album, where the largest print would be 11×14. And I’m confident that the image there will look great on an album page of that size.

    Neil vN

    Reply
  15. 15Han Cheng says

    July 12, 2008 at 11:09 pm

    You managed to bounce the light?
    I thought in museums, the ceilings are too high and bounce flash is rendered useless?

    I have a stofen-omibounce + SB600. Tried in a museum once but the ceilings are too high to bounce.

    Reply
  16. 16Neil says

    July 13, 2008 at 1:49 am

    Han ..

    There are the images as evidence. ;)
    The key to success here was that I chose my settings such that I was able to get good exposure using just that one on-camera speedlight.

    Neil vN

    Reply
  17. 17Allen says

    July 14, 2008 at 10:09 am

    The Stofen would drop the light output quite a bit, wouldn’t it? I’ve learned (probably from Neil) that if I’m bouncing the light to remove any diffuser, the bounce itself is diffusing the light plenty :)

    Reply
  18. 18Tom K. says

    July 14, 2008 at 7:05 pm

    Neil,
    Thank you once again for this brilliant (no pun intended) lesson on how to use on camera flash more intelligently.

    I am wondering what flash zoom setting you used in the example photos. I have a 580ex and am a bit confused by flash zoom settings.

    How do you determine what zoom setting to use when shooting photo in these situations?
    Regards,
    Tom K.

    Reply
  19. 19Neil says

    July 14, 2008 at 7:08 pm

    Hi there Tom …

    I haven’t bothered (yet) with playing with the zoom setting of my flash. I just let the camera control it as I zoom my lens.

    But I have seen great examples on some of the photography forums, where the photographer very specifically used his flash at a certain zoom settings for effect. So there is some room to play there in fine-tuning the results we get, but I haven’t really had the opportunity to yet. On most shoots I am too busy to distract myself with controlling the flash’s zoom setting as well.

    Neil vN

    Reply
  20. 20Tom K. says

    July 14, 2008 at 8:44 pm

    Many thanks for the info Neil. This web site is one of the finest gems for learning flash on the planet.
    Regards,
    Tom K.

    Reply
  21. 21Harry Simpson says

    July 15, 2008 at 12:09 pm

    Neil,

    Have another wedding this weekend and stopped by for some inspiration….
    Question: when half snooting and bouncing flash – which part of the flash did you snoot – the side away from the subject or did you use it like a gobo?

    And I suppose you’re shooting ETTL with the flash set at normal power?

    Thanks

    Harry

    Reply
  22. 22Neil says

    July 15, 2008 at 12:10 pm

    Harry ..

    I used it exactly as shown on this page.

    And yes, just using E-TTL.
    Flash exposure compensation was at 0 EV in this case.

    Neil vN

    Reply
  23. 23Rachel says

    July 16, 2008 at 2:27 am

    Hi neil just wanted to clarify something. In manual mode someone told me the other day that E-TTL flash doesn’t work? I am a little confused because I know you work in manual mode setting your camera depending on wether you are using flash to fill or work with ambient and then compensate accordingly. Clarification would be great. thanks

    Reply
  24. 24Lucian says

    July 16, 2008 at 11:10 am

    Dear Rachel,

    As I’ve been an avid reader of Neil’s tutorials and techniques for quite awhile, lemme see if I can answer some of your queries for him (also for me to find out if I’ve gotten his teachings right.)

    What you described is pretty much what Neil has been teaching:
    – work in manual mode

    – set ambient exposure depending on whether you want to use flash as fill flash or to be an impt source of light (for the former you would have to meter the ambient light for proper exposure; while for the latter some degree of underexposure is usually required to achieve an overall appropriate exposure after flash is added in)

    – decide on the appropriate flash exposure compensation
    i) for fill flash, usu some deg of negative FEC is require to prevent it from appearing too harsh
    ii) for flash as an alternative light source, the amt of FEC varies depending on the situation (and how you arrive at the right value is by a combination of experience + some trial and error)

    PS: Perhaps the “manual mode” that someone else told you about refers to manual flash mode and not manual exposure mode per se (sounds similar but completely different). In manual flash mode, there is no metering by the flash unit to determine what it thinks is the appropriate flash output – the flash unit relies on you to decide how strong the output is. It is thus a different flash mode as compared to ETTL flash.

    Otherwise, if you are talking about manual exposure mode, then both ETTL and manual flash works perfectly fine.

    (I really hope I haven’t confused you or anything. If I have made a mistake regarding anything, Neil, please correct me =)

    Reply
  25. 25Neil says

    July 16, 2008 at 12:26 pm

    Rachel ..

    Lucien has it correct. :)

    I suspect the person who told you E-TTL doesn’t work in manual, was thinking of manual flash exposure … which is different from manual exposure mode on your camera. E-TTL certainly works with manual exposure mode.

    Neil vN

    Reply
  26. 26Dave says

    July 16, 2008 at 2:28 pm

    I tried this with a large area such as this and I’m not convinced that half-snooting in a situation like this makes any noticable difference. The amount of forward directional light is very little and not much of it is making a large impact at this distance. Unless I am misunderstanding exactly how much of the strobe is actually pointing at the subject? I imagine it is pointed up and to your right, nearly over your right shoulder. If I were the groom, could I see the flash head from where I was standing?

    Have you tried a comparison leaving it on or off? I suspect, in the heat of shooting, I would just leave it on and forget about it.
    Thoughts?

    Reply
  27. 27Neil says

    July 16, 2008 at 2:29 pm

    Hi there Dave …

    In this case I wasn’t bouncing the flash behind me at any degree. The flash was pointing more forwards than directly 90′ to my right .. so the couple would’ve seen the flash-head. Therefore there would’ve been direct flash of some kind.

    In this case I didn’t have time for a comparison photo .. I barely had time to fire off the pull-back shot to show where I was bouncing flash off.

    While shooting I am less interested in parsing the idea of when flagging the flash like that will have a discernible effect (and to what extent) .. than I am interested in getting the images and have them look good.

    As such, the technique works.

    best

    Neil vN

    Reply
  28. 28Rachel says

    July 16, 2008 at 9:02 pm

    Thanks for the clarification Lucian. When you are relatively new to all of this flash business you can very easily doubt yourself. How you described the teachings of neil is exactly what I thought.
    The individual may have as you said misunderstood what I meant …or…. may not know as much as what they think. I have suggested to a few people the techniques taught on planetneil and have met with a condescending, “well when you have been doing this as long as I have…” Their loss.
    Neil, do you use independent light meter’s. Should we have one and learn how to use it. This is something I really don;t know a lot about and if it is going to help me create better shots would love to know and learn more.
    I am sure you are never short of things to teach here but if you are ever looking for an idea it is something not many people bother with

    Reply
  29. 29Neil says

    July 17, 2008 at 2:03 am

    Hi there Rachel …

    I do have a Minolta flashmeter, but I rarely use it. When I do shoot with studio lighting or on-location lighting, I use the histogram method to determine exposure.

    I would never dissuade anyone to get a good flashmeter, but I’m not entirely convinced that it is as an essential tool with digital photography as it was with film. The histogram now gives me the info that I need to pre-determine correct exposures when I am shooting under controlled situations such as studio lighting or consistent ambient light.

    Knowledge of how to use a lightmeter is never wasted, but there are probably more useful items to get if you’re on a limited budget, than a lightmeter.

    Neil vN

    Reply
  30. 30Lucian says

    July 17, 2008 at 9:54 am

    Hi Rachel, if I may again:

    I think light meters are very accurate ways of measuring exposure, but as Neil has pointed out, it may not have *that* crucial a role in the digital era as compared to film days where messed up exposures meant wasted time and money.

    I don’t use external light meters personally because
    i) it’s an extra load to carry around, esp when you need to be on the move (for the kind of photography I like). There’s already enough in the form of camera + lens + flash +/- tripod to lug around as it is.
    ii) I find it an acceptable compromise to use the camera’s light meter and adjust based on test shots / histogram results.

    It never kills to use a light meter, and some purists may insist on it, but to me it is a personal preference (like many things in photography) and you will have to see if it is beneficial for you (but like Neil said, the knowledge is never wasted =)

    ——–

    Re: the comments made by others regarding the teachings here:

    I have to admit that I’m not someone who just take people’s teachings for granted. I truly have to see the logic and reasoning behind the words in order to be fully convinced.

    And convinced is what I have been after having read many of Neil’s articles. Not just regarding flash photography, but I’ve found his reasoning behind his articles of exposure modes, camera shake, why we shouldn’t be too hung up on noise and high ISO (to list a few) pretty solid.

    The final test is how it applies in RL though, and the results have been wonderful. In the end, I would say let the pictures speak for themselves and find what works for you.

    Reply
  31. 31Rachel says

    July 21, 2008 at 1:28 am

    Thanks Neil and also Lucian for your comments. I really appreciate people’s willingness to share their knowledge and opinion. I am on a very tight budget and I have to think very carefully about the next addition to my kit bag. What you say makes sense to me and I will for now skip the light meter and put the $$$$ to something else, thanks

    Reply
  32. 32Yiftach says

    July 24, 2008 at 3:19 pm

    First time looking at your site, Wow ! Thanks.
    Just a comment about light meters, I find that when I am doing a family grouping inside and using umbrellas and studio flashes, I can easily wind up over exposing one side of the grouping by having for example, my right flash one stop or more brighter than my left flash. I can not see this on my cameras monitor !
    This can cause me lots of problems when you have people in white dresses and men in black etc. I use a light meter to make sure my flash is even from both sides of the large family grouping.

    Reply
  33. 33Jeff says

    August 5, 2008 at 2:12 pm

    Hey Neil,
    Great post (as usual). Question: For this shot, you underexposed by 1.5 stops, but yet used 0 exposure compensation. Why don’t you need +1.3 ( or +1.7) FEC to compensate for the underexposure of the ambient? I understand the concept of exposure compensation (both FEC and in camera: +1 or so for white subject; -1 or so for black, etc.), but I keep wanting to equate FEC with ‘power’. Is that wrong? Like my above question indicates, I would think you’d need extra flash ‘power’ to make up for the 1.5 underexposure. I’d appreciate your thoughts. Thanks!
    – Jeff

    Reply
  34. 34Neil says

    August 8, 2008 at 11:02 pm

    Hi there Jeff …

    The camera and flash, when in a mode where it will regard the flash as the main source of light, will try and expose correctly, regardless of the ambient exposure.

    So I only need to keep the flash exposure compensation around 0EV. (It depends on the reflectivity of the subject / scene in front of the camera.)

    It is from *this* baseline – (the camera calculating correct TTL flash exposure, whether as filll or as main source), .. that I need to adjust FEC up or down.

    Neil vN

    Reply

Leave a Reply to Tom K. Cancel reply

Your email address will not be published. Required fields are marked *

categories

Articles & Tutorials

  • • About myself & this site
    • Books by Neil vN
    • Best photography books
    • Black foamie thing
    • Photographers’ success stories
  • • Flash Photography Techniques
    • Natural looking flash
    • Flash + Ambient light
    • Dragging the shutter
    • Bouncing your flash
    • On-camera flash outdoors
    • Exposure metering
    • Flash exposure compensation
    • Bounce flash examples
    • Which is the best flashgun?
    • Flash brackets
    • Off-camera flash photography
    • Flash photography basics
    • Using video lights
    • Flash photography tips
  • • Photography workshops NJ / NYC
    • Models @ photography workshops
tutorials:
flash photography
Photography
Workshops

All rights reserved. Copyright © Neil van Niekerk 2025 · Customization by The Traveling Designer

Copyright © 2025 · NvN on Genesis Framework · WordPress · Log in