Tangents

photography tutorials, reviews & workshops

tangents photography blog
learn : discuss : share
subscribe today
  • Tangents
  • Tutorials
    • Flash Photography
    • Wedding Photography
    • Studio Photography
    • Posing People
    • Understanding Your Camera
    • Exposure metering
    • BFT
    • Best Photo Books
  • Workshops
    • Info: Workshops
    • In-person
      tutoring sessions
    • Online
      tutoring sessions
    • Video tutorials
    • Workshops in
      New Jersey (NJ)
    • Workshops in
      New York (NYC)
    • Studio Workshop
    • Workshop results
  • Books
    • On-Camera Flash (revised ed.)
    • Direction & Quality of Light
    • Off-Camera Flash Photography
    • Lighting & Design
    • On-Camera Flash (1st ed.)
  • Reviews
    • Nikon
    • Sony
    • Canon
    • Fuji
    • Profoto
    • lighting gear
  • Projects
    • Two Perspectives
    • B&W Infrared
    • Vintage lenses
    • Time-lapse photography
  • Info
    • About
    • Contact
    • My Photo Gear
    • Books by NvN
    • Newsletter
    • Join us on Facebook
    • Acclaim
    • Success Stories
    • Photoshop Actions
  • Forum

Direction of light – Using available light in the studio

July 24, 2019 Neil vN 2 Comments

Direction of light – Using available light in the studio

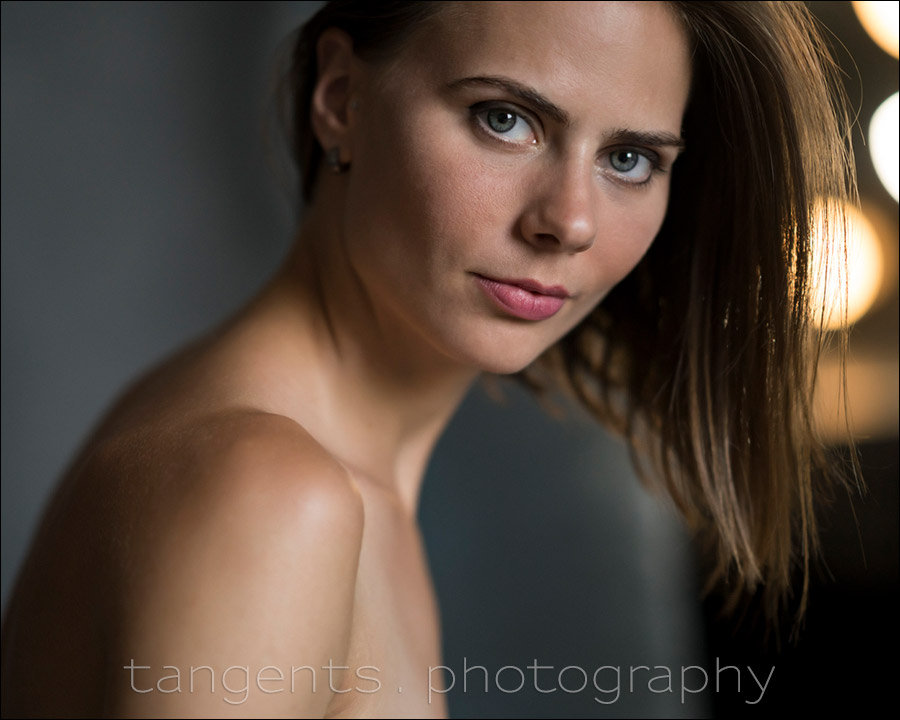
This striking portrait of Rozalinda was lit by big window light in the studio. In using light – whether studio lighting or available light – you need to consider the direction of the light. You need to figure out how you want to place yourself and your subject in relation to where the light is coming from. Your own position in relation to the light and your subject, will significantly change the way the light appears on your subject. Check this article for an example: Change your position, change the direction of light.

With this photo, I was working at approximately a 45 degree angle to the light coming in. Further down there are comparative photos and a pullback photo to show the progression from the original image.

This time I used a Sony A7 iii camera  (affiliate), and the Sony FE 85mm f/1.4 GM  (affiliate). The background here is a canvas backdrop by Oliphant Studio, and the lights behind Rozalinda are from the make-up table in the studio. Oh, and here is Rozalinda’s Instagram account.


The starting point with the photo session was with the canvas parallel to the window, and me standing directly in front of it. Simple enough.

The light here is soft, because it is a massively large light source — but because I am shooting on the same axis as the light is falling, it looks flat.

Not bad in itself, but the light just isn’t that interesting. We can make this portrait more dynamic by changing the light.


This pull-back shot will explain how we got the more dynamic lighting pattern seen in the photo at the top.

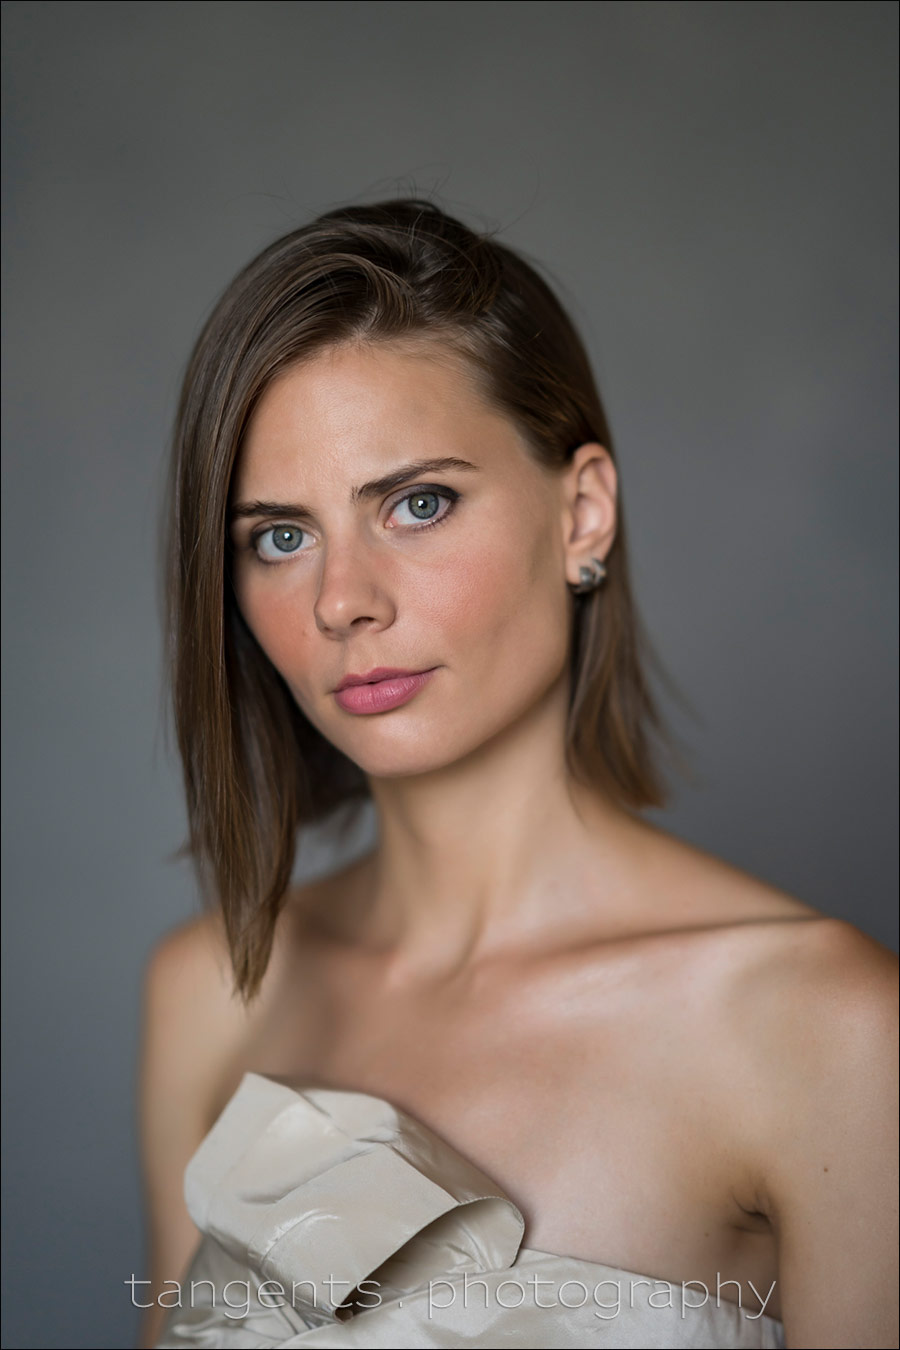
Turning the canvas at a 45 degree angle to the window, and now moving my own position, I could get a gentle, more distinct shadow on part of her face. It is that interplay between light and shade that makes light interesting.

One thing that I love about wide aperture lenses, is how the background melts. Especially with an 85mm lens – The best lens to change your portrait photography.

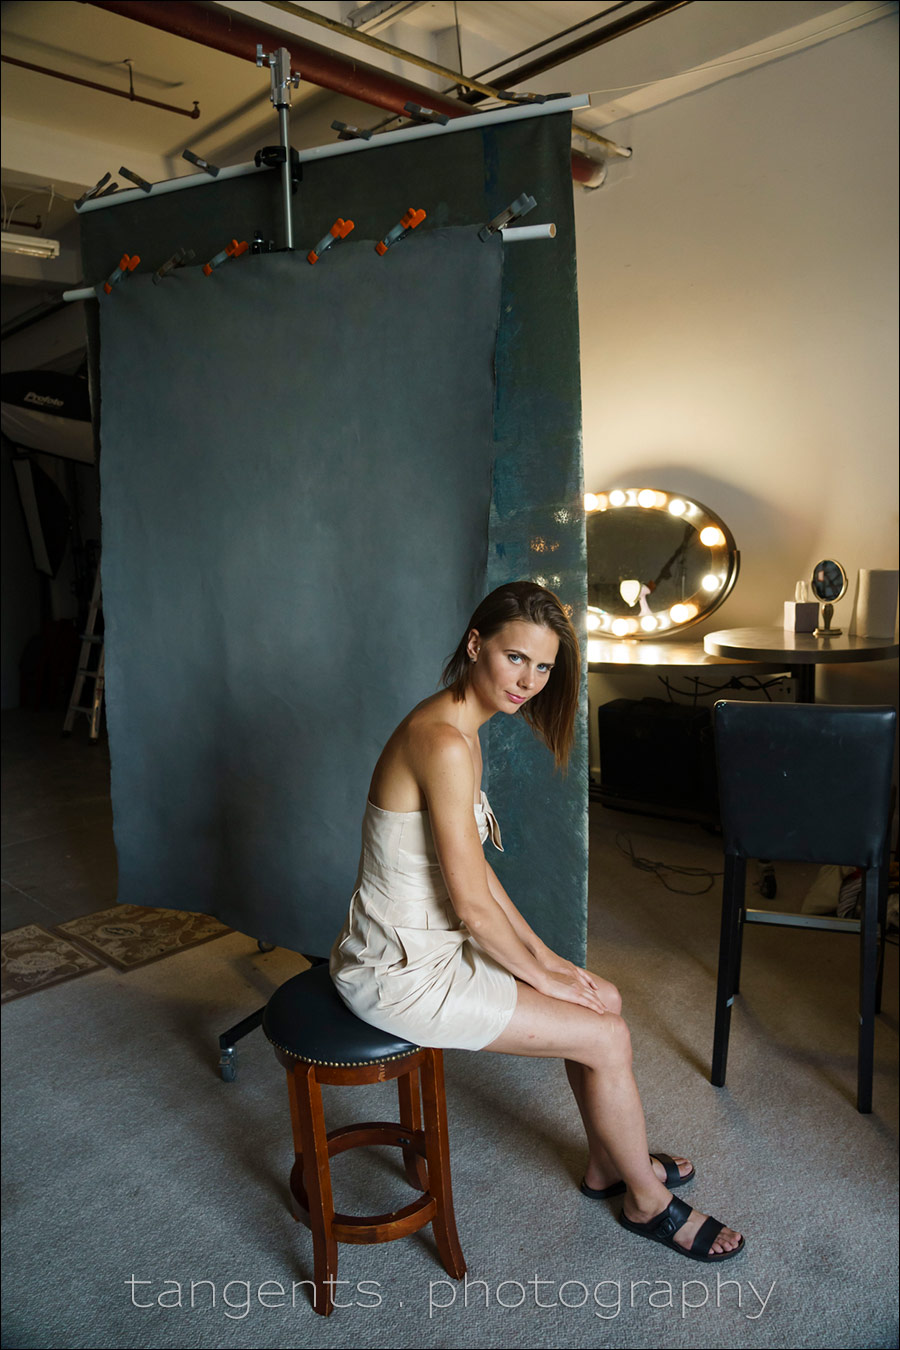
All the clutter disappears with the tight framing and the f/1.4 aperture. I do feel though that the sandals complete the scene here.

Regarding the two canvas backdrops – hey are each clamped to a plastic-covered wooden rod …. which are clamped to the tall rolling stand. This way I can move the two canvas backdrops around the studio as I need, in and out of the shot. I use them as well in the photos accompanying this article –  available light: Feminine portraiture.


  • 1/640 @ f/1.42 @ 1000 ISO … available light
  • Sony A7 iii camera  (B&H / Amazon)
  • Sony FE 85mm f/1.4 GM  (B&H / Amazon)

In the main photo at the top, you will recognize the lighting pattern as Short Lighting. I didn’t strictly keep to that, and found that broad lighting also worked well, depending on the mood and composition.


When posing someone at an angle to the camera, I always check to make sure that the bridge of the nose isn’t partly blocking the corner of the eye. Here you can see the difference when you swipe between the image I like, and another image I took before, where I posed Rozalinda at too much of an angle. To me, it just looks better when you can see the entire eye like that.


Camera settings for the photo above

  • 1/640 @ f/1.42 @ 1000 ISO … available light
  • Sony A7 iii camera  (B&H / Amazon)
  • Sony FE 85mm f/1.4 GM  (B&H / Amazon)


Related articles

  • 85mm – The best lens to change your portrait photography
  • review: Sony FE 85mm f/1.4 GM lens
  • Lens review: sharpness – Sony 85mm lenses
  • Available light: Feminine portraiture
  • One thing you can do to improve your portrait photography
  • Off-camera flash – Change your position, change the direction of light  (model: Ulorin Vex)

Filed Under: available light photography, portraits, posing, Rozalinda, Sony Tagged With: available light portraits, photo session with a model, posing techniques, posing tips, Sony 85mm f/1.4


Help support this website

If you find these articles of value, please help support this website by using these B&H and Amazon affiliate links to order your photo gear.

I also offer photography workshops and tutoring sessions, whether in person, or via online video tutoring sessions.

Stay informed via the monthly newsletter.

Please follow me on Instagram for more.

You can also join our thriving photo community in the Tangents group on Facebook, where we show our photos and discuss all things photography.

Thank you,

Neil vN

Books by Neil van Niekerk


2 Comments, Add Your Own

  1. 1Clinton Stoltz says

    July 25, 2019 at 8:17 am

    Thanks so much for the valuable info, always love reading the tangents!

    Reply
  2. 2Valent Lau says

    August 2, 2019 at 3:44 am

    Nice tips as always, I like the use of the backdrop to half cover the lights

    Reply

Leave a Reply Cancel reply

Your email address will not be published. Required fields are marked *

categories

Articles & Tutorials

  • • About myself & this site
    • Books by Neil vN
    • Best photography books
    • Black foamie thing
    • Spinlight 360
    • Photographers’ success stories
    • email newsletter
  • • Flash Photography Techniques
    • Natural looking flash
    • Flash + Ambient light
    • Dragging the shutter
    • Bouncing your flash
    • On-camera flash outdoors
    • Exposure metering
    • Flash exposure compensation
    • Bounce flash examples
    • Which is the best flashgun?
    • Flash brackets
    • Off-camera flash photography
    • Flash photography basics
    • Using video lights
    • Flash photography tips
    • Photography books
  • • Photography workshops NJ / NYC
    • Models @ photography workshops
tutorials:
flash photography
Photography
Workshops

Recent Comments

  • Pat: Right up front, I’ll say I would NEVER buy a Sigma lens. That out of the way, and referring to these...
  • Stuard Santana: Poor Garret Shaw! he should know better, lol I got another one today with the same exact wording and...
  • Mohd Zamri Mohd Zan: In my country are even worst, most guest asking professional photographer to take their photo...
  • HenkW: Thanks for this review – one of the very few I could find on this most interesting topic. So, the...
  • Rachel Abi: Thank you so much for this guide!! There are some many options and you made this really clear :D

All rights reserved. Copyright © Neil van Niekerk 2023 · Customization by The Traveling Designer

Copyright © 2023 · NvN on Genesis Framework · WordPress · Log in