Business headshots in the studio with a contemporary, modern look
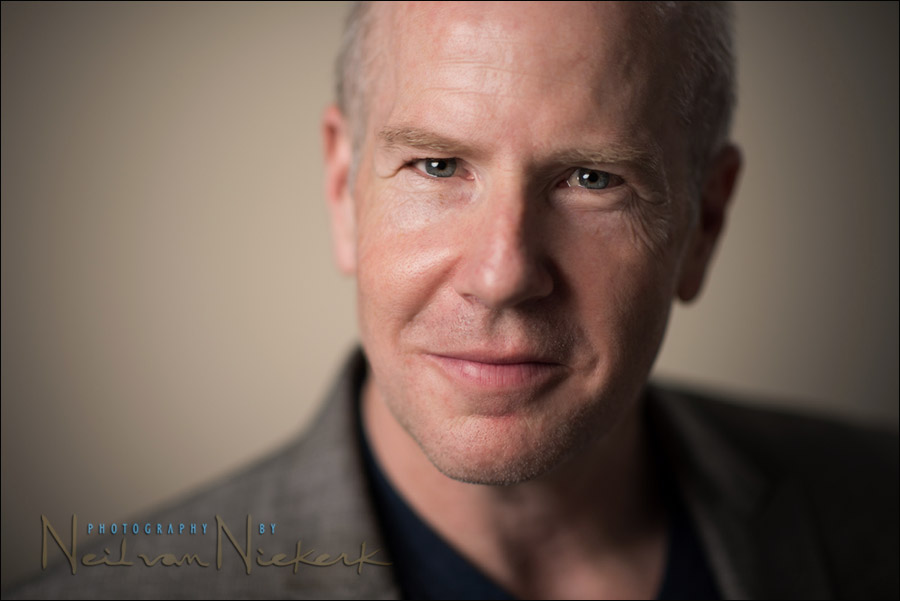
When Matt Sweetwood, the owner of the largest Camera Store in New Jersey, discussed doing new new business headshots for him, we agreed that a more contemporary look suited him. There’s a large dynamic personality at work here … and using an 85mm f/1.4 lens wide open would place attention on his eyes and his expression. Nothing else is really in focus aside from his eyes, and this really makes for a compelling portrait that grabs your attention.
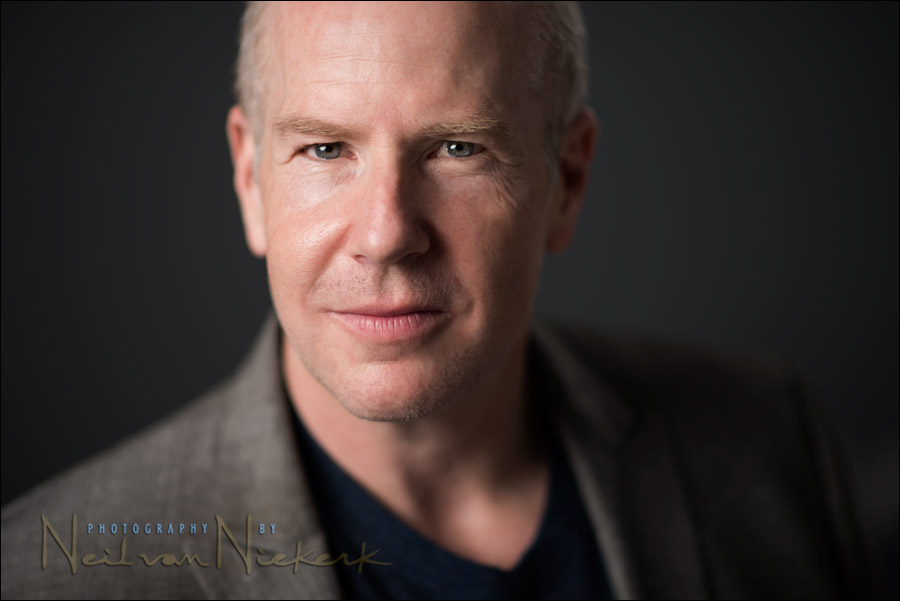
We shot various sequences, with the background brighter and darker. In the end we settled on a sequence of images with the lighting shown in the top photograph – it has an airy brightness to it, and looks modern. With the colors muted like that, it draws attention to his expression even more. No bright colors to distract.
Lighting setup & camera gear used
- 1/200 @ f/1.4 @ 40 ISO
- Nikon D810
- Nikon 85mm f/1.4
These and any other photo gear can be ordered from Unique Photo.
The low ISO settings that the D810 offers, helped in maintaining that wide aperture with studio lighting.
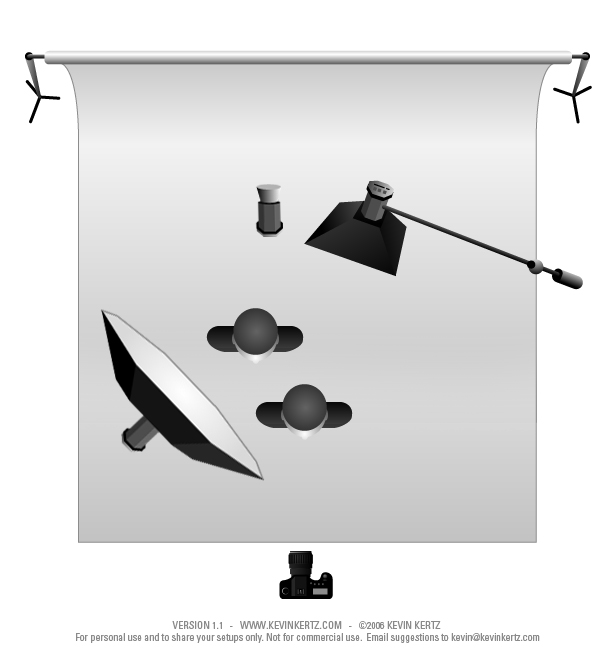
The lighting setup used Profoto D1 studio lights, with the main light modified by a Profoto 5′ Octabox
Click through on the image for the exact description of the lighting setup.
Related articles
- What makes for good head shots?
- Photo gear & logistics: corporate headshots
- 85mm f/1.4 portraits in the studio
- more articles on headshot photography
- more info about: NJ business headshot photographer
Great stuff, as usual, Neil!
Neil, are you using continuous light and high ISO? or a ND filter? flash would probably overexpose at even the lowest setting at that aperture ?
thanks as always!
Denis
Hi there – I have now added the camera settings.
The EXIF data says I shot at 40 ISO. This is outside the nominal ISO settings, into the LOW settings.
Such a low ISO helped me maintain that wide aperture.
Nice work! Great to see some fresh thinking on headshots. My only question: Does it hold up well when it gets reduced to say 150px by 200px or smaller? Lots of times headshots get published pretty small. My fear would be the whole image would look out of focus because they eyes will be so small.
It holds up pretty well.
I do resize in stages though.
Timely – Our marketing gurus want headsots of our staff. I plan on furnishing my own with off camera flash (these will be used in web promotions). As for the above, did the apparent vignette in the first photo result from the wide open aperture, position of lighting, or post processing (or some combination thereof?) Thank you for your willingness to share your knowledge and experience – it has certainly made my photography better. Nick
Nick … the vignetting is mostly due to the gridded light on the background wall. So there is a distinct light fall-off to the edges.
fukken A
Hello Neil,
For such scenarios (wide aperture necessary), would you consider using your strobes with the modelling lamp only (for continuous light then), in order to avoid the (sometimes) disturbing flashes?
Regards
Marco
Hi Neil, thank you for this great article. as always great resource for us. I noticed there is banding on images especially its pronounced on second and third photos. Its not because of high ISO and it doesnt look like you did heavy PP in PS. Can you please advise what is causing it and if it is acceptable by business standards.
Thank you,
Toby
The banding is a constant plague when there are even tones and you’re working in an 8-bit environment.
So for photos like these, I adjust the exposure and contrast and such, in the RAW file. Then I export to 16-bit TIFF. Then I do finer retouching and skin retouching in the TIFF file. Only when I finally resize them for web, do these images go to 8-bit JPG … and then the banding sometimes comes in again.
I also think the resizing makes it more noticeable.
https://neilvn.com/tangents/post-processing-workflow-deal-color-banding-photographs/
https://neilvn.com/tangents/post-processing-workflow-removing-color-banding-in-photos/
There are Photoshop techniques to reduce this, and I should’ve taken care of them before posting here.
Thank you for answering my question. What is your preffered workflow to post process Nikon RAW files?
what program do you use to export Nikon files to 16-bit TIFF?
I’m still doing it “old school” with Bridge and ACR.
oh, same here… ok…phew…I thought I was missing something :)
Banding also looks worse on uncalibrated monitors. And then sometimes prints show more or less banding depending on what they do.
Very nice Neil
Why are there two models in your lighting diagram?
Dwayne, as it says there: “Click through on the image for the exact description of the lighting setup.”
amazing , the eyes are so sharp!!!
Hi Nell,
I’ve been asking myself how did you created this portrait.
and couldn’t tell if it’s was only acheived with a lens like a 1.4 or if you did some retouching technic to enhance the portrait. Wonder if you could acheive the same effect with a bokeh plugin like the OnOne Perfect portrait 9? Would you care explaining how you retouch this portrait as part of the equation of the final product. I really love this resulting portrait.
I’ve learn a great deal from your work. thanks Nell
The shallow depth-of-field is a function of the super-wide aperture. f/1.4
The vignetting you see in the top photo – that wasn’t done in post-processing. It was created in the studio. In-camera. It was done by having a gridded light shine on the background. So it has a kind of hot spot that fades to dark at the edges. I also put a 1/2 CTS gel on it to make it a warm glow behind him.
Thanks Neil,
Do you remember where you did your focus. It look obvious that it should be on the closer eye but you did get the nose sharp as well. So was it directly on the eye?
In your lightning plan, I don’t see the use of a eye opener reflector. Do you sometimes use them?
I didn’t use the Westcott Eyelighter here. You can see the light pattern in his eyes – there isn’t that inverted half-moon reflection which is a tell-tale with the Eyelighter.
I focused on his eye closest to the camera. Anything else that is sharp is incidental.