shooting in bright sunlight with off-camera fill-flash
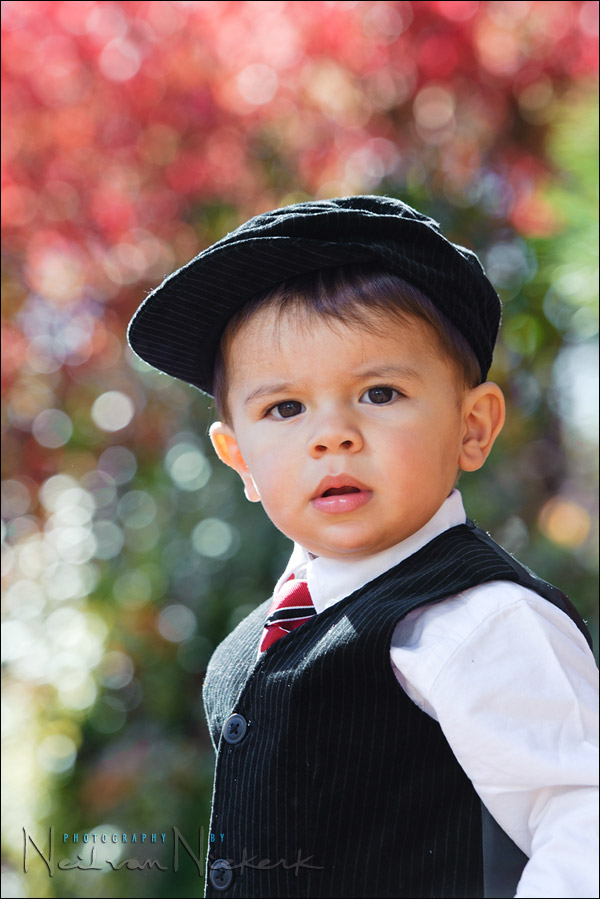
This adorable kid looked at the camera briefly because I was singing to him. Kids are devious little creatures. They know when you’re calling them and will purposely ignore you. So you have to be crafty too in getting their attention. Of course, you have to be ready for the moment … and shoot a lot. Sometimes that Decisive Moment is to be found in the edit.
The photo session was from 12 noon to 1pm. So the sun was high overhead. We’re often told that the sun directly overhead isn’t the best time to take photographs. While this isn’t as ideal as the fabled ‘Golden Hour’ – that time just before dusk and just after dawn – there are ways of working with hard sunlight and still get great images …
The simplest way of dealing with hard sunlight – as described in this recent article on photographing wedding portraits in bright sunlight – is to have your subjects turn their back to the sun. This way they are effectively in open shade, and the sunlight giving a rim lighting. This does mean carefully positioning your subject in relation to the light, and yourself in relation to your subject, as well as the light, and the background! It’s always more effective an image if you keep your background in mind.
I knew I wanted some out-of-focus color in the background, so I set my position so that I could use that red shrub and defocused high-lights. I set up a softbox on a light-stand to my left. Why my left? Since I was using an on-camera speedlight as the Master flash, it was easier to hold my camera with the flash pointing to my left for vertical shots. Then my left hand would support the lens, and my right hand held the grip … instead of the ‘hand under’ way of holding a camera, where your right hand is supporting everything and your right forefinger is tripping the shutter. Shooting with your right hand under the camera just seems like an invitation for camera shake. Either way, it’s just comfortable for me to use the camera in a vertical position with the flash pointing to the left, whether I am holding the vertical grip or have my hand ‘over’ the camera.
I was shooting in TTL mode, since I knew I would have to rely on the TTL flash technology to take up some of the slack as this little guy and his sister moved around.
Normally when using flash as a mere touch of fill-flash with an on-camera speedlight, I would work with the flash set to around -3EV. This way the flash is less noticeable. But since I was using a 24×24 softbox here, I knew my light would appear softer and still appealing, even if I used the FEC at a higher setting.
Camera settings: 1/250 @ f5.6 @ 200 ISO … TTL flash at -1 EV
The Slave flash was in a Lastolite Ezybox softbox (24×24) on a Manfrotto 1004BAC lightstand.
My exposure was set so that the light on him was nearly the correct exposure, with the TTL flash then taking up the slack and opening up his slightly shaded face. Dead simple.
More articles on off-camera flash …
Equipment used during this photo session:
Nikon D3; Nikon 70-200mm f2.8 AF-S VR II (B&H);
Nikon SB-900 (B&H); Nikon SD-9 battery pack (B&H);
Lastolite EZYBOX 24×24 softbox (B&H);
Manfrotto 1004BAC light-stand;
umbrella clamp (B&H); brass stud (B&H)
Another great shot Neil, I love the background, One question , the little guys hair seems to have a strange cast to it or is that just me ?
Hey, am yet to find a blog that is as generous with info as yours. A lot of photographers put up posts that are endeavors in self-promotion masquerading as information. Yours has as very matter-of-fact and non-intimidating way of dispensing information. Thanks for it all!
Regards,
R
Hi Neil! Thank you for generously sharing your knowledge and talent with us. I have a question with regards to off camera fill flash(TTL) using a softbox. How does TTL work if the sensor on the flash is covered by the white diffuser in front of the softbox? or is it the sensor from master flash from the on-cam speedlight that analyzes the distance from the flash to the subject for TTL to work??? Thank you so much.
@Joel: by no means I wanna by-pass the Master (I think we all agree Neil is a real one, in the purest meaning of someone willing and being able to teach..), but I guess the calculations you are referring to, happen via the camera sensor. That’s why the flash mode is called TTL, Through The Lens. I hope to be right! :P
Thank you very much. I really appreciate it.
Neil, thanks again for your advices. But I really don’t understand how to avoid the “spots” on the children’s faces. I really don’t like when the skin has different tones of colors and white, even corrections can be more difficult. It seems it isn’t a problem for you, should I ignore this fact? Thank you.
did you have trouble tripping that slaved flash when working in such bright conditions?
WAW, i like your new 85 lens. Has an amazing bokeh !
o, mea culpa, seems like to be 70-200mm :)), sorry hehe
First, GREAT site! I’ve used your recommendations for bouncing flash and fill flash outdoors many times over…and my clients love the look! Question about using flashgun as the “master.” I have Nikon SU-800 Speedlight Commander I use to control my SB-800’s off camera. What are advantages to using the flashgun (SB-800 or SB-900) as master vs. the SU-800? Thanks again, D.
Neil,
I have a question about the camera settings you used. You mentioned you were looking for some washed out color on the background: this would imply a wide shutter. Is there a reason you chose f5.6 with the 200 iso versus something like f4.0 and 100iso in the bright sunlight? Just curious. Thanks a lot.
Scott
Neil,
It had been my understanding (and I have little of that so please keep that in mind) one used soft boxes fairly closely to the subject (the distance being no more than 2-3 times the width of the soft box). Do you find this to be true or is it really a case-by-case approach?
Second, why a soft box instead of an umbrella?
Thanks for any thoughts you may be willing to share.
Mark
(getting into off-camera lighting)
Thank you Neil. I ALWAYS check back!
Great comment Neil turning the camera counter clock-wise.
When shooting weddings under harsh sunlight, any recommendations on how to add fill light when people wear glasses / are sweating? The reflection is then quite an issue
Neil:
Great photo and great advice. Shooting at f 5.6, did you do any post-production blurring of the background? I frequently shoot ice hockey, and yesterday I was photographing a player on the ice at with a 200mm lens, 1/500 sec @ 2.8 and the rink vending machines (10-15 ft behind) were still distinguishable in the background. What am I doing wrong?
I’ve rarely gotten my Canon speedlights to work in the Master/Slave relationship, relying on Pocket Wizards instead. Are you saying the Master speedlight (on-camera) will have a better chance of triggering the Slave speedlight if the Master is pointed in the direction of the slave? In other words, if the Master isn’t being used to light the subject at all? If this is the case, why not just put a PW, or similar transmitter, onto the camera’s hotshoe and use it to trigger the OCF?
photomatte,
When using Canon’s E-TTL, the master speedlight fires a pre-flash signal light that has coded TTL information for the remote speedlights. If the master’s flash output is set to — (nothing), then only the pre-flash signal light is generated. This doesn’t contribute to the final image except when very close to the subject. The remote speedlight detects this pre-flash signal light via an optical sensor somewhere on itself. Because the signal light is visible light, the remote speedlights have to be able to “see” the master speedlight. That is why people call this “line-of-sight.”
You can use PocketWizard units to trigger the off-camera flash, but the the camera and the remote speedlights each need a transmitter.
Hi Neil, Great Photo.
I wondered how you considered the highlights on the boy’s cap and left ear when making the ambient light exposure, how did you know that the highlights would not bleach out, and if they did would you accept that they were of little importance compared to the overall exposure.
Many thanks for the great resource you provide.
Neil
If I use the popup flash on my Canon 60D as the master to remote trigger my off camera 430ex ii speedlite, will I be able to use my Sekonic L358 light meter to check the exposure or will the pre-flash light of the pop up flashmess up the light meter readings? If its outdoor in sun will it have less of a contribution? Is there a trick to be able to correctly use the light meter in this remote trigger mode if not using a Pocket Wizard system. The reason I upgraded to the 60D was because it had the remote flash triggering capabilities so I could save some money now and not have to buy expensive radio triggers. Thanks for all the great articles you provide us on a regular basis.
It looks like main light. Without softbox on your left hes face would be black. Am I right ?
Nope, the flash isn’t quite a main light. It acts as fill-light. Hence, the side of his face isn’t lost in shade.