overpowering hard sunlight with flash
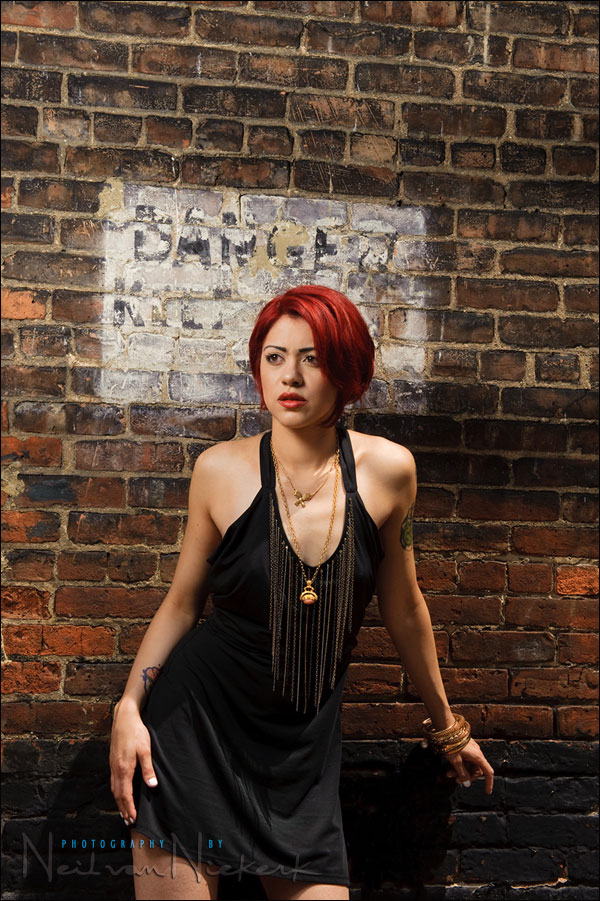
With this part of a photo session with Johannie, we worked in an alley. The light was very uneven, with some swathes of sunlight falling directly on her. (See the image below for the photo without flash.) To get rid of this uneven sunlight falling on her, we have to add at least as much light on her as the brightest areas lit by sunlight. In the example above, our exposure is set to 1/250 @ f13 @ 200 ISO and we can see from the bright patch of light on her shoulder, that we’re at the edge of acceptable exposure. Any wider on our aperture, or higher on our ISO or slower on our shutter speed, and we’ll start to lose detail in the sunlit areas.
In the example above, our model’s pose helped hide the uneven light due to her face being in shadow and her shoulder being in sunlight.
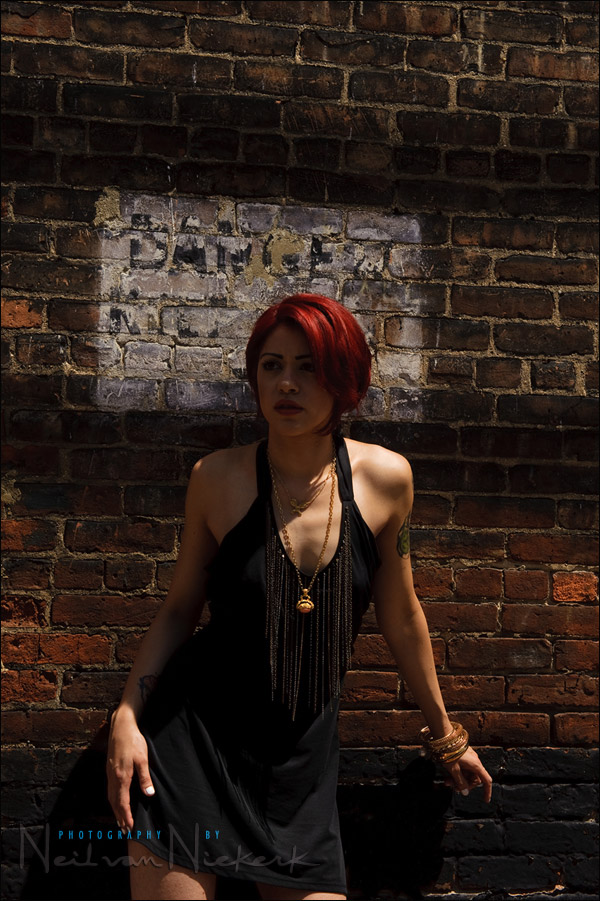
Here is the same image, without flash. This will give you a better idea of how much flash was added, and how uneven the available light / sunlight was.
In this following image, we can see the uneven light below her chin, casting strange shadows. Even though I had pulled out one of the two baffles inside the softbox, we still couldn’t deliver enough light from the softbox to completely over-ride the daylight. In other words, I had to set an aperture / ISO combination where the daylight still registers to a large extent.
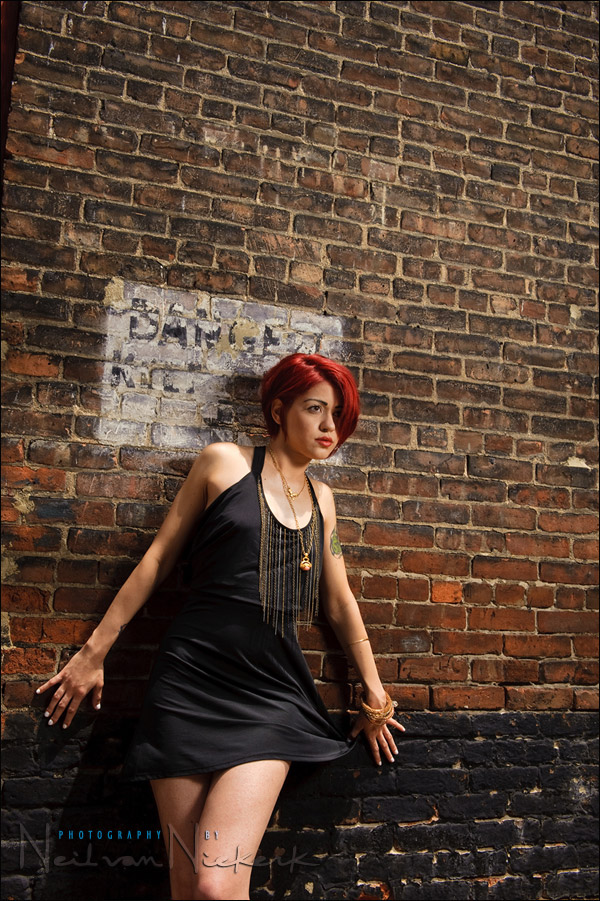
Ideally, to lose the dappled or uneven or harsh available light, we need to under-expose it by around 3 stops. Then the flash exposure will completely dominate.
For our lighting here I used a softbox on a monopod, with a slaved speedlight attached. The Slave flash was triggered by an on-camera flash set to Master. I disabled the output from the Master slave so it didn’t add anything to the final exposure. It was there just to communicate the camera’s instructions to the Slave flash.
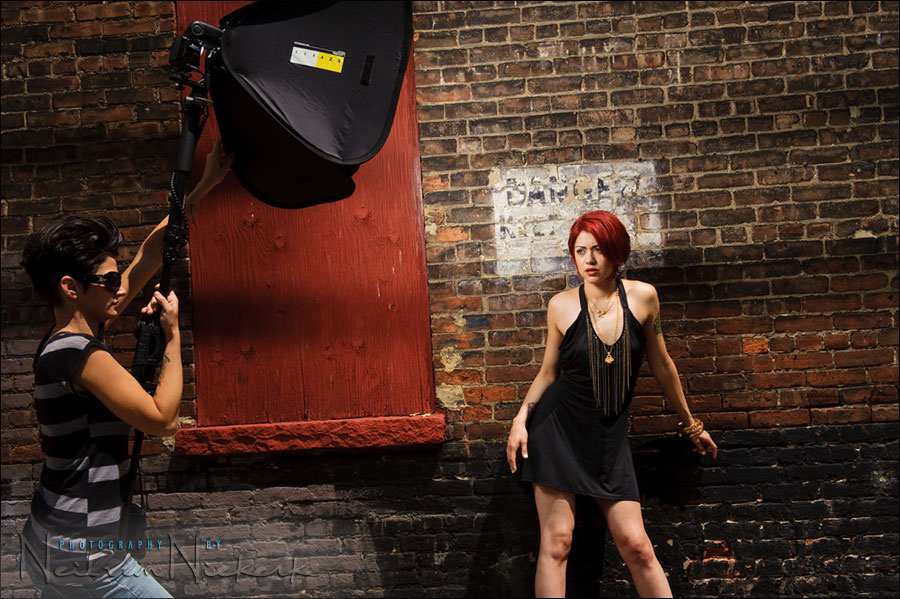
The key in overpowering hard sunlight, is to under-expose our available light to some extent, and then use flash to make up for the slack. In this case we could get away with a softbox held closely to our model, but with these other shoots, I used different lighting setups:
- controlling bright daylight w/ direct off-camera flash (model: Molly K)
- a powerful on-location flash setup to overpower the sun (models: Sarah & Mark)
- use bare flash, ie, use your speedlight off camera, and without modifiers (model: Lea Liu)
- more articles on off-camera flash
equipment used during this photo session
Nikon D3; Nikon 24-70mm f2.8 AF-S (B&H); Nikon SB-900 (B&H)
Lastolite EZYBOX 24×24 softbox (B&H); Quantum SC battery pack (B&H)
Manfrotto 680B monopod (B&H);
brass stud to attach softbox to monopod (B&H)
Neil,
Great information, as always. Your blog always pushes past the boundaries that I have placed on my own photography, opening new lighting scenarios that I would have traditionally walked away from. Quite honestly, if I saw this uneven lighting, I would have found another location that wasn’t so challenging. This example prompts me to try flash first and then relocate if I could not make it work.
Thanks,
Matt
Great stuff as always Neil. Quick question on triggering the flash, you’re using the flash in the softbox as a slave triggered by a master flash on the camera. Why not use pocket wizards for this and save having to hold the (heavier) camera with a flash attached?
Is it so you can use the on camera flash as fill if/when you need it, so it’s convenient to fire in this configuration? Or are you using TTL so PW’s aren’t going to help here?
In this case I did use TTL flash, and couldn’t use the old school Pocket Wizards (the Plus II units).
I did bring PWs with me, but decided to use TTL, rather than manual flash. Mostly just because I felt like doing so. But a part of the reason was that during this photo session, we were moving around looking for different locations to photograph the model. Then I find TTL easier to work with, since the technology gets me halfway there already.
I find TTL flash faster to work with than manual flash, and sometimes it is more convenient to forgo the consistency of manual flash. With TTL flash I can change my Aperture and ISO settings without having to re-adjust the 4-way manual flash equation of aperture / ISO / distance / power.
Ultimately though, both ways – TTL / manual flash – can work. And I think we can actually be stronger photographers if we can easily flip between using either of those.
Hello Neil,
once again congrats for your photos. In a previous post i wrote that i never try to duplicate yor camera/flash settings because everything is different for each person/situation/location etc. Now i had a look and see that was 1/250, f13, iso200. I believe that the flash was 1/1 power. OK, my question is what time was during the shot? I asq this beacause with an SB-28 (full power bare bulb) i can reach f13 but mounted into Photoflex X-Small i cannot reach f13, only f9 (all iso100). OK, if you rise the iso from 100 to 200 the flash can do it, but in a sunny day, it is difficult (maybe impossible) to underexpose de ambient with 3 stops with your settings at 2-3-4PM. Last Saturday for example to underexpose the ambient (creating dramatic sky with the sun directly in the frame) i needed 1/250, iso100, f18 and 3 SB-28 zoomed at 50mm full power (without softbox or shoot trough) to expose the model. I believe you time was 6-7PM? Thanks, Marius
Thanks Neil
What monopod do you use to hold the softbox and flash
Martian
>I use the Manfrotto 680B monopod (B&H),
but there are other monopods which might be slightly lighter.
You have to use some kind of stud to attach the softbox to the monopod (B&H).
How did you get such soft shadows, was it because of the size and distance of the softbox?
great post. I ran into this problem last week (and gave up). I ended up using two people… one with a diffuser and the other with a reflector to bounce back into the subjects face. I would have never imagined underexposing and replacing with flash. Thanks Neil!
Hi Niel, thanks for the blog, it’s one of my required reading sites for the day :-) Have one equipment question for you, what kind of “belt” or device are your assistants using to hold the monopod? Looks like they tuck it into a flag pole carrier or something. Thanks
@Ned – Correct me if i’m wrong here Neil but I believe the assistant isn’t using any sort of ‘pole carrier’, it may just be the angle of the photo and or something else dangling.
Great article Neil! Harsh sunlight has always been a thorn in my side.
Hi Neil,
Ok, so the plate and the stud are for mounting the softbox to the monopod. I won’t need them if the softbox is going on the Manfrotto 1004BAC lighstand, correct? (the lightstand already has a stud at the end)
Thanks.
You mention in one of the above comments that the assistant has an SC Turbo battery pack on her belt. Is that the battery that you generally use to power your speedlights? Do you feel like it significantly improves your recycle time say over a CP-E4? Thanks!!
Hey Neil,
You mentioned you removed both baffles and shot bare-bulb. Does the softbox still do anything because some of the light from the bare flash is reflecting off the inside walls of the softbox, still making it a larger light source that without any softbox at all?
Contrast, sharpness, and color of this pic is awesome! Would you mind sharing some of your post-processing technique as it relates to this picture?
Thanks, Adam
Wouln’t adding flash blow out the areas that are already bright from the sun. I mean sunlight plus flash would make the hot spots even hotter… right?
Neil,
As per Marks comment above regarding the softer shadows… I noticed there is basically no light spill on the brick wall. Is this because of the softbox being so close or is this something cleaned up in PP? I have tried a similar technique in the past and the softbox lit up the whole wall around the model. A fellow photographer told me to move the model away from the wall a bit but I see you managed just fine here in your examples.
Hi Neil.
Can you explain how you have retouching the skin of the model?
Best regards,
Alfredo.
Hi Neil,
Thanks for all you do!!! Two quick questions:
1. You say you removed the internal baffle, but did you remove the outer one as well shooting direct flash? I know another poster said you did but I can’t see that in your explaination.
2. Do you use any gels over your flash when shooting outdoors like this?
Neil, the 3rd article I read and again, very interesting info!
If I compare the first one (with flash) to the second one (only natural light), I can see that her left shoulder remains the same. One would think that the added flash light would over-expose her left shoulder (sun+flash combined), but it doesn’t: the light on her two shoulders is nice and equal. How can this be?
Under the 3rd photo (or the second with flash), I read: …”to lose the dappled or uneven or harsh available light, we need to under-expose it by around 3 stops”…
-> do you mean by making the aperture smaller?
Thanks!
My question is what did you use as a white balance when you shoot these typevof shoots out site.
I’m using a Nikon D90… and I would want you to help me on choosing the best WB when shooting outside…thank you!!!!!
Mike, here is an article on choosing white balance settings … but before we get there, I have to reinforce the importance of shooting in RAW. Concerns about specific WB settings dissipate when you shoot in RAW, as opposed to being confined by your JPG choices.
White Balance settings – my approach
Hi Neil, I discovered your Tangents only about a year ago (all these comments are much older), mainly because I just started reading and searching more on photography. My favourite theme is flash and I find your comments extremely helpful and detailed, trying to go through all of them. Baaie dankie, Mike
Neil,
Thank you for all the great info, love your site! I just upgraded to the D750 and was experimenting with my softbox in bright sunlight. The D750 has a new “highlight metering” mode, which is supposed to protect the highlights. I believe it is designed for stage lighting, and can often lead to an overall underexposed image, but I found it to be a perfect shortcut for this purpose.
I just set to highlight metering, and underexpose my meter by 2/3 or 1 stop and the ambient is mostly a non-issue. I find this easier than in normal metering mode because you don’t have to interpret what the meter is trying to exposure for overall, rather just placing the highlights. Have you tried this on any of your newer bodies?