recap: photography workshop – Philadelphia (2009)
One of the final workshops for 2009, was the one held in Philadelphia in the prestigious Ritz hotel! Working inside the hotel and the surrounding areas, provided us with some stunning backdrops while photographing our models. Still staying with the updated format with the flash photograph workshop, if I am guided by the response by those who attended, then the workshop once again appears to have been a hit. I had a great time as well, and I am sure there will be a few interesting photographs surfacing again. Thank you again to everyone who attended, as well as our two models.
And as always with a report-back on a workshop, I like to add a little bit of useful info for everyone else. Some technical info, and the thought-process about the camera and flash settings used in the image above:
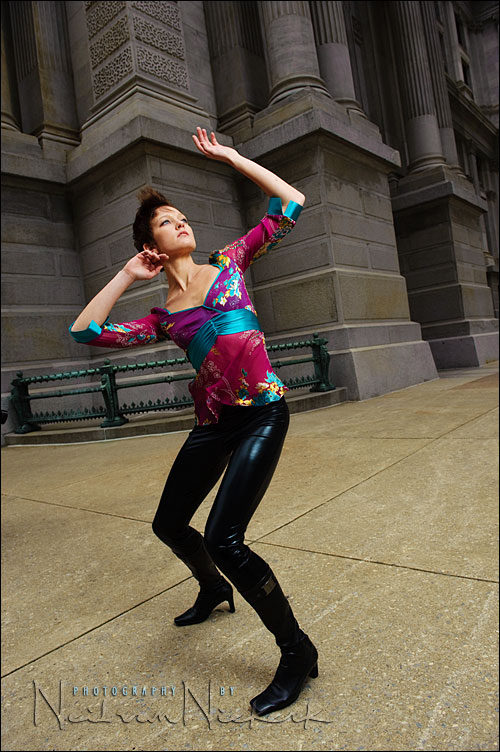
With an idea in mind of how I wanted to position the model in front of Philadelphia City Hall as a stark urban setting, I now had to decide on the exposure and lighting. The available light at that point was actually really good – the sun was covered by a layer of clouds, but enough of the sun was coming through to give some directional light. However, we wanted to play with some off-camera lighting .. and I wanted to use flash to add a touch more drama.
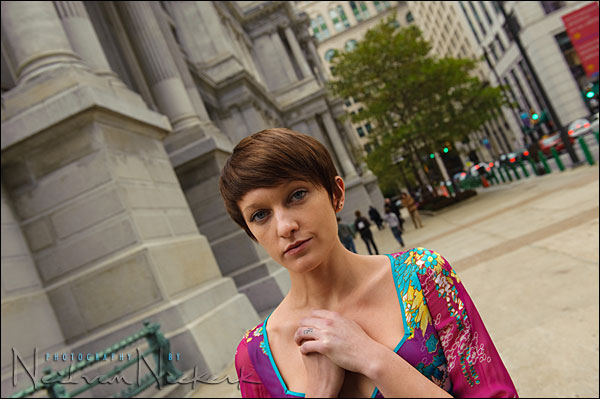
Here is the starting point .. a grab-shot to check that the exposure settings for the existing light, as metered with our cameras, are correct.
1/250th @ f5.0 @ 400 ISO
As always, there is a specific reason for starting with maximum sync speed.
The next step is to purposely under-expose the subject by 2/3rd stop or 1 stop so that we can add flash to the final set-up. Here is the under-exposed test-shot ..
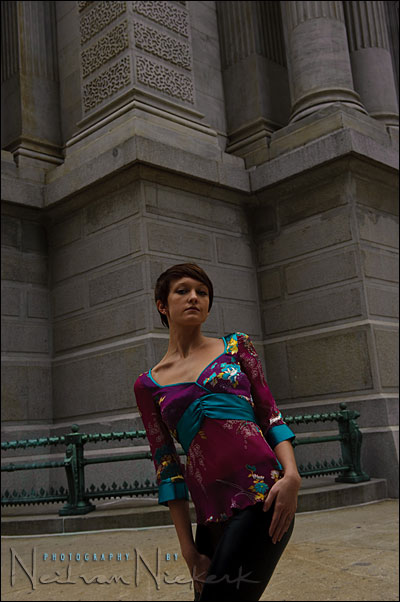
1/250th @ f6.3 @ 400 ISO
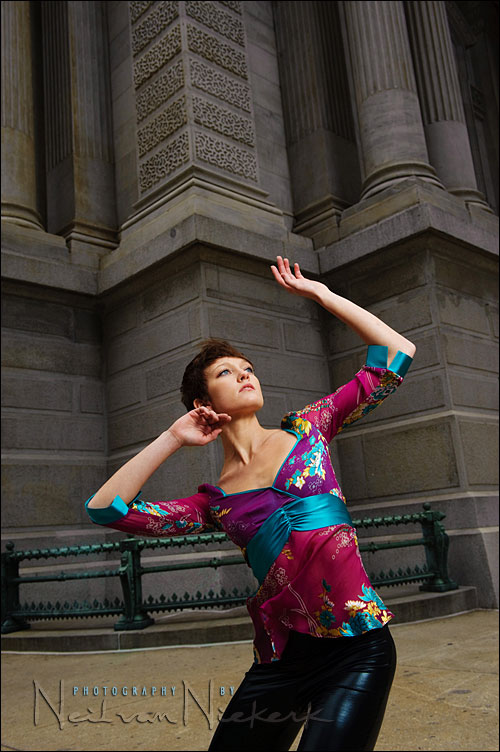
Then it becomes a simple matter of metering for the manual flash until we get f/6.3 … and add the flash via a speedlight in a softbox. And there we have it.
The lighting helps pop our subject in this stark setting.
Photography workshops
- More info about upcoming photography workshops.
- Recap of previous photography workshops.
Thanks , again for an ‘enlightening’ tutorial and attached Tangents.
What is your opinion on using an external flash/light meter; outdoors or indoors with multiple flashes?
These really simple and visual explanations are perfect for me – thanks so much.
Any reason you closed down on the fstop instead of reducing the ISO to get the under exposure, to make the flash work at less power?
hi Neil,
The metering you took for the ambient light, is that the light on your subject for example with spot or matrix including the background?
Thx in advance.
Hi Neil….I love the idea of you showing the equipment used on the shot in addition to you showing the photo underexposed as you explain…The third part which makes your new book “a must have” is that you show a picture of the setting with “you” the photographer and the models so we the reader can visualize everything….in addition to your explanation…thanks again…
Anthony
Neil, once again thank you for such a great post. That is an absolutely spectacular portrait shot.
Chris.
Hi Neil!
I know that the softbox is on camera right, but is it at the level of the model or higher or high pointing down? I am starting some off camera, and was wondering for reference.
Thanks!
Joy
Hello Neil,
I hope this finds you well.
I have 2nd shoot a few weddings and noticed each main photographer has used different lighting for the group formals in the church; from on-camera flash bracket with 1-2 flash heads, a single umbrella to multiple off-camera flashes and umbrellas.
With your group formals, can you share with us what lighting you typically use? I’m thinking of buying a Q39 Softbox (medium size) for the softer diffused light, or perhaps a 60-inch umbrella as these appear easier to transport/setup. Your input would help me decide which route to take.
Thanks so much!
Ernst
Ooh, I can’t wait to see the family formal series! I’m chugging along nicely photographing the candids as a 2nd photographer but I find lighting (and posing) the family formals rather intimidating. Can’t wait…
Ernst
I just had to add this image taken by Sherry McCracken during the workshop!
Hey Neil,
I’m finally back in town after taking your workshop in Philly. Just wanted to say thanks for a great day. From the sumptuous surroundings of the Ritz, to the wealth of information and attention to detail that you provided, it was truly a memorable class.
Your efforts on our behalf are much appreciated!
Linda Kamholz
Neil,
I love this photo! Not because it’s my shot, but because it really captures the mood of your workshops. Such a fun learning environment! It’s a treat to spend time learning from someone who obviously loves what they do, is so talented and knowledgeable, and is willing to share all that they know! Thanks again for the fabulous workshop!
Sherry
Neil, I’ve been noodling around with OCF for a while now but there’s one thing that for some reason doesn’t sink into my brain and I’m finding tough to understand, I hear it often but can’t grasp the meaning.
In your description you say… “Then it becomes a simple matter of….. metering for the manual flash until we get f6.3” … You’re adjusting the power of your flash manually until the subject is lit to your desire, but where does the f/6.3 come in? like I say, this never seems to sink in with me!
many thanks, mark.
Hi Mark,
If I can answer your question, based on my understanding and my experience. We setup the speed to 1/200 just enough to darken the background/ambient, but also because it is the max sync speed. Once you decided which ISO you want to use, then you decide what shutter speed to control the ambient light (how dark or light you want it to be). The flash is using manual setting (not TTL). So either you manually set the flash power (full, 1/2, 1/4, etc) or use your aperture to control the amount of flash exposure you want to have. We did use a light meter to get the aperture setting, though. But you still can do a series of shot to decide which aperture is best for you, given the same power flash setting.
I find that if the ambient light is not dark enough for our taste, since we can’t go past the max sync speed (1/200 or 1/250 depending on your camera), I would have to make the aperture smaller, like f/11 or even f/16. Then your only option is to set the power on the flash manually to have the subject exposed as desired. Of course the distance of the flash to the subject will also have an influence on the exposure level. In other words, you don’t have room to play around with the aperture to control the amount of flash.
I hope this helps.
Leo Dj
Neil, Leo, thank you. I understand OCF and the way you went about getting the shot, I think for me it is more the terminology that confuses me…I think I’ve got it now.
thanks again,
-mark
I know this thread is a few months old, but I’m going to make a reach here. Is this the Mark Crosby from 49th and Walnut Street in West Philly? If so, this is a very old friend who would love to hear from you.
-Charles
hi neil, love your blog. i’ve learned so much thank you. my question is, after metering at 5 at max sync speed, than underexposing to 6.3, how do you determine the flash output on your speedlite? I’ve been shooting with ttl mostly and it’s still tough for me to determine where to put the flash power. I shoot with a 7d w/ 580ex ii w/ mostly the 70-200 f2.8 using pw to trigger. Is there a “rule of thumb” of to where to start? I’m sure you have a tangent blog about it somewhere, but I probably can’t find it. Thanks again. Hope you can help.
Neil,
Thank you for publishing a clear, concise and practical guide to photography. I have sincerely learned more about taking pictures in the 30 mins I spent reading some of your material than in all the classes and experience I have had prior. It is one thing to be able to take a good picture, it is another ball of wax to relate how you took the picture, what your thoughts were, and why you made those decisions. Thanks again.