A simple lighting setup with speedlights & white seamless backdrop
A question on the Tangents forum asked about setting up and using two SB-910 speedlights against white seamless. It’s a topic we’ve covered in a previous article – a simple lighting setup for studio photography – but it might be good to revisit this again.
The article on that simple lighting setup with two speedlights, explained our choice of camera and flash settings in detail, so we’ll only briefly cover it this time. Still, a different explanation from a different angle might trigger new ideas and questions.
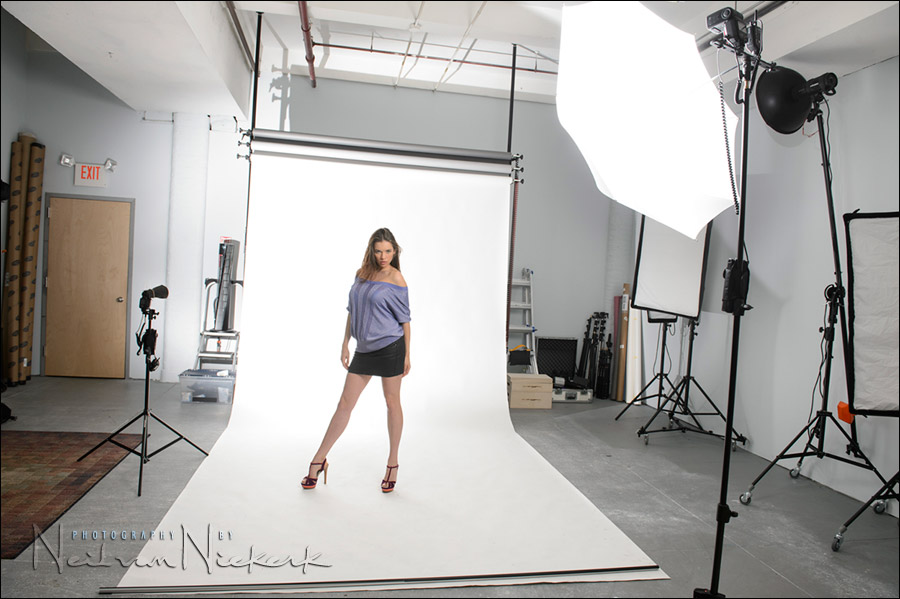
The pull-back shot of the setup we used during a personal workshop at my studio. Before we jumped into using the studio gear, I wanted to show that with a minimalist setup using speedlights, we could accomplish similar results (sans the higher output and fast recycling of the studio gear.)
The shoot-though umbrella acts as a “light bomb” (as I’ve heard this described elsewhere.) This floods the place with light, as light is scattered all around and bounced off the walls. Setting the flash to full manual output – (TTL wouldn’t make sense here) – we metered the light as f/5.6 for where she was standing.
Then we added the background light. You can see this speedlight on the light-stand to the left of the white backdrop. I used a black foamie thing to flag the light so there was no light directly spilling on her from the speedlight itself. The white backdrop does reflect a lot of light back.
A battery pack on both speedlights mean the recycling time isn’t too bad. With the main speedlight dumping full output, it does take a few seconds to recycle – this just gets slower and slower as you keep shooting, unless you have a battery pack there to help.
- camera settings: 1/125 @ f/5.6 @ 200 ISO
Metering for the light on the white seamless backdrop, was done via the camera’s histogram . We dialed the power up until the histogram completely bunched up on the right-hand side of the histogram. This ensured that the white seamless would be rendered as pure white for most of the background.
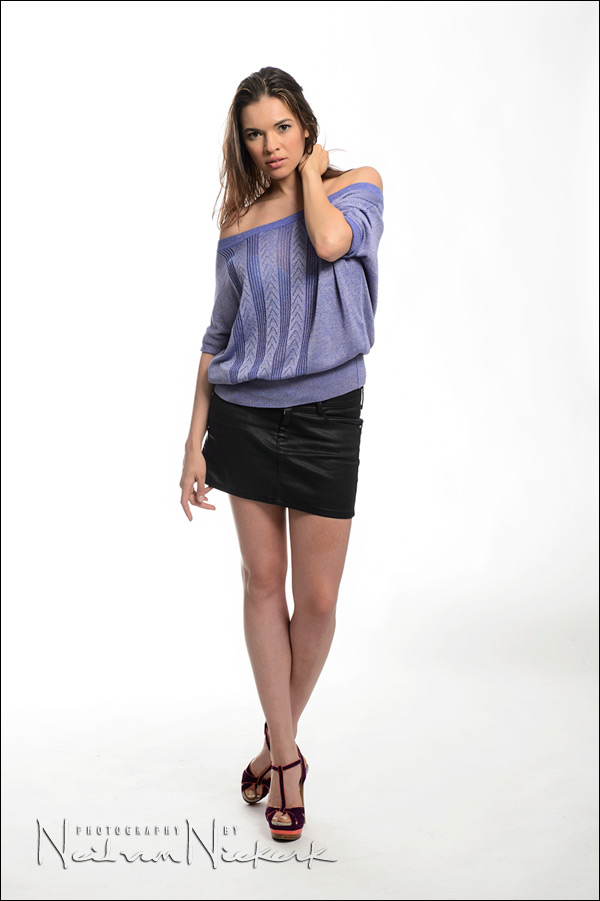
Using just one speedlight for the background does mean that the background isn’t evenly lit from left-to-right. You can see in the top-most photograph that there are areas in the background which isn’t pure white. So this would need some work in Photoshop to get that background the way you want to … or, you could use another speedlight on the right. There is a certain limitation in paring the equipment down to a minimum – as in this example, you may have to correct a few things afterwards in Photoshop to achieve the ideal.
Related articles
- A simple lighting setup for studio photography (models: Anelisa & Aleona)
- Gear list – Starting out with off-camera flash
- Tutorial video – A home-studio setup with speedlites
- Video clip: Photo session in the studio (model: Anelisa)
- Home studio – Portrait lighting setup in limited space (model: Kaylex)
- Manual flash / TTL flash (model: Aleona)
Photo gear (or equivalents) used in this photo session
- Nikon D4
- Nikon 24-70mm f2.8G AF-S / Canon 24-70mm f/2.8L II
- Nikon SB-910 Speedlight / Canon 600EX-RT Speedlite
- Nikon SD-9 battery pack / Canon CP-E4 battery pack
- Manfrotto 1004BAC – tall light-stand
- PocketWizard Plus X Transceiver
A little bit of homework
Using Photoshop, what would be the simplest ways of removing the less-than-white areas in the background, turning it into white?
Answer: I would use a “Replace Color” to get rid of the white.
This took about 8 seconds: http://i.imgur.com/aeBEL8M.jpg
Hi Neil. Is there a reason you specifically chose 1/125 as your shutter speed as opposed to the flash sync speed?
Alex .. check this tutorial on high-speed flash sync where lower down in the article I mention propagation delay.
It is usually safer in a studio to work just below maximum flash sync speed for this reason.
Nice quick post, that’s my setup, but with two speedlights pointing at the background. I need to remember about the BFT on my background lights though, I keep getting spill with kids not staying still!
Neil,
Regarding propagation delay, does sensor size influence this? I ask because I’ve never noticed this issue on my 7D and wonder if that’s because it’s not full-frame. Perhaps a smaller sensor has a little more wiggle room when it comes to synchronization errors? Great post as always.
Justin
Justin, I am sure it has an effect. Propagation delay also depends (mostly?) on how the camera interfaces with the specific wireless trigger. So you may see it with some cameras and some triggers, but not others.
Ultimately, there is usually no reason to shoot at maximum flash sync speed, so why risk this? Just keep to 1/125 or thereabouts, and you’ll be fine.
“What would be the simplest ways of removing the less-than-white areas in the background, turning it into white?” In Levels click on eye dropper (white) and then click on the background in the shot; this instantly creates a nice white, even, background!
Doesn’t the white point dropper stretch the histogram, essentially giving a global adjustment?
Steve, yes it does and would alter the structure of the file.
You could still do that on a separate layer but using the blue channel and Calculations Merged/Blue; Merged/Blue; Mode Multiply; output Selection
Then you would do Calculations again, Merged/Selection; Merged Selection; Mode Multiply; output Selection then apply that mask to the layer as that would make the outline of the girl very black which would protect her from the Levels White Point adjustment.
Probably would still need some light brushing on bottom right to make background totally white.
Maybe a high-tolerance magic wand, followed with a white paint bucket fill?
In PS they are many ways.
1: Curves or Levels
2: Clone Stamp Tool
3: Lasso tool, right click, fill, content aware
4: Paint brush tool, sample area and lightly brush in
I think the answer to the homework ought to be shoot in raw, then use Lightroom (not Photoshop) to raise the exposure of the white background via the local adjustment brush. This is easy and fast.
Justin
Seems like it would be relatively easy to add in a blank layer and paint white over the not-so-white portion, erasing / masking off any area where you didn’t want it. (Although I am by no means a PS expert!)
Thanks for the reply Neil (comments 3 & 4). Delay due to the triggers makes sense… I read this tonight, but was thinking about it earlier today at work… It was a slow day but I ended up with a different conclusion. This is all based on the assumption that a camera’s sync speed is determined by the time it takes a shutter to fully open or close. If this is wrong, then the rest is kaput :P
I was thinking it might have to do with the flash duration itself. Flashes dump a lot of power at the initial moment, but their output continues for a while after (approx 1/300th sec for most speedlights at full power, it seems). At slower-than-flash-sync speeds, there is always a finite period where the frame is fully exposed before the 2nd curtain closes. Assuming a 5D (which is what I did in my maths since it’s what I shoot), the flash can’t fire until 1/200th of a second into the exposure to allow the first curtain to clear. If the shutter speed is 1/125th, the time between the first curtain being fully open and the 2nd curtain beginning to close is 1/333 of a second. Which is roughly the t.1 time of speedlights. So you get a nice full exposure here on a 5D with a speedlight.
If you shoot at 1/160th, the total time from the first shutter opening – and the flash firing – and the 2nd curtain clsoing drops to 1/800th of a second, which is less than 40% of a full power flash’s duration. The shutter starts to close before the flash is finished. So one side of the frame will be slightly underexposed compared to the other. Now I may just be seeing this, but it looks like such an effect occurs in both the 5D and D3 shots. The model’s left elbow in particular looks darker in the 5D’s 1/160th shot and the D3’s 1/200th shot – 1/3rd of a stop under their sync speeds. I see a subtle, but similar difference in each when I compare them to their respective 1/125th shots. And I don’t see it in the HSS samples either at sync speed either…
So shooting at sync speed, there is no time for the frame to be fully exposed because the 2nd curtain closes the moment the first one is fully open, leading to the more drastic tapering of the exposure from left to right (or top to bottom) because the 2nd curtain is blocking the exposure from the majority of the flash duration.
I am aware that radio triggers do have an inherent delay, but I’m wondering if that’s the cause here. Of course, it could be the non-HSS shots have the banding and not the HSS shots could be due to the fact that only the non-HSS shots used radio triggers. But the concept seems sound and I wonder if it stands up to scrutiny…
Or if it just made everybody go cross-eyed… :P
Is it important to use a shoot through as the mainlight in this lighting setup? If I was to use two speedlights (with or with out a reflective umbrella), to blow out the background, then could I not use another diffuser such as a softbox or an octabox?
You can use any light source as the main light. Improvise and experiment.
I found myself more interested in photography, what i did is to learn how to use studio lights with a backdrops. a challenge now is most of my full length pictures comes with a shadow. what might be the cause of shadows? i use two umbrellas a silver and a white. I also experience pictures with sort of showers on the skin when using a camera without a flash.
Isaac – there are a few factors at work here:
What is the size of your umbrellas?
Do you “choke” the flash on the umbrella, or do you extend it as far as you can on the umbrella shaft?
How close are your subjects to the white backdrop?
How close are your umbrellas to your subjects?
In here are the answers to avoid getting a pronounced shadow.