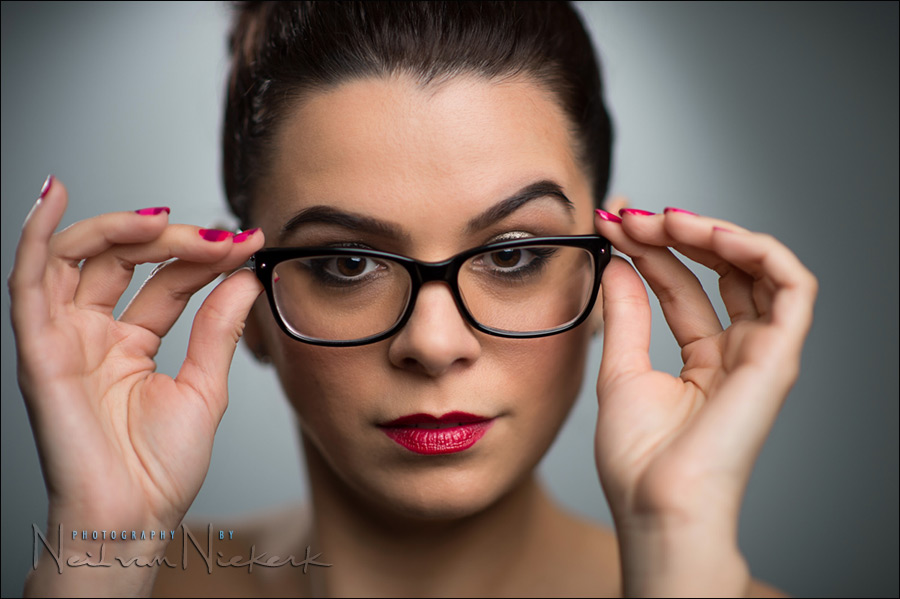
Studio portraits with an 85mm f/1.4 lens
Shooting portraits with fast lenses for that distinctive shallow depth-of-field look, works in the studio too. In fact, it works exceptionally well. But it is perhaps an unexpected way of working in the studio – the usual way is to work with apertures in the range of f/8 or f/11 for great depth-of-field and superb image sharpness.
That super-fast aperture portrait lens – such as the 85mm f/1.4 – really focuses the attention exactly where you want it …
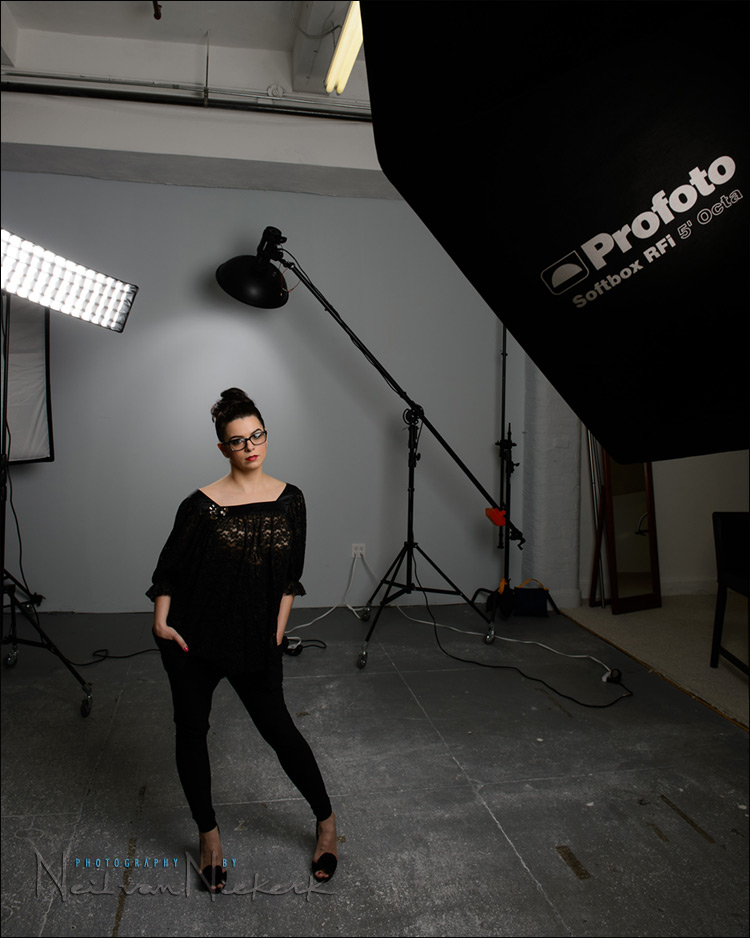
The main light was via the Profoto 5.0′ RFi Octa Softbox (affiliate). This huge light source makes it easy to get flattering light, and by moving it around, you can control the contrast and how much light falls on the shadow side of your subject’s face.
The rim-light was via the Profoto RFi 1’×3′ softbox (affiliate) and the Profoto 50 degree 1×3 grid (affiliate). This helped create some separation, and some interesting highlights.
The background light was via a Profoto beauty dish (affiliate) and Profoto 25 degree Honeycomb Grid (affiliate) which I used because I didn’t want to go to the effort to change it up to something else. It was available, and it gave an interesting gradual high-light to the background, used this close to the wall.
- camera settings: 1/160 @ f/1.4 @ 100 ISO
- Nikon Df
- Nikon AF-S Nikon 85mm f/1.4G
- B+W 0.9 (3 stop) ND Neutral Density Filter
The super-wide aperture offers a few challenges – the obvious one would be that the shallow DoF isn’t forgiving of even the slightest movement. Working with studio lights though, another challenge is that there’s just too much light. When I’ve shot similarly with shallow DoF in a (home) studio setup, it was with speedlights and Quantum flashes. Then it was easier to get to the f/1.4 aperture.
With the 500 Ws Profoto D1 studio lights (affiliate), there was just too much light. You wouldn’t think this would be a problem in a studio – too much light. But I wanted to use that huge Profoto 5.0′ RFi Octa Softbox (affiliate) because of how easy it is to control the light and contrast with it. So I had to use a B+W 0.9 (3 stop) ND filter (affiliate) to bring the light down. This brought another problem – the camera just didn’t want to grab focus in such low light while a 3-stop ND filter was on the lens.
I ended up having the make-up artist hold a video light closer so the camera had enough light to focus by. Then I’d take a sequence of photos while the video light was pulled away. Not an ideal way of working. I can see the use of lower-powered studio flashes here – for less light

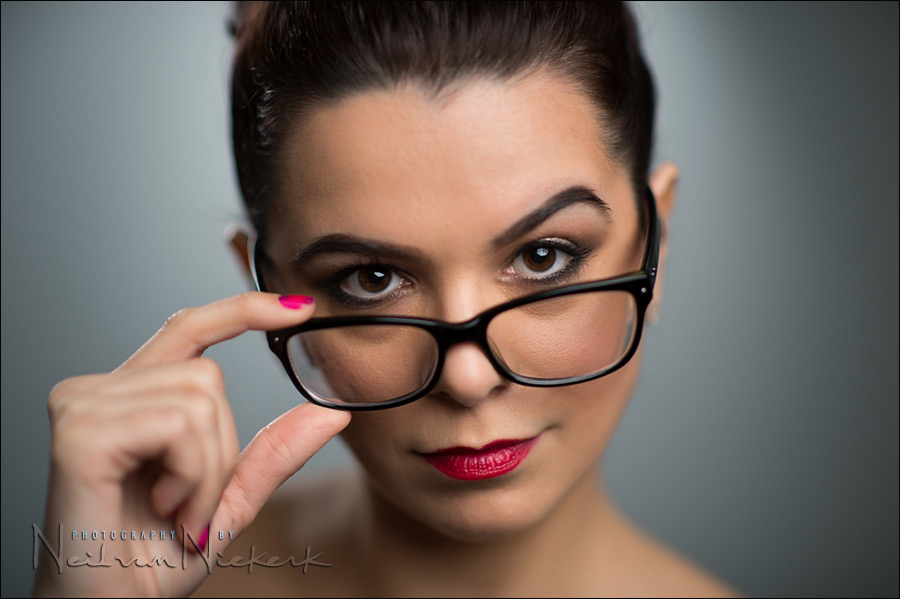
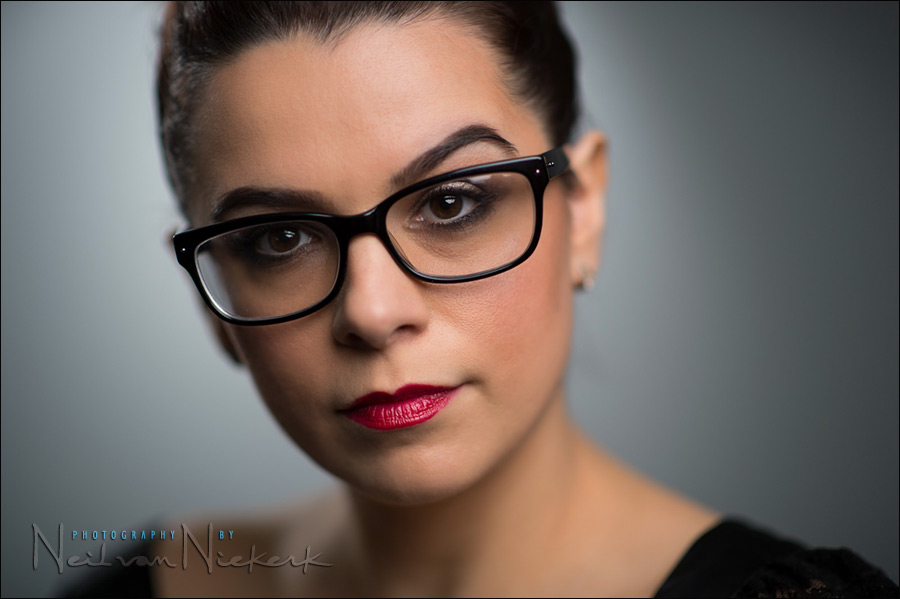
The stunning model here is Oktavia, who also graced the cover of my book, Off-Camera Flash.
- camera settings: 1/160 @ f/1.4 @ 100 ISO
- Nikon Df
- Nikon AF-S Nikon 85mm f/1.4G
- B+W 0.9 (3 stop) ND Neutral Density Filter
Lighting gear used during this photo session
- (3x) Profoto D1 Air 500 Ws studio light
- Profoto 5.0′ RFi Octa Softbox
- Profoto beauty dish with a honeycomb grid (25 degrees)
- Profoto RFi 1’×3′ softbox; Profoto 50 degree 1×3 grid
Related articles
- 85mm – a lens to change your portrait photography (model: Elle)
- Home studio – portrait lighting setup in limited space (model: Kaylex)
- Using a neutral density (ND) filter to control DoF with flash (model: Ulorin Vex)
- camera review: Nikon Df – the steampunk D4
- review: Nikon 85mm f1.4G AF-S lens
- NJ photography studio New Jersey
- NJ headshots photography
Studio lighting workshops
If you are interested in learning more about studio lighting, including lighting for headshots, I offer workshops on studio lighting. The workshops will be held at my studio space in NJ, and it has a wide range of studio lighting gear to play with!
Great image Neil and that shallow DoF really grabs the eye. Speaking of eyes, I assume (from a portrait perspective) that this is always the area to focus – correct?
I had this discussion previously I think – as some of the profile photos I did for work colleagues using the Canon 70-200 f2.8 when focussing on the eye rendered the tip of the nose out of focus.
With these images at f1.4 – it seem less obvious than mine at f2.8!
It was the review of this very lens and your comment (#46) actually sums it up… If it’s the look you want then that’s what you do!
Always the eyes, and if you have to choose, the eye closest to the camera.
Good point on the pros of lower power strobes. Alternatively do you think LED lights could replace a lower power strobe set and also double as a video light kit?
I don’t think you’d get enough power from an LED light, if you had to diffuse it to the point that you got that large light source.
The obvious step up would be Westcott Spiderlites.
Neil
Yet another great article; you have the knack of very often writing on topics that are of (current) interest to me.
Wasn’t the modelling light strong enough to allow you to achieve focus?
Using the modeling lights could’ve worked, and I’ve used them in the past. But then you’re around 1600 ISO again, not that I have obvious issues in using high ISO settings when shooting on location.
This is a great blog post. As a newborn photographer, shallow DOF is something we strive for. I’d been discussing the best way to achieve this with another photographer and neutral density gels for the strobes were suggested. Have you had any experience with gels Neil?
I have no idea how to gel these kinds of lights, since they become too hot to place the gel against the flash-head.
Placing a large gel sheet in the softbox isn’t practical either. That’s a 5′ octabox!
I think the obvious step here would be to use speed lights.
Nice series of images Neil. The best answer is to you use ND gels as another has already mentioned. They come 24″ square so it’s easy to tape them into a large softbox without them touching the tube. Or cut or double them over for a smaller box like a Strip.
Great article and discussion Neil.
Since your subject here was pretty much not moving around! Maybe! Wouldn’t it have been more practical to manual focus first then place the ND Filter over the lens?
Mark
Just the act of dropping the camera to attach the filter, and putting the camera back to my eye, will change the plane of focus. The DoF is that thin.
Great article as always, Neil. It always amazes me at how razor thin the DoF is at 1.4.
Great stuff as always. Could you do a shoot where you reenact a shoot like this with more budget oriented gear, to see how close speed lights and smaller boxes can get to the expensive stuff?
Eric … this is one of the linked articles: home studio portrait setup.
Neil,
Are those non-reflective glasses that she was wearing or were you able to control the reflection of the lights by adjusting the angle?
K
Two of the test shots:
Neil, do you find you have to contend with CA and purple/green fringing at such wide open apertures, especially when backlighting is involved? If so, do you just correct it in RAW?
Nothing corrected.
That purple fringing that fast lenses show when shooting at maximum wide aperture, is usually due to strong back-lighting. That’s not the scenario here.
Great shooting ! thanks for sharing. I love so much my 85mm f1.4 ! so perfect lens, always surprised by such amazing results !
Neil, since you are using Profoto you can use Pocket Wizards to get a shallow depth of field. On the Profoto D1 500 you can shoot up to shutter 1/4000. With the older Profoto Compacts you can go all the way to 1/8000.
Sample pix of Profoto D1 500 at f2.8 in the studio.
https://web.500px.com/photo/50662214/The-Look-by-Arif–Kaser/
Stunning work Arif! Loved this one too:
https://web.500px.com/photo/48301010/Bella-Blues-by-Arif–Kaser/
Kudos
That does look good. Which PocketWizard units?
I tried your settings with the Profoto Air and the PW Plus II units, and I’m just getting the expected black frame.
I am using the PW Flex TT5. Both on my camera body ( D700 ) and Profoto D1 500w. We were trying to replicate shallow dof in the studio. After trying ND 3 Stops we were abit frustrated because it was hard to focus. Since we were PW Flex TT5 users we just thought why not try ” HSS ” with Profoto D1 500w. We managed to to shoot at f2.8 | 1/1250s | iso100 with the Profoto D1 500W ” If ” I am not mistaken the D1 500w can go all the way to 1/4000s before banding starts to occur.
We also tried in on the older model of Profoto Compact 600w. The Compact 600w can go all the way to 1/8000s.
How does PW Flex TT5 does it ? no idea. Is it ” HSS ” I have no clue. All I know that it works. Best of luck trying :)
I’ve used a 50 mm on a DX format camera for quite a while, effectively giving me a 75 mm focal length, but I never felt I could really create a frame-filling portrait without introducing too much perspective distortion. I’ve since then moved on to a full-frame camera, and now am in doubt choosing between an 85 mm f/1.8 and a 105 mm f/2.8 macro lens. I would like the lesser distortion of the 105mm for the same size of portrait, and the macro function would be a nice bonus, but not having touched either lens ever, how does the depth of field compare? Is it that much less than the f/1.8? (I’m a bit on a budget)
Thanks!
Great stuff, as always!!
A few weeks ago I had the chance to do a studio session with several powerful studio strobes from HENSEL and I have to say: I did not get along with these flashes at all. So much light everywhere, … and you just cannot dim them really down. *Sigh*, think I’ll stick to my 16 little flashguns! :-))
The Elinchrom Ranger Quadra would be ideal for this situation. You have a range as low as 8ws (on B terminal) to 400ws on A terminal). No need for the ND filters.
Interesting post! I’ve never try portrait with a prime 85mm but your post is making me want to try that for portrait photography. As a primary wedding photography, I must say I use my 70-200 mm to cover the 85mm length but of course I know the result would be totally different with a prime so I should try it :).
I would say that I really believe the 70-200 f/2.8 (stabilized) is much more versatile for wedding photography than the 85mm.
Thanks for sharing how you solved this problem. With my Dynalights the lowest I can get is 5.6. I bought the ND filter and I bought Roscoe in sheet gels to cover the face of the lightbox. Love your result.