Tangents

photography tutorials, reviews & workshops

tangents photography blog
learn : discuss : share
  • Tangents
  • Tutorials
    • Flash Photography
    • Wedding Photography
    • Studio Photography
    • Posing People
    • Understanding Your Camera
    • Exposure metering
    • BFT
    • Best Photo Books
  • Reviews
    • Sony
    • Nikon
    • Canon
    • Fuji
    • Profoto
    • lighting gear
  • Workshops
    • Info: Workshops
    • In-person
      tutoring sessions
    • Online
      tutoring sessions
    • Workshops in
      New Jersey (NJ)
    • Workshops in
      New York (NYC)
    • Photo walks in NYC
    • Studio Workshop
    • Video tutorials
    • Workshop results
  • Books
    • On-Camera Flash (revised ed.)
    • Direction & Quality of Light
    • Off-Camera Flash Photography
    • Lighting & Design
    • On-Camera Flash (1st ed.)
  • Projects
    • Two Perspectives
    • B&W Infrared
    • Vintage lenses
    • Time-lapse photography
  • Info
    • About
    • Contact
    • My Photo Gear
    • Books by NvN
    • Join us on Facebook
    • Acclaim
    • Success Stories

Using on-camera bounce flash outdoors at night

June 29, 2011 Neil vN 48 Comments

Using on-camera bounce flash outdoors

With wedding photography, when doing the night-time romantic portraits of the couple, the pressure is usually on. The only opportunity to whisk the couple away for a few minutes, is during dinner time, when the party is at a lull. The pressure is on because you have even less time than you had during the earlier part of the day, and you also don’t want to lose the attention of your couple who wants to get back to their guests at the reception.

I usually scout a few places before-hand, getting a clear idea of what I want. When setting out with the couple, I rely on bounce flash and on video light. There is rarely time for carrying around a soft-box. You need to move fast, set up fast … and still come up with the goods.

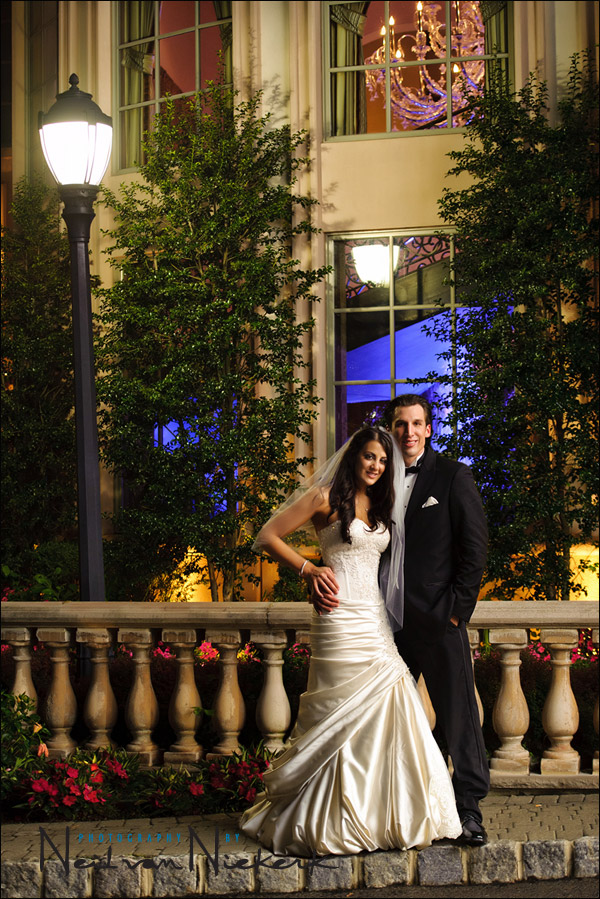
With this wedding from the past weekend, I wanted to capture two specific portraits of the couple with the outside of the venue as a backdrop. I would normally have used video light here, but I had the idea that I wanted the compression from a longer lens … the 70-200mm f2.8 … and then the person holding the video light would be in shot. So the solution was to get flash in there. Where we were working outside there, I fortunately had part of the building to bounce my flash off.


On-Camera Flash Photography

On-Camera Flash Photography – revised edition

This book is explains a cohesive and thorough approach to getting the best from your on-camera speedlight.

Particular care was taken to present it all with a logical flow that will help any photographer attain a better understanding of flash photography.

You can either purchase a copy via Amazon USA and Amazon UK, or can be ordered through Barnes & Nobles and other bookstores. The book is also available on the Apple iBook Store, as well as Amazon Kindle. Also check out the Amazon Kindle store.

Learn more about how the cover image was shot.


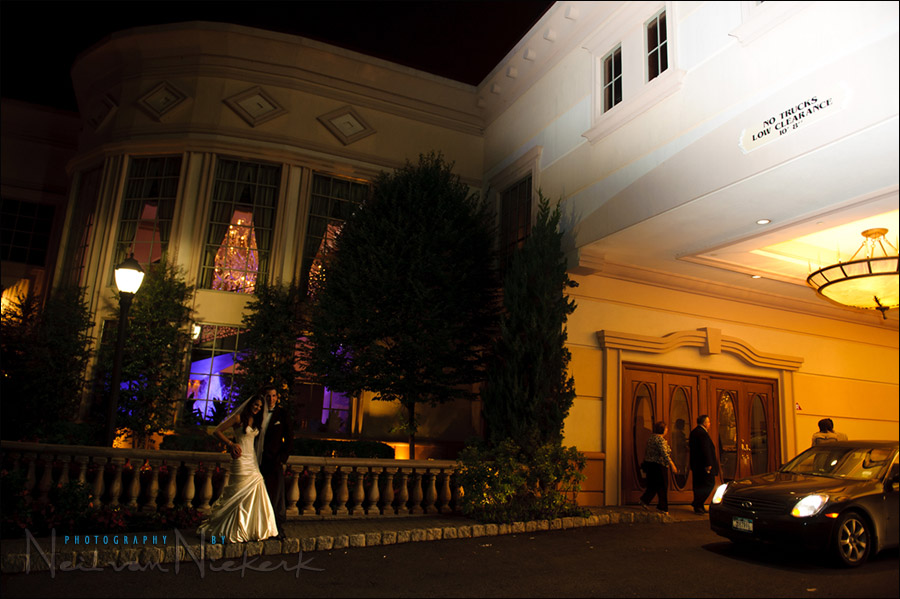
Here is a quick grab-shot with my camera which had the 24-70mm f2.8 on, so that you can see what I bounced my flash off – that part of the building over where the guests arrive.

Because I had to bounce my flash partly forward, towards the couple, I had to flag my flash. Black Foamie Thing to the rescue! As always, the idea with using the BFT to flag my flash, is to block any flash falling directly on my couple. This way I can get soft indirect light, similar to using an off-camera softbox. Of course, I had to be at fairly extreme settings on my camera to make this work in this case.


Camera and flash settings & photo gear used (or equivalents)

camera settings: 1/60 @ f2.8 @ 1600 ISO; TTL flash
The lens was zoomed to 70mm for this specific image.

  • Nikon D3
  • Nikon 70-200mm f2.8 AF-S VR II  /  Canon EF 70-200mm f/2.8L IS II
  • Nikon SB-910 Speedlight  /  Canon 600EX-RT Speedlite
  • a BFT (black foamie thing)


On-camera flash modifier – the black foamie thing

I use the black foamie thing (BFT) as a truly inexpensive flash modifier to flag my on-camera flash to give me lighting indoors that truly look nothing like on-camera flash.The piece of foam (Amazon), can be ordered via this link. I cut the sheet into smaller pieces.

The BFT is held in position by two hair bands (Amazon), and the BFT is usually placed on the under-side of the flash-head.

The linked articles will give clearer instruction, especially the video clip on using the black foamie thing.


Summary

Oh, about those sloping verticals – that light pole is actually skew! And the kerb does slope outward like that.

Working fast like this, with a flexible idea of what is possible in bouncing on-camera flash, I was able to get an image which really looks good. Ultimately though, on-camera bounce flash is just one part of any photographer’s lighting arsenal.

Filed Under: flash photography, style, Uncategorized, wedding photography Tagged With: bounce flash photography, how to bounce flash


Help support this website

If you find these articles of value, please help support this website by using these B&H and Amazon affiliate links to order your photo gear.

I also offer photography workshops and tutoring sessions, whether in person, or via online video tutoring sessions.

Please follow me on Instagram for more.

You can also join our thriving photo community in the Tangents group on Facebook, where we show our photos and discuss all things photography.

Thank you,

Neil vN

Books by Neil van Niekerk


48 Comments, Add Your Own

  1. 1Roy Barnes says

    June 29, 2011 at 5:40 am

    Neil – You have become my photographic guru! I have to admit to checking out your site at least once a day – sometimes several times more. I’ve been very interested in the constant reference to the Black Foamy Thing and this current article really does it for me. I can suddenly really see just what the benefit is to using that little ‘device’. Pure Magic!
    I shot a roll of film this weekend past (in Sydney, Australia)and used the ambient light/flash exposure techniques that you so frequently espouse, and I was very happy with the results. Hope you head this way soon – I sense that you already have a substantial following here.

    So, photographic messiah, I thank you for your inspiration and teaching and hope that your continue to prosper.

    Regards

    Roy

    Reply
  2. 2Wiz says

    June 29, 2011 at 6:57 am

    Neil, great info !!
    I am just amazed of the power of that speedlite.
    Do you think that would be possible with a 430EX II ?

    Reply
  3. 3Neil vN says

    June 29, 2011 at 7:01 am

    I’m not sure the 430EX II would’ve been up to the task, although I have to admit that the original (RAW) image was over-exposed by about 1/2 a stop. But I still think it would’ve been more than the 430EX II is capable of. This type of situation really needs a berried flashgun like the 580EX II or the SB-900.

    Neil vN

    Reply
  4. 4Allan Høgholm says

    June 29, 2011 at 7:16 am

    Very nice picture, and a great idea to bounch the light of the big white wall :)

    Reply
  5. 5Stephen says

    June 29, 2011 at 7:28 am

    Every time I use TTL at night with low ambient light, my histogram is skewed to the left (left to middle of the histogram). Is that how your shots turn out?

    The image ends up fine overall, but I’ve lost a lot of data in the image.

    Reply
  6. 6Neil vN says

    June 29, 2011 at 8:00 am

    The histogram will be skewed t the left because of all the darker tones in the image. However, this photo was over-exposed by 1/2 a stop, so I still had to pull the exposure down a touch on the RAW file.

    Neil vN

    Reply
  7. 7Scott says

    June 29, 2011 at 8:20 am

    Hi Neil,

    The flash must be the dominant light source for the subject so is this a case of ‘dragging the shutter’ to let the background ambient register nicely and then letting TTL flash do the rest? Aperture and ISO settings to get best reach out of the flash gun given what you were bouncing off?

    Thanks for all the great articles,
    Scott

    Reply
  8. 8Neil vN says

    June 29, 2011 at 9:00 am

    Scott ., you have it right.

    Neil vN

    Reply
  9. 9stakx says

    June 29, 2011 at 9:04 am

    Great location– looks like a movie or theatrical set. I remember the couple’s engagement photos.

    Reply
  10. 10Christos says

    June 29, 2011 at 10:23 am

    Neil,You never cease to amaze. Great image and capture.

    Reply
  11. 11Bob Kidd says

    June 29, 2011 at 10:50 am

    Neil,
    Great photograph and fabulous use of the wall surface to the right. I was curious why you used a smaller aperture to get greater depth of field. A little surprised you didn’t choose a softer background with your f/2.8 lens.

    Thanks,
    Bob

    Reply
  12. 12Neil vN says

    June 29, 2011 at 10:55 am

    Bob … I’m not quite following you here.

    I shot at f2.8 … wide open on that zoom lens. Why would I need more DoF ?
    And how would I choose a softer background ?

    Neil vN

    Reply
  13. 13johnlo says

    June 29, 2011 at 10:57 am

    Neil, Very nice! thx for sharing that idea.

    Reply
  14. 14Alvin says

    June 29, 2011 at 12:01 pm

    Hi Neil, since reading your bounced flash + BFT, I’ve been bouncing off everything, even outside: cars, trees, other people.
    I’d imagine to pull off your shot, you needed a fairly high ISO for the flash to register, especially with the wall so far away.
    I’ve tried something similar during a sunset portrait with some problems: to underexpose and saturate the sky, I needed a low ISO. After bouncing the flash at a nearby wall, it was difficult to get the subject to be exposed properly – probably because the ISO was too low to “register” the flash.. any tips on these situations? Thanks!

    Reply
  15. 15Neil vN says

    June 29, 2011 at 12:30 pm

    Bouncing your flash implies a loss of power. It isn’t an efficient way of using your flash’s output. So you won’t be able to bounce flash at low ISO settings (or small apertures), or in daylight or anytime the ambient light is strong, since this will imply settings where your flash runs out of juice. It just can’t deliver what you’re trying to do with it.

    For that, you’re better off using a softbox or something similar.

    Neil vN

    Reply
  16. 16Edy says

    June 29, 2011 at 12:56 pm

    Hello Neil,
    I have a great doubt.
    In this photo you said that to achieve the shot you would need a very high ISO (1600) to get the flash on TTL married couple.
    If I remember correctly, the FLASH TTL is not ‘affected by ISO and shutter opening.
    Iso opening distance and power of the flash manual flash only influence.
    In TTL flash shutter speed and aperture and ISO affect ONLY the background … and ‘correct?
    So to increase the power of a TTL flash I just have to act on comprnsazione Ev (+1, +2, +3).
    Why ‘increase ISO to increase the power of the flash TTL when the flash output in TTL is controlled only with a positive EV??

    Thanks Neil you’re always the best source of my inspiration and constant.

    Edy trigona Genoa Italy

    Reply
  17. 17Neil vN says

    June 29, 2011 at 12:57 pm

    Edy … you have to consider the complete equation here.

    TTL flash exposure is not affected by change in aperture or ISO, since the camera and flash are working together to dump more (or less) light to still give you correct exposure for how you are changing aperture / ISO settings.

    Remember, for manual flash, exposure is determined by aperture / ISO / distance / power.

    So the power of the flash plays a distinct role. So your camera is telling the flash to dump more power .. but at some point the flash can’t cope with what you’re demanding off it. There just isn’t any juice left in it. That means you have to change your aperture / ISO combination so that your flash is capable of delivering enough power.

    With the same reasoning, it doesn’t just help to increase the FEC … because at some point you run out of juice. There just is no more.

    Neil vN

    Reply
  18. 18John says

    June 29, 2011 at 12:58 pm

    Neil, Wonderful post! I must say your new book “Off Camera Flash” is the one of best photo books I have ever read!
    Cheers,
    John

    Reply
  19. 19Jerry says

    June 29, 2011 at 1:03 pm

    Mornin’. Since this is vertical image and the light is coming from camera right, did you basically shoot with the camera in reverse? Otherwise the flash would’ve been aimed to the left. I’ve never tried that before. I see more and different practice in my future if that’s how you did it.

    Reply
  20. 20Neil vN says

    June 29, 2011 at 1:05 pm

    Jerry, I held my camera with the camera in the palm of my right hand, so that the flash could point to my right.

    “camera over hand” vs “hand over camera”.

    Neil vN

    Reply
  21. 21Kyle says

    June 29, 2011 at 1:10 pm

    I know it’s probably more case-specific than anything, but when using TTL flash as the main source when bouncing it, are you generally using it around +2, or maybe higher? (This photo, e.g.)

    I almost always use manual flash, but I’m trying to make clear to myself when TTL makes more sense, and how to arrive at a +/- setting intuitively based on a particular situation.

    And secondly, when dragging the shutter and using flash as your main light source, how much do you “let up” on the “rule” of (roughly) 1/focal length as your shutter speed? Especially during reception photos, when people are moving a lot.

    Hopefully my questions make some semblance of sense, any thoughts appreciated. Thanks Neil!

    Reply
  22. 22Neil vN says

    June 29, 2011 at 1:15 pm

    2 stops over-exposure would be 2 stops over-exposure .. even though the TTL flash metering often suppresses the flash exposure in relation to the ambient light.

    Also, with strong backlighting, you may want to push the FEC that high. But this was not that scenario. I had my flash set to 0EV compensation. That was a little too strong, since the Nikon D3 and SB-900 tend to over-expose at 0EV … I usually dial it down to -0.7EV as my default.

    1/(focal length) .. that didn’t quite enter in my reasoning here since I used a lens with excellent stabilization. However, since I was working fast, I didn’t want to pull the shutter speed very low.

    Do keep in mind that the 1/(focal length) rule of thumb is meant for camera shake .. ie, your movement. Not the movement of your subjects.

    Generally, use as high a shutter speed as possible to minimize camera shake.

    Neil vN

    Reply
  23. 23sheri j says

    June 29, 2011 at 1:19 pm

    I am always inspired by what you share, this is no exception. Your examples help SO much.

    Reply
  24. 24fotografii aniversari says

    June 29, 2011 at 4:44 pm

    It’s better and better, your tehnique and your images inspire all of us.

    Reply
  25. 25Paul Bohman says

    June 29, 2011 at 4:51 pm

    This is a stellar example of the technique. I’ve been able to bounce the flash off of outdoor structures too, but rarely do you get something so big and white as the structure you had here. The photo looks great.

    Reply
  26. 26Eduardo B. says

    June 29, 2011 at 5:31 pm

    Hi Neil, nice post!

    Did you zoom your flash? Do you remember how much?

    thanks

    Reply
  27. 27Neil vN says

    June 29, 2011 at 5:50 pm

    Eduardo, I had probably kept my flash zoomed to whatever I had it set while working indoors. (Probably zoomed to around 200mm or such). I didn’t take particular note.

    Neil vN

    Reply
  28. 28Bob says

    June 29, 2011 at 6:48 pm

    Hi Neil,

    I am impressed by the focus behind the couple. I thought it would have been softer at f/2.8. That is all I meant to say. Thanks for clarifying. The photograph is something we would all like to achieve. Your help is appreciated.

    Bob

    Reply
  29. 29lauren says

    June 29, 2011 at 7:23 pm

    Hi Neil — this is my first note here. I’m just an amateur who loves portraits now and then when I get the chance. I found your site a few months ago after a frantic search on the Internet — because I had to use flash for the first time at an indoor event (and also purchased your book). Just want to say that you’ve been an amazing teacher. Thanks for so generously sharing your knowledge!

    Reply
  30. 30mike says

    June 29, 2011 at 7:33 pm

    how much flash comp did u use??

    Reply
  31. 31Neil vN says

    June 29, 2011 at 7:52 pm

    I had my flash set to 0EV compensation. That was a little too strong, since the Nikon D3 and SB-900 tend to over-expose at 0EV … I usually dial it down to -0.7EV as my default. So I had to pull the exposure down a bit in editing the RAW file.

    Neil vN

    Reply
  32. 32Niko, Philippines says

    June 29, 2011 at 11:22 pm

    Hi!

    I’m a long time reader, but here’s my first note :)

    I’m curious about the pull back shot where you included the white wall where you bounced your flash. I noticed that the couple were still underexposed.

    Did you increase the FEC for the main photo of the couple?

    Or did you intentionally darken the couple in post to emphasize the wall (2nd image)?

    Thanks! And I really love your blog!

    Reply
  33. 33Neil vN says

    June 29, 2011 at 11:54 pm

    Niko, the 2nd image was just a quick grab shot to show what I had bounced my flash off. As such, its only use is to see the wall in relation to the couple.

    I didn’t have time to make a carefully controlled pull-back shot, since we were working in a hurry. So don’t read too much information into it.

    Neil vN

    Reply
  34. 34bimal nair says

    June 30, 2011 at 3:14 am

    Neil the genius! You are master of speedlight usage man! you simply rock!

    Reply
  35. 35bradleywalter says

    June 30, 2011 at 7:13 pm

    Just phenomenal. It really is world class stuff you’re giving us here, Neil. Thanks for this one. Tied it all together for me rather abruptly.

    Brad

    Reply
  36. 36Ben says

    June 30, 2011 at 11:15 pm

    Hi Neil

    Have been reading your tangents for a few months and have been super pumped at all the great info.

    Thanks,

    I do have a quick question from a rookie :)

    How did you handle the white balance in this shoot?

    Ben

    Reply
  37. 37Neil vN says

    June 30, 2011 at 11:19 pm

    I had my WB set to Daylight (+2 amber) … but you have to shoot in RAW. Your concern about the specific WB sounds like a JPG shooter’s concern. If you’re shooting in JPG, you need to immediately rethink your options.

    Neil vN

    Reply
  38. 38Ed says

    July 1, 2011 at 9:16 pm

    Hi Neil,

    Great shot in a less than idea location! A couple of questions. Firstly, in some previous posts, you’ve mentioned Quantum flashes. Could you see yourself using a Quantum flash on a bracket to squeeze out lower ISO? I’ve been looking into a Quantum setup and wondered how that would affect my workflow.

    Secondly, what do you look out for in order to make sure the groom doesn’t cast a shadow on the bride?

    Thanks,
    Ed

    Reply
  39. 39Neil vN says

    July 4, 2011 at 1:34 pm

    Ed, I’ve long ago passed up on the idea of using a Q-flash (on a bracket) on my camera when I found the output was only linear over a 3 stop range. With wider apertures (and higher ISO settings) it would over-expose, regardless. I found that speed lights are better integrated with the ca,era’s metering and capable of more subtle results. Admittedly I haven’t kept up with the latest Q-flashes such as the Trio.

    So this is where I am in situations like these – I either use speed lights or video light.

    As for the groom not blocking the light on her… simple posing technique on the spot, re-affirmed by checking the camera’s preview.

    Neil vN

    Reply
  40. 40bill taylor says

    July 4, 2011 at 5:44 pm

    great shot an thanks for the information!
    if you keep hammering this into my head it may stick someday. i forget about some/allot of the bounce possibilitys out there.

    thanks again.

    Reply
  41. 41Galen Herrington says

    July 5, 2011 at 1:03 pm

    Thanks again for some great advice. I’m going to start playing with my ISO more to see how much more use I can get out of my 580.

    Reply
  42. 42Rick says

    October 11, 2012 at 11:53 am

    The white wall used for bounce now becomes a MAJOR distraction in a photo that is about the bride and groom. Bounce flash is fine as long as the surface you are bouncing off does not overwhelm the actual photo itself.

    Reply
  43. 43Neil vN says

    October 11, 2012 at 1:11 pm

    Rick, I’m not following you on this. How is the wall that I’m bouncing the flash off, now becoming a distraction?

    Or are you referring to the pull-back shot? That’s for reference only.

    Neil vN

    Reply
  44. 44Colleen says

    November 26, 2012 at 5:01 pm

    This is a great solution to lighting, and I like the overall look, but am surprised no one has mentioned the dark shadow cast on the groom’s face, with his right eye almost completely in shadow, which most wedding clients would find objectionable.Turning him more towards your light source would minimize that.

    Reply
  45. 45Neil vN says

    December 18, 2012 at 5:21 am

    Colleen, true, the lighting here isn’t studio-perfect. For me though, the photo here is more about the location and mood of the place. Also, the speed with which we worked was necessary at the time. Finally, the client loves the photograph, and this to me, seals the deal – the image works.

    Neil vN

    Reply
  46. 46Daniel says

    February 14, 2013 at 2:15 am

    Neil, how would you shoot a house & backyard party with on-camera? Balanced ambient with flash mounted CTO gel indoors bounced off wherever I want to direct the light (ceilings/walls/corners) is what I would guess might work ok for inside – but what about outside, just say there is no roof and no walls or windows to bounce off? What do you when you can’t actually angle the light towards anything other than the subject? Without going off-camera.

    Reply
  47. 47Neil vN says

    February 18, 2013 at 5:23 am

    Daniel .. in that case, you have to improvise and adapt.

    Neil vN

    Reply
  48. 48Daniel says

    February 18, 2013 at 7:31 pm

    Thanks Neil, love your guides!

    Reply

Leave a Reply Cancel reply

Your email address will not be published. Required fields are marked *

categories

Articles & Tutorials

  • • About myself & this site
    • Books by Neil vN
    • Best photography books
    • Black foamie thing
    • Photographers’ success stories
  • • Flash Photography Techniques
    • Natural looking flash
    • Flash + Ambient light
    • Dragging the shutter
    • Bouncing your flash
    • On-camera flash outdoors
    • Exposure metering
    • Flash exposure compensation
    • Bounce flash examples
    • Which is the best flashgun?
    • Flash brackets
    • Off-camera flash photography
    • Flash photography basics
    • Using video lights
    • Flash photography tips
  • • Photography workshops NJ / NYC
    • Models @ photography workshops
tutorials:
flash photography
Photography
Workshops

All rights reserved. Copyright © Neil van Niekerk 2025 · Customization by The Traveling Designer

Copyright © 2025 · NvN on Genesis Framework · WordPress · Log in