Tangents

photography tutorials, reviews & workshops

tangents photography blog
learn : discuss : share
  • Tangents
  • Tutorials
    • Flash Photography
    • Wedding Photography
    • Studio Photography
    • Posing People
    • Understanding Your Camera
    • Exposure metering
    • BFT
    • Best Photo Books
  • Reviews
    • Sony
    • Nikon
    • Canon
    • Fuji
    • Profoto
    • lighting gear
  • Workshops
    • Info: Workshops
    • In-person
      tutoring sessions
    • Online
      tutoring sessions
    • Workshops in
      New Jersey (NJ)
    • Workshops in
      New York (NYC)
    • Photo walks in NYC
    • Studio Workshop
    • Video tutorials
    • Workshop results
  • Books
    • On-Camera Flash (revised ed.)
    • Direction & Quality of Light
    • Off-Camera Flash Photography
    • Lighting & Design
    • On-Camera Flash (1st ed.)
  • Projects
    • Two Perspectives
    • B&W Infrared
    • Vintage lenses
    • Time-lapse photography
  • Info
    • About
    • Contact
    • My Photo Gear
    • Books by NvN
    • Join us on Facebook
    • Acclaim
    • Success Stories

Portraits of the bride & bridesmaids – location and direction

September 7, 2010 Neil vN 19 Comments

Portraits of the bride and bridesmaids – location and direction

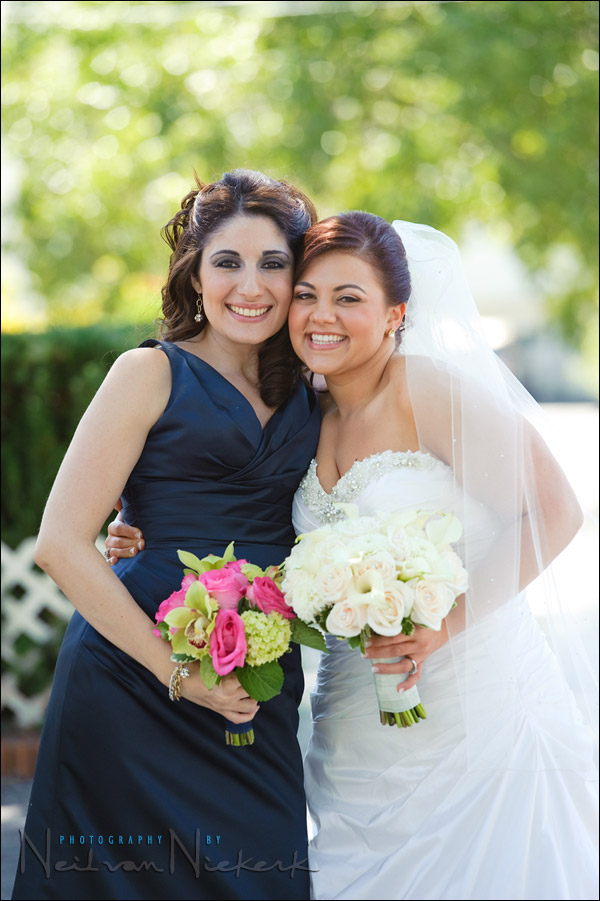
One of the series of photographs that I like to “have in my pocket” are the individual photos of the bride with each bridesmaid.  This is the kind of photograph you can hammer out very quickly, one after the other. The bride with a bridesmaid, hugging each other.  I always make time for this. One stumbling block might be a lack of place to do this.  But there is usually somewhere to do this, by isolating your subject with a long lens against an out-of-focus background.

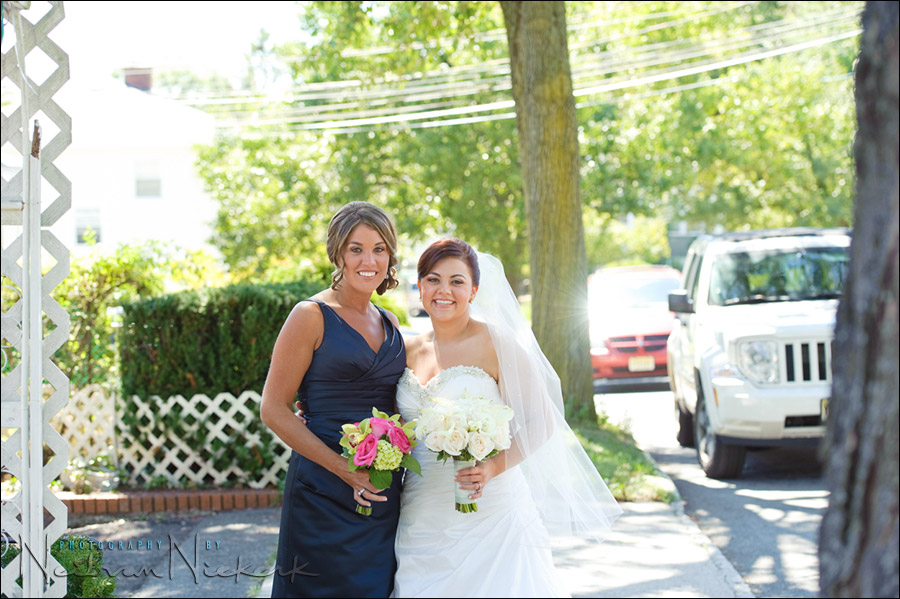
Still at the bride’s house, we had a few minutes before the limo had to leave. Inside the house there wasn’t really space to do this. So I looked outside.  It was the usual New Jersey suburban clutter – cars and utility poles and houses and just things!  Looking around me outside the house, I saw one direction I can shoot in that would give me a backlit image, with just out-of-focus trees in the background. Perfect!

Here is the pull-back shot to show what it looked like …

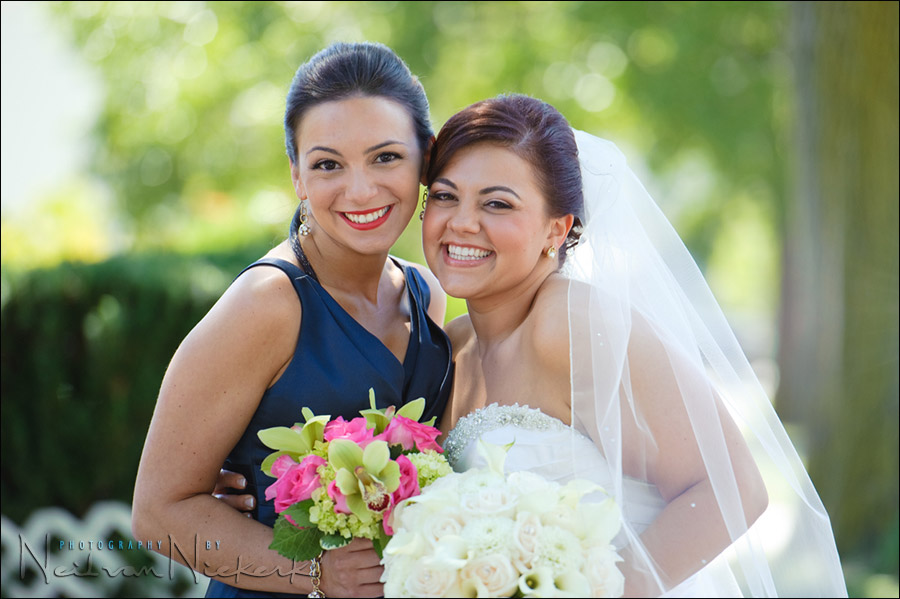
.. and with carefully selecting my background, I get the typical on-location portrait with an out-of-focus background.

By considering where I place my subject(s), and moving myself and my subject(s) in relation to the background .. and carefully framing with a long lens … I can get photographs where the viewer’s attention isn’t distracted by unnecessary elements within the frame.


Related articles

  • Simplifying composition with a fast telephoto zoom
  • Wedding day portraits – simplifying composition for effect  (bride: Jaime)
  • Effective on-location portraits  (model: Anelisa)
  • Composition – finding your background
  • Portraits with just a touch of on-camera fill-flash.

There is a repeatable method here that works every time! Even in a pinch.  Actually, especially when you’re in a pinch to get the job done quickly.

With these images here, there was no editing in Photoshop.  I just changed the WB slightly before processing to JPGs.  With wedding photography, a fast workflow becomes necessary.


Filed Under: composition, general photography, wedding photography Tagged With: using a 70-200mm lens


Help support this website

If you find these articles of value, please help support this website by using these B&H and Amazon affiliate links to order your photo gear.

I also offer photography workshops and tutoring sessions, whether in person, or via online video tutoring sessions.

Please follow me on Instagram for more.

You can also join our thriving photo community in the Tangents group on Facebook, where we show our photos and discuss all things photography.

Thank you,

Neil vN

Books by Neil van Niekerk


19 Comments, Add Your Own

  1. 1Eric - Spécialiste Abdominoplastie says

    September 7, 2010 at 9:10 am

    Hi Neil,
    Just a quick question : when you shoot people like in photos 1,2,3, are they in the shadow in order to use your fill-in flash?

    Reply
  2. 2Neil vN says

    September 7, 2010 at 9:22 am

    Eric … I very specifically positioned in shade with their backs to the sun. This gives open light on their faces, and a little bit of rim lighting on their hair and shoulders.

    Neil vN

    Reply
  3. 3Eric - Spécialiste Abdominoplastie says

    September 7, 2010 at 9:47 am

    Thx for your reply.
    So you shoot in front of the sun to create a particular shade on the face and shoulders. OK!
    How do you avoid the flare ? Are you in the shade too, to avoid it ?

    Reply
  4. 4Neil vN says

    September 7, 2010 at 9:54 am

    lens hoods!

    I also remove any filters when I am shooting towards the sun.

    Nikon lenses are also quite flare-resistant. Then if need be, I will shield my lens with my hand, or move so that a tree or something is blocking light from falling directly on the front of my lens.

    Neil vN

    Reply
  5. 5Mark Cornwell says

    September 7, 2010 at 11:07 am

    Hi, Neil, thanks for this one. I find it great to see what can be done in an area that looks initially uninspiring. Those kind of shots inspire me so much because I know that when I have an awful location there is still hope!

    Reply
  6. 6Grayden Provis says

    September 7, 2010 at 11:07 am

    Hi Neil
    I’m a newcomer to your blog and a relative newcomer to photography but am enjoying the clear way you teach and answer questions. Thankyou. I like very much the simple, foolproof technique you describe above. Its great “bread and butter” photography. I have a Nikon D40 and just leave the Nikon 18-200mm VR lens on it all the time for now while I’m learning. It seems pretty good at getting the sort of shots you show here. Thanks again for the wonderful resource that is this web site. I’m hoping to be in NYC God-willing later this year so might have to join in one of your classes! I’ve ordered your book so looking forward to that too.Best regards from Perth, Western Australia.

    Reply
  7. 7Sheri Johnson says

    September 7, 2010 at 4:45 pm

    Thank you for sharing not only the images, but the surroundings, it helps to know what you were dealing with and what you were able to achieve.

    Reply
  8. 8Bret Linford says

    September 7, 2010 at 5:06 pm

    Hi, Neil.

    Just asking (not critiquing): Would you normally correct your finals for the blue-ish hair highlights from the shade? Thanks!

    Reply
  9. 9Neil vN says

    September 7, 2010 at 5:07 pm

    Bret … definitely not for proofing, and most likely not for the final images. I would for a blue tint in the wedding dress.

    Neil vN

    Reply
  10. 10Kulbir says

    September 7, 2010 at 8:52 pm

    Thanks for enlightening us!

    Reply
  11. 11Fred Silver says

    September 7, 2010 at 9:32 pm

    Why not create your own background and super impose post

    Reply
  12. 12Neil vN says

    September 7, 2010 at 9:36 pm

    Fred … I’m not sure I understand you. You’re suggesting adding a different background? And then spending time in post-production masking the bridesmaids (and their hair styles), and adding it over a different background?

    Aside from the ‘why do it in the first place?’, this would just slow down the post-production even more. Honestly, this is not a consideration. Ever.

    Neil vN

    Reply
  13. 13Pat Reynolds says

    September 8, 2010 at 9:03 pm

    Commenting on Bret’s question about color correcting the blue-ish highlights on the hair – I used to spend hours editing for that sort of thing – I now realize that only other photographers notice it, the clients ‘never’ do!! As Neil said, I stick to removing tints from white dresses in any final images the client chooses. Apparently some wedding dresses are sprayed with some sort of protective fabric coating, which can sometimes have a reaction with UV light and particularly with flash light – ever noticed a bizarre color cast on the bride’s dress but not on other white objects in the same shot? That’s it!

    Reply
  14. 14Gene Hales says

    September 10, 2010 at 2:08 pm

    Neil, this is an excellent post and reminds me of the necessity of using my long fast lenses. Your teaching method is outstanding. Thanks.

    Reply
  15. 15mona says

    September 17, 2010 at 1:09 am

    great lessons and wonderful pointers and examples!
    just a quick question, are the above shot with a handheld camera?

    thanks!
    mona

    Reply
  16. 16Neil vN says

    September 17, 2010 at 1:29 am

    I very rarely use a tripod, so these photos and pretty much nearly everything on this site are hand-held photographs. But I do use vibration reduction / stabilized lenses. And I also take care to steady myself and the camera when I take a photograph.

    Neil vN

    Reply
  17. 17mona says

    September 20, 2010 at 6:42 am

    thank you for your reply. :)

    Reply
  18. 18Bill Millios says

    September 27, 2010 at 10:20 am

    Genius.

    (takes notes.)

    Please keep this up!

    Reply
  19. 19Artur Ocubaro says

    September 28, 2010 at 6:49 pm

    Hi Neil!

    Beautiful photos! Inspiring, as always! And I think that the real touch of your teaching way is the simplicity and the pull-back shots! Thanks!

    Reply

Leave a Reply to Bret Linford Cancel reply

Your email address will not be published. Required fields are marked *

categories

Articles & Tutorials

  • • About myself & this site
    • Books by Neil vN
    • Best photography books
    • Black foamie thing
    • Photographers’ success stories
  • • Flash Photography Techniques
    • Natural looking flash
    • Flash + Ambient light
    • Dragging the shutter
    • Bouncing your flash
    • On-camera flash outdoors
    • Exposure metering
    • Flash exposure compensation
    • Bounce flash examples
    • Which is the best flashgun?
    • Flash brackets
    • Off-camera flash photography
    • Flash photography basics
    • Using video lights
    • Flash photography tips
  • • Photography workshops NJ / NYC
    • Models @ photography workshops
tutorials:
flash photography
Photography
Workshops

All rights reserved. Copyright © Neil van Niekerk 2025 · Customization by The Traveling Designer

Copyright © 2025 · NvN on Genesis Framework · WordPress · Log in