Choosing on-camera flash light modifiers
One of the things I always emphasize if you want to achieve the best results from your on-camera speedlight, is to be aware of the direction of light from your flashgun.
When you know which direction you want your light from your flash to come from, then the simplest way to figure out what direction to bounce your flash towards, is to consider the simple geometry of it all. Yup, triangular geometry from your days in primary school. And from Science class in high school, you can also consider the Angle of Incidence = Angle of Reflectance.
The key here is not to think of your speedlight as being your light-source anymore, but of the area that you’re bouncing flash from, as being your light source.
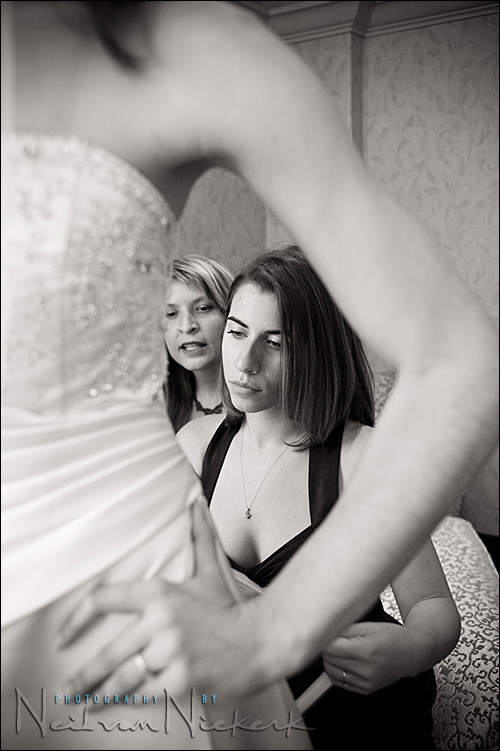
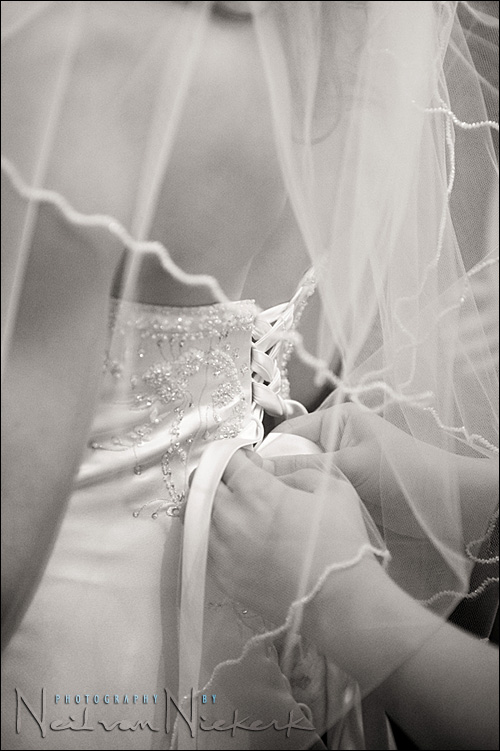
Now, looking at this image where the bridesmaid is lacing up the bride’s dress, you can see that the light from my flashgun comes from behind where the bride is standing. To achieve this, I flagged my flashgun so that no direct light from my flash fell onto the bride’s dress right in front of me. Doing this enabled me to have more light fall on the bridesmaid behind the bride. In other words, I sent more light to the subject in the background than the foreground.
Bouncing off the wall like this, gives form and shape and dimension to my subject. You can see that the light on the bridesmaid’s face is directional. It isn’t flat.
To achieve these two things;
– directional light (that is also soft),
– lighting my subject in the background more than the foreground,
would be impossible with the generic plastic light modifiers that can be purchased.
You simply can’t achieve this kind of effect with on-camera flash while plonking a piece of (over-priced) tupperware onto your speedlight. A plastic light modifier on your flashgun would’ve given a more direct-flash look as well.
The usual plastic light modifiers that are added on top of the flashgun would throw too much light on the foreground, and less on the background. In other words, the bridesmaid kneeling behind the bride would’ve been less well-lit. You’d get an entirely different look to the light with one of the usual light modifiers. Especially so when working in close proximity to your subject, those flash modifiers will give you more of a direct-flash look.
Instead, the better way to use an on-camera speedlight here, is to figure specifically how I want light from my flashgun to fall onto my subject.

On-Camera Flash Photography – revised edition
This book is explains a cohesive and thorough approach to getting the best from your on-camera speedlight.
Particular care was taken to present it all with a logical flow that will help any photographer attain a better understanding of flash photography.
You can either purchase a copy via Amazon USA and Amazon UK, or can be ordered through Barnes & Nobles and other bookstores. The book is also available on the Apple iBook Store, as well as Amazon Kindle. Also check out the Amazon Kindle store.
Learn more about how the cover image was shot.
While shooting indoors, my best advice to improve the results from your on-camera speedlight when there are surfaces to bounce your flash off :
– throw the tupperware away, and then
– consider the direction you want your light to come from.
This will give you images with soft, directional light – and no tell-tale sign that on-camera flash was used.
Related articles
- How to bounce your flash
- Directional bounce flash
- The black foamie thing
- Why use a light modifier that is black?
- Bounce flash and catchlights
- Using bounce flash to mimic window light
- How to get ‘short lighting’ with bounce flash
Jacob Serrano was kind enough to provide us with the PSD file to show the way the flash was bounced off the wall. Even the gobo / flag is shown on the flash, which then makes it more clear how the flash was flagged to not fall directly on the bride.
Thanks Neil,
I wish I read this before I bought my tupperware. Directional light is so much more appealing that widespread flat lighting. I used my expensive tupperware once and then shelved it… what a waste of money. How did it ever become so popular? Good marketing?
Wayne
Valuable piece of advice Neil! Thanks! I got question regarding controlling the light in open space/high ceiling. I read that u prefer the Stofen, but how do you contol the power. Manual/TTL.
Lanz
Thanks for sharing. Now I need to experiment with bouncing light off a wall. You made me save money :)
Thanks for the blog on this,and I gave my wife the tupperware.
I have been working on this direction the light comes from for a few days now with some luck but must have missed that science class, If i bounce over my left shoulder more times than not I get a flat picture with no shadow. In my mind it seams, I do better to think of it as I need to see the shadow but for now its a 50 / 50 shot.
Thanks again for all your help.
John
Hi Neil, first I wanted to complement you on the site, absolutely amazing.
Then, I have a question regarding this article. When you use this technique are you shooting on manual and ttl flash ? If so, do you under expose the ambient or do you shoot it with the same settings you would if it were not a flash photo. It looks like the second option, but I wanted to ask anyway.
Best regards,
David
Hello Neil, first let me complement you on your site, extremely good.
While I was reading this entry I was wondering, do you use a higher than usual shutter speed to darken the ambient a bit, or do you use the settings that the camera ” suggests ” for a normal exposure and use the flash as fill ? I’m assuming the camera’s on manual and the flash is in ttl.
Thanks,
David
Neil – your articles are really interesting.
Maybe someone is interested in simple (diffusor) test on my blog:
https://kacnje.blogspot.com/2009/04/canon-5d-mark-ii-and-flash-canon-580ex.html
Hello Neil,
I have taken photos for years but I’ve always shied away from flash photography. Your fabulous photos and your approach to using flash has inspired me.
Well, a very kind photographer in Chicago let me accompany him to a wedding as the 3rd shooter a couple of weeks ago. I made myself the Black Foamie Thing, bought some CTS gel for the flash and headed off full of confidence that I would take beautiful, natural looking flash shots. Ahhh.
The ceremony and reception was held in a very dimly lit, very large room. Alot of the action was located away from nearby walls. I was at times befuddled as to where to point my flash and often just decided to point it behind me into the room.
During the reception, I peeked at the photos and they looked bright enough on the camera’s LCD. But when I saw them on the computer I was crushed. Devastated. They were very underexposed and quite often too blurry.
Now, I realize this is not the fault of the camera or the Black Foamie Thing but rather something I was doing, or not doing. Briefly;
1.) I was often at F2.8, ISO of 1000 or 1250 but with a shutter speed of only 1/20th. I can raise my ISO further to 1600 bump up my shutter speed.
2.) I was using a Nikon SB600 and just sold it for an SB900 thinking the additional power might brighten things up, especially when bouncing behind me into a room.
Neil, I am wondering if you or others might have other suggestions. The main photographer who was not familiar with your techniques suggested I use a diffuser such as a demb flip, lumiquest, Fong Lightsphere etc. But I will not give up & attach plastic tupperware just yet!
Neil, I am wondering if you or others might have other suggestions.
Cheers!
Ernst
Hi Neil,
I’m learning a lot from you’re site. Thank you for sharing.
Just a question, in bouncing flash, how do you estimate the amount of light that will fall on your subject? Also, in bouncing light from a smaller flash (e.g. sb 600), what do you recommend I do to compensate for the weaker output?
vincent
Thanks, Neil. This is a reminder many of us have needed.
The proliferation of garish plastic diffusers has led many to forget what can be accomplished with simple bounce flash, augmented perhaps with a simple deflector. I use an OmniBounce in many situations for speed and convenience, but pull it off for creative opportunities. Other bulbous and hinged monstrosities don’t appear to offer enough benefit to justify their intimidating appearance.
Another great article Neil, I love the idea you projected in the first shot. Your work is always inspirational.
Neil,
Great Site. Learned Lots. Thanks Much.
Dave Graham
Neil
Ok I went and made the flag and that seamed to help alot of the light direction issue, I still have my background light spill. It’s not like your child photo from last week in flaged section any help on this part would be great.
John
I truly admire Neil’s work with flash. I have next to no luck with bounce flash. Green walls, no walls, poor composition if arranging subject to provide bounce, gross underexposure, etc. are problems that plague my attempts. So I lug a studio strobe and battery around with me everywhere I can get away with it. PITA I tell you!
Mac
aaah, don’t tell me about green walls!
For this wedding, I was at the groom’s place where he and the groomsmen were getting ready. The groom and best man resorted to YouTube clips to figure out how to tie a bow-tie. The computer was next to a green wall, and no matter how I bounced my flash, enough light would spill back from the green wall .. and this gave a weird green / normal color balance.
I resorted to changing the images to B&W. That was the simplest solution here.
I have a feeling a lot of people are not reading this post the right way. Neil said:
———————————
So while shooting indoors, here’s my best advice to improve the results from your on-camera speedlight when there are surfaces to bounce your flash off :
– throw the tupperware away,
and then
– consider the direction you want your light to come from.
—————————————–
As I understand it there will be times that you will not be able to bounce your flash and you will not want to choose to use flash directly. In this case your Tupperware will most definitely be able to save you from having dark and grain invested photographs.
Tupperware saved me from this nightmare scenario this weekend where I was presented a; dimly lit, dark poor reflecting walled reception hall with a black 35 foot high ceiling. ISO speed 6400 and with a shutterspeed op aprox .40 sec did the trick everything where everything else failed.
So to get back to what Neil said:
– If you can bounce don’t use the Tupperware and start thinking about the direction of your light.
– If bouncing is no option you should adapt and hopefully you haven’t left the Tupperware at home. Unless you’re going for arty-farty.
Good luck to all!
ps, Neil, your site rocks!;-)
for lighting setup diagram:
https://lightingmods.blogspot.com/2007/09/lighting-setup-diagrams-with-and.html
best regards
peter
Ernst, I’ve been trying out Neil’s approach on things and it seems like my best results are when you’re bouncing that light off of something directly behind you instead of into the air (air don’t reflect much unless you’re in a foggy swamp;) . Maybe stand closer to a wall and shoot into the room. See how that works ;) We had the same situation at a large wedding about a year ago (my first wedding trying out NvN’s technique). The only photos that came out well were the ones where I was standing about 3-5 feet from a wall and bouncing off of that. Hope that helps!
Nina, I’m much bolder than just staying 3-5 feet away from a convenient wall. ;)
Here are two examples again from the wedding I photographed in New York, using the same technique to flag my flash to get directional light:
(click on the images to see a larger version)
It works wonders during the reception:
(1st image) f2.8 @ 1600 ISO
Here I bounced my flash into the open restaurant area which had a fairly high ceiling. There wasn’t a specific area that I bounced my flash off. I just pointed my flash towards the direction I wanted my light to come from.
You can even use it in a church for the processional ..
(2nd image), f2.8 @ 2500 ISO
.. if the church isn’t very large. It is the same lighting effect. If you look at the bride’s dad, the side of his face furthest from the camera is better lit than the side of his face turned to the camera. I did have to crank up the ISO considerably to get enough flash and ambient light on them here.
Using your flash like this can open up the scene, without making it look flat.
Dear Neil,
I just wanted to say a big big THANK YOU for your amazing advises, there aren’t much people who are able to explain their work that clearly, I love your blog and your amazing photos and even your humor, again thanks a lot for taking time to help us making better photos specially with flash.
Your a real god to me,
From France,
William Blake
Neil,
I presume in the photo with the father of the bride and bride at ISO 2500 was with the D3. I hardly see any noise at web resolutions. I’m sure you needed to crank up the ISO to get the aperture and shutter speed you wanted. I think my D300 would falter in that situation.
That’s the 100% crop of the JPG from the RAW file, as edited in ACR with the default noise reduction. I did bring down the exposure by 0.3 EV … so that will have a slight effect.
However, that crop there looks very good to me … and will print very nicely in an album for the couple.
Neil,
Thanks for putting up some of your techniques here,i’ve been searching everywhere for tips on using the flash and i guess i found it! im so happy and i love the pictures you took. Such an inspiration u are. Thanks again mate, cheers!
Hi Neil,
Thanks for the 100% crop of the shot of the the bride and her father. There is little noticeable noise, and the client will be too busy thinking how awesome you are than seeing the noise in that photograph. I just feel that my Nikon D300 has noticeable noise levels compared to the D3. The D3 makes noise even less noticeable. I just need to take awesome shots so the subject doesn’t notice the noise. :-)
Hi Neil,
I now remember when you showed my wife and I that wedding album at your home office. It was a 8″ x 11″ photo of the bride (it was one of the larger photos in the album). You mentioned there was noise in the photograph, but the noise looked different than what was on the screen. The noise in the printed photo blended into the scene, and I recall it looked like the photo was “textured” in a nice way.
I had forgotten about noise looks when printed. Thanks for the reminder!
I’ve also been trying to use more directional bounce flash (less off of the ceiling) but I was finding it too broad. When my flash (Canon 580EX) is rotated it goes to wide angle coverage. I now set it to it’s narrowest coverage manually so that the light bouncing back is more directional, plus it this increases the amount of returning light.
Neil,
First, I would like to thank you for sharing your knowledge, it’s been tremendously helpful. Being new to using flash creatively, I have a question regarding comment 1 in this thread.
Does light actually “reflect” from a white surface as is shown in the diagram? I thought that light, once it hits a white surface, is reflected AND diffused (omnidirectional at that point)? In the diagram it looks more like a “direct” reflection as a mirror would do.
As a result, when I try to recreate the photo technique in the beginning of this page (the bridesmaid tying the dress) and bounce my flash off the wall, it seems much less directional than is shown in the diagram and I get more spill in the foeground. Even whaen flagging the strobe.
Thanks, Ralph
Like any diagram, it’s an approximation of what really happens.
You’re correct. Light is both scattered and reflected.
But by narrowing the beam of light using the zoom function, and flagging the light, you can get surprisingly good control over the direction of light.
Other than that, I don’t know what else to add. It works.
Those are the type of results I get.
Thanks Neil,
I happened to notice the illustration for bounced light on the Lumiquest website was very similar to the one above. But then on p.33 of “Light – Science and Magic” by Fil Hunter, it shows something much different. It shows the bounced light scattering in all directions, as opposed to cleanly reflecting off the surface as in the diagram above. That is what had confused me. I was not sure how to intepret what actually occurs when I bounce my strobe.
I will continue to practice your recommendations. I already have seen dramatic improvements by applying your advice. I look forward to attending one of your seminars soon.
Regards, Ralph
Hi neil, I´m from México and I really love your blog and your lessons. I did shoots with tupperware and with out it. I love the bounced flash whit piece of fomie.
But I have a question. The next month I´m going to have a destination wedding in the beach. What can I do? I will not have a walls and I don´t want to take photos with direct flash
Ralph,
Any light, whether a flashlight, strobe, sunlight, or even laser light *will* be diffused and scatter to some extent when bounced off of an imperfect surface (anything not a mirror, in other words). The diagrams that Neil sometimes shows us are simplified to help us visualize what we’re trying to achieve, or how a particular image was shot. The light from a strobe will indeed scatter in all directions when bounced, and this is why bouncing your flash is far from the most efficient way to use your on-camera flash.
Like some one above, the D300 seems to have a lot of noise above ISO 800.
Also, Agree with the necessity of the BFT but the “Tupperware bowl” has its place also. Its a matter of the correct tool for the job being used the correct way at the correct time. Admittedly, changing from the BFT to the Tupperware and back would be a huge hassle.
The Tupperware bowl has its place and might even be “a correct tool for the job”? Perhaps, perhaps not. I don’t use one, and can’t see myself ever using one. And you’re welcome to look at my wedding photography blog, and suggest where it would’ve improved my work.
Neil,
I just received your book and found it very interesting and helpful. I actually have a lightsphere that i never use because i dont like it’s results. however, after reading from your book, i’ve decided to mask the majority of it with foil to retain light output and still cut any direct light from the subject. in all of my test shots so far, using your bounce techniques, this seems to be working quite well. what’s your take on this? risky?
the true test will be next weeks wedding.
PS: i cant decide if i like the color rendition i get when the flash is in full zoom. wider seems more accurate.
Andrew .. that should work too. The idea is to avoid light coming directly from your camera’s axis, as much as possible .. so that we can get directional light.
Thanks for the reply.
you appear to be quite fond of the black foamie thing and a stofen as your main choices (correct me if i’m wrong)…in fact, in another part of your blog you post on the preference of black foam vs white and that black leads to a more uniform and predictable result.
i guess what i’m looking for an opinion on is this: given the reflectivity of the foil (as opposed to black or even a white foam half snoot), do you think that the light created by this method might be or become unpredictable?
A
Great site and resource that I have just found courtesy of FB.
I think the great learning points here are not to be afraid of upping ISO, using FEC (or perhaps fully manual flash) and just having a go.
Noise reduction s/w is good enough to allow high ISO on any camera that can go that high, so why not use the tools you have? Get out to a local church or hall with another tog or assistant and practise!
Thanks again
Andrew
Another comment on the “Incidence/Reflectance” confusion…
I tested this by setting up a flash on manual power tilted about 60 degrees into the ceiling. Took a pic. Then I rotated the flash and stand 180 degrees and positioned it so that it would flash in the same exact spot. Took another pic. The gray card in the scene, positioned so that the flash bounced towards the card in one image and away from the card in the other, was illuminated equally in both images. This seems to indicate that it doesn’t really matter what direction the light comes from when bouncing from diffused surfaces such as painted ceilings.
It’s a good thing…with on-camera flash and no wall around, you can bounce to your side or even behind you by rotating your head past 90 degrees and tilting slightly less than 90 degrees. You’re not going to lose power just because the flash is pointed away from the subject. It will be as if you were bouncing straight up from a position a little further back and to the side (Although I suggest zooming in your flash to reduce the spot size.)
Hi Niel
Thanks for this cool site I started using the BFT today and it rocks! And so easy to store in your bag! I now look at a room with a total different perspective and walls or any reflective surface are now my friends some of the images I took of my daughter Mila today came out great.
Your site has become my favourite site. I found out about it when I listened to an old Camera Dojo podcast being South African I was totaly spun out hearing a South African being inteviewed by Kerry Garrison
All the best to you
Marius Henning (Johannesburg South Africa
regarding angle of incidence, when light is bounced of a diffuse surface ie: a white wall (not a shiny wall and not mirrors or windows) the light scatters in all directions equally, so the example graphic above is somewhat inaccurate, unless the wall is partially reflective the light will bounce off going in all directions at the same intensity
Excellent tips and fantastic images! I will be making my BFT this weekend! Thanks Neil! Owe you a pint! – scott
Hi everyone ! Hi Neil ;-)
Well, now we all know, when to not use the “tupperware” and white card.
But the question is, when this accesories are welcome ?
thanks for the tips – a few things to test out before the new wedding season comes :)