Flash Photography Techniques
Flash & ambient light ~ Dragging the shutter ~ Bouncing your flash
![]()
Dragging the shutter – balancing flash and ambient light
When balancing flash with the available light, the combination of settings is usually chosen so that the mood of the place and surrounds is retained – or at least have the available light add to the image. In doing so, the advice is often given to “drag the shutter”. In allowing a slower shutter speed, more of the ambient light is allowed to register and influence the final image.
This is a very simple technique – but an understanding of how and when to apply it, often seems elusive.
So let’s take a step back and consider ambient exposure.
Here we have three controls for our exposure – shutter speed, aperture and ISO.
With flash, we have two completely different beasts to consider – manual flash, and TTL flash. We will have to consider manual flash and TTL flash separately, since their behaviour and how you control the exposure for each, are fundamentally different.
Balancing manual flash with ambient light
Looking first at flash exposure – we have 4 controls:
– aperture, ISO, distance, power.
this distance would be the distance from your light source to the subject, and it should intuitively make sense already. The closer you move your manual flash (perhaps in a softbox) to your subject, the brighter the light would be, and hence it would affect your exposure.
Similarly, it should already make sense that if we increase or decrease the power setting on our manual flash, this too would affect exposure.
Now, comparing the controls between what affects ambient exposure, and what affects manual flash exposure, we can see that there are two common controls – aperture and ISO. This means that shutter speed becomes the independent control for available light exposure. So when we balance manual flash and ambient light, it makes most sense to start by adjusting the shutter speed, since adjusting the aperture or ISO in an attempt to change the ambient exposure, will also affect the manual flash exposure.
This is a crucial concept then – within a certain range, shutter speed has no effect on flash exposure. This key will allow us to better mix flash with available light – by controlling the shutter speed. The reason why shutter speed doesn’t affect flash exposure, is that flash exposure is near-instantaneous, and ambient light is continuous. You just need the entire picture area (frame / digital sensor) to be open to be lit by the burst of flash from your speedlight. A further explanation revolves around a description of how your camera’s shutter works, which is another topic, even though closely related to understanding how flash works. But accept for now that within certain limits, shutter speed has no effect on flash exposure.
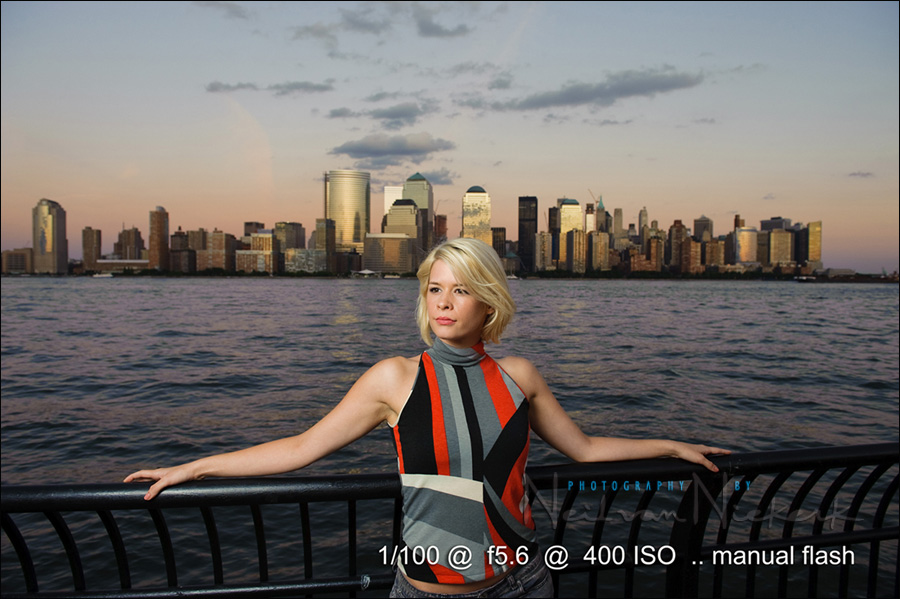
Enough words though .. let’s see how this all translates with some images.
In this sequence, the model was lit by manual flash, against the Manhattan skyline as a backdrop. The background light is obviously only ambient / available light. Flash had no effect on the background exposure.
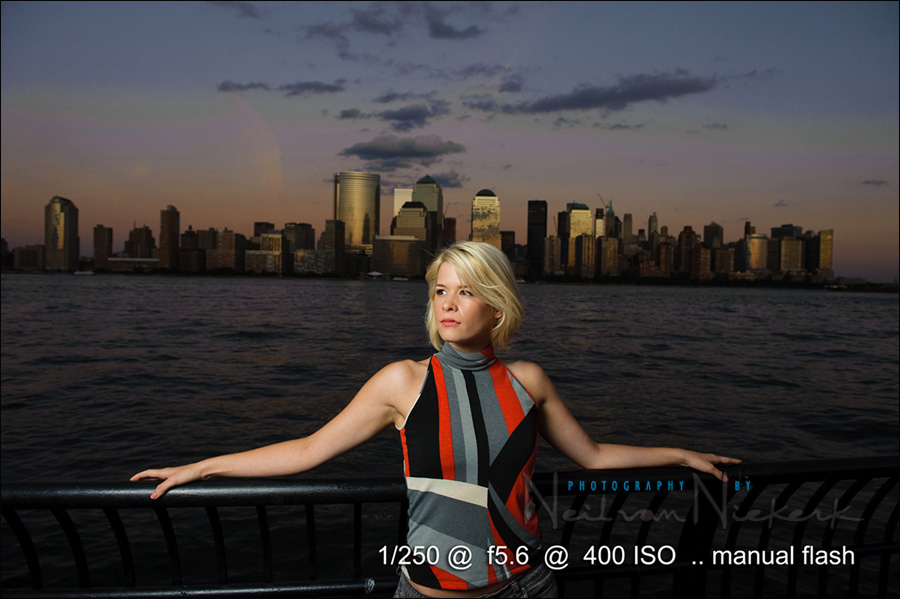
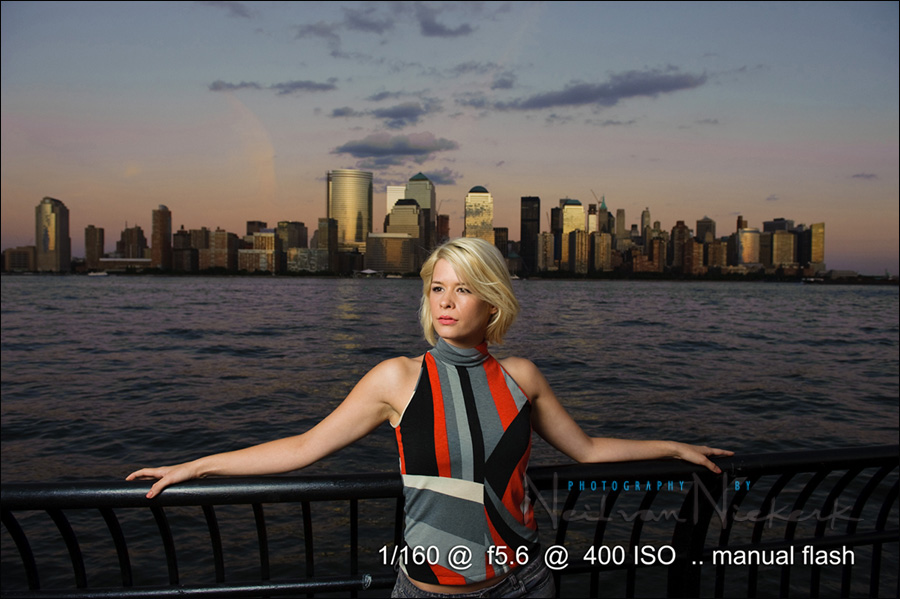
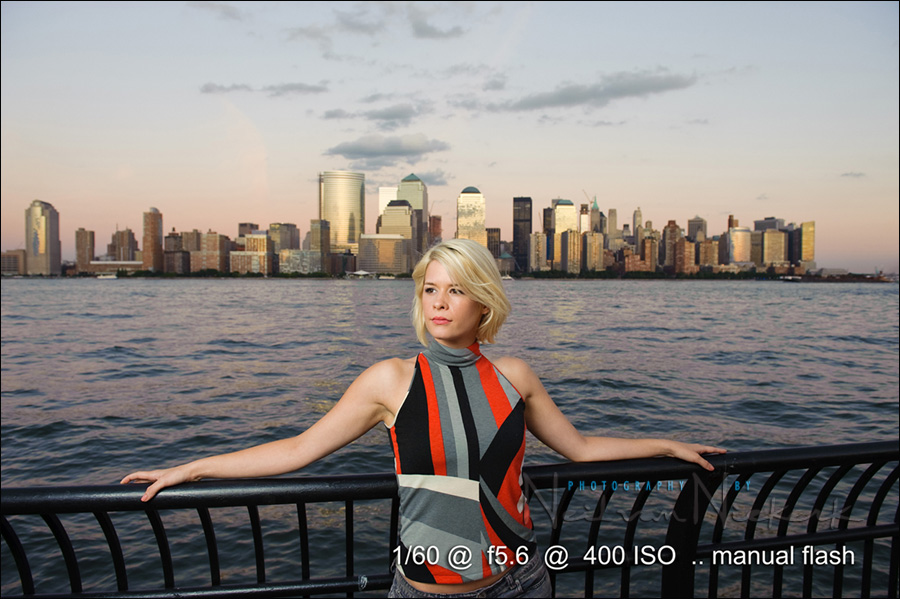
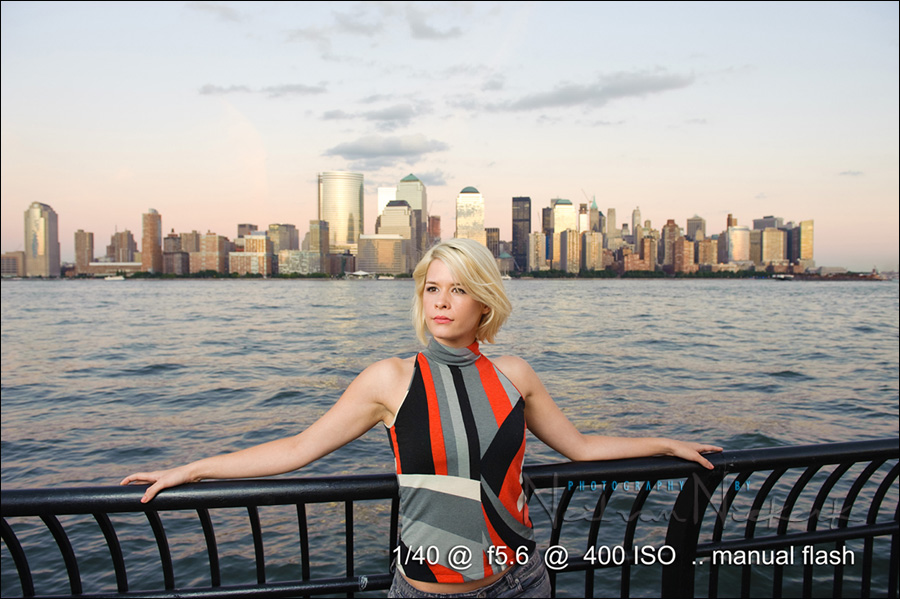
The only thing that changed between the images, was the shutter speed which I changed by 2/3rds of a stop each time. As you will notice, the exposure for our model (lit only by manual flash), remained even. The background however, changed in brightness, since a change of shutter speed will affect our ambient exposure.
At some point, in continually lowering our shutter speed, we do reach a stage where the ambient light does register for our subject. In the images where our settings were such that our subject is under-exposed, we could effectively use flash to bring the exposure for our subject up to a correct level.
As an aside – “correct exposure” for our background is a matter of taste as this point. It becomes an individual decision as to which you prefer and with that, there is a fair amount of leeway as to what could be considered to be “correct exposure”.
This technique of using a slower shutter speed to allow ambient light to register more and more, is usually called “dragging the shutter.” With this, you’d use your camera’s light meter like you normally would .. but instead of using it to expose perfectly for just the ambient light, now you use it as a guideline as to how much ambient light you would like to register. Somewhere around 1.5 to 2 stops under-exposure will still give you enough detail in the background – and then you use flash as your main light source, and use the light from your flash to expose correctly for your subject.
Balancing TTL flash with ambient light:
TTL flash is a different beast altogether than manual flash. With manual flash you had the 4 controls for flash exposure – aperture, ISO, distance and power. With TTL flash however, none of those have an influence (within reason) on flash exposure. Your camera & flash will follow our chosen aperture and iso combination (and change in distance), and give you what it deems to be correct exposure, by adjusting the output (ie, power) from your flashgun.
This implies that we can now use aperture and ISO and shutter speed – all three controls – to control available light, without having an influence on our flash exposure. (Of course, common sense needs to be applied here with your settings. You can only squeeze so much light out of your flashgun.)
With manual flash, if you decided to change any of your settings (aperture / ISO / distance / power), you would’ve had to juggle something else to still keep correct exposure. In other words, if you were at f5.6 and wanted f2.8 for shallower depth of field, you’d have to change one or more of the other settings accordingly maintain correct exposure for manual flash. But if you changed your aperture, this would then affect ambient exposure too, and you’d have to adjust the shutter speed and / or ISO accordingly.
So with manual flash, changing any of the 4 controls / settings, will have a knock-on effect and you’d have to adjust something else again. However, with TTL flash, if you decided to change your aperture to control your available light, then (in theory at least), your TTL flash exposure will remain the same .. since your camera and flash would still give you (what it deems to be) correct exposure. The same goes for ISO and distance. These settings in effect become transparent to TTL flash exposure.
With manual flash, shutter speed was the only independent control for your available light, and you would “drag the shutter” to allow more available light in. With TTL flash, you could change your ISO and aperture as well (and not just be bound by the single option of shutter speed as your control) to adjust the available light exposure. You would have to adjust your flash exposure compensation then to adjust your TTL flash exposure.
So now with TTL flash, if you wanted the same effect – allowing more available light in – you need not resort to a slower shutter speed. You could as easily change your aperture or ISO to allow ambient light to register. Here’s an example:
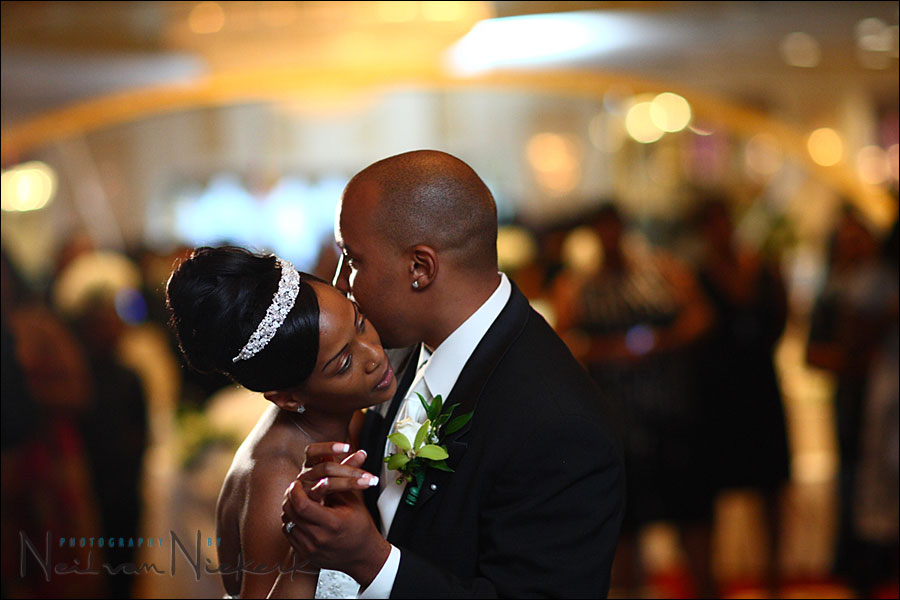
settings: 1/200th @ f1.6 @ 1600 ISO … TTL bounce flash, with CTS gel.
Here I allowed the background to register by choosing a fast aperture and a high ISO … as opposed to the traditional choice of lowering my shutter speed. This freedom comes from TTL flash exposure’s ability to follow my settings and adjust accordingly to give me correct exposure. (or close enough to correct for me to just use flash exposure compensation to nudge the flash exposure where I want it.)
With these examples, it should be clear that there is a fundamental difference in how you’d approach the ever-interesting challenge of balancing flash with available light.
Specific camera settings
I’ve seen some photographers give advice like “shoot at 1/8th sec @ f5.6” .. but that kind of advice about exact settings is misleading, since every situation is different.
The actual shutter speed chosen will depend on circumstance and the effect that you want,
– and the amount of ambient light that is available,
– and whether you have a tripod,
– or can shoot with a steady hand at slow shutter speeds,
– and the f-stop chosen,
– and whether you can bump up the ISO to allow more ambient light in,
– and how much subject movement there will be, or you will find acceptable.
There are a number of interlinked factors here that you balance out depending on the scenario. But in the end, the photograph where the flash and ambient light is balanced by using an appropriate shutter speed, just looks so much better in comparison to a photo where the flash light completely dominates.
When you add flash to ambient light, don’t you over-expose the subject?
Speaking very broadly, there are two main scenarios (with any possible combination inbetween):
In the first scenario, the background is brighter than the subject, and you set your exposure to give near correct exposure for the background. Since your subject is darker than the background, they’d still be under-exposed. Then you use your flash to expose correctly for them. This is the simplest scenario.
But usually what you’d encounter is low light situations where the background and your subject have about the same kind of light on them, and would need the same exposure. So what you’d do here, is intentionally under-expose for the ambient light – around 1.5 to 2 stops – so that the ambient light registers, but doesn’t dominate. Since your subject would then still be under-exposed, you would then use your flash to expose correctly for your subject.
So by adding flash, you wouldn’t over-expose your subject, since you are pulling down your ambient exposure. You will encounter a lot of different lighting situations, but those two scenarios cover the basics.
How do you deal with slow shutter speeds?
I often get asked why the images displayed here that were taken at slow shutter speeds, still appear sharp. The reason why you don’t see (much) camera shake in those images, is that I do take care in keeping my camera steady, but there’s more at work here than just the basic technique.
The image of the piano player (and another image on a subsequent page) probably have a measure of camera shake – BUT – it is in areas which aren’t important – the background, the city lights. They are slightly out of focus anyway because of minimal depth of field.
Similarly, the piano player (from another page) was in ‘shadow’, and then I used flash to expose correctly for him. The photo of the piano player without flash, shows clearly how under-exposed he would’ve been without flash. And this then allowed the flash to freeze movement on my part and his.
The flash therefore freezes any camera shake, since the available light falling on my subject(s) is so low. You just wouldn’t see camera shake. Since the flash is pretty much an instantaneous burst of light, it will freeze action / camera shake.
Therefore you simply don’t see camera shake .. even though it probably does exist to some extent in the background.
 next section: How to bounce flash
Help support this website
If you find these articles of value, please support this website by using these Amazon and B&H affiliate links to order your photo gear.
I also offer photography workshops and tutoring sessions. There are also video tutorials, which are online workshops on photography.
Join us on the Tangents Facebook group for further discussions.
Neil vN

Books by Neil van Niekerk

Nice write-up, Neil. You may also want to suggest second-curtain sync for slow-shutter situations where the foreground subjects are moving rapidly. I have found this effective during wedding receptions, particularly at moments like the bouquet toss. Trailing streaks are much more pleasing. :-)
Hello. Been learning so much from reading your post. And I’ve been practising for a few weeks now and got good result. But one question though, what would you do if the background light is darker than your subject? Would you still try to get the correct exposure for the background?
Thank you.
Dani
Brunei
Dani .. in that instance, where your background is darker than your subject, (and your lighting options are simple), then you have to expose for your subject and allow the background exposure to be what it is.
Alternately, you can explore your options of using off-camera flash (or additional lighting) to get more light into the background.
Followed most of the concept however one question.
You talk about the flash being MANUAL or TTL , what mode was the camera set at while shooting ?? Aperture preferred or manual ??
Enjoyed your new book. I must purchase a second copy one for the coffee table
and one that can get a little wet while soaking in the bathtub where I do my best studying.
For a number of reasons, I shoot nearly exclusively in manual mode on my camera, whether I use flash or not; or whether my flash is in TTL mode or manual flash.
btw, I wish everyone would buy two copies of the book. ; )
Neil,
I didn’t buy 2 copies of your book, but I did buy one copy and then told my photographer buddy it was really good and he should buy one too. :)
Thanks for updating your tutorial on “dragging the shutter”. I thoroughly enjoyed your book but really struggled with fully understanding how to choose what settings to set in Manual mode. I just didn’t get it. I didn’t understand the process of figuring out the correct ISO, shutter speed, and aperture for my camera in manual mode, while using TTL flash.
I’ve been puzzling over this since I first read your book several weeks ago. Your answer to the question about over-exposing when adding flash to ambient light was just the piece of the puzzle I needed to finally understand. In particular, your explanation of the 2 main scenarios finally made it all make sense to me.
Thanks again.
Great explanation, Neil
I have 2 questions:
When you meter the subject, do you use center (spot) metering (meter the model) or evaluative metering (meter the whole scene). and what kind of setting do you get with it?
Secondly, how much F stop do you adjust ( -2 stop??) for your final shot to get the image on the right?, Do you have a guide as how you adjust the setting ( from the camera metering setting) in this outdoor kind of scenerio , and what about indoor scenerio
Thanks
Roy
Roy, when you shoot in manual exposure mode on your camera, and you use techniques other than using the camera’s meter to get a general meter reading of the scene, then essentially it wouldn’t matter which metering pattern you used.
For example, if you used the histogram to calculate your exposure settings, then you are guided by the falling edge of the histogram … and this is not affected by your metering mode, but would be affected WHAT you are metering off.
re your second question – I do give the camera settings there, and the aperture remained constant in this case.
Hi Neil,
I always learn something new from your website.
I have Sony DSLR with a function Slow Sync (I don’t know about Canon and Nikon) – which looks like your technique. What do you think about this?
Probably I should try both.
Best regards,
Niki
Niki … Slow Sync does the same thing, but that is done in one of the automatic modes. Usually though, the technique of dragging the shutter is done in manual exposure mode where you have control over the exact shutter speed being used. So it is the same technique, but used with different exposure modes.
Hi Neil,
I work very hard to put your concepts into practice and maybe someday you will make it back to Chicago. For TTL lighting, I have used your comments and ideas and then reformulated them into a way that I can think/use them quickly. So I want you to tell me why my formulation is not quite right or really wrong!! If I am lucky, maybe it is not too bad!)
When I use TTL, I think about the total light coming to the camera with contributions from ambient and strobe. If I want ambient to be equal to the strobe contribution, I set my exposure to be about 1/2-1 stop below the ambient reading and then the TTL on the strobe to about -1EV. If I want the strobe to be more dominant, then I set my exposure 2-3 stops below the ambient reading and set my strobe for 0EV. In doing so, I think I am just changing the ratio or balance of light contributed by ambient vs strobe.
Steven, your formulation there would be a solid starting point .. and from there you adjust to taste. The key would be to regard that as a starting point, and not get locked into the idea that it *has* to work for every situation.
Neil,
Great article! I’ve just started using the M mode (have been using A mode) but I’ve tried to follow your article here. One thing I don’t quite understand is that when I shoot with the bounce the flash (as fill or main source of light), do I need to keep the meter bar in the middle for “correct” exposure?
I tried to keep shutter speed at least 1/60 second, but I have to pump ISO way up to keep my pictures from under-exposing (Even at high ISO, 1/60 @ wide aperture, the meter bar still shows underexposure). Should I really have the meter bar at the middle every time? Could you provide me with some guidance?
Thanks.
Tom .. A few things to keep in mind ..
In manual exposure mode, having the needle set to the middle of your camera’s exposure meter does not necessarily imply correct exposure. You need to meter for your subject, and then also keep in mind the tonality of your subject.
Now, with flash photography – there isn’t necessarily the need to expose correctly for your subject, using the ambient light. Since you are using flash, your flash exposure will now give you correct exposure if you are using flash as your main source of light.
If you are only using it as fill-flash, you’d still expose correctly for your subject (or close to correct) using the ambient light. Then the fill-flash is just a touch of light to fill in the shadows.
Therefore we’re not overly concerend with getting “correct” exposure for ambient light. And that would imply that zero’ing the needle for your ambient exposure wouldn’t be the direction to take. In fact you’d most likely under-expose your ambient light by 1-2 stops .. and then add flash.
Neil, always love your write-ups. I’m having some trouble determining a starting point for my settings with TTL flash. Is there a general rule for aperture and TTL flash? Or is it all just desired DOF?
I was invited to a wedding reception last week by a videographer friend and ended up having all my camera gear in the car. I was allowed to shoot their reception for practice and had a lot of trouble. I ended up resorting to trial and error (test shots). The challenge I was having was regarding ambient lighting. The party was in a club in LA with little to no ambient light. When trying to expose for the background, my light meter was showing severe underexposure even with the lens wide open at 1/15 and ISO 800 on my D90 with 18-105mm and 50mm f/1.8 (I was worried ISO 1600 would look really grainy with that low of light). What is the practice you use in dark indoor settings? I was using the built in bounce card on my SB800 or using direct flash for longer distances (wide dance floor shots). Should I have been exposing for the subject instead of the background with TTL? I fear I got it mixed up with Manual (I read this post several months ago and was trying to remember it during the shoot).
In the end my photos came out great. Any weird exposure settings were fixable through Camera Raw but it still bothers me that I didn’t know where to start and felt like I had to guess.
Rob … you have it correct there. With TTL flash your choice of aperture is now dictated more by your DoF needs. You might still set a smaller aperture than you need though, since you also need to control your ambient exposure. So you would still keep that in mind, and not let your choice of aperture be solely controlled by your specific DoF.
Re the scenario you have in a club. You would get dark backgrounds with a lens like the 18-105mm which has a slower maximum aperture. To get any detail in, you’d have to be at a wide aperure + high ISO + slow shutter speed. When you run out of options in the combination of those three settings … then you simply have to settle for what you have in how dark the backgrounds appear.
Re your comment about exposing for the background or the subject .. in that type of setting, you’d let the flash expose correctly for your subject in the foreground, and let the combination of settings (shutter speed + aperture + ISO) give you detail in the background, assuming the background is a bit brighter than your subject.
Neil,
Is it correct for me to assume that if I use flash, I would normally meter to underexpose my background by 1 to 1.5 stops and use flash to expose for my subject foreground using +0.7 to +1.7 FEC while bouncing it over my shoulder or even to the side?
Do I meter for correct exposure of the subject at all when using flash indoors or would I generally have to expose subject to underexposure?
Kenneth
Kenneth .. you have it correct there as a general recipe, except for one thing – in theory you wouldn’t need to adjust your FEC to compensate for the background being under-exposed. The idea with TTL flash is that it follows your settings, and attempt to give you correct exposure for any settings you might use.
So the assumption there that you’d need +0.7 to +1.7 EV immediately as a start would not be correct. (Assuming of course that your subject isn’t light in tone or your background is very bright.) But for a neutral subject, you’d keep it around 0 EV if your subject is an average tone. That’s the theory – in practice I’ve found that with the Canon 5D series of cameras, I need to push the FEC up by 0.7EV as a default. This is something you’d have to check for yourself and see how your camera and flash behave when bouncing flash.
Now, when using TTL flash like this, you wouldn’t meter specifically for the subject, but rather for the background … and then use that as a guide for your settings, and then let the TTL flash technology take care of the flash exposure … with a nudge of the FEC if necessary.
Hi Neil-
Thanks for your willingness to share all this info. I will buy your book, but have a wedding this Friday and would like some advice. Reception will be very dark, with a lighting company uplighting walls in multicolors. I have my camera body 40D, with my 580EX flash and 2 slaves. I need to keep one on my camera for synching purposes (Canon). Just curious to what settings you would choose. I have a 50 prime that opens to 1.2 otherwise the best apeture I can get is 4.0. I know I can open up to 1.X, but I do want to get some dramatic lighting where the ambient is low.
I also have a studio lighting kit which I plan on using for the formals, but not sure how I would use them in the reception. Do you know if I can sync the strobes using my 580EX? I usually use a RC unit in the hot shoe, but have never lit a reception with strobes.
Enough talk, just looking for suggestions. Thanks!
Best,
Amber
Amber .. it is impossible to give specific advice about settings, since scenarios change so much. There are many articles here that cover the topics of Camera Settings and Exposure Metering, so read up further via the Related Articles links.
To use additional lighting during a reception, you would need wireless transmitters of some kind. Using an optical slave is just a way to give yourself a headache.
But again, giving specific advice on how to use additional lighting at a reception is a wide enough topic to cover an entire book or an entire website.
You will have to do some serious homework though .. more than just reading about it.
Neil-
Thanks for the input. I will be fine at the wedding, it is not my first time using a secondary flash by any means and I plan on practicing any and all techniques the night before. I learn fast. The bride didn’t tell me she hired an up-lighting company until last week is all. So I’m just doing what I can and wanted some tips from the pros. I would never do something for the first time during such an important moment! Thanks again.
Amber
Amber, if the venue has up-lighting, then you definitely don’t want to use additional lighting since it will drown out the subtleties of the lighting. Just use on-camera flash, and bounce it with care .. and make sure your camera settings are such that you allow the ambient light in.
Neil,
I am mostly using flash as a supplement (fill flash, I guess) when shooting newborns. I have a 40D and don’t really like to go higher than ISO400 because of grain….and I usually keep my aperature around 2-2.8. I really want to make the use of the ambient light, so…would I still expose for the subject and dial down on my 40d?; wouldn’t this make the flash my main source of light?
Thanks!
Emily .. I’m not clear on what you’re dialing down on your 40D ?
If you want to make use of the ambient light, and not go higher than 400 ISO, and f2.8 .. and you don’t want to have flash as your main source of light .. then your only option obviously is to take your shutter speed lower. But that brings in other attendant problems such as camera shake and subject movement.
All this means is that you ultimately have to make a decision about how YOU want to juggle those options there in order to get correct exposure.
I see said the blind man. I have learned a lot just by reading your write-ups. I did purchased your new book a couple of days ago and I should have it by next week. Can’t wait to read it. By the way, thanks for sharing all this info.
In summary, hope I get this right.
1. In manual lighting. Shutter speed changes the ambient.
2. In TTL. Aperture and ISO changes the ambient.
3. In TTL. Meter of the background and under-expose accordingly if the subject and background are the same. Meter of the background and near correct exposure if the background is brighter.
Do you meter the same way using manual flash?
The example of the African American couple. Did you properly expose or did you drag the shutter?
So much to learn. Thanks again Neil for your contribution to photography.
Cheers,
Ray
4. I
>Hi there Ray,
Here’s an important summary as well of the controls for TTL flash and manual flash, and the differences between TTL flash and manual flash.
Going over your summary ..
1. Don’t forget that aperture and ISO still control ambient light. However, when we use manual flash, they are interlocked for us in our flash exposure. Therefore shutter speed becomes the only independent control for ambient light.
2. Shutter speed still changes ambient light! But since TTL flash exposure will follow our aperture and ISO settings, we can now also change aperture and ISO to affect our ambient exposure .. while the flash exposure remains constant (by the camera controlling the flash’s output.)
3. Those are viable possibilities in how to go about exposing for flash and ambient.
Do I meter the same way with flash? Yes .. but there are a huge variety of possibilities and approaches and scenarios. Our approach can change depending on what we encounter, but also change because we intend to have a different result.
With the photo of the couple dancing, check the shutter speed .. 1/200th. That’s a high shutter speed for working indoors in low light. There’s no dragging of the shutter there. Quite the opposite.
Hi Niel. Great article. I learned a lot. I kept on reading repeatedly the section about TTL and Manual Flash. I do understand the use of Manual flash and how I can manipulate it.
What confused me in the TTL is that, since aperture can now control the ambient light, what if I want to get more ambient light but I need a deep dof also? Lets say f/11 and up. Will adjusting the FEC compensate for it just like when using manual flash wherein we increase the flash power?
thanks
Hi there Ray ..
I slight semantic correction, but just so that we’re keeping it accurate …
Aperture has always controlled the ambient light.
But back to your question.
If you need more ambient light, but you require a specific f-stop, then you have to adjust the other two controls – shutter speed & ISO.
This is where you now have to consider how you juggle those three balls – shutter speed, aperture & ISO.
A good method would be to figure out what your highest ISO is that you’re comfortable using. This will depend on how you want to use the image, and also your own preference. Then that leaves your shutter speed as the best way to control how much ambient light you want to allow in … and then we’re right back at the top of this page … dragging the shutter! : )
Adjusting the FEC won’t help you. This will just cause your flash to give MORE light and lead to over-exposure. FEC doesn’t do anything for your ambient exposure itself.
So we have to consider those two components separately – ambient exposure and flash exposure. In the scenario we’re working with here, the flash is the dominant source of light, and merely pushing the FEC higher will just cause over-exposure. Nothing gained.
Hi Neil,
I’m using Metz 58 AF-1 flashes on my Canon 5D and Pentax K20D. Is AUTO flash with the Metz the same technique as using manual flash?
I’ve noticed that the TTL flash will under-expose indoors so I’ll need to add FEC. With AUTO, it seems to over-expose and need minus FEC. Outdoors, TTL needs – FEC in cloudy sky and AUTO seems the same.
I’m using AV and spot-metering. What should I use with the Metz to be consisitant: spot or evaluative? Auto or TTL?
Thanks!
Hi there Lisa ..
If you set your flash to Auto, it works closer to the way TTL works, in that there is some kind of automation with the flash exposure metering. With Auto, the flash exposure is metered via a sensor on the flashgun itself, and controlled by the flash. But your approach in working with an Auto flash isn’t too dissimilar from working with a TTL unit.
I’m not au fait with the Metz unit at all, so can’t give specific advice on why the different modes would differ. The best I can offer is the advice to just get accustomed to how the flash responds in the different modes, and learn how to adapt to it. Just like you have there.
The spot-metering might be something that is throwing your flash off, since some cameras take spot-metering into account when using TTL flash. Personally, I keep my cameras to Matrix / Evaluative metering when using flash.
Still a little confused, I take a meter reading in manual and adjust my settings until the mark is in the middle for the exposure on the back of the camera and depending on how much ambient light there is I +/- it to get the effect I want (If it was a snow scene I would want to + a few stops so I would get the whites) Then I would turn my flash to manual and use the – 1/3 on the FEC on the back of my flash is this what you mean when talking about taking and ambient reading for the flash?
Thanks Carol
Yes and no. In other words, not quite. But yes.
This is how you’d take an ambient reading. Of course, you have to take the tonality of the scene and subject into consideration. Just like you did there for the snow scene.
This is what I meant by taking an ambient light reading using your camera’s built-in meter. This doesn’t necessarily relate to flash. It is something you’d do anyway for pretty much any kind of photography.
In my opinion, it is essential to do this when you do any kind of non-studio photography with flash. You need to start with the ambient light, and then add a certain amount of flash to it.
The point I am trying to make, is that you’d do this independent of whether you’d be using flash or not.
Now, when you use flash, you need not expose correctly for your ambient light. Quite often you don’t want to.
For example, you might want to under-expose your ambient light, and then use flash as a main source of light to bring the exposure up to correct levels.
But your intent and your approach will vary, depending on the scenario you find yourself in.
“But usually what you’d encounter is low light situations where the background and your subject have about the same kind of light on them, and would need the same exposure. So what you’d do here, is intentionally under-expose for the ambient light – around 1.5 to 2 stops – so that the ambient light registers, but doesn’t dominate.”
Neil, by doing this don’t you run the risk of having an under-expose background when you are in a big room and the flash would not have the power to reach the back of the room?
Adi … then you improvise and adapt. Change things.
It’s impossible to give advice that will cover every possible scenario. So with that in mind, you have to consider the information on this website, take it on .. mull over it .. practice it .. and make it your own. Having an understanding of these techniques and how certain things inter-relate, such as:
– shutter speed, aperture, ISO
– balancing flash with ambient light,
– direction of light,
then you will be able to use these techniques in various other ways.
Much of the material on this website isn’t quite a strict “how to” guide, but rather information for you to get to that aha! moment when things start to make sense.
The info is there. Connect the dots. : )
hi Neil, yesterday I play around with my sb800 flash unit attached to my d300s. I was taking picture of my kid toy in my living room which is lit by a single lamp. I use manual exposure and get something like 1/25s f5 iso 3200 for correct exposure. Then I turn on the flash and take a picture using flash with the above setting. I do have ambient light register in the picture. However when I change the speed to 1/100, I do not have any ambient light register in the picture. My question is, is it because the ambient light is too weak to be able to get registered in the picture?
Adi … at some point, the need for a lower ISO and higher shutter speed overrides the need for the ambient light to play a large part in the final image. When you’re starting to hit 3200 ISO, then you’re at that point. ; )
So in the scenario you have there, I wouldn’t be concerned with what the camera’s meter says … but instead just rely on the TTL flash exposure (or manual flash) to take care of the exposure.
Neil
I would love to use TTL but doesnt noise in the ambient become a problem? I have a D300 but still dont like to see noise at ISO1000 and so forth. Also, to get a better mixture you can use the flash exposure compensation, doesnt the TTL metering take this in account or does this override TTL.
Please go into this a little for me.
Joe, the noise you see in an image has no relation to whether you’re using TTL flash or manual flash.
When you look at the noise, are you looking at 100% on your computer screen? Or an actual print. What size will the photo be used at? These are just two factors that we also need to consider when looking at digital noise. You’d also be surprised to see that digital noise prints differently than you see it on the computer screen.
Re flash exposure compensation .. this is indeed what you use to override the camera’s decision about TTL flash exposure.
Neil, Thanks for all of this – it is just what I need as I step into the (new) world of using an SB800 on my Nikon D300. My interest is portraits of people and animals, especially horses.
Back to your photo of the African American wedding couple and settings: 1/200th @ f1.6 @ 1600 ISO. Shortly after that you listed six different settings that all contribute to the outcome – but you did not mention focal length. The reason I bring this up is that, with an aperture of f1.6 the depth of field captured within the subject – is amazing. What was your focal length in order to get this much depth of field at f1.6 within the subject (the couple dancing)? Or – how far away were you from them? Or – what part of whose body did you focus on? (His ear?) I now notice that his hand is slightly out of focus but otherwise the depth of focus on the couple has to be at least two feet – I just can’t see it at f1.6.
Hamish .. re the depth of field
You need to keep in mind that the perceived depth-of-field is also dependent on the image size. And we’re looking here at a small web-size image.
f1.6 on an 85mm lens is quite shallow. But I really only need one point in focus here … the bride’s face, and specifically her eye closest to the camera. The groom’s ear is completely trivial to this image, and wouldn’t be something I’d purposely focus on.
Another completely different comment / question from me on this post. I shoot home interiors in WYoming where we have five months of snow on the ground and lots of sunshine. Consequently I am always dealing with very ‘hot’ windows. Flash power doesn’t always create a great result and I wonder if you recommend bracketing and HDR blending with flash?
Hamish .. that would seem the way to go with that. The extreme contrast range would be difficult to control with just one or two flashguns inside. So, bracketing shots and the use of a tripod seems a logical step.
Neil, I think I may have taken the “dragging the shutter” too far. I was recently taking pictures at a friends birthday party. I shot at 1/15th F/4 ISO 3200 at a 50mm range (on a non-IS lens). I would have expected some motion blur and camera shake on the ambient. But, I was seeing (what looked like) camera shake on the subject. Shouldn’t the flash have frozen them?
Kevin, the flash will freeze the movement if the ambient levels are low … at least two to three stops under. But there are some conditions attached to that. Check the linked article.
Hi! Neil!
thanks for this articel.
I have a problem to understand this:
When I’m in a pretty dark situation. And I will take the shutter longer) maybe from 1/200 to 1/25 I will make the background 3 steps higher (+3 EV) That’s right. Isn’t it?
BUT when doing this my Subjekct will be 3 steps higher TOO. So I understand that that the shutter speed will not influence the flash light that falls on my subject BUT than it will be 3 EV to much.
Is this right or not?
Often I find out that the shutter speed has no result on my subjekct. but why? the longer time will brighten up my ambient light AND my subject too.
Not matter wheter taking the picture in Manual or i-TTL Mode the subject ahs to be over exposered. But it is not everytime why?
Why does the longer shutter don’t have this effect on my subject?
And last is there a different for the modes Manual, i-TTL and i-TTL standard?
thanks a lot.
George .. this technique only works when your flash is your main source of light. It doesn’t quite translate to a situation where flash is merely fill light.
With your flash now the main source of light, this implies you have to be working with a scenario where your subject is under-exposed in terms of the ambient light.
Remember, you’re working with TWO exposures here …. flash and ambient light.
Now with flash being the light source that will essentially give you correct exposure … you could have correct FLASH exposure for your subject, and still have your camera controls set so that your AMBIENT exposure registers at different levels, without affecting your overall exposure much.
But this only works if:
– your ambient exposure is kept low, and your flash dominates, or
– your subject is relatively shaded compared to your background, and you can now use your flash to lift your subject to the same level as your background.
The scenario you describe then, makes it sound like your subject and background are equally well lit by ambient light. If you then change your camera settings so that you get proper ambient exposure, then you will get over-exposure on your subject if you add even more light with your flash.
You do need to control the shooting scenario if you want to apply this technique of “dragging the shutter”.
As to why a longer shutter speed doesn’t affect your flash exposure … once again, think of your final photo as having two exposures … flash and the existing ambient light. SInce flash is near-instantaneous, you just need an exposure slower than max sync speed to get the entire frame well exposed with flash. In dark enough situations, you could have a really slow shutter speed, and then use flash to expose correctly for your subject.
In other words, shutter speed largely has no effect on flash exposure. (It’s partly covered in that linked article on max sync speed.)
The difference between manual flash and TTL flash are covered on a few pages on this site, but this linked page should be a good start.
I hope this all helps in pulling a few concepts together into something understandable.
Hi Neil, as someone who finds it incredibly difficult to learn from just reading, the image examples FINALLY make some things very clear for me! I’ve never used TTL flash for much of anything because I simply didn’t understand it and didn’t trust it to get the shots I wanted. I’ve always shot manually (camera and flash) and trial and errored my way until now. Thanks for making this a bit more comprehensible.
Your flash photography tips/tutorials is the reason I bought my 430EXII (for a start). It’s been a week or so that I’ve been tinkering with this flashgun applying your lessons and this rocks, man.
Bookmarking your site. Very educational for an amateur like me.
Neil,
Great site, I have only just discovered it but what a God send after trawling the net for tutorials on flash.
I have tried the effect you describe with my flash on “M1/1” which I assume is what you mean by manual? At 1/1 my images were just burnt out so I had to drop the power to 1/8 before I could start getting the same effects by reducing the shutter speed to record the ambient light (I chose 1/8 by looking at the effect changing the power had upon the distance scale on the rear of my SB800. I got the scale to reflect my estimation of the subject to camera distance). I also tried this with the flash set to “A” and also got it to record the ambient light in the same way. is this correct?
I am at the bottom of a verY steep learning curve here but with constant study of your teachings then hopefully I will get there!
Thanks,
Soren.
Soren, you’ll have to meter properly for the flash exposure when you use manual flash. You got there by guessing and systematically changing your flash output until it looked okay. But using a handheld meter, or using the histogram method to get to correct manual flash exposure, is better.
With direct flash, you could of course use the distance scale on the back of your flash .. but really, this isn’t the prettiest way to use on-camera flash.
Hi there Neil,
Wow, what a Godsend this site is…I’ve recently bought a Nissin Di622 unit for my Canon (basically a budget speedlight), and I’ve spent the last few days trying to wrap my head round the concept of balancing flash and ambient light. Reading through the articles on your site (and this one in particular) has finally nailed it into my brain, so many thanks!
I’m shooting using TTL, as I’m too much of a wuss to experiment with manual flash at this moment in time! I now hopefully have a far greater understanding of metering for the available light…to increase the ambient light, it’s a combination of using a slower shutter speed / higher ISO / wider aperture, and to reduce ambient light, increasing the shutter speed / smaller aperture / lower ISO (in extremely basic terms, of course…please correct me if I’m wrong…!)
I’ll stop now, before I confuse myself even further!
Thanks again,
Dan
Dan .. that’s it. You have it. It’s that simple … and that complicated.
Hi Neil,
Was a part of clickin’ moms webinar—great job! Been experimenting w/your recommendations too—BFT & max sync speed when shooting subject in the sun. For all those sitting and reading—it’s a trial and error, the advice is solid but you gotta grow into it w/practice.
I have 2 ?’s for you re flash. You mention preferring to user higher ISO rather than work at slower shutter speeds b/c you don’t want to deal with blurry images. I’m confused b/c isn’t the flash freezing the motion so why would there be blur?
2nd: when shooting a subject w/direct sun landing on them, will direct flash on the subject (preferably at max sync speed) balance out so highlights won’t clip? or would i need to power up greater than the sun falling on them?
Thanks!
Jennifer :)
April .. flash will only freeze the action completely if the ambient light is 5 stops or more under-exposed. The closer your ambient exposure gets to being correct (at slow shutter speeds), the more it will register, and show motion blur regardless of flash.
Related articles:
Choice of shutter speed with flash
Finding something to bounce your flash off – read the comments from #11 onwards.
Re your question 2 about matching the sun with flash:
The basic technique here is to get your ambient exposure so that you don’t lose detail (ie, clip).
This is best attempted at max flash sync speed and your lowest (base) ISO.
Then you find your aperture where you don’t lose detail in your subject … and expose your flash for that aperture.
Great post Neil. This is the same as slow sync flash, isn’t it?
Sort of … but the phrases ‘dragging the shutter’ and ‘slow flash sync’ are usually used in different contexts. But the implication is the same – a slower shutter speed with flash.
Hello Neil, just found your blog , excellent. i have a question regarding a particular scenario at the weekend.A wedding ,very rushed group shots in overcast ( UK ) skies. Manual exposure , with flash /stofen hand held remote in front of and above the group as high as I could manage . Most shots were fine ,perhaps a little hot. Settings were around 1/60, f8, ISO800.
What we experienced was a weird fringing effect on the outer edges of the group ( group of 10 people in two rows), I have no idea what caused this , the people did looked a little cut out.
Very interesting note about use of stofen/ diffusers, I always was under the impression they softened the light never thought of using an open space to bounce from and certainly not with an open lens on the flash. Also good to see that on camera can be just as subtle ,hand holding is a nuisance and does stop you from keeping the camera steady.
Thanks David
David, without seeing the images, I will guess that your camera moved … i.e., camera shake. 1/60th is a slow shutter speed.
If the fringing is black, then it is most definitely due to the flash freezing some of the movement, and with your subject or your camera moving then.
A stofen doesn’t soften the flash when you work outdoors, since the light source is still the same size as the bare flash-tube would’ve been.
Hi Neil,
Your blog is terrific and has compelled me to purchase your books, not just because of the great content, but also because of your generosity.
Another book I read listed the 4 controls of manual flash as aperture, ISO, distance, and flash zoom. So, if we also include “power” from your list above, does that mean there are actually 5 controls of manual flash?
Thank you!
Ralph
Ralph .. generally, the way the flash head is zoomed (wide / tele) is seen as something that affects flash power. Similarly, adding diffusion material or some kind of other flash modifier, is seen as something you’re doing to affect the flash’s output – hence, the flash power.
Hi Niel, i take photos for a nightclub on a saturday night, it was my first week last week and was hoping for better results, i wanted to capture the lights in the club behind my subjects either in motion or just catch the rays spreading out, but i kept coming out with just dark backgrounds. I was using a flashgun in manual on around 1/16 and my camera setting were aout 1/20-1/50 shutter – 3.5-5.6 and iso from 400-1600, i’ve used these setting before in a similar venue and got the background spot on but without using a flash. its a really dark club with a very low ceiling and its all painted black/dark green. Should i just drop my shutter speed to capture the lights behind maybe like 1”- 1/4?
Tom, you would really have to do a few test shots without flash to see how the background registers. And then find your settings so that there is at least a hint of detail in the background.
In a dark place, f5.6 and 400 ISO would be settings that would work against you. You ave to chase the higher ISOs and wider apertures …. and slower shutter speeds.
“With manual flash, shutter speed was the only independent control for your available light, and you would “drag the shutter” to allow more available light in.”
This is incorrect. You can use ISO to lighten or darken the image using ambient light.
Doug … the key here is the word independent.
If you change the shutter speed (and don’t go in to HSS mode), then the shutter speed affects the ambient light only. Not the flash. Hence … it is an independent control for the available light.
With aperture and ISO, any change would affect (manual) flash and the available light. Hence, neither of those two parameters independently affect the ambient light.
So if you adjust the ISO to lighten or darken the amount of ambient light … you also affect the manual flash exposure.
Neil on wedding couple why did you have your ISO at 1600 if using TTL? So the ambient is show more so?
The choice of ISO setting, and whether I shoot in TTL or manual, are not related decisions.
pls , could you tell me what’s lens focal length and distance from camera to subject , of the first photos model in NY background . or could you update the information at bottom each img editing focal length and camera distance . I’ll really appreciate , thanks and cheers .
That focal length is irrelevant to the technique, and would be superfluous information here. It would just be clutter that’d distract from what is being explained.
A most excellent presentation and extremely generous discussion effort.
Hi Neil. This is a fantastic site!
Just a question, is the flash on the girl at the bay picture bounced? Has it any kind of diffuser?
Thanks!
The photos at the top here are all done with off-camera flash and a softbox.
Another advantage that E-TTL can give over manual flash power control that many people often miss: With enough negative FEC dialed in the flash will often output at a power level *lower* than the lowest available manual power level setting. This is very helpful when shooting in low ambient light when one wishes to preserve the atmosphere provided by the various ambient light sources while also throwing just enough light on a nearby subject to give proper illumination and skin tones.
I am using a Nikon D800 with 3 Profoto D1s. I have a pocket wizard on my camera and am triggering one of the D1s with it. The other two D1s are in slave mode and are triggered by that D1. No matter what settings I use the photo is dark. Very dark. It’s as if the flash is not firing at the same time as the camera. I am shooting in manual mode. I had the shutter speed at 1/250th of a second at first but tried other slower settings in the hope I could find something that worked. Nothing did. I have tried turning the D1s all the way up. Nothing seems to change anything. I am not new to photography but I am new to the D1s. Can you think of anything that is causing my D1s to fire at a different time than my camera? I’d really appreciate any help I can get.
Is there a Pocketwizard on the main Profoto D1? Or how are you triggering it?
When you trip the camera’s shutter, how many of the flashes are firing?
Hi Neil, the images of the NY background and the differences of shutter speed are more than useful to understanding the basic principles – can you tell us what flash diffuser to used, if any?
The photos at the top here are all done with off-camera flash (a speedlight) and a medium sized softbox.