Gelling your flash for effect – Blue background
The idea of gelling your flash for effect has been a topic here a few times. I most often use gels on my flash to correct my flash when working with tungsten / incandescent light. There are times though when I gel my flash just for effect, creating a shift between my foreground (lit by gelled flash) and my background.
In the examples shown in the several articles here, there wasn’t the type of background where the effect can clearly be seen on easily recognizable “neutral” background. In the article turning day into night, we turned the sky a dark shade of blue. With the sequence of photos of a model, Bethany, there was a reflective mirrored wall as background that we changed the color of. The effect looks stunning, but the mirrored wall might not be something that makes the color shift obvious to the casual visitor here.
With that, during a recent personal workshop in Manhattan, while working with Anelisa again, I took the opportunity to specifically take this sequence of images. They will hopefully clearly show how we can create a more dramatic effect by shifting the color balance of our flash in relation to the available light …
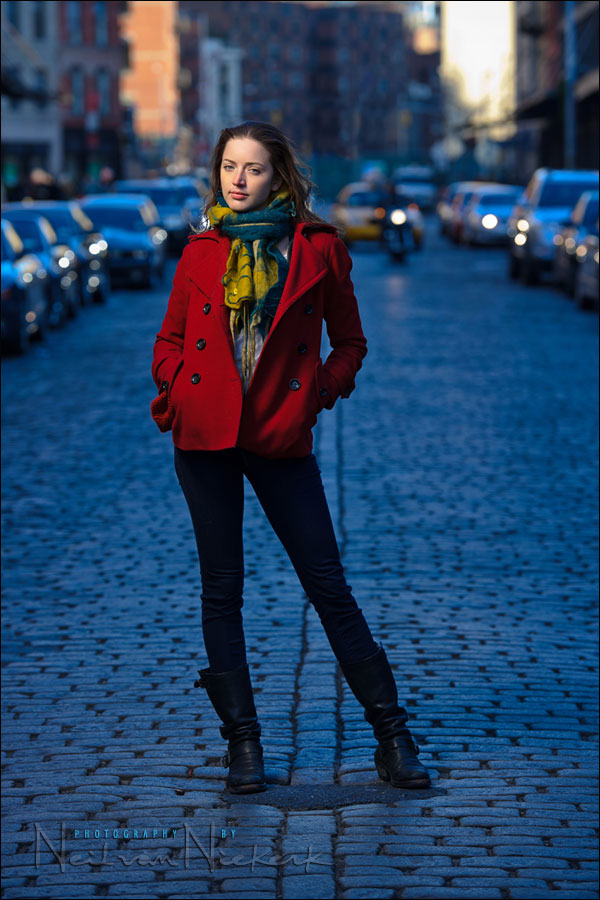
Here is the starting image. We’re working in the shaded area here, so my White Balance is Cloudy. Keep in mind that I inevitably will change my WB as part of my usual RAW workflow. It’s an adjust-to-taste thing. Therefore, I regard my WB as being “Cloudy RAW”.
The technique is a straight-forward one. We get our basic exposure based on the background. Keep in mind that we can not expose correctly for the shaded areas such as the ground, AND the sunlight buildings at the same time. The simplest approach here is to under-expose for our subject – the model – and then pick up the slack with flash. In this case, I used TTL flash since we could work faster. But I had to adjust my exposure in RAW, because of over-exposure. More about that in a short while.
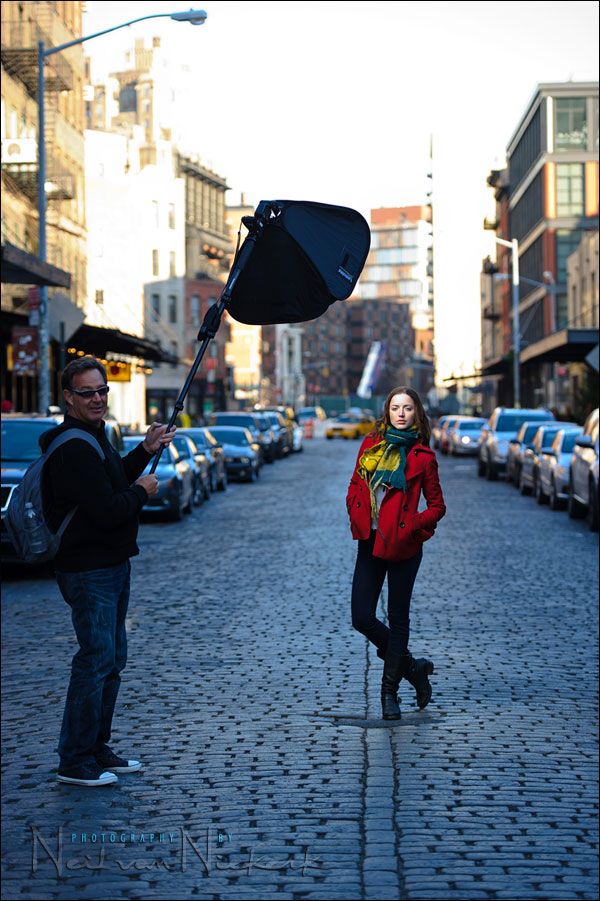
Here is the pull-back shot to show how the light was held in relation to Anelisa. I wanted the light to come from nearly-the-front and to the side. So the softbox was held higher up so I could get the longer shot that I wanted, without the softbox getting in the shot.
Here is the image without the flash.
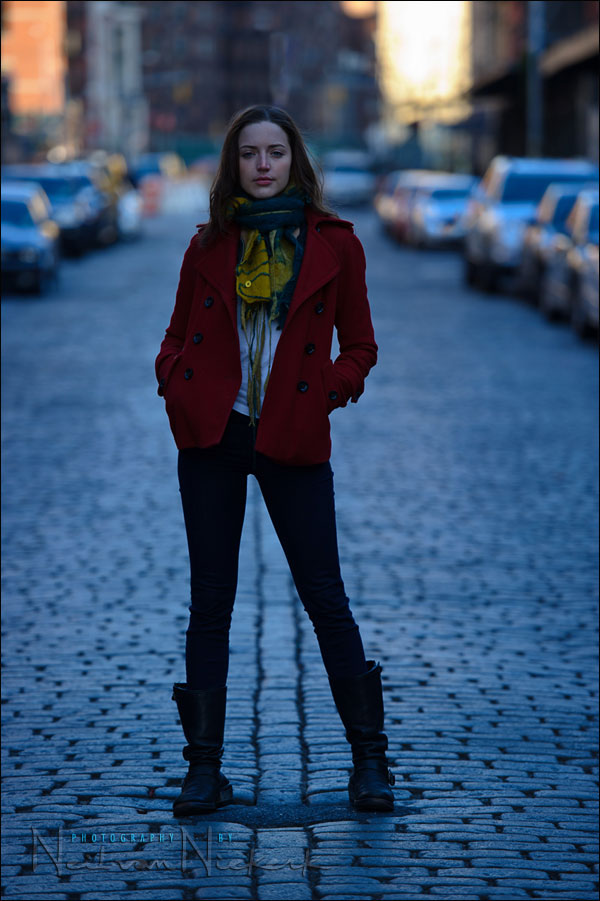
image settings: 1/250 @ f2.8 @ 200 ISO
How to get the optimal camera & flash settings
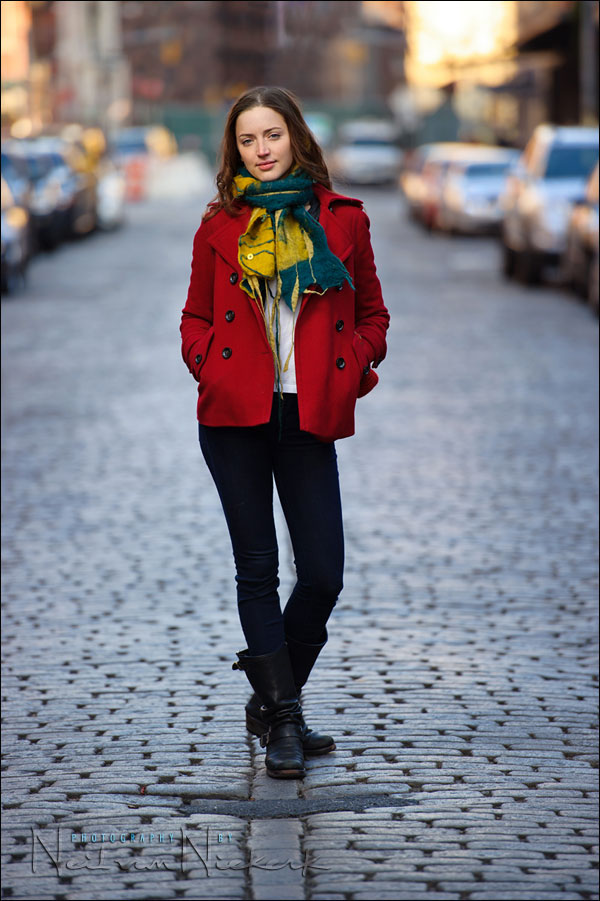
Knowing that I am gelling my flash with 1/2 CTS gel, I changed my camera’s WB to 3850K … but in editing the RAW files, I changed the WB of this sequence of images (incl the ambient-only shot), to 4650K. The predominance of blue tones of the available light, made the 3850K gelled flash still look too cold. Hence, my WB was … 3850K RAW. That has to become new terminology! Cloudy RAW. Daylight RAW. Incandescent RAW. 3850K RAW.
With this sequence, the flash over-exposed by 1 stop. Since it is TTL, the flash’s exposure can vary depending on composition and how much dark tones there are, and how much of the subject / scene is lit up by flash. So this ambient-only shot, and the pull-back shot above, and the following flash shots, had the exposure pulled down by 1 stop in the processing of the RAW file, than they were in-camera.
I could’ve spent the minute or two there to finesse my flash exposure with my FEC dial, but Anelisa had to leave soon, and there were cars constantly moving by, and it was cold. So sometimes I just rely on the latitude of the RAW file to help me out.
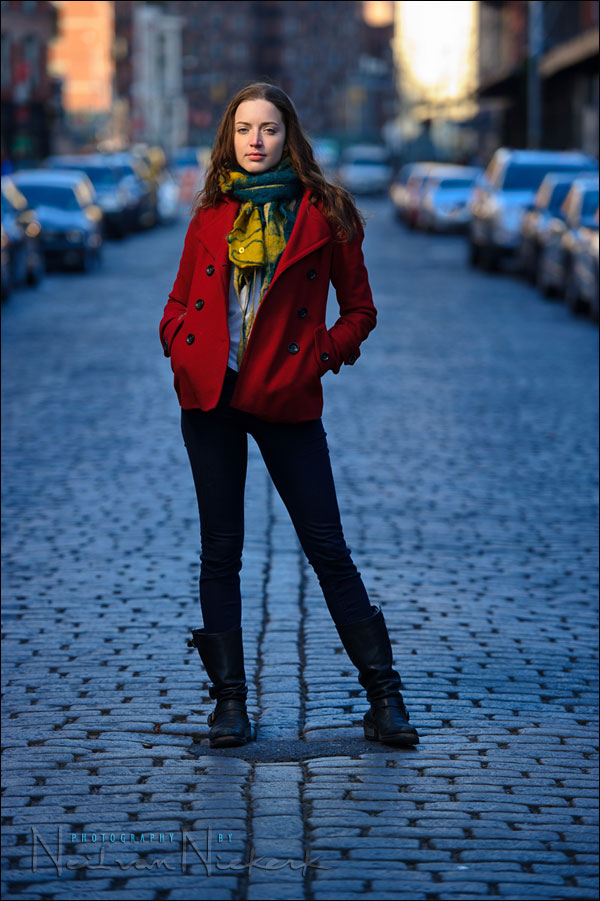
image settings: 1/250 @ f2.8 @ 200 ISO
image settings: 1/250 @ f4 @ 200 ISO
With this photo, I dropped my available light by another stop by closing down my aperture.
While I had enough leeway with my flash exposure to jump into high-speed flash sync territory with an 1/500 shutter speed, I chose to stay at maximum flash sync speed, and change my aperture. Since I am shooting in TTL mode, the change in aperture will only affect my ambient light, and not my flash exposure.
Remember the rule that aperture controls flash exposure? Well, it is only true for manual flash. Not TTL flash. TTL flash will follow your choice of settings … while you remain within range of what your flash is capable of.
By changing my ambient exposure like this, under-exposing it even more, my flash is starting to dominate, giving a more dramatic effect.
Photo gear (or equivalents) used during this photo session
- Nikon D3S
- Nikon 70-200mm f2.8 AF-S VR II / Canon EF 70-200mm f/2.8L IS II
- Nikon SB-910 Speedlight / Canon 600EX-RT Speedlite
- Nikon SD-9 battery pack / Canon CP-E4 battery pack
- Lastolite EZYBOX 24×24″ softbox

Very nicely done! I love the effect and need to try this someday! :) As always, thank you for sharing your wealth of knowledge with us Neil. p.s. congrats on becoming a US citizen…. I guess I need to follow your footsteps on that one too! :)
Love the blue in the image. I’ve never seen it used in street settings like this, but it looks great in beach/sunset situations. Another thing I look forward to trying. The list of things I want to do keeps growing faster than I actually DO them.
Neil,
If you change the WB of the entire photo to 4650K from 3850K, wouldn’t that change the color on the subject to a color that was not desirable?
Or is it because the gelled flash on the subject created a separate WB “zone” compared to the background WB, so when you change the WB on the entire image, the background color-shift further than the subject.
Hello Neil
Great Photographs, i just love the blue tone, Just a quick question. what was the On Camera WB while shooting the first Photograph and how did you end up with that Beautiful Blue tones in Workflow?. what i understand is you have started with a ‘Cloudy” WB on camera and give a touch of 1/2 CTS gelled light.
Please correct me if iam wrong
Thanks
Anoop
“I just want my subject’s skin tones to look good.”
Amen to that :)
Excellent subject to discuss, Neil.
Thanks
Hi Neil
Am I right in saying the following:
You selected an ambient white balance that would make the image appear cool. To combat this, you warmed the flash with gel to ensure your model has a warm, attractive skin tone?
I always find your blog inspirational. One light, a simple pose and an empty road and you create something like that :-)
Neil, nicely done as usual.
Is that a Mettle softbox on that monopod?
Neil, I was the tounge twisted fellow who ran into you Saturday afternoon in NYC right after you finished this shoot. It’s amazing to see the results of the shoot knowing exactly what the day and environment was like.
I realized I never introduced myself, nor did I congratulate you on your recent naturalization. I was nervous to meet you. Running into you, for me, was like a young physicist running into Albert Einstein while he was at a chalk board working on formulas. I saw you were working and didn’t know to whether to say hello or leave you alone so you could work. I’m glad I did say hello but I felt all that came out was jibberish.
So, if I may, I’d like to start over: Hi, my name is Anoop and I’m a huge fan of your work. I just want to thank you for sharing your knowledge and let you know how inspiring your work is for me. I hope one day to get to one of your workshops as well as share some time over a cup of coffee or tea. Congratulations on your citizenship, all of us young photographers are blessed you are here and sharing your work. Thanks again.
-Anoop
Flash + WB : new lesson learnt. Thanks for this Neil.
All my shots with a BFT have been “experimental” until last night. We celebrated Christmas Eve with family in our new home and I captured as much of it as I could with a 7D with 580 in the shoe. BFT and hair bands attached, of course. This is the first “live” event I’ve shot with the BFT. Used gels to match my 2700K lighting. Can’t believe the quality of the images! The light was gorgeous, never intrusive. Thank you so much for sharing and detailing this method. It is truly amazing the quality of light that can be achieved with an on-camera flash.
This article turned out to be one of those “got it” moments for me! You are awesome!!
or if you don’t have any external lights and flash you can try this psd file to get flash gel effects
http://graphicriver.net/item/studio-gel-backgrounds/5325031?WT.ac=portfolio&WT.seg_1=portfolio&WT.z_author=rafimmedia
Neil,
I understand the concept of color correcting with the gels on the flash and Tungsten WB in the camera, to match the light source indoors at the catering halls, churches, etc.
I am photographing a wedding this weekend and will be trying out your bounce flash methods and gels on he flash.
My question; The event has equal access to inside (Mixed Tungsten/Incandescent) and outside areas (Early afternoon sun/shade) during the entire time of the event.
Can the Tungsten WB and gels stay on all the time and just adjust with post processing? Or is there a more moderate approach that will be easier all around, inside and out? I don’t want to create a nightmare of post processing.
Thank you,
Frank Wolff