How to overpower bright sunlight with on-camera flash
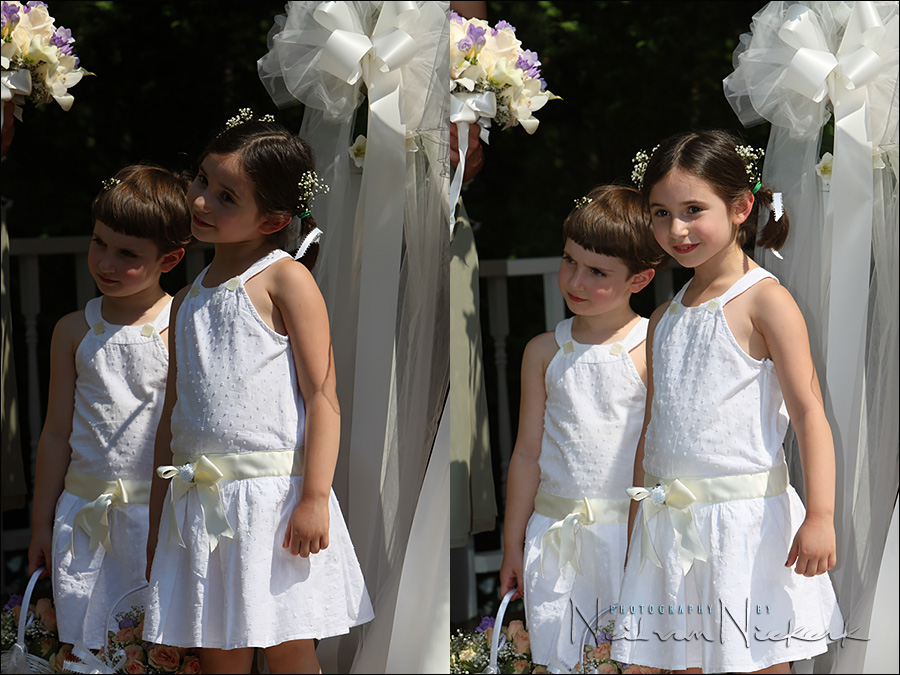
The photograph on the left shows one of the toughest lighting conditions you get to deal with. Your subjects are half in the sun / half in the shade … and there is no way you could interrupt and change things in your favor. There is no way to have the flower-girls move. No way to bring in additional, off-camera lighting. You can’t scrim the sunlight either with large reflectors.
There are these times when your options are limited, but you still have to get the best out of this challenging situation. There is one viable option here, crouched down in the center aisle – use on-camera flash to bring up the shadow detail.
There have a few articles here on how to overpower the sunlight with off-camera flash …
- Flash photography: overpowering the sun with flash (models: Sarah & Mark)
- Controlling bright daylight w/ direct off-camera flash (model: Molly K)
- Overpowering the sun with off-camera flash – what are my settings?
… and they all follow a specific train of thought to get ourselves out of trouble. Even in this article – engagement photo sessions: posing, lighting & context – there is an algorithm in place.
Same with this scenario where we use on-camera flash. In fact, it is even a little easier:
Step-by-step: optimal camera and flash settings
1. Best camera settings
We don’t want to worsen a tough situation, so we won’t have the camera settings at somewhere between the brightest areas and shadow areas. Then we’d just be blowing out the brightest parts of our subjects.
The Sunny 16 Rule immediately suggests a good starting point: 1/200 @ f/11 @ 100 ISO
Sunny 16 Rule is actually: 1/100 @ f/16 @ 100 ISO, but our flash will needlessly work harder at f/16 than it would at f/11. For that extra stop in our aperture (f/16 instead of f/11), our flash would have to deliver twice as much light. It also means your batteries will run down faster at the smaller aperture. f/11 just makes more sense than f/16 does.
Why f/11 though? Because that is linked to the maximum flash sync speed. At max flash sync speed, we have the widest possible aperture, without our flash going into high-speed flash sync (HSS).
Why not HSS? Because we lose approximately 1-2 stops of light here from our flash. We are already in a tough spot, so it would be a better starting point to not go to HSS immediately.
- Flash photography: applying the Sunny 16 rule and the flash Guide Number
- Max flash sync speed – the sweet spot for flash
For this wedding, I was using the Canon 1D mk III, which has a max flash sync speed of 1/300. Therefore the actual camera settings I used were: 1/300 @ f/9 @ 100 ISO. For simplicity of explanation here, we’re going to work with the idea that our max flash sync speed is 1/200 – that of the Canon 5D mark II and Canon 5D mark III, and similar cameras.
So there we have our starting point: 1/200 @ f/11 @ 100 ISO
2. Double-check our exposure metering
We can’t just rely on Sunny 16 Rule nailing it for us. We need to double-check our exposure metering.
We can do so using the histogram to determine exposure. We should even check with the blinking highlights display of our camera. Keep in mind that the edges of her dress could very well be blinking – but that’s not an issue really. Rim lighting or specular reflections will do that. As long as large patches of our subject isn’t blowing out, we’re good.
3. Flash settings
We can shoot in either manual or TTL flash here. The results should be similar. If our position is fixed, then manual flash would be the better option though.
Since we won’t be bouncing our flash – this would make no sense whatsoever here – our flash will give us the distance scale on the back of the display.
This distance scale directly relates to the Guide Number of the Flash. But without even going there, we can simply read the distance off the back of the flash for our camera settings. It should be around 10 ft / 3 meters (for the flash zoomed to 35mm), for top-end speedlights like the Canon 600 EX-RT and Nikon SB-910 (affiliate links).
This is something you can check for yourself, right there, right now, with your camera in your hands.
- Practical tutorial: controls for manual flash exposure
- Getting the most power from your flash / speedlite / speedlight (model: Shawna)
- Tutorial: how to use the guide number of your flash (model: Shawna)
This implies then that to be in range of the output the flash is capable of, we need to be around 10 ft / 3 meters from our subjects. In this practical scenario, we have more leeway – we can be a little further away because the flash adds to the available light. So we might be able to be a few feet further away, and still get the best results.
If you were using TTL flash, and the flash looked too bright, you’d just dial in less FEC. With manual flash, you would be adjusting the flash power.
4. No flash modifiers
I didn’t use any flash modifiers here – they cut down too much of the light, and don’t make a substantial enough difference. If you think about it – the speedlight is a small light-source – the flash-head. If you place a plastic cup over it, your light source stays more or less the same size. Nothing gained. But you did lose some light.
Similarly, I wouldn’t have my flash in a half-bounce position either. That too would make no sense – throwing flash unevenly across my scene.
Summary
If you’ve followed this practical exercise – overpowering the sun with off-camera flash – what are my settings? – you would’ve noticed that it is exactly the same thought-process. Just because it is now on-camera flash instead of off-camera flash, it didn’t change the algorithm to get to the best camera and flash settings.
In this way, step-by-step, our camera and flash settings fall into place. There is no wild guessing, and no frantic dialing of the camera’s shutter speed and aperture. We’re calmly in control, making the best of a tough scenario.

On-Camera Flash Photography – revised edition
This book is explains a cohesive and thorough approach to getting the best from your on-camera speedlight.
Particular care was taken to present it all with a logical flow that will help any photographer attain a better understanding of flash photography.
You can either purchase a copy via Amazon USA and Amazon UK, or can be ordered through Barnes & Nobles and other bookstores. The book is also available on the Apple iBook Store, as well as Amazon Kindle. Also check out the Amazon Kindle store.
Learn more about how the cover image was shot.
Another option
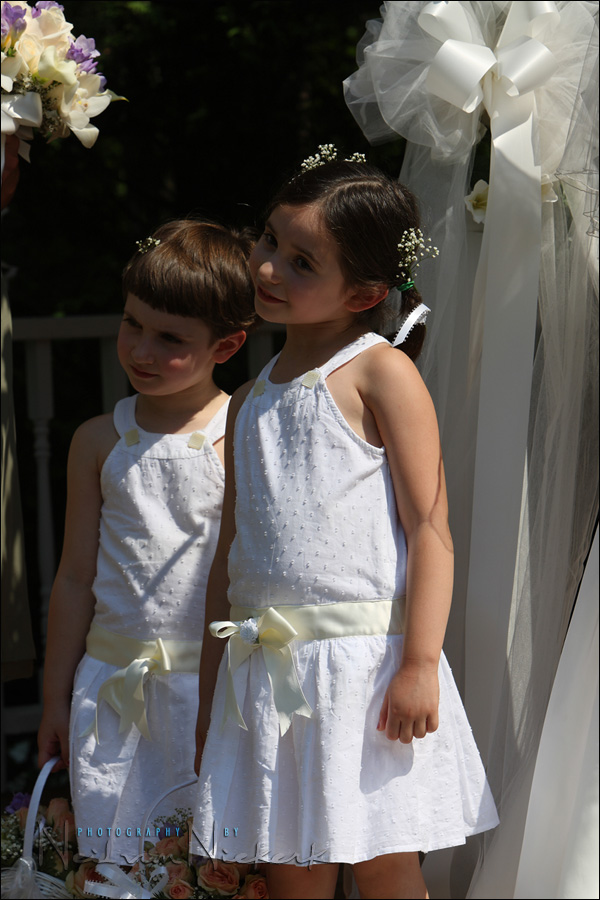
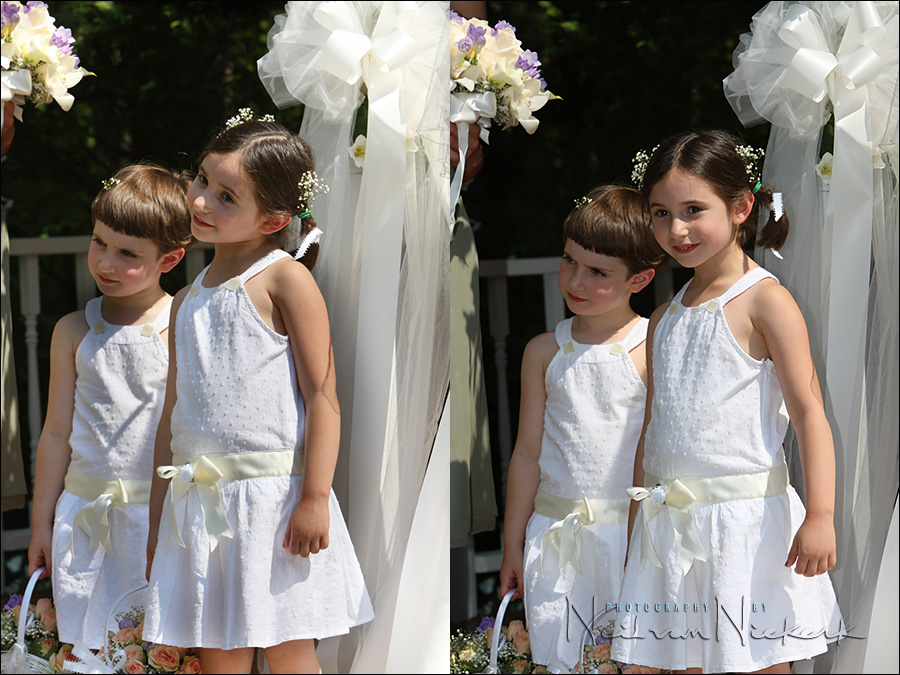
This image on the right is the one where I used flash to light the shadow details. It needed no work in post-production to look like this, and as far as I am concerned is a perfectly acceptable image of these two flower girls.
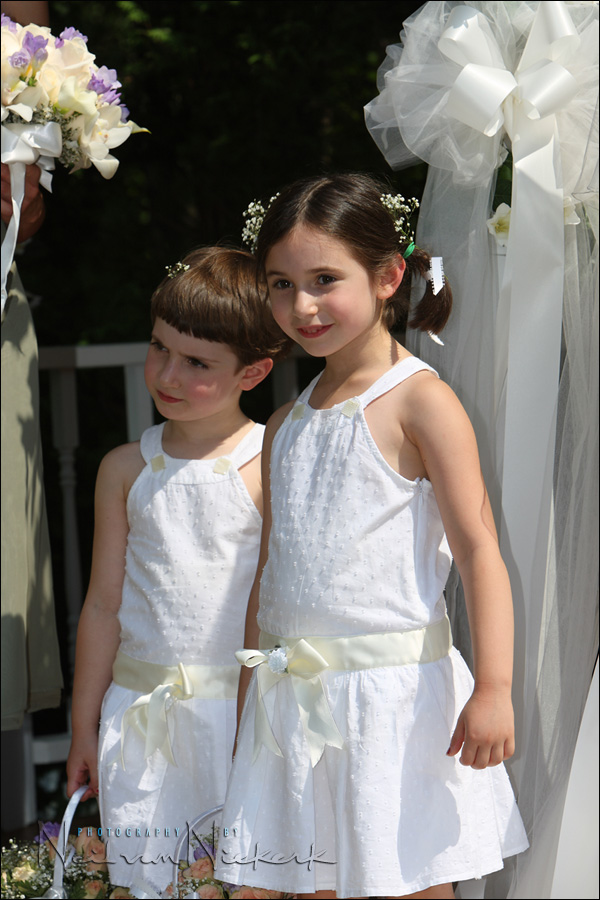
With the image on the left, I used the available-light only image, but did some work in Photoshop. Here I created two JPGs from the RAW file, each at different exposures. Then I combined the two JPGs as layers in Photoshop and masked off certain areas so I could get detail in the shadows and retain detail in the highlights. This does look good, but this does take time.
So there you have the choices. Personally, I would be quite happy to accept the compromise of fairly hard fill-flash in this situation to bring up the shadow detail. Doing it this way and still controlling my exposure properly by using my camera in manual exposure mode gives me a very good image already during the actual moment of taking the photograph.
Neil,
Just curious re the first image up top – no flash was used – did you spot meter? Did you increase exposure to bring the shows up on the faces? Did you change the exposure comp to allow for severe strong backlighting? It’s a beautiful capture by the way.
Paul
Nice article, as usual. One thing I struggle with, especially attempting to transition into full Manual exposure mode from Av (maybe a crutch for me), is where to meter? I can’t meter the dess (in your example), I can’t meter the highlights, and the faces are too far to spot-meter (for me) — whenever I do so, I get wildly different readings. So, I’m left with center-weighted or evaluative metering, and I just feel that it’s not too accurate. One thing I tend to do it point to the ground (looking for grass), meter it, and either keep it or go -2/3ev from there.
What are your thoughts?
-Dave
Thanks again Neil!
Even with an assistant I have found that if you always wait to get the lighting conditions modified just right the moment is gone. My thoughts are that you should have a strategy to deal with whatever comes your way then you won’t miss the moments that are to me the most important aspect of wedding/people photography. I have struggled with this situation myself and in the past have either bracketed my exposures or taken the long road in photoshop. Thanks to you I have recently ventured into the whole idea of fill flash, still no where near mastering it but moving forward all the time, armed with the knowledge from ‘planetneil’, thanks
These two girls are so precious – it seems that no matter what strategies you use to modify the image, they remain beautiful. Your lesson was superbly detailed and ‘enlightening’.
Thanks so much for taking the time to post this article and the many others on your site. They are very well written. Not only listing the different options but showing pictures as a result of using each option was brilliant!
You mention that you shoot and check the histogram, then let some of the highlights blow out. How do you know you’re not generally overexposing the focus of the image too? Checking the histogram, for me, I can see where the highlights are. I can see that they might be in section 5, or blown out. However, if A LOT is blown out, then I can’t really tell if the rest is where I want it to be? How do you come to the right exposure just by checking the histogram? If you see a high stack at the far right, how do you know some of that isn’t detail you wanted back?
Your latest image, for example: So much of this couple would be shown as stacked to the right in the histogram. There is probably very little left in the back levels. How do you know when you’ve gone enough? Did you zoom on her face and spot that, then set it in Manual?
Thanks,
-Dave
In the following quote, what is the difference between max sync speed and high-speed sync flash?
“I would suggest staying at max sync speed to get the most range / power from your flashgun. Only go to high-speed sync flash if you really need that shallow depth of field or high shutter speed.”
Does flash power automatically increase with the increase of the sync speed?
Sidney, in response to your question, max sync speed is the highest speed that a mechanical shutter will sync with a flash, on most cameras 250/s although some consumer cameras achieve 500/s with the use of an electronic shutter. A higher sync speed allows a higher shutter speed which in turn allows a larger aperture. This allows more flash to be captured by the camera so the flash unit does not have to work as hard, which in turn translates into greater flash range.
The high speed sync flash I believe Neil is referring to is high speed FP mode (I don’t know what it is called on Canon cameras) which allows the camera to sync at any speed above 250/s. This normally has the effect of significantly reducing flash range, although I am having amazing results using this mode with a D300 and an SB600 flash. It doesn’t seem to be taxing the flash at all, almost an instant recycle.
To comment on what Christian said I use the FP high speed sync all the time for this situation. The problem is that the smaller the aperture the less the range of the flash. Therefore to kill the shadows you need full power flash. You are after all competing with the sun.
So I generally try a test exposure at f4 or so then set the appropriate shutter speed for 1/2 stop or so under exposure (spot on subject face)then blast the flash full manual in FP so my shutter speed could be 1/2000. The flash is going full pop so it does take full time to recycle. The “magic” is that the FP mode makes the flash fire several times to get exposures across the shutter as it moves.
My experience is that it is a waste to try anything other than full power manual when doing this and then to adjust exposure accordingly. The downside is the “magic” decreases the flash range considerably. With iso100 SB800 at f4 1/250 is good to 7.6 meters at the 1/1600 that you will need to get the correct ambiant exposure the range is 1.4 meters. Stopping down decreases range as well so there is no correct answer (1/[email protected]) is 1.4m range.
A work around is to fire the flash full power with the PC and utilze only the part of the image that is not cut off by the shutter. To do this you may have to turn the camera upside down. This requires lots of experimenting and I have not yet done this at an event. However it does work. And will give you the 7.6M range.
As usual however Neil has multiple ways of accomplishing this and I learned alot from this post.
on the canon 580exII when shooting in ettl doesn’t the camera meter the scene and reconize it as fill flash and compensate automatically? That’s actually one question I”ve been trying to figure out.
Thanks Neil, love your blog and insights.
I too like to use the LCD screen to judge expose. My problem however, in this lighting scenario is, I can’t see bugger all on the screen. How do you overcome this issue.
Peter
Neil,
What is your white balance setting in the above outdoor pictures (and is it different if you are using direct flash or fill-flash)?
Daylight?
Thanks,
Les
Hi Neil
Thanks for your great sites!
Scenario: Shoot is on bright sunny day – Nikon D200 – 12 subjects positioned in shade with their backs to sun – will need to fill flash. But with shutter speed locked at 1/250 (SB800), what do I do to the aperture (Nikor f2.8 lens, 24-70mm) to get them all in focus?
Please help
1 Neil, thanks, I Yahooed for DoF calculators, but this is a real can of worms! Does one do these calculations only for large groups ,or other very special circumstances? Does one actually need to calculate the depth of field before one takes every photograph? Is that why I sometimes get slightly blurred photos in spite of the focus indicator showing in the view finder, because I don’t do these calculations?
2 Then I’ve been struggling with on camera flashing, like most – I’ve read all your posts on the vast subject, much appreciate your knowledge, but – if one uses the blinking highlights screen, why can’t one take a test shot with the speedlight actually working, at 1/250 shutter speed, fiddle with the aperture, and maybe ISO, and adjust until the highlights don’t blink any more? Why does one have to first determine a non-flash exposure, then under-expose by a stop, then switch on the speedlight?
Please, would appreciate help.
“About the blinking highlights … this would work if you only took into account your subject, and your subject had areas which were white or near-white. You can’t summarily decide on exposure based on blinking highlights in your background.”
Thanks for your wonderful answers, but please help me figure out the blinking highlights issue – histograms are simply beyond me – how do you know, when looking at the histogram, that any blown-out detail shown running up on the left, are caused by over-exposure somewhere on the subject, and not by the over-exposed background? It sounds to me as if this spike on the left of the histogram is ignored if it is caused by, for instance, the bright sky behind the subject? Can one not do the same for the blinking highlights – as long as there’s no blinking on the subject – ignore the blinking in the background? I just don’t understand histograms and would so much like to work with the blinking highlights instead…?
Hello Neil
Could you please advise me the situations when i need to use High Sync Speed(FP) and when not to use it?
Thanks
Anoop
Hi there Neil, I am still using fuji velvia 50 and 100. I’ve had a hard time getting pictures taken on the beach under bright sun to expose properly when using the camera’s built in meter. They came out all underexposed (dark). After this mistake,I read a few books on exposure and when the author says, open up a stop, ex. 1/16 to 1/13, but have not tried it out yet.
I guess my question is, what do you recommend using for a meter: a spot meter to meter the highlights, or an incident meter to meter the light falling on the subject? I guess another completely different option would be to use the meter in a digital camera, take a picture on manual and then check the exposure before exposing the fuji film. With this option, I wondered about the dynamic range of the sensor being severely different from the slide film.
I thought that I would pose these questions to a real professional before going out an shooting off a few rolls with no usuable shots.
Thanks!
Using an incident meter on the beach might slow you down. Some might say that would make the photography more methodical, but at some point the meticulous technique of using a hand-held meter interrupts the flow of a shoot.
I would suggest using your camera’s spot-meter, and place the highlights 1.3 stops above zero. (Or where test shows would be optimal for the film you are shooting with.)
Great article Neil thank you. I have recently returned from a destination wedding over in Greece, harsh sunlight during the day ceremony. I used a fair bit of ocf during the wedding and post wedding portraits, I got the light bulb moment, just wanted to say thank you.
Hi, very much appreciated article. I have been in this situation but at weddings you are unable to use any form of flash, any suggestions on how I can resolve the same situation without flash, TIA
You have little choice then but to massage the images in Photoshop, as shown in the final part of this article.
Great conversation here! I too have been in this situation many times, and as Neil always points out, you must have a good understanding of how to get a good general exposure of your subject before trying to add fill from a small flash. One tool that I use that has proven to be extremely helpful in really bright light is the HOODMAN HOOD LOUPE. This device makes it possible to clearly see your exposure on the LCD with zero sun glare, making it much easier to see exactly what you’re getting. Easy and quick to use too.