Tangents

photography tutorials, reviews & workshops

tangents photography blog
learn : discuss : share
  • Tangents
  • Tutorials
    • Flash Photography
    • Wedding Photography
    • Studio Photography
    • Posing People
    • Understanding Your Camera
    • Exposure metering
    • BFT
    • Best Photo Books
  • Reviews
    • Sony
    • Nikon
    • Canon
    • Fuji
    • Profoto
    • lighting gear
  • Workshops
    • Info: Workshops
    • In-person
      tutoring sessions
    • Online
      tutoring sessions
    • Workshops in
      New Jersey (NJ)
    • Workshops in
      New York (NYC)
    • Photo walks in NYC
    • Studio Workshop
    • Video tutorials
    • Workshop results
  • Books
    • On-Camera Flash (revised ed.)
    • Direction & Quality of Light
    • Off-Camera Flash Photography
    • Lighting & Design
    • On-Camera Flash (1st ed.)
  • Projects
    • Two Perspectives
    • B&W Infrared
    • Vintage lenses
    • Time-lapse photography
  • Info
    • About
    • Contact
    • My Photo Gear
    • Books by NvN
    • Join us on Facebook
    • Acclaim
    • Success Stories

bounce flash vs video light

September 2, 2009 Neil vN 39 Comments

bounce flash vs video light

With the recent posts on using video light for stills photography, the question comes up why one would want to use video light over flash.  Two of the main advantages are that you see exactly what you’re going to get; and also that video light gives a certain dramatic quality.  With video light the fall-off to the edges of the spot is fairly abrupt.  But it is exactly this quality that lends itself so easily to giving you that dramatic lighting.

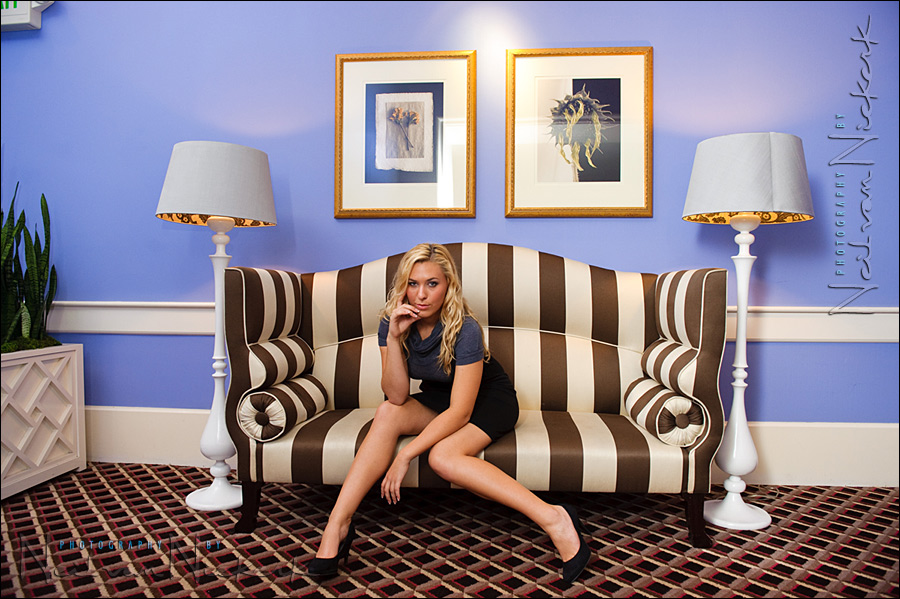
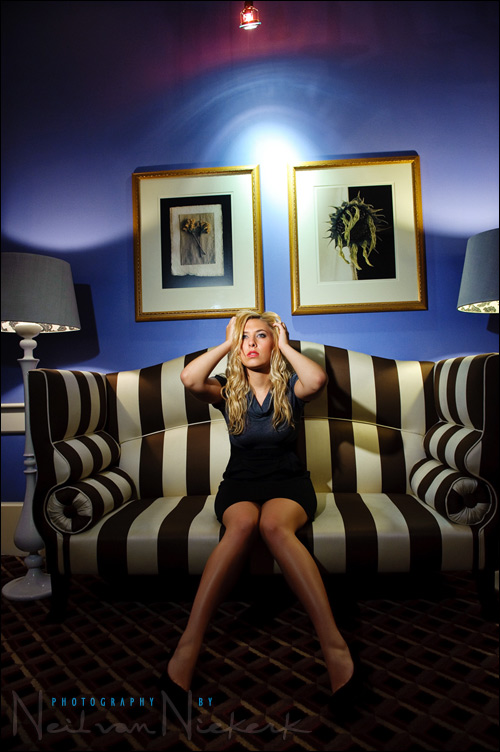
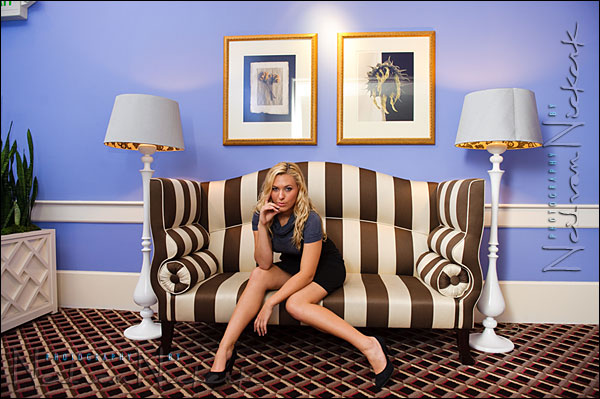
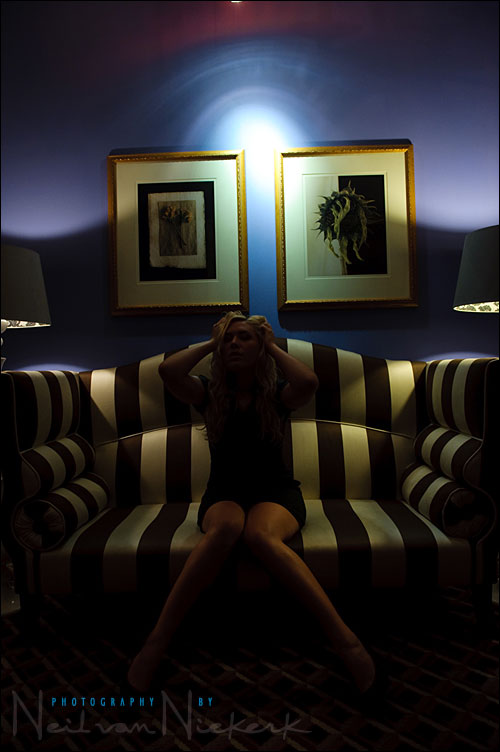
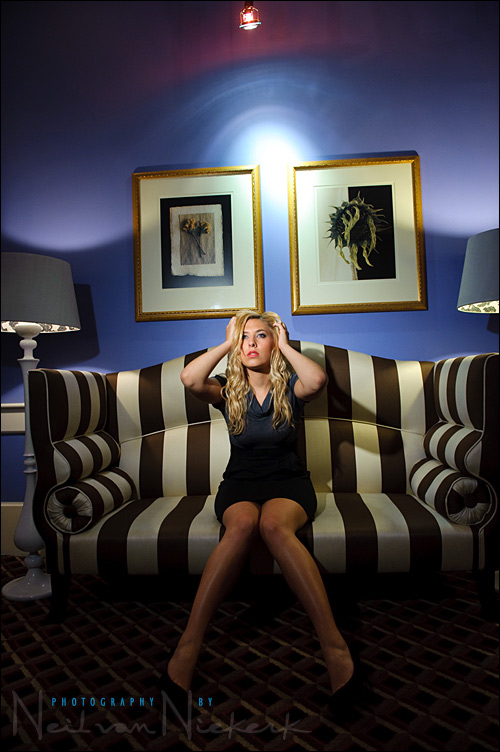
With the photo at the top, I use bounce flash to light the model .. and the entire scene.  That’s the advantage / problem with bounce flash – it tends to open up the entire scene.  In the next image however, I used video light for more dramatic effect.

Camera settings for the image at the top, using bounce flash:
1/160th @ f4 @ 800 ISO

Camera settings for second image (with video light):
1/80th @ f3.5 @ 1000 ISO

With the image where I used flash, I purposely chose a fairly high shutter speed to reduce the effect of the ambient light .. thereby allowing the flash to dominate and open up the image much more. Of course, there aren’t just these two options in lighting the scene.  There are 101 ways of getting good results.   And even in setting up the first image, I could’ve used a completely different combination of settings.   I could’ve let much more of the available light register by choosing a slower shutter speed and wider aperture .. and reducing the TTL flash exposure by dialing down the flash exposure compensation.

And that’s the beauty of playing with lighting .. so many more options open up.  Your choice.

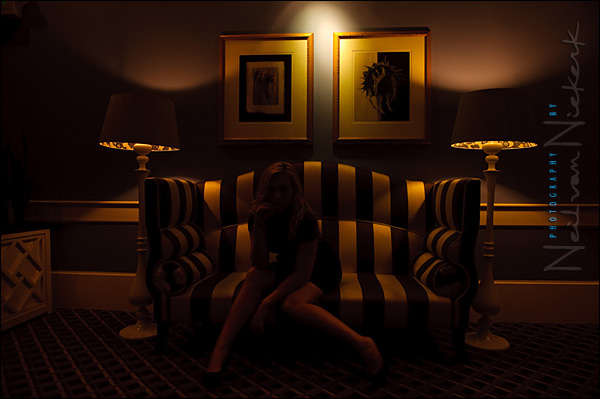
Back to those two images at the top – here are the available-light-only images for comparison:

With the flash image you can see that in my choice of settings, I pushed the available light levels down in comparison to the eventual flash exposure.  I did this by choosing a higher shutter speed immediately.  But the aperture and ISO values also play a role here.

This is 60% cool venue; 20% hot model; and 20% the video light.
Whoever was responsible for the interior design here should take a lot of the credit.

Back to the video light – as you can see here, the way that the video light is concentrated and gives a spot-light effect – there is the dramatic appeal.

equipment:
Nikon D3  //  Nikon 24-70mm f2.8  //  SB-900 speedlight
Lowel ID-light and accessories


related articles

  • bounce flash vs video light  (model: Shawna)
  • video tutorial on using an LED video light
  • posing and lighting – aiming for a consistent style  (Nicole & Brad)
  • positioning the hand-held video light
  • lighting ideas for the romantic wedding portraits
  • romantic wedding portraits with video light  (Allison & Scott)
  • exposure metering when using video light  (Amy & Clark)

Filed Under: flash photography, lighting, video light


Help support this website

If you find these articles of value, please help support this website by using these B&H and Amazon affiliate links to order your photo gear.

I also offer photography workshops and tutoring sessions, whether in person, or via online video tutoring sessions.

Please follow me on Instagram for more.

You can also join our thriving photo community in the Tangents group on Facebook, where we show our photos and discuss all things photography.

Thank you,

Neil vN

Books by Neil van Niekerk


39 Comments, Add Your Own

  1. 1Ashley Violi says

    September 2, 2009 at 7:08 am

    Hi Neil – just wanted to say what a huge inspiration you’ve been, and massive thanks for sharing your experience. I’ve been following your blog for the past 6 months, and have learnt so much valuable information!

    I was actually hoping for a quick bit of advice re your choice of the Lowel ID light – I’m in the market for a video light, but am unsure about how to deal with the heat issue from the tungsten models. How do you handle using it on location or at a wedding and needing to pack it up to move to the next location? Do you find you need to stop and let it cool down? Any burnt assistant fingers?

    I love the warmth and beam spread from the ID Light, but am still trying to make an informed decision on whether an LED equivalent might be a little bit more practical for me… any advice would be hugely appreciated!

    Thanks in advance!
    Ashley

    Reply
  2. 2Neil says

    September 2, 2009 at 7:13 am

    Ashley … video lights come with handles for that exact reason. The Lowel ID-Light has one too. Check the link out.

    Neil vN

    Reply
  3. 3Peter says

    September 2, 2009 at 7:19 am

    I’ll take 20% of the ‘hot model’, you can keep the venue :)

    Seriouly though, thanks for sharing that. I have been wondering whether to get a video light or not. This helps the decision making process.

    Thanks, Peter

    Reply
  4. 4Martin Burri says

    September 2, 2009 at 8:11 am

    Gret photos, Neil! I like both of them.

    From your experience, do you think it would give a totally different result with an off-camera flash with snoot, gelled to 1 CTO (or CTS) instead of the video light? Or do you think it would be about the same?

    I like the idea of “seeing what you get” by using video lights.
    Regards, Martin

    Reply
  5. 5Neil says

    September 2, 2009 at 8:12 am

    Martin, I’m sure you could make it look quite similar once you can figure a way out not to have the spread of the light from the snooted flash be too contained.

    The video light, even though it has a spot-light effect, has a certain way the light spreads out and falls off from the center. It doesn’t have as hard an edge as a snooted flash might.

    Even if you did figure that out, there is still the WYSIWIG aspect that would be missing from the snooted flash.

    Neil vN

    Reply
  6. 6Sheri Johnson says

    September 2, 2009 at 8:13 am

    I can really appreciate seeing the differences here. I haven’t yet tried the video light, but I have heard a lot about it for use especially during wedding receptions.

    Reply
  7. 7David says

    September 2, 2009 at 10:16 am

    Extraordinary effect.

    This looks so much like a rendered scene, I wonder how much postprocessing is responsible for that. I would really appreciate if you could post non-edited versions of each flash/video shot.

    Reply
  8. 8Neil says

    September 2, 2009 at 11:27 am

    David, the image at the top (with flash) had no post-processing done to it other than adjusting it as part of my usual RAW workflow. The second image (video light), had a little bit of post-processing done to it.

    I try to keep the results here as realistic as possible when I post about lighting techniques. Meaning, I do want to show the results that are (nearly) immediately possible with the lighting. In this case I did bump the saturation and contrast a touch more (in Photoshop) than my usual default for the RAW image in ACR .. but I do feel it is still representative of what is possible with the lighting alone.

    Neil vN

    Here is the unedited file:

    The image as posted above with a bit of Photoshop sweetening:

    Reply
  9. 9Michele Stapleton says

    September 2, 2009 at 3:47 pm

    Great lesson. Thanks for posting.

    In the video light photo, is that video light the fixture we see at the very top of the photo?

    Reply
  10. 10Neil says

    September 2, 2009 at 5:39 pm

    Michelle, in the image without the video light, you can see the light fixture’s effect.

    So I do think that a large part of this image’s success depends on the interior designer’s work. :)

    Neil vN

    Reply
  11. 11Bryan Decker says

    September 2, 2009 at 6:47 pm

    As one who was there with Neil yesterday I can tell you that I don’t think Neil did much post on this shot because we all got one similar at his workshop. By the end I think most of us started talking about getting a video light of some kind we were so impressed with the results. I highly recommend taking his workshop even if you have to travel a great distance. He stands there as you try his techniques and you amaze yourself with the results!

    Thanks for the class Neil! Now off to practice!

    Reply
  12. 12Neil says

    September 3, 2009 at 11:09 am

    Bryan, thanks! It was nice to meet you as well. :)

    Neil vN

    Reply
  13. 13Roman says

    September 3, 2009 at 11:15 am

    Hi Neil,

    in the 2nd picture you used different exposure setting, basically what I see you’ve moved every setting by 1/3rd and the overall exposure should be the same, Right? What I’m interested to know, is what was behind your decision to change the settings ?

    Reply
  14. 14Neil says

    September 3, 2009 at 11:32 am

    Roman, I think you misread the settings:

    Camera settings for the image at the top, using bounce flash:
    1/160th @ f4 @ 800 ISO

    Camera settings for second image (with video light):
    1/80th @ f3.5 @ 1000 ISO

    The image at the top was taken at 1/160th (and not 1/60th like I suspect you misread it to be).

    That would make the difference in settings 1.7 stops, which is a significant jump.

    Neil vN

    Reply
  15. 15Ed says

    September 3, 2009 at 1:16 pm

    Hey Neil,
    Very nice results! Just a question, have you tried using a grid spot on a SB-900(for example here: https://strobist.blogspot.com/2007/06/more-cheap-and-easy-grid-spots.html )? I guess this would give you the exact same result?!
    Cheers from Belgium
    Ed

    Reply
  16. 16Ed says

    September 3, 2009 at 1:18 pm

    Sorry, I didn’t read Martin’s message about the snoot.

    Reply
  17. 17emily says

    September 3, 2009 at 2:46 pm

    Wow Neil you are fast. Yours turned out absolutely amazing! I can not wait to work on mine. Thanks so much for all of your help, guidance and humor on Tuesday. Your workshop was incredibly helpful. My brain is still filtering it all! You are the best!

    Reply
  18. 18Ashley Violi says

    September 3, 2009 at 4:29 pm

    Thanks Neil
    I’m aware of the available handle for the light – I’m more curious about how you deal with the heat when you need to change locations. Do you need to stop and let the light cool down before you can pack it away?

    Thanks again
    Ashley

    Reply
  19. 19Neil says

    September 3, 2009 at 6:19 pm

    Ashley, I don’t much worry about the heat since I have the barn doors on the video light, and that creates some space around it when I bung it into a Crumpler bag, (B&H), to carry around during a shoot or a workshop.

    By the time I pack it all away in the roller case, it has cooled down. So somehow the heat just isn’t much of an issue.

    Neil vN

    Reply
  20. 20Sara Ash says

    September 4, 2009 at 8:58 pm

    Hi Neil,

    I wanted to thank you for such a great workshop in Portland!! It was one of the best workshops I’ve ever been to (and I’ve been to a lot!)! I learned so much and I really appreciate you sharing your skills and knowledge. I bought a video light the next day and I’ve already had fun playing with it :) Thanks so much — I will tell everyone about you!!

    Best,
    Sara

    Reply
  21. 21Danny says

    September 6, 2009 at 1:04 am

    Hi Neil,

    Great photos there and your blog entries are always insightful and useful. My question is about the specific video light gear that you have on your list; how much “on-time” do you achieve with that specific battery pack?

    Danny

    Reply
  22. 22Neil says

    September 6, 2009 at 2:07 am

    Danny, I don’t actually know how much continuous time I have with the battery pack that I list there. I just don’t shoot with it continuously on, and for stills photography, it wouldn’t make sense to have a handheld unit like this run continuously.

    The way to work with it is to set up the shot, light it, shoot .. turn the light off, and move on to the next spot. This way it does last quite long. Longer than I have ever needed at a wedding, and long enough at a workshop where we use it a lot more. Although, at a workshop a battery barely lasts long enough.

    Neil vN

    Reply
  23. 23Nancy says

    September 6, 2009 at 2:43 am

    Hey Neil, just wanted to say thanks so much for the great workshop in Portland on 9/2. It was SOOOOO worth my time and money, and I am thrilled with this new information and ammo in my arsenal – and the cool thing is that it’s been there all along, I just didn’t see it… thank you for your patience with us and for staying on track to teach us the things you knew we needed to learn. I wish I would have asked one more question that I can see I will spend a lot of time contemplating, and that is about the angle to use for bouncing your flash. I play billiards so I do understand angles, but will have to experiment with things like how many angles you can use, if it affects the light on your subject by where you put the “long” side and “short” side of the angles, etc. Now I just have to get out there and shoot more! Cheers, Nancy

    Reply
  24. 24Neil says

    September 6, 2009 at 3:29 am

    Nancy .. it is that part that just needs constant practice, and before long, you’ll get it. And it will just make sense how to direct the light towards the area you want it to bounce back from. :)

    Neil vN

    Reply
  25. 25Jet says

    September 7, 2009 at 3:24 am

    Neil I was wondering did you use the diffuser on your light for this shot?

    Reply
  26. 26Neil says

    September 7, 2009 at 3:35 am

    Jet .. nope, no diffuser used, or needed. In fact, a generic diffuser quite often works against you when you shoot indoors. And in this case, a diffuser cup on my flashgun would’ve given me different results.

    Neil vN

    Reply
  27. 27David says

    September 8, 2009 at 12:35 pm

    Hi Neil,

    thanks for posting the original images. Extraodinary sharp, extraordinary interior.

    Reply
  28. 28lafayette says

    September 10, 2009 at 1:31 pm

    Hey Neil,

    Where and at what angle did you bounce your flash? It seems as if you bouced it forward. Can you discribe how you bouced your flash? Also did you use a flag?

    Reply
  29. 29Neil says

    September 17, 2009 at 12:56 am

    Hi there Derrick .. I bounced my flash over my left shoulder. And I had the black flag foamie thing on my flash .. but mainly not to blitz people behind me in the eyes.

    Neil vN

    Reply
  30. 30Jesse Kaufman says

    January 20, 2010 at 4:02 pm

    huh, i would’ve said she was closer to a 100% hot model ;) … great article! i was JUST thinking about this last night and wanted some samples … well, here they are! :)

    Reply
  31. 31Brooke says

    October 24, 2010 at 12:28 pm

    You write: ” I could’ve used a completely different combination of settings.   I could’ve let much more of the available light register by choosing a slower shutter speed and wider aperture .. and reducing the TTL flash exposure by dialling down the flash exposure compensation.”

    Why in this situation would you need to dial down the FEC? Wouldn’t the TTL system do this automatically? Isn’t that the point of TTL?

    Reply
  32. 32Neil vN says

    October 25, 2010 at 3:01 am

    Brooke … I see where my description is ambiguous. What I meant to add (and should’ve been a more complete description), is that at the point where the available light is correctly exposed for, then we can’t / don’t want to use flash as the main source of light. The flash then needs to be fill-flash … and this implies dialing down the FEC as a consequence.

    I hope it makes more sense now. But as stated there, you’re correct, dialing down the FEC doesn’t seem a solution, since the TTL flash exposure would follow any changes in settings … and this works very well, while we under-expose the available light.

    Neil vN

    Reply
  33. 33Artur Ocubaro says

    November 15, 2010 at 1:01 am

    Hi Neil!

    Are 1/160th @ f4 @ 800 ISO, the settings for the non flash photo? And where did you point your camera to take the exposure? Evaluative, matrix metering? And with the flash photo you just turn on the flash?

    Thanks!

    Reply
  34. 34Neil vN says

    November 15, 2010 at 2:13 am

    Artur … I didn’t take a meter reading. The available light is entirely under-exposed at those settings. I simply let the camera’s TTL flash exposure metering take care of it.

    Neil vN

    Reply
  35. 35Matt says

    November 29, 2010 at 4:58 pm

    Neil – always appreciate your stuff. I’m on this post by following some links from your latest “video light” post.

    Two questions:

    1) Is there such a thing as a “beginners video light”? Something in the $100-200 range that I can start with and learn the basics?

    2) I’m dying to know – where on earth is this room?? It’s fantastic!

    Thanks for all you do.

    Matt in Seattle, WA

    Reply
  36. 36Neil vN says

    March 29, 2011 at 12:18 am

    Matt … check the Amazon link for some of the LED video lights. They are quite affordable.

    This was shot in the Kimpton Hotel in Portland, OR.

    Neil vN

    Reply
  37. 37Linda says

    December 14, 2011 at 6:20 pm

    I love having video lights on my weddings to add drama

    Reply
  38. 38john says

    December 17, 2011 at 8:24 am

    Hi Neil

    I have just visited your site for the first time (thanks to a link from someone on SWPP forums)

    Having seen just a few of your set ups and set up info. I know that I will be spending many a happy time at your site

    Fantastic photography and explanations – keep up the great work
    John

    Reply
  39. 39Damian says

    August 20, 2013 at 5:44 am

    Very interesting, very cool! Thanks again

    Reply

Leave a Reply to Neil vN Cancel reply

Your email address will not be published. Required fields are marked *

categories

Articles & Tutorials

  • • About myself & this site
    • Books by Neil vN
    • Best photography books
    • Black foamie thing
    • Photographers’ success stories
  • • Flash Photography Techniques
    • Natural looking flash
    • Flash + Ambient light
    • Dragging the shutter
    • Bouncing your flash
    • On-camera flash outdoors
    • Exposure metering
    • Flash exposure compensation
    • Bounce flash examples
    • Which is the best flashgun?
    • Flash brackets
    • Off-camera flash photography
    • Flash photography basics
    • Using video lights
    • Flash photography tips
  • • Photography workshops NJ / NYC
    • Models @ photography workshops
tutorials:
flash photography
Photography
Workshops

All rights reserved. Copyright © Neil van Niekerk 2025 · Customization by The Traveling Designer

Copyright © 2025 · NvN on Genesis Framework · WordPress · Log in