Environmental portraits – Speedway racer, Courtney Lefcourt
When Courtney’s mom first contacted me, she told me that Courtney is a race-car driver and that the camera loves her. Intrigued, I met up with her family at the Bethel Motor Speedway for on-location portraits of Courtney. To find out more about Courtney, check out her Facebook page, Courtney Taylor Racing.
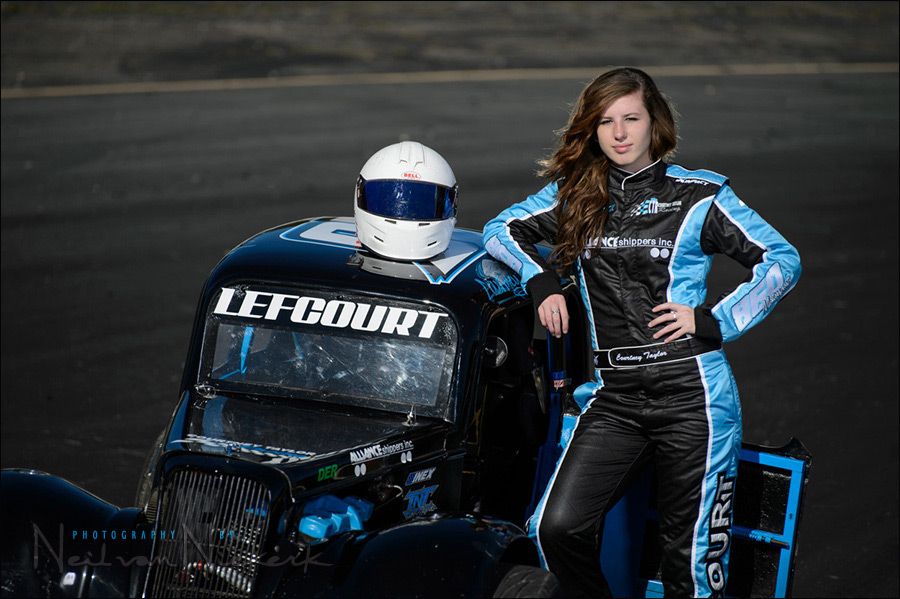
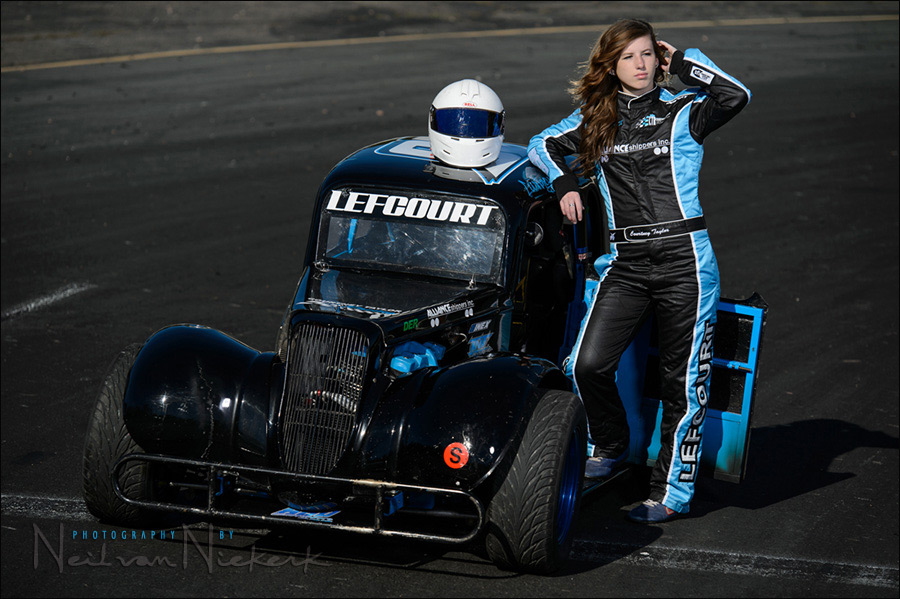
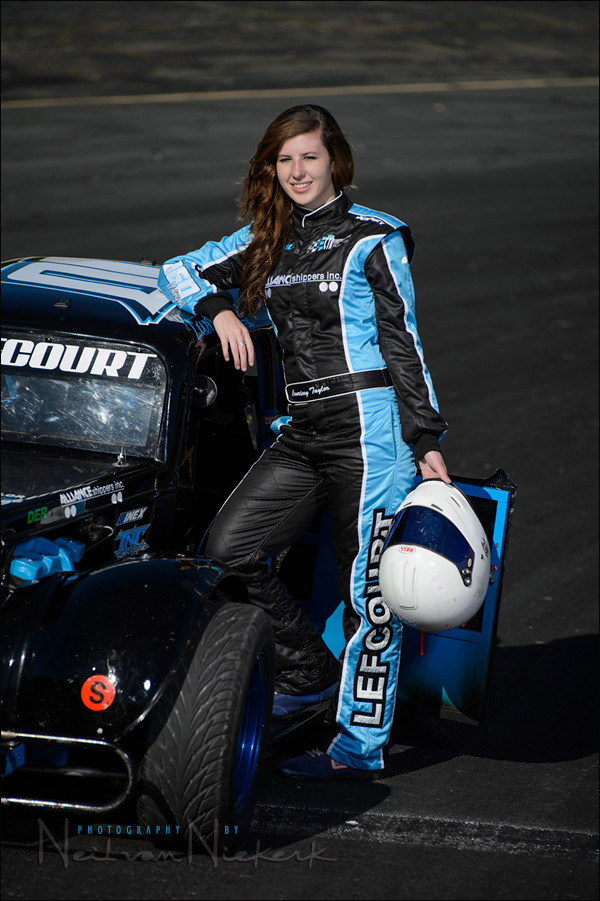
So the challenge here was two-part. The sun was very bright since it was 3:30pm in the afternoon. The other challenge is that while speedway racing might be an exhilarating sport to watch, the speedway race-track isn’t exactly a visual feast. The race-track is a barren oval strip of tarmac at an angle. I had to accentuate her more, and the race-track less – but still keep it relevant as an environmental portrait.
Courtney’s fire-retardant suit was fortunately a vivid blue and black. This neatly matched the blue sky and black top. This especially helped with the wider images.
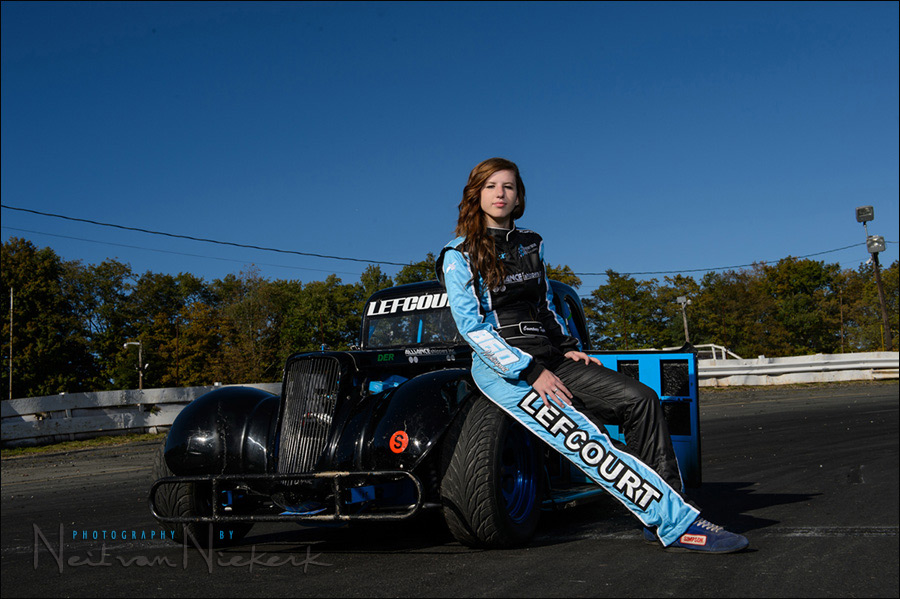
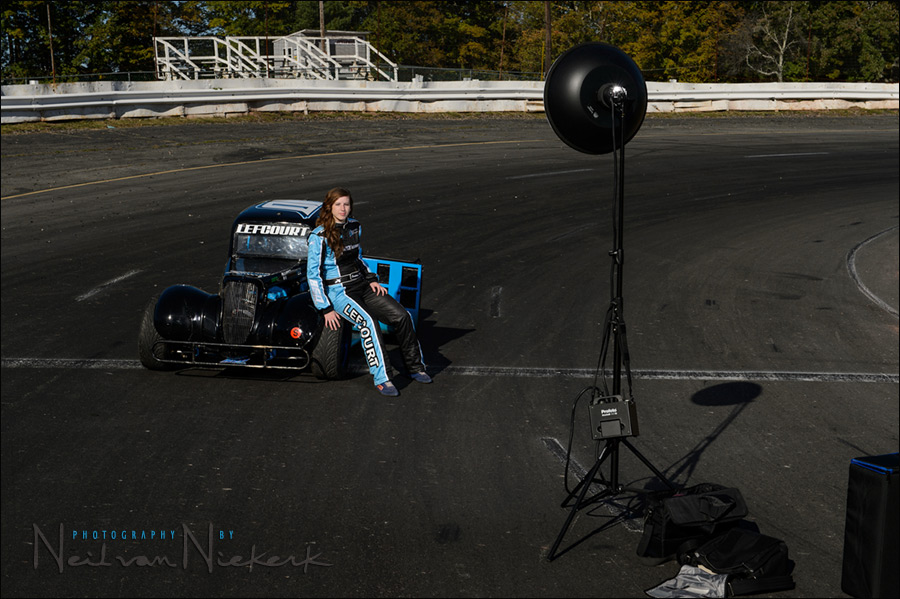
For the wider shots that established where we are, I used a wide-angle and went for a lower viewpoint. The pull-back shot for the wider images in the series, shows the lighting setup – a Profoto Acute B2 600 Ws powerpack (affiliate), and a Profoto beauty dish (affiliate) with a 22″ sock (affiliate). These wider shots were done without a ND filter, since I didn’t so specifically need a shallower DoF.
For the tighter portraits, I could eliminate the distracting background that would be the crash barrier and trees, by shooting from an elevated viewpoint and shooting down on the race-track. That would really simplify my background to just the black tarmac. For this, I stood on a small step-ladder. I was very careful not to include any of the edges of the race-track. Visual simplicity by eliminating clutter!
So the higher viewpoint helped accentuate her. But with the bright sun, we’d be working at small apertures, and I would prefer a wider aperture. Adding a 3-stop Neutral Density filter (affiliate), brought my aperture to f/4.5 and this was an aperture that made sense. Just enough depth-of-field.
Then, to create even more separation, I set a speedlight behind her at full manual output. It gave that bit of rim-light which helped beautifully to create that bit of a 3-D effect with Courtney really popping out even more from that neutral out-of-focus background.
Both the Profoto light with the beautify dish, and the speedlight, were at full power. The speedlight just had to add that bit of rim-light from behind. The Profoto had to do the heavy lifting in more than just matching the bright sunlight, thereby opening up the shadows and giving flattering light on Courtney. (Keep in mind that the ultra-wide angle view in the lighting setup shot distorts the relative distances.)

Photo gear (or equivalents) used in this photo session
- Nikon D4
- Nikon 24-70mm f2.8G AF-S / Canon 24-70mm f/2.8L II
- Nikon 70-200mm f2.8 AF-S VR II / Canon EF 70-200mm f/2.8L IS II
- B+W 77mm 0.9 (3 stop) ND Filter
- Profoto Acute B2 600 Ws power pack
or alternately, the Profoto B1 500 Ws AirTTL flash - Profoto beauty dish w/ a 22″ sock for a beauty dish
- Manfrotto 1004BAC – taller, heavier light-stand


Keeping to a specific thought-process in adding off-camera light to strong sunlight, the photo session was made easier, and the chances for success significantly better.
Related articles
- Using a neutral density (ND) filter to control DoF with flash (model: Ulorin Vex)
- Photographing a vintage motorbike on location, with Profoto lighting
- Camera & flash settings: what do you want to achieve? (model: Ulorin Vex)
- photo session – Modern Gypsies – golden birds
- photo session – Modern Gypsies – Silver Birds
A little bit of homework
What was the thought-process, or algorithm if you will, to get to my camera settings?
A great post as always! Here’s my response to Neil’s homework. We’ll see if anything has stuck after reading Tangents religiously for the last year and a half.
1- Set shutter speed to max flash sync speed.
2- Reduce ISO to lowest setting.
3- Choose distance from light source to subject that gives desired light fall-off.
4- Use aperture and light source power to achieve desired balance of ambient/artificial light.
5- If adding a ND filter, adjust the aperture setting by the appropriate number of stops.
Justin
Did you start with Sunny 16 and work from there, setting your light so it was the main light source?
Really great photos. What a fabulous example of shooting in strong sun in the middle of nowhere and still producing ‘wow’ photos.
I’m with Jennifer. The 3 stop ND filter would have taken it down from f16. F4.5 would be close enough to 5.6 and with all that black in the background, the touch of extra exposure couldn’t hurt too much. Then adjust the power and distance of the flash to suit the subject.
I’m guessing you were trying to bring the ambient light down a little more in the image than was actually seen by the naked eye at the time of the photo. You set the shutter speed to max sync speed (1/250th) and the ISO to 100. Using the “Sunny 16” rule, F10 would give you a “proper” exposure. But you state that the 3-stop ND filter you used allowed you to open your aperture to 4.5, which means your aperture without the filter was f13, not F10, which would account for the slightly-underexposed, deep blue sky.
Neil, How did you get the Profoto light and the speed light to go off at the same time? Did you use some kind of slave trigger or does one of the remotes have a passthrough which would allow you to connect both of them to the camera at the same time?
Both lights were triggered by PocketWizards.
You didn’t list the triggers on the gear list. Folks like to know about the complete package so they can determine budget to recreate the same image on their own.
Just to the right of every article posted on this site, you’ll find a link to Gear. A lot of the stuff used on any shoot, is implied, but is usually listed there somewhere. I’m not going to list every cable, and every little item that I used for every shoot. Some of it is either common sense, or generally available stuff, or there’s so much variety available, that a specific listing per article doesn’t make sense.
Nice shots Neil!
As you mentioned why you introduced the 3 stop filter to get to f4.5 and you haven’t mentioned your original settings I would say that you were shooting at F13 (3stops) with an ISO100 and 250sec (max synch speed).
You couldn’t use a faster shutter speed as you were already at 250sec so used the 3 stop filter to Open the Aperture instead…
Neil, why did you decide to use the beauty dish? What did it do for you as opposed to a soft box or another modifier or no modifier? Did it spread the light better? Did you want the center disc to block the direct light (reading from B&H description there)? Thanks!
The beauty dish is very easy to transport, even if bulky. It’s easy to set up, and also less likely to get snagged by wind like a big softbox.
If the shot was in the afternoon time instead of midday the color temp may not be the same, so sunny f16 rule may not exactly apply and have to be adjusted a little, but since it was out in the open with nothing blocking the light, maybe not.
I know Neil likes to set his shutter to max synch speed of the camera first. That’s a given. Expose for the background and make it a little under exposed do that you can add in fill light from the flash to make the subject pop out more from the background.
I always love looking at your images! So, you got that lovely blue sky without any post-processing or a polarizing filter?
The blue sky is as it was for my exposure settings.
Hey, that’s definitely my kind of girl! Fantastic images Neil.