
Exposure metering – expose for your subject !
In preparation for a review of the Fuji X-100 camera, I met up with Anelisa to see how this little camera performed during an actual photo shoot. The image above was one of the photographs we ended up with. Now, there is something specific about it that I wanted to explain in a separate article, instead of it being glossed over deeper inside a camera review.
The composition is simple – I do like my compositions fairly central, it seems. Similarly, the lighting is simplicity itself – all available light. There were two main sources of light – the light inside the shopping mall entrance; and some very strong back-lighting flooding the place.
While the technique here hinged on specific exposure for the available light, there are a few crucial ideas here that I’d like to underline:

1. Expose for your subject, not the scene. I had to decide on my camera settings, and couldn’t just leave this to the camera. Therefore it was imperative that I shoot in manual exposure mode.
Since I was only using available light, I didn’t have the option of exposing for my background and then using flash to lift my subject to the correct exposure.
2. With ambient light only, you have to consider the ambient light carefully, and decide how you want to position your subject in relation to the available light. There is a related article on this topic: direction of the light – using found light.
3. You have to recognize the tonal values of the entire scene – this will allow you to pre-vizualise the image.
Here is a reference image, where I brought the exposure down so that the background showed more.
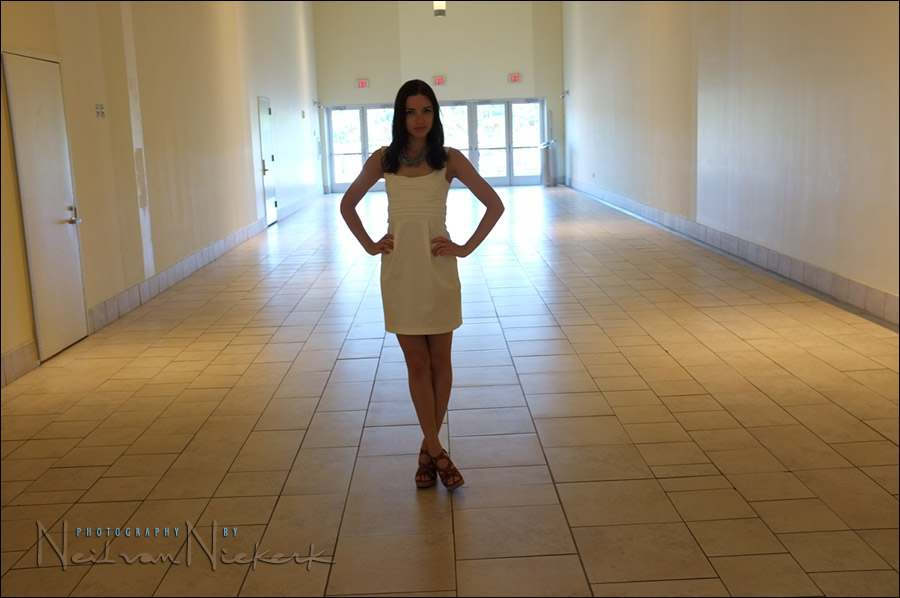
It will also give you an idea of the truly bland setting we were working in. But there was distinct potential here!
In this instance, I knew that if I had Anelisa turned with her back to the bright background – then the light on her face and body would be quite even. I saw that the light coming in from the back was so bright in comparison, that I immediately knew it would blow out, creating that halo effect around her. A first test shot showed that I was on my way to what I wanted.
Two or three images later, I had what I wanted in terms of exposure – now it was just a matter of directing Anelisa in how I wanted her to pose. The video tutorial on using video lights, will give you some insight in how I would normally direct a model in a studio setting. In this case though, we were trying to shoot surreptitiously in a shopping mall, so we shot just a few images before we moved on.
Back to the image that I wanted – here is the un-edited image, straight out of the RAW converter. I only adjusted the WB a bit, and also straightened the image a touch. I wanted the image that warm.
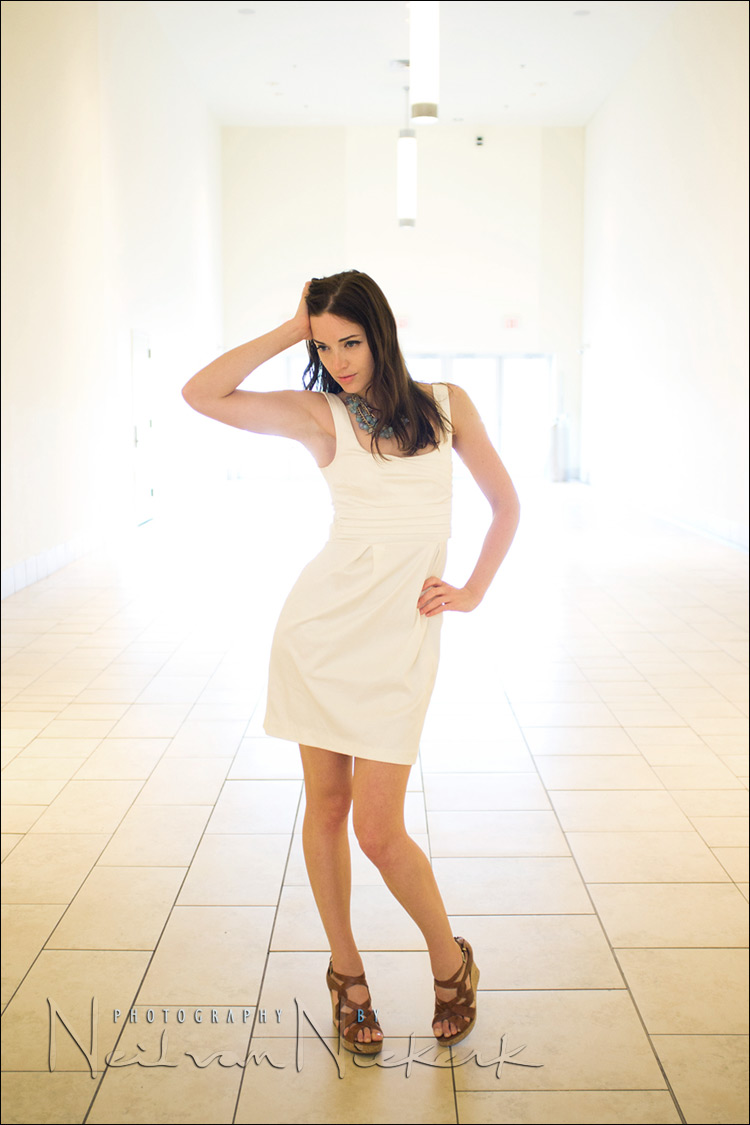
To sweeten the final image a bit more, I did a quick edit and removed the part of the door frames that were still visible. Just for comparison, here is the final image again. It should be clear just how little part Photoshop played in the final image. I just erased a few spots in the background. The halo effect existed because of the available light, and how I posed Anelisa in relation to the available light.
Finally, this photograph hinges entirely on recognizing the potential in a place,
and pre-visualizing what the light would do, depending on your exposure metering and camera settings.
Related articles on available light photography
- Direction of the light – using available light (model: Shawna)
- What should I meter off with the in-camera light meter? (model: Anelisa)
- Photographic composition – look at your background!
- Available light vs fill-flash
- Looking at the available light
- Direction of light & choice of background (model: Catherine)
Outstanding job Neil. Thanks for all the advice you have posted! Everything I have learned from lighting can be attributed to your blog. Much appreciated!
I’m a fan sir! Great job! =)
how do you expose for or fix the situation where your background is so much brighter than the subject that the light starts to bleed over your subject. I notice this is starting to happen on the models upper arms. Do you think about that while pre-visualizing? Is there a way to control that?
Embrace the flaws.
did you take your exposure from here white dress and increase it by 5 clicks ?..thanks
I could’ve, and it would especially well with a D-SLR where you can spot-meter accurately. In this case however, I guessed my exposure – partly based on experience and shooting elsewhere inside there – and adjusted it 1.3 stops on from there.
Brilliant! Best photo from a mall I’ve ever seen.
So you pre-visualised it, rather than just visualised it, interesting! Neat shot.
Neil, you turned a boring setting into a wonderful set-up :)
That’s what i call mastery of your surroundings :)
Beautiful picture!
I would never thought that I can get a stunning picture like that inside a mall.
Another great example of the balance of a creative eye being matched with perfect technical ability to make an idea a reality. Great stuff!
Hard to believe such a wonderful result is derived from a ‘nothing’ situation that most of us see (and walk straight past) any old day.
Again, those example shots are everything. Such a clear explanation in themselves.
While I can’t pre-visualize like that yet. I can post-visualize, and see you standing in that Mall, showing the model that pose, in person ;)
Great post Neil, really informative
The before-and-after shots of exposure really shows how you have to take creative control and decision making of how the photo looks – rather than let the camera decide !
Kind Regards
Stuart
Sometimes, when I use aperture priority, I select spot-meter to be sure the subject is better exposed.
Wow that’s amazing how you got a shot like that from such a bland background….
Thumbs up!!
Informative +5
I would never have imagined that blowing out a background could create such an interesting visual. Of course, it has to be the right kind of background lighting to blow out.
Divine light was my first thought. It looks as if she walked out of heaven.
Top work Neil, once again.
This technique is pretty close to what I’d use for the “bride in front of the window” shot, and as you said, a bit of pre-visualization goes a long way to making things a lot less stressful, if one can read the light and have a fair idea what can be achieved, where and when.
On a side note, I have one of your iBooks and can honestly say I felt like you were right beside me all the way through. You have a real gift with communicating which you don’t see often enough.
Thanks very much,
Peter
Amazing and beautiful! Curious…what was the initial and final exposure?
Thanks,
Anne
Neil,
The ability to pre-visualize is amazing. I am sure a lot of us might have continued walking past that location, thinking that there is nothing there.
Neil,
As others have said, this is beautiful and amazing. I’m just beginning
and would like to know what lens and exposure you used to
get this shot.
Thanks,
Anne
P.S. Just bought both of your books…fantastic!
@Anne:
Neil stated he’s been using a Fuji Finepix X-100 for these shots. It’s a fixed focal length (35mm equivalent) high “specced” compact camera. It seems that now that this little camera is in Neil’s hands we’re gonna see some amazing stuff produced with it.. ;-)
I noticed that the crispness of the model’s face seems to deteriorate in the edited image compared to the unedited, was that intentional?
Thanks for all the education.
I don’t see it. I didn’t do any editing on her face between those two images. But I did use the healing tool on two minor skin blemishes before those two images were done. So that should be the same.
Cracking image Neil. I love your “Embrace it” response too. As I’ve become ever more immersed in my photography, I’ve come to realise that an image doesn’t have to be technically perfect with every single tone falling somewhere between 0 and 254! It’s hard to let go of this ideal of technical perfection, particularly with an engineering background such as I have, but let go if it I must and I am – and I can honestly say it is paying dividends!
Attending your workshop (and those by other photographers whose work I respect and admire) has helped me on my journey and I would recommend education to anyone wondering how they might improve their work.
I love shooting in boring locations like this (this image, http://photos.modelmayhem.com/photos/100901/04/4c7e3cf55c900.jpg, was taken using a similar approach to what you describe here, but in an alleyway). I now approach my photography from the point of view of “light first, location second” – a great location is useless if the light isn’t right and any location can work wonders providing due consideration is given to the lighting.
It’s true talent to see what can’t be seen ahead of time! You’ve got a great creative mind!
Hi Neil,
I love this image. How do you think of this stuff! I gotta check out my mall in durham to see if I can get similar results. You are so amazing!!! One day I’m ganna splurge and do one of your NYC workshops! I had a private turorial with you at the conf. in Chapel Hill, NC in 2011. You’re a fun chap, and so cool, I enjoyed meeting you so much!!!
Thanks for all you do & have a great holiday!
XO
Kathleen