wedding photography: flash and low ambient light – adapting during the shoot
I’m often asked what I would do when I encounter a situation where you need to use flash, but there is no easy way to bounce flash. My flippant answer is … you’re screwed!
Well, not really. My advice is that you have to improvise and in some way of finesse your use of light. In tough situations, you still want to try and shy away from using direct on-camera flash whenever possible. Direct on-camera flash as the main source of light is rarely aesthetically the best choice.
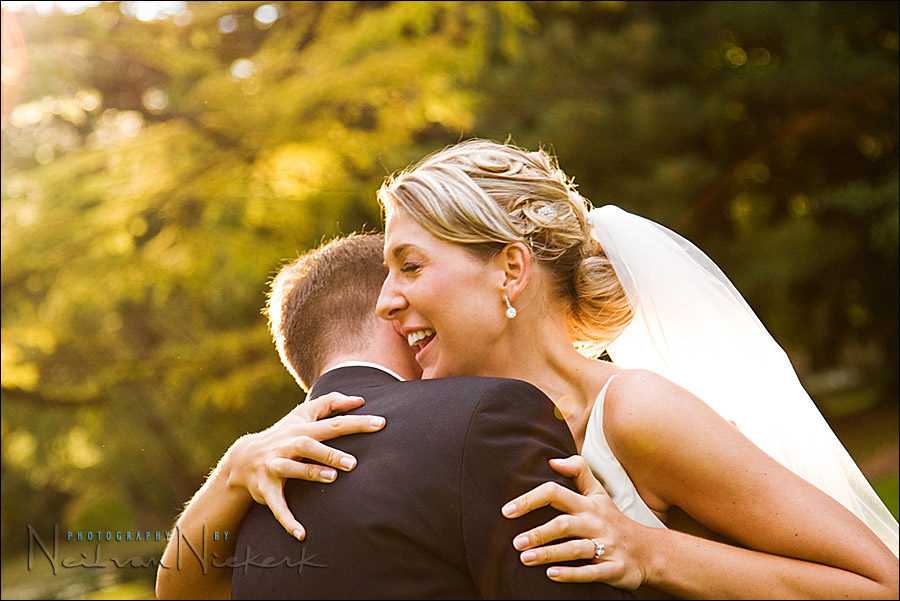
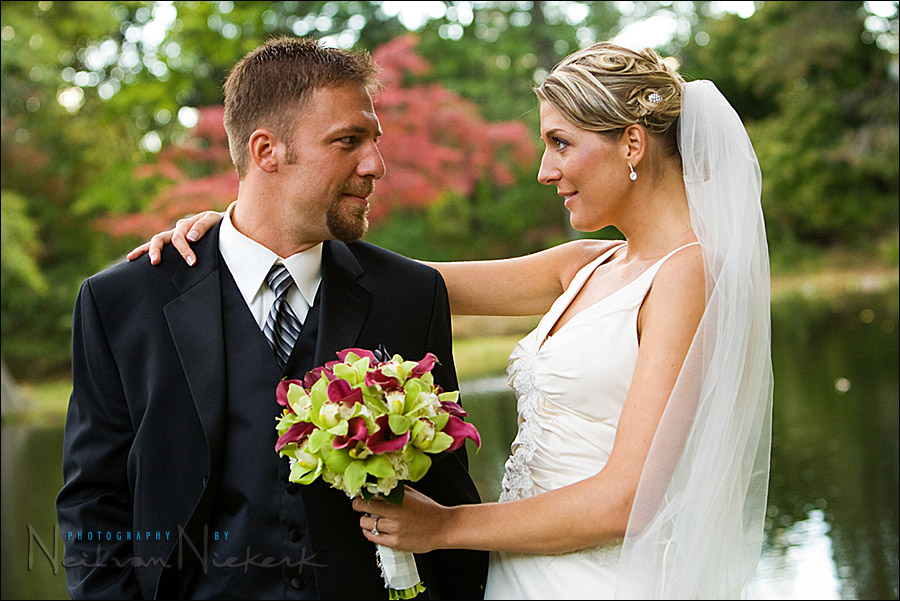
As an example of what I meant by improvising, here is a wedding I photographed a wedding at the Pleasantdale Chateau. Earlier in the day, working outside with the couple, we had great light. There was a changing mix of dramatic light and soft light, which made it easy getting beautiful photos of the couple.
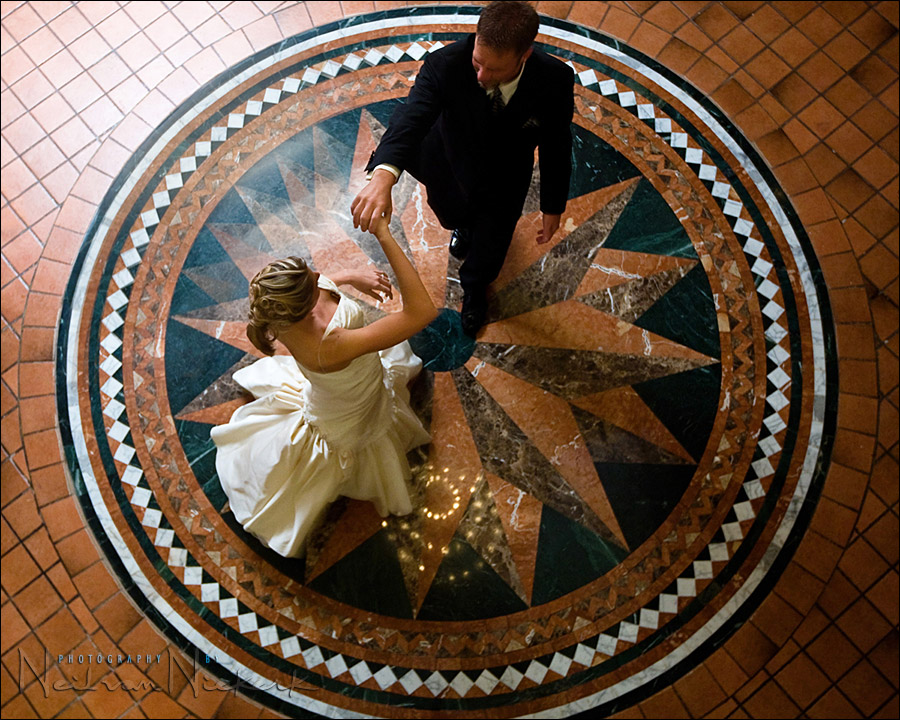
Later in the evening, just using bounce flash was enough to work with:
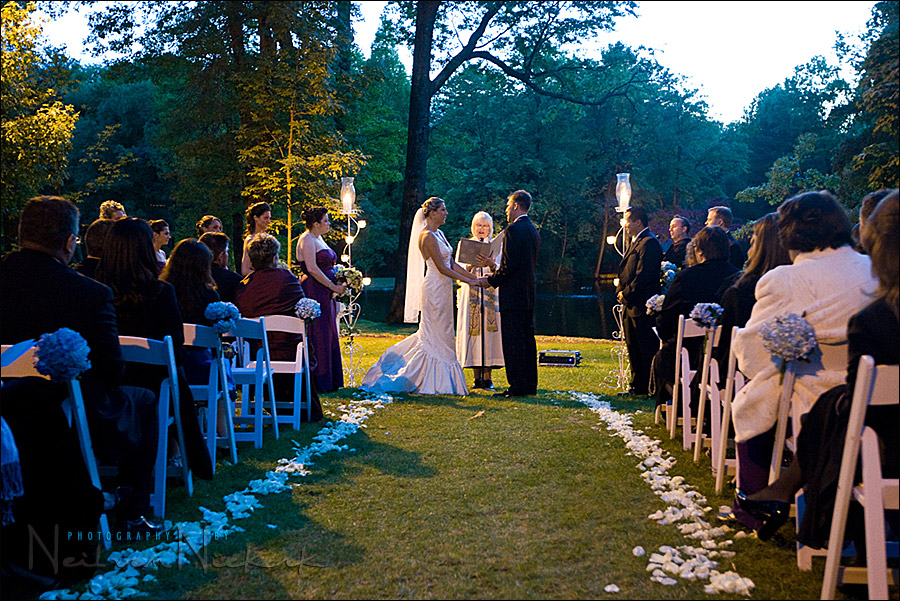
However, the outside ceremony was scheduled for early evening. I knew that even if the ceremony started on time, the light would gradually fade into darkness as the event progressed.
I now had to balance the practical consideration of getting sharp images, with the artistic consideration of retaining the mood of the setting and the mood of the ceremony. I couldn’t rely on there being enough available light to carry myself and my second photographer through the time of dusk setting in. Direct on-camera flash just doesn’t look that good, but there really was no way to bounce flash there … we were outside next to a lake.
This is where panic set in. I desperately want to give my clients images that look as great as those they saw in my sample albums or on my website. But there were the practical matters to consider. I wanted both these things – sharp images, but also images that retained the mood …
I decided to cover myself both ways. I would do both things – use flash, but also get images that were only available light. Something had to stick.
I gave my second photographer, Elisbeth Millay, all my f1.4 and f1.2 optics, and told her to only shoot only available light. To use high ISO settings. With these lenses, she’d be able to shoot handheld in very low light. At the time she was using the Canon 5D bodies, and I was happy with the results at 1250 ISO, from these cameras. Even 1600 ISO if we had to. I can always deal with high-ISO noise in post-production, but I can’t fix images which are soft due to camera shake.
For myself, I decided to cover myself the other way, by using additional flashguns. Before the ceremony, I very quickly set up two Quantum flashguns on 13′ high lightstands. I couldn’t use umbrellas, because even the slightest wind would topple the light stands. I weighted the lightstands down with camera bags hanging at the bottom of the stand.
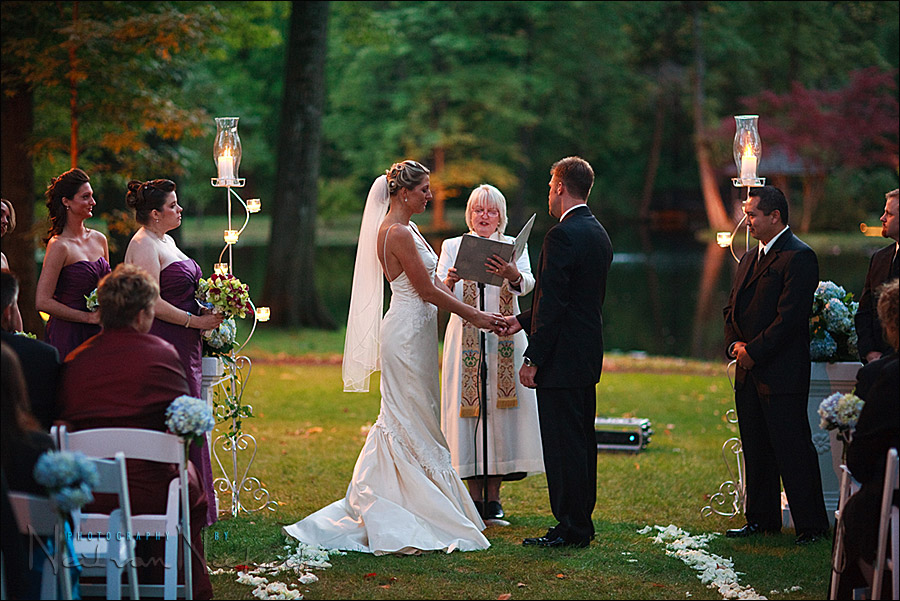
I set up the two lightstands at the two back corners of where the guests were seated. If I recall correctly, I had set the power to 1/4 of full power. I used the diffuser disc that comes standard with the Q-flash. Other than that, these two flashguns were directly pointed towards the area where the couple would stand during the ceremony.
My reasoning was that the flashguns would illuminate their areas individually to the back, and to the center, add their exposure … ending up giving as even light as was possible right then with a quickly improvised setup.
off camera flash as additional light at a wedding
I used on-camera flash in my set-up, with the idea that the two additional flashguns would second-light my photographs. I was hoping that the additional lighting would reduce the ‘flat’ effect of on-camera flash, by giving some dimension and depth to the resulting images. My speedlight on my camera was in TTL mode. The additional flashes were in manual mode.
It’s not that difficult judging the relative settings to ensure the additional lights and the on-camera flash augment each other. For the manual flashes, aperture and ISO controls exposure. For the TTL flash … they don’t. That’s the key. (Oh, for some images, I did switch my flash off.)
In this image here of the bride approaching down the aisle with her parents, you can see how the one Q-flash was positioned. That’s the flashgun (obviously) flaring in the corner of the image.

camera settings: 1/60 @ f5 @ 1600 ISO
equipment: Canon 1D mkIII; Canon 24-105mm f4; Canon 580EXII
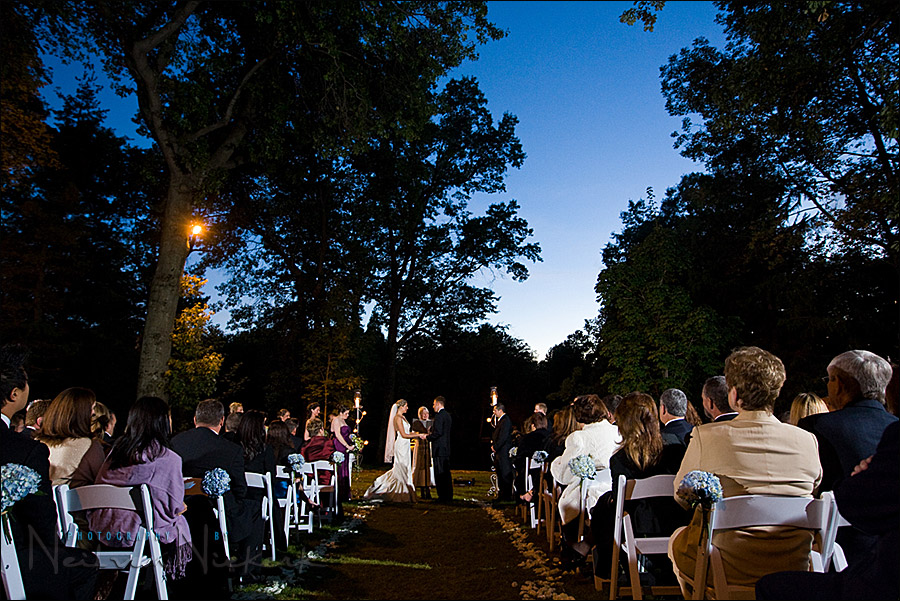
Here is the image taken moments before, as the bride was approaching – but this time, available light only.

camera settings: 1/125 @ f1.8 @ 1000 ISO
equipment: Canon 5D; Canon 85mm f1.2 II
photography: Elisabeth Millay
You can immediately see the problems we’d be facing with ever-fading light levels, if these are the settings we’re dealing with at the start of the ceremony already.
But with the two-fold approach, I’d be assured of getting solid results – one way or another. Or perhaps if I’m lucky, working like this would give me the most images to choose from to give to my clients. And that is actually how it panned out in the end.
A few more images taken from approximate the same angle, or at the same time – one with my set-up with additional flashguns; and the other the available-light-only approach.

camera settings: 1/25 @ f4 @ 1600 ISO
equipment: Canon 1D mkIII; Canon 24-105mm f4
camera settings: 1/125 @ f1.6 @ 1250 ISO
equipment: Canon 5D; Canon 85mm f1.2 II
photography: Elisabeth Millay

camera settings: 1/40 @ f3.5 @ 1250 ISO
equipment: Canon 1D mkIII; Canon 70-200mm f2.8 IS

camera settings: 1/100 @ f1.4 @ 1600 ISO
equipment: Canon 5D; Canon 85mm f1.2 II
photography: Elisabeth Millay
camera settings: 1/13 @ f2.8 @ 2500 ISO
equipment: Canon 1D mkIII; Canon 16-35mm f2.8 II
camera settings: 1/30 @ f3.5 @ 1600 ISO
equipment: Canon 1D mkIII; Canon 16-35mm f2.8 II
Oh, for those three pairs of images above, for those who would insist in a passive-aggressive way that they need to be told which are with flash, and which are available light only – and who insist they can’t figure it out from the settings and the look of the images – I am going to post your names on failblog.org !
Here are two photos taken during one of the key moments. In this case the available light shot was taken at the very extreme ends of hand-holdable settings .. and as a result, there is noticeable camera-shake. However, it shows the bride’s elated gesture so well. Since that image clearly encapsulates the mood of the evening, I included it in the final selection of images without hesitation.

camera settings: 1/50 @ f3.5 @ 1600 ISO
equipment: Canon 1D mkIII; Canon 70-200mm f2.8 IS

camera settings: 1/60 @ f1.2 @ 1600 ISO
equipment: Canon 5D; Canon 85mm f1.2 II
photography: Elisabeth Millay
So there is some of my approach to wedding photography, and perhaps some insight into the thought-process. It’s a constant adapting and changing, depending on the scenario I have to deal with. It’s not just one way of working.
What would I have done if I had been alone on this evening? I would’ve worked just so much harder – but with the same multifold approach to make sure I get the kind of results that is expected of a professional photographer.
other articles on wedding photography
Very informative and definitely lots of lighting tips to remember.
Dankie.
Neil: I’m absolutely grateful for your generosity and sharing this with us.
Nico van Allen
Hey Neil,
Interesting shots. Wedding photography is all about compromises as a photographer.
I think I prefer the natural light shots myself as the shadows are too harsh on the lower part of the dress with the flash pics.
The shots above could have been further enhanced by higher ISO and the use of a monopod.
This scenario is a classic example of when not to use AV mode on the camera too.
Also critical is having a fast prime lens in your bag – what if the ceremony did not permit flash photography!(common over here in UK). There have been times when I’ve gone to ISO6400 – F1.2 – 1/30 and cleaned up iso noise in post.
Finally, I would add that shooting RAW is also crucial – you’ll need the safety net of being able to deal with less than perfect exposures.
Neil
You don’t say how you were controlling the Qflash but I would assume pocket wizards.If I get this correctlly the manual flashes raised your ambint light and the on camera in ttl to ballance. Did you chimp with out the on camera first to find a base level and then turn on the on camera and ttl?? also on your camera were you using center weight metering for the ttl.
I hope this makes sence.
I enjoy your site, and have learnd much.thank you
John
Hi Neil,
Very informative and certainly one heck of a scary situation to be in!
In this instance I much prefer the images without flash but fully understand your reasoning and methods in terms of approach.
This may sound a little silly, but given an overcast low light situation, could you not just bounce straight up?
Excellent site btw!
Ya Neil! Knowing you, you could bounce light off of the moon and still make it look good! :)
I’m curious if you were nervous using flash during the ceremony because of the distractions from the flash pulses. I shoot about 150 or so images during a typical ceremony and would not want to distract from the ceremony. How do you overcome this?
Hi Neil, it had to be really scary situation there…
A few months ago, I started to use a tent peg to stabilize a light stand in a wind. It works perfectly – all you have to do is hook the tent peg onto a leg brace or a center column and tread the peg in the ground. Of cours it works only when used on a not-solid surface.
Very…very informative..thx.
Niel, help me, what you think about shooting a wedding with 35,50,85,135 and 200 fixed prime lenses and away from 16-35,24-70 and 70-200 zoom 2.8 lenses. Is it make you think harder than the said zooms on locations?
Hi there … I have a full range of primes and zooms, but prefer the zooms.
I never understood the rationale that primes “make you think harder”. How does that even come into the equation?
Why would you even WANT to make things more difficult during a shoot where you have a lot of pressure already? That truism about prime lenses just doesn’t make sense on any level.
With primes you can’t compose as efficiently on the spot as you can with zooms. So you have to address that in post-processing .. and that’s a pain when you have a large volume workflow.
Where I do rely on primes is for the very wide aperture for control of depth-of-field .. and for shooting handheld in low light. That kind of reasoning makes sense.
Neil, really love the two direct comparison shots looking down the “aisle” towards the ceremony.
I hope you don’t mind but, of the two, I prefer Elisabeth’s shot, simply because I like the way that it’s kept the brighter background and sense of place.
I have a question, however. Why did Elisabeth shoot at f1.6, when she could have shot at f1.2 and had either a faster shooting speed or a lower ISO (hope I’m right about this)? I’m only thinking that with this lens there must be a temptation in this situation just to shoot at the maximum f stop.
(I’m lucky enough to own both of the lenses used so this is of great interest, many thanks for such inspirational work.)
Wow, great article! How do you keep your images so sharp at such slow shutter speeds? I noticed you had shots at 1/13, 1/25, 1/30. They all look so sharp for such slow shutter speeds!
“My speedlight on my camera was in TTL mode. The additional flashes were in manual mode.”
How did you get them work together? I thought you can not mixed manual and TTL together with the preflash and stuff? Thanks.
Hi Neil. I just thought I would let you in on a conversation we’re having about flash and panicking at a wedding reception. Your post is a perfect example and very, very timely.
—>
Great stuff Neil – that’s what you call calm professionalism!
Hi Neil,
I’d like to ask you about a situation I was in recently which is probably the exact opposite of your situation, … a high contrast sunny day.
I was trying to photograph an outdoor art installation/statue on a sunny16 day. For contextual and compositional reasons I wanted to have the main subject in the foreground while also including the city skyline above and behind the subject.
Now the problem arises from the following facts:
1. The background buildings were bathed in Sunny16 light and were mostly white or light to mid tones. A test shot of the buildings alone gave no blown-highlights at 1/1600th, f16, iso1600. (1/800th, f8, iso200) would have also been just fine.
2. The main subject was well shaded by trees and was itself already a very dark tone (not quite coal colored, but at least charcoal).
A test shot (no flash) of the dark subject suggested I was getting about the right amount of detail at 1/320th, F11, iso1600. More than 3 stops less than the background buildings.
I wanted to get good detail in the main subject rather than a dark under-exposed amorphous blob, and I didn’t want to blow out the background. My immediate thought was “no problem, I’ll expose for the bright background and bring up the dark subject with flash”.
However, using on-camera flash in TTL mode, I couldn’t get enough power out of the flash (even at the maximum +1.0 compensation) to get a good amount of detail in the subject.
The audible feedback from the flash was suggesting under-exposure and when checking the flash it was indicating a maximum usable range of only 1.8m at the settings I was using, and I needed to be at least twice this distance to frame the subject.
By opening up the aperture to F11, and slowing the shutter speed to the max sync speed of 1/320th, I was able to extend the range of the flash to expose the subject quite well, but this resulted in blown out buildings and sky in the background, but any attempt to expose the background well, seemed to exceed the capabilities of the flash in this contrasty situation.
Luckily this was not a high-pressure situation like yours, but might well be a situation you’ve encountered at weddings. eg. Groom in the foreground in dark shade wearing a dark suit, and the bride in the background in a white dress in full sunlight. :-) … and you want them both well exposed!!
Equipment: D300, SB800 (Guide# 53m @ iso200)
Is this really a situation which has exceeded the capabilities of the flash? …or have I just done something stupid like used the wrong flash mode for the situation?
…I really thought that the SB800 should have sufficient power to compensate for the 3-4 stops difference in exposure at the range of 3-4 meters.
The only way I can currently see to solve this is to compromise on the shadow details by exposing for the background and then bring them up in post-processing perhaps with D-Lighting, but I really think the flash should have had enough power for this.
The only other alternative I can think of is to use off-camera flash (placing it within 1.8m of the subject), but it would then be tricky to keep the flash-gun out of frame.
Thanks in advance for any advice
Phil
SOunds like you are going to have to compromise… Well exposed foreground with blown out background. I guess you could use a more powerfull studio strobe or something off camera if the scene has that much disparity/contrast. You could blend different exposures from one RAW file but that takes time in post-processing.
Thanks Daniel,
I agree, a more powerful strobe would have provided the required range, but there’s just a couple of slight issues with that…
1. I don’t own any studio strobes…
2. This was a “Street Photography” scenario where I was just wandering around, so I wouldn’t have been carrying them, even if I did own them. LOL
… I still think the SB800 should have handled that range… maybe the batteries were flat….(that particular model doesn’t have any “charge level remaining” indication).
re: “…compromise… Well exposed foreground with blown out background.”
I’m relatively new to digital photography (about 1 year) but from what I understand, it’s almost always better to keep the highlights under control because it’s easier to recover details from shadows than from blown out highlights — blown highlights have exceeded the sensor sensitivity, and are effectively “chopped”, so any information in that part of the scene is lost and can’t be recovered.
(Same rules apply in digital music recording… avoid digital overs at all cost)
So I’d be inclined to take the opposite compromise: “expose to the right” of the histogram (ie. expose for the highlights in the background) and then try to boost the detail in the shadows in post.
Of course, if I didn’t care about the background, or the exposure of the main subject was of primary importance, then your suggestion would give a superior result for the main subject, as it would result in better gradation of the dark subject.
I guess it all depends on what’s most important in the shot to the photographer in a given situation (there’s many ways to skin a cat). In this case I wanted the background to contribute to the composition and I wanted it in focus (hence the smallish apertures)… so this required the background to be properly exposed as well, therefore I need to deal in some way with the high contrast of the scene.
Obviously, the more you do to get the exposure right “in-camera”, means more latitude in “post”, and a better result overall.
At the end of the day that’s what I’m trying to achieve…. It’s all good practice. :)
Any other thoughts welcomed…
Cheers
P
Hi Neil,
you have mentioned some post-production process to deal with high ISO noise. I think there are many readers like me to see a best process or a tip to reduce the High ISO noise.
“Even 1600 ISO if we had to. I can always deal with high-ISO noise in post-production, but I can’t fix soft images.” —
If there is a link or a an atricle in your archive would help me a lot..
Neil, sorry if all this is a bit off topic.
… although, you could say it’s still about “difficult light”, just the opposite type of “difficult light”. :-)
BTW Neil,
On first impression, I also felt that I preferred the look of the natural light shots in your sequences above, but then on reflection I think each shot has it’s own merits.
eg. the reduction of background detail in some of the flash assisted shots actually seems in some way to contribute to the mood or character.
So, most of these shots seem to work in some way, but for different reasons…
At the end of the day I think it’s just in the eye of the beholder.
I note that in your usual indoor work, you often use (bounce) flash to eliminate shadows present in the ambient conditions.
In the particular conditions on this occasion, most of the ambient light shots seem to have achieved less harsh shadows than the flash shots — obviously because you can’t bounce flash off of the moon or clouds. :LOL:
Ironically, this is the exact opposite of what usually occurs with your shooting. ;-)
Clearly, when there’s no opportunity to bounce flash, then nothing beats fast glass, so it was a wise decision to have your second shooter using the fast stuff!
One thing I noticed (on my uncalibrated monitor) is that in this one:
…there appears to be a slightly warm color cast outside of the flash range (most noticeable on the chairs).
I can only assume this occurred due to some form of warm ancillary lighting provided at the venue. I guess the only way to exclude this effect would have been to gel the flashes to the same temperature as the ambient lighting and set the WB on the camera to match?
Regards
Phil
Phil,
Sure, exposing to the right and not blowing highlights is optimal.. However, the situation you described would be misleading if you just went by the Histogram. What is more important to you and what is the main focus of the picture? If there was indeed as much difference between the background and shaded areas, then exposing for the backgound would render the main subject very dark. THis would be hard to correct in post-processing and would still require layering techniques. I would rather expose for the actual subjects in the foreground and let the background blow out. However, if you are going for a silhouette effect then exposing for the backgorund would do the trick. I was just assuming that your main subject was the people in the foreground. Correct exposure is indeed crucial, but you have to decide what you are exposing for in such a scene as you described.
Hi Neil,
Fantastic post. Really interesting to see how you managed this situation.
Cheers,
Adam
Hi Daniel,
All of what you say is correct and well understood. In fact the issue “exposing for the backgound would render the main subject very dark.” is exactly what I anticipated prior to taking any shots, and the flash was supposed to compensate for that effect.
I’m still learning the limits of my flash and I think scenarios like this are quite revealing. What had me stumped was that I expected the flash to have enough range to add the required amount of additional light to the dark subject.
ie. According to the formula: Flash range = Guide number / F-stop, then 53 / 16 = 3.31m.
However, I’ve now gone back to the Flash Manual and on pg 120 I found an interesting statement…
For Flash shooting distance in TTL modes it says the range is: “0.6m to 20m (varies depending on ISO, zoom head setting, and aperture in use)”
This seems to imply that the “effective” guide number in TTL modes is more than halved to about 20m. If we plug a guide number of 20 into the formula, then we end up with 20/16 = 1.25m. This does in fact seem to be very close to the sort of performance that I was getting.
The manual doesn’t explain the reasons for this limitation, but I can only conclude that the pre-flashes required in TTL mode actually expend more than 1/2 of the power available, hence limiting the range. So maybe the trick to maximizing the power/range of your Nikon flash is to use manual mode. (Maybe I’ve actually learned something by reading the manual!!) ;-)
Cheers
Phil
Phil,
In this situation it is very important to not exceed your flash xsync speed. If you do exceed your xsync speed, the flash will go into HSS (high speed sync) mode, where the flash actually starts before the shutter opens, continues after the shutter closes, and most of your flash is wasted on partially or fully closed shutter. You lose more than half your flash power, perhaps as much as 7/8.
You always achieve the highest flash/ambient ratio right at sync speed. If you don’t have enough flash power at xsync, you will have even less at any other shutter speed.
Neil has several articles on this site about using xsync speed.
If you cannot get a small enough ISO and aperture to stay within sync speed, then a ND filter can help get you there.
DavidBGraham
Hi David,
That is spot on!
I do remember reading those articles some time ago, and I did in fact bring the shutter speed down to 1/320 after the initial test shots. (I always have flash sync set to 1/320FP). This allowed the flash to gain the required reach, but I ended up with blown out highlights in the background anyway.
After reviewing the shots, I discovered the real reason for this:
I made an amateur mistake and didn’t notice at the time that I’d left the aperture at F8, when in fact it needed to be reduced to F13 or smaller (which would have fixed the highlights in the background while retaining a flash range of 3.0 – 3.8 m.)
In my defense:…at this point I was a little distracted by the homeless man standing behind me with his eyes on my gear bag, but that’s not really any excuse! :-)
You certainly do need to keep a very close eye on the range indicator on the flash when shooting in bright conditions where faster shutter speeds are required to limit exposure, and the effect you describe David is certainly confirmed by observation of the max-range on the back-panel of the flash unit…
Starting with flash sync 1/320FP, ISO200, head angle 24mm, 1/320th, and F14, the flash range is 3.4 m.
A reduction of aperture to F16 (1/3 stop) results in a small reduction in range to 3.0 m, but a corresponding change of shutter speed to 400 (again 1/3 stop) takes the range all the way down to 1.3m!!!
So in these conditions (when the shutter speed is already at max-sync), if flash range is critical, I would say the rule of thumb should be to always adjust aperture or ISO first, and only take the shutter speed above flash-sync when you’ve run out of other options.
This is probably already second nature to experienced pros, but I’m still a bit of a novice with flash (esp. in bright conditions) but with your help I’m learning.
Thanks for all the comments guys. :)
P
Hi Neil,
Another fantastic article and love following your blog.
Just would like to know the first photo(http://www.planetneil.com/tangents/images/lighting/wedding/Caisey-John_2509-900.jpg)on this article.Skin and background look abit warm, is it because of post processing/warm flash/daylight at that moment? would you mind explaining.
Looking forward to your response.
Cheers,
Sam
Sam .. thanks! The image at the top is quite warm because of the way the light flared in that back-lit portrait. It’s mostly because of what the optics did when sun hit the front element. In fact, I reduced it somewhat from the original RAW file.
I do sometimes purposely use flare in my images.
Neil,
Do you remember how far the Q-flashes were from the area where the couple stood? From the pictures, it looks to be quite a distance, yet you only had them on 1/4 power. (They must pack some punch in terms of range compared to a speedlight!)
Phil
Thanks Neil,
I see that the Q-flashes (50m @100iso) are about 30% more powerful than my speedlight (38m @100iso), so that’s gotta help a bit as well.
I just now noticed your reply to my question on color cast…
(“Phil .. re the color changes through the image….”)
Sorry to go on about this, but because I’m new to digital and a bit of a novice with flash, the practice of matching flash and camera body WB to the ambient is of course a little new to me (although I understand the reasons for it) , so I have a few more questions/comments…
I hope this doesn’t come across as passive aggressive! ;-) — It’s not meant to be!
I understand what you’re saying about the difficulty of the various light sources.
Clearly, not only was this situation difficult from an exposure point of view, but because of the various light sources it was also difficult for WB.
I guess once you’ve make your decision on how to deal with WB in a high-pressure situation like this, rightly or wrongly you’re going to have to deal with the consequences of your decision in POST. (and you can’t really add or remove gels on your Q-flashes if you change your mind about WB once the ceremony begins!)
My understanding of mixing flash with ambient light is as follows:
As a basic rule of thumb…
“If the available light is likely to feature in the exposure, and is significantly different in temperature from the flash, then you should try to gel the flash color to match the ambient, and set the same WB on the body”. (so that white will be white in the scene, whether it’s affected by flash, or not.)
In this situation, as you noted, you clearly cannot do anything about the natural light due to it being sunset.
However, if the ceremony is likely to extend into the night, then at some point the artificial lighting will begin to be more dominant than the daylight, so if I was in this situation I would probably be wondering whether it’s worth trying to match the color temp of the artificial lighting at the outset. (The idea being that this approach might at least reduce color casts in shots taken later on, once the sun has set.)
— The thought process here, is that the changing daylight would now be the only source of light contributing color casts, and so any color casts would be consistently cool and only occur at the beginning of the cremony (rather than a mixture of warm and cool throughout), which might ease things in POST.
Of course, all of this assumes that you actually know what the color temperature of the artificial lighting is, and that you can match it closely with gel strips. — If you can’t closely match the flash light to the ambient, then I guess there’s probably no point trying. (And the other thing to consider is the loss of up to 1 stop of exposure due to gelling the flashes.)
This sounds like a lot to think about when you’re in a high-pressure situation, but I guess you probably don’t consciously think of ALL these things at the time, but you probably just instinctively know from experience what works and what doesn’t. — I’m not quite there yet! ;-)
What do you think about the pros and cons of my approach as outlined above?
In practice, do you think it’s pointless to be so pedantic about WB matching at capture time?
— I tend to think that if you can isolate color casts to only the one source of light when you capture the image, then you increase the likelihood that any remaining issues can be tweaked as part of the RAW workflow (as they’ll either be all cool or all warm, but not both at once).
I appreciate any comments/insights you may have from your experience. (Please forgive any misconceptions due to my lack of experience.)
Phil
Thanks Neil,
That’s exactly why I’m doing the painful “armchair analysis” now, so that when I encounter a similar situation one day, hopefully I’ll be forearmed with some fairly simple rules of thumb about how to deal with it.
I agree that it’s definitely worthwhile doing the thinking about it now, as long as you can recall the analysis when you need it. ;-)
Next step is to actually test this in a practice situation, before encountering it in a real shoot.
Thanks for your patience and advice.
P
Re:
“You can then just as nimbly rip the gel off your flash and stick it on your lenshood”
You might need to work on a different strategy when your Q-flashes are mounted 13ft from the floor… ;-)
Hi Neil,
Great article (but you already know this by all the above comments. It isn’t often that good photographers share their knowledge and set-up info. If you don’t mind me asking, what did you use to synch your lights with the 1D?
-KedR