lighting the wedding formals
In the first of two postings on how I light the wedding formals, I showed how I use a single flashgun when photographing smaller formal groups indoors. The equipment is relatively simple then – a single flashgun (Q-flash) and a large 60″ umbrella to give me good lighting. The flashgun that I use for these, is a Q-flash. Specifically the older T2 model since I only use them in manual mode here. When I have a larger group I use two of these flashguns – each with an umbrella. But more about that in a follow-up article coming up soon.
What I wanted to illustrate here is one of the benefits of doing the formal portraits (indoors) with manual off-camera flash – consistency.
Since the flash gives off a specific amount of light every time – it is manual flash after all and not TTL flash – and since the flash is on a stand, and therefore at a constant distance to your subject .. this means that your flash exposure will be consistent. It will be consistent regardless of YOUR position. You can move around.
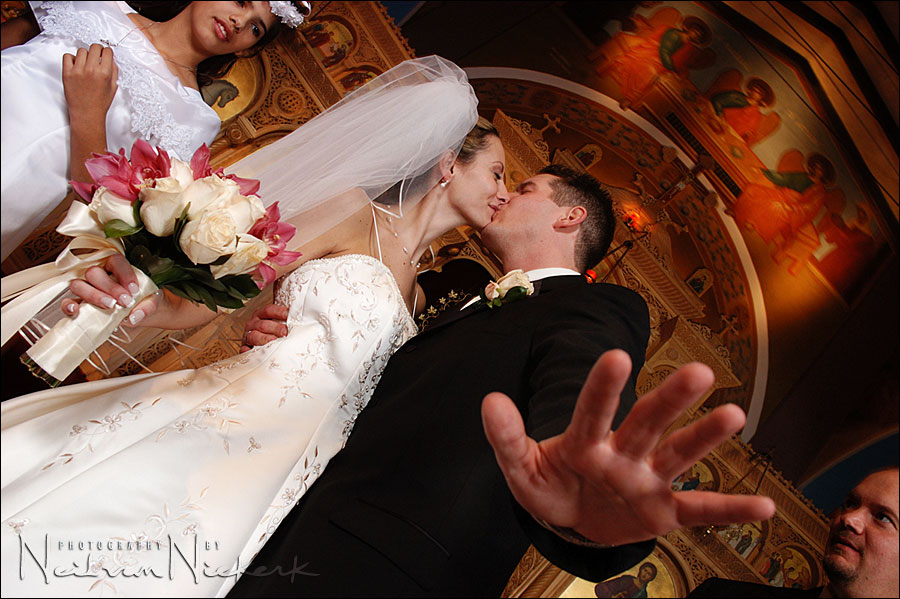
This off-beat photograph of the bride and groom kissing, was a grab shot. While I was on my knees in front of the bride, adjusting her dress, the groom leaned in for a kiss. I grabbed my camera and as I lifted it to my eye, the groom playfully tried to block my shot. And there it is.
Since my lights were set-up and exposure calculated for the manual off-camera flash, the exposure remained the same .. regardless of my being right up close to them. My distance to the subject had no influence here.
Let’s briefly go back to the basics then …
Manual flash exposure is controlled by 4 things ..
– aperture,
– ISO,
– the flash’s distance to your subject,
– power of your flash, which includes how you diffuse your flash.
Since those four things will (or should) remain constant when you’ve calculated correct exposure, your flash exposure will remain consistent. And if your manual flash is used off-camera, then your own position has no effect while you remain in the same direction as you metered your lights. There is a small caveat though. The moment you move off to the side, and continue to do so at a greater angle to the lights .. then your position does have a slight effect on the exposure. But as mentioned .. while you remain within the same general arc that you metered your lights for, your flash exposure will remain constant.
Back to the topic ..
During the formal photo session, I will often step closer to some of the kids to do a tight portrait of them within the group.
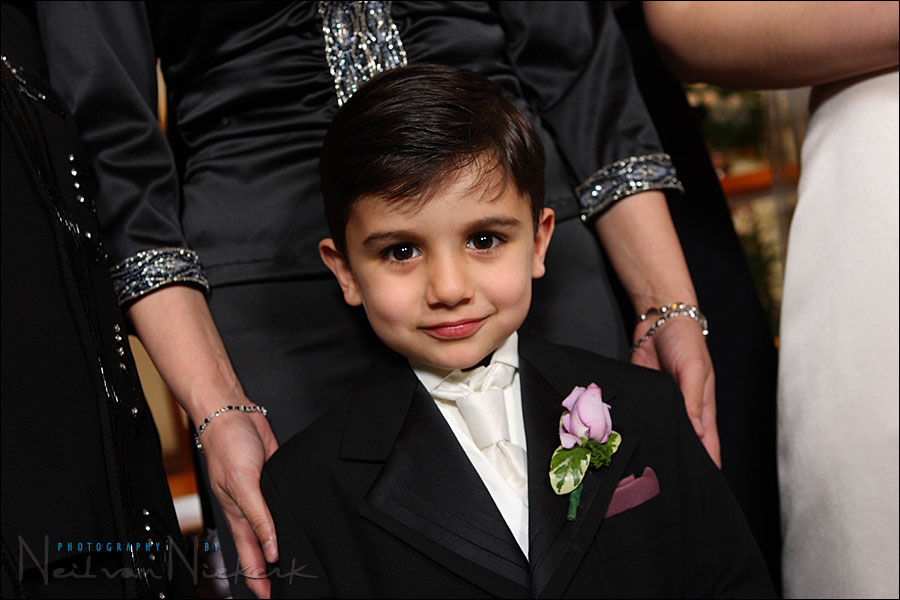
Sometimes this is to slightly humorous effect if the group is still waiting for stragglers to join them.

And again, I know my exposure will be correct because I have already metered for it, and my own position has no effect on the exposure while I use off-camera manual flash.
related articles
- a simple lighting setup for photographing the wedding formals
- wedding photography: positioning your flash for the formals
- wedding photography – lighting large groups with a large light
Great tip about taking portrait whilst waiting for everyone to arrive.
I am interested in how you think off camera manual flash and off camera TTL flash are at all different with respect to the shooter’s position? Surely the TTL flash is lighting the same area irrespective of where you are in relation to that area, just like the manual flash.
I would have thought the difference between manaul and TTL is that while you move around, your camera is metering slightly differently every time. This info is passed on to to the TTL flash meaning variations in flash exposure – sometimes quite large variations. Bit of a pain when shooting formals where you may want your group shots to be more consistent (less post processing to get them all looking the same exposure!).
How do you deal with hard shadows from person to person. Posing must be a total art form.
I find it hard to keep people IN LINE (F8) with each other. Can you expand on this for me?
thanks
M
“I am interested in how you think off camera manual flash and off camera TTL flash are at all different with respect to the shooter’s position? Surely the TTL flash is lighting the same area irrespective of where you are in relation to that area, just like the manual flash.”
It is fairly apparent, as somebody who switches between on-camera TTL and off-camera manual flash regularly that there are vast differences between TTL and manual settings, and whether the flash is on-camera or off-camera.
There are two major factors in play:
1: As AubreyG noted: With TTL, each shot will be metered slightly differently, and especially with the volume of shots you are processing from a wedding, the less variations that you must correct for, the better.
2: As you move around with an on-camera flash, whether in manual or TTL mode, the flash head, and thus the source of light) becomes bigger or smaller relative to the subject. The farther away from the subject you are, the source is relatively smaller. This means that the light coming from it will be harder. This results in more defined, and more unattractive shadows. The closer you are to the subject, the source is relatively bigger, resulting in a softer light, which usually leads to more attractive, softer shadows. Processing cannot easily and transparently correct for these differences.
Also, light modifiers for on-camera versus off-camera are much smaller, resulting in the harder shadows in the same way described above.
“How do you deal with hard shadows from person to person. Posing must be a total art form.
I find it hard to keep people IN LINE (F8) with each other. Can you expand on this for me?
thanks
M”
I use a single flsh, on-axis, slightly above and behind the camera. This means that the light falls downward, not off to the side, like it would if the flash was placed to the left or right.
If I were to use two flashes, I would probably put them equidistant from the center, set them at the same output, use the same modifiers, and aim them at the person about 1/4 of the way from the end of the opposite side of the group.
This cross-lighting makes it so that for each person in the group, the light they are closest to will be the key / main light, and the other light will serve as a fill light, helping to reduce the shadows. Then in post, I can use Photoshop’s Camaera RAW tool to adjust the fill light and black levels if there is a particular pose where the shadows bother me.
The whole idea here though is to leave all the settings the same so there is less work to do after the fact. For this to work though, the flash must be off-camera.
Check out Lighting 101 and 102 over at https://strobist.blogspot.com
@RJurden: IMHO, the farther away the flash, the softer the light and the larger the apparent light source… Especially when bounced.
Remember: you can light a big gym hall with half a flash, also over at Strobist: https://strobist.blogspot.com/2006/04/on-assignment-big-gym-little-lights.html
Excellent elaboration, btw – and once again thx to Neil for enlightening us.
R.
Neil,
So if I read you correctly: a small light source (read: flash) bounced into a large surface (wall / ceiling) makes the light source appear larger and thus softer.
It’s the bounce that grows and softens the lighting, right?
R.
PS: still awaiting my book on “applied mathemathics and physics in lighting”. :-)
Neil,
When you are using your umbrellas, are you using them as shoot through or bounced?
Thanks,
joy
FWIW:
I always go shoot-through. I don’t even own a silver umbrella. I have used a white umbrella in a bounce configuration maybe 5 times in two years (shooting 150 clients a year).
The bonus you get with shoot through, in my opinion (and this discussion really doesn’t apply to wedding formals, just to portraiture), is that you can place the umbrella in shoot-through mode very close to your subject, yet be able to keep it just out of the frame. This makes the relative size of the light source to the subject larger, making for many times softer light.
With the umbrella setup as a bounce, you are almost required to keep it about two feet from your subject because moving it any closer causes the stand to be in the frame.
This image ) was shot with one flaghgun, into the umbrella in shoot-through mode, and one 24×36 white reflector. The ambient lights were on but they didn’t add too much exposure to the subject. The umbrella was about three inches outside of the frame to camera-left. Notice hos there are next-to-no shadows anywhere on the subjects face because the light is so soft, and because of the use of a fill card.
Roel:
The thing about the Big Gym, Little Lights article over at Strobist is that the flash was at such an angle that the shadow fell out of the frame. If the shadow was in the frame, it would definitely be a big, dark, hard shadow. You can see the shadow on the dunker’s face and then on the dribbler’s left leg and arm.
Using a fill or background light cannot compensate for this either, because the shadow is coming from such a hard (small) source.
I hope this all helps.
Where’s the groom’s ring??
Thanks Neil! Your information and site are always so helpful to me! I appreciate it.
Joy
“Joy .. For the formals I use the umbrellas with a black backing. They are a little more efficient in a large space. Most importantly though, I can stand behind them with much less risk of lens flare than I’d get with shoot-through umbrellas.”
Neil vN
Comment by Neil — December 4, 2009 @ 3:05 pm
As far as his wedding ring..It kind of looks like it’s on the other finger that is wrapped around her waist…
In your comment “Since my lights were set-up and exposure calculated for the manual off-camera flash, the exposure remained the same .. regardless of my being right up close to them. My distance to the subject had no influence here”. That is correct if your subject does not move – but, weddings have lots of activity how do you compensate on the go? are you making on camera adjustments on the go by adjusting your aperature since it primarily controls the flash, not ambient light?
Thanks Neil. I am so inexperienced with flash. Your articles are a huge help!
I just used your ‘on-camera TTL’ method to light a series of family portraits in which the client to feature their brand new home. But instead of leaving the 580 EX2 on the hotshoe and rotating it, I used PW mini and flex, with the flash mounted on a lightstand -which I moved around to change ‘bounce’ walls depending on the portrait location. Using the recommended modification to deal with the inherent RF issues, I shot 93 flash images, indoor and out (gelled 1/2 CTO outside to warm up the cool light – as you recommend). They came out great – not a single missfire. The images look like I was using a mega softbox, instead of a single 580 without any modifier. I used the best of both worlds – your method and the new PW equipment which allowed wireless ettl. It was extremely liberating. I received your book yesterday, and plan on memorizing the sucker.
I could have used a ‘foamy thingy’ tho, bought the 99 cent sheet at Hobby Lobby this afternoon.
Thanks
@RJurden: Thx for the extra comments. Btw, I was on a shoot this weekend (studio shoot, me and the kids as subject – you have to switch roles from time to time…) where the photographer used a giant softbox right in front of our faces. Thanks to you guys, that makes perfect sense to me now!
Regs,
R.
“As far as his wedding ring..It kind of looks like it’s on the other finger that is wrapped around her waist…”
Comment by Joy Oxenrider — December 5, 2009 @ 10:38 am
Hey Joy well spotted, great observation!
If its helpful for others, people from some European countries wear wedding rings on their right hand instead of their left. I don’t know if this is the case for this couple but thought the information might help solve a mystery.
***********************************************************************************
“The right hand is the traditional hand for vows or oaths. It is raised when such an oath is given, so the wedding ring would here show the sincerety of the oath. A traditional reason to wear the wedding ring on the right hand stems from Roman custom and biblical references. The Latin word for left is “sinister”, which in addition to this sense also has the same senses as the English word. The Latin word for right is “dexter”, a word that evolved into “dexterity”. Hence, the left hand had a negative connotation and the right a good one. For the same reason, an oath is sworn while raising the right hand.”1
1 Wikipedia. (2009), Wedding ring https://en.wikipedia.org/wiki/Wedding_ring
Ah David yes:)
In looking at the picture a little closer..from the looks of the church design and mural that is above the bride and groom, I believe they may be Greek Orthodox…Greek Orthodox DO where their wedding rings on the right hand…I think we solved the mystery of the wedding ring…haha! But…That is just and observation..
Neil,
Do you have any advice on how you would tackle large group shots outdoor in bright summer sun, with respect to camera settings and distance, flash settings/position, etc…if you were limited to my equipment: D300, 18-200 f3.5-5.6, SB800.
I’m not a professional and have only done 1 wedding in the past.
Firstly, I would be inclined to place the group in some shade (if available) with their backs to the sun to avoid squinting, but this is not always possible.
My initial thought is that TTL-BL would be the obvious way to go in this situation, but I’m also thinking I should try to get the flash off-camera in wireless remote mode to get a more directional light from the flash. — Because, I think competing with bright sun, the amount of fill from the flash in bright light may be a significant proportion of full power.
Unfortunately, as far as I know, in remote wireless mode the flash doesn’t do TTL-BL mode, so I was wondering if you would simply use it on the hot-shoe in TTL-BL giving more straight-on flat light, or would you still go for the off-camera wireless approach? (which would mean losing the ability to use TTL-BL)
I would be interested how you’d tackle this scenario and your reasoning, and if any other equipment would be a good idea in the wireless remote scenario. eg. umbrellas — It seems to me that a single SB-800 whether on-camera, or off is much too small a light-source for groups.
Regards
Phil
Thanks Neil and Happy New Year,
If I read you correctly, what you’re saying is that straight TTL will work just as well or better than TTl-BL in this scenario, just a little less automatic as it’s necessary to ride the FEC levels in TTL mode (when I think about it, it’s probably better to have the awareness and control over the FEC anyway).
— Sounds like you’re not a big fan of TTL-BL..
I guess you could draw the analogy that TTL-BL as it pertains to flash exposure, is sort of like Program Mode on your camera (automatic, but no operator intervention) whereas TTL mode is sort of analogous to Aperture or Shutter Priority, if you get my drift.
Phil
PS. I have another scenario I’ve recently encountered which I want to ask you about. It’s not really related to this thread, so I’ll try to find a more appropriate place to ask that question to avoid taking this thread off-topic.