
eliminate & simplify – the first steps in photography composition
These two images were taken from more or less the same spot.
All that changed was my vantage point, and my choice of lens.
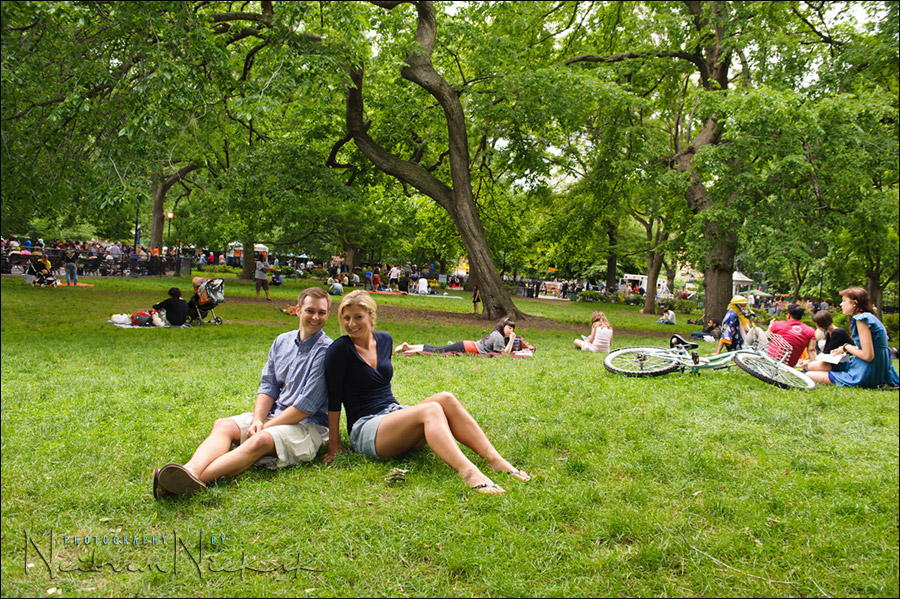
This vibrant park in Manhattan seemed like an interesting place to photograph, but when photographing a couple, I really want the accent to be on them. The best way to do this is to frame them so that the background is as simple as possible, but still complements the final photograph. I had the couple sit on top of this grassy mound, and I lay down on the grass, and framed them tightly against the trees in the background.
Even though I was working with a 70-200mm f2.8 lens, I was shooting around 90mm in focal length. But this was enough, coupled with my low viewpoint, to eliminate any distracting elements from the frame. It is essential to look at the edges of the frame when you compose. And that is the key here in the composition – simplicity.
Working with a telephoto zoom such as the 70-200mm f2.8 makes this much easier of course.
Now, people also naturally have the tendency to stand with their backs against a wall or against something when they pose for a photograph. As photographers, there is the temptation when posing a couple to always pose them directly against a background of some kind.
A neat and effective trick is to have your subjects stand well clear of the background. This can allow you to move your own position, and get a varied background. For example, with these two photographs from a sequence, we used some artwork by painters as a background. But we stood well away from it on the edge of the sidewalk. (I was cautiously in the middle of the road!) This allowed me to move to either side, and get images which look quite different, even though the couple didn’t move much between the two images chosen out of this sequence.
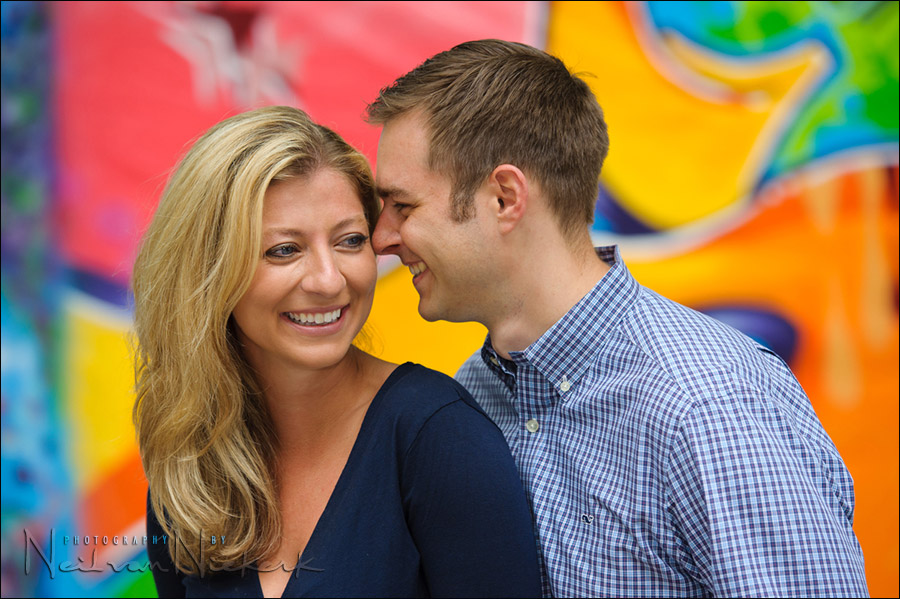

Working with a longer lens makes it relatively easy to play with the background and with the composition like this.
The wide aperture is also very useful in blurring the background. Even though the jump in aperture from f2.8 to f4 is incremental in the change to the depth-of-field, it is noticeable.
For me, the 70-200mm f2.8 lens is essential and very much part of what defines the style that I shoot in. I wouldn’t want to be without it.
Intriguing as always.
Similar to Bresson’s insistence that great photos are about the merest tweaks in terms of millimeters.
Carissimo NEil,
hai ragione il 70-200 e’ un obiettivo fantastico.
Ieri l’ho usato all’aperto di giorno con il sole e con flash sb 800.
Le mie impostazioni sono state:
Iso 100 macchina Nikon D 200 impostata in manuale con obiettivo 70-200 in prevalenza a 2,8
MATRIX
Flash SB 800 TTL BL
Le mie domande sono due:
1) E’ corretto aver impostato Sb 800 a -1EV?Oppure per avere semplice Fill-in posso ancora scendere di EV fino a -2,-3.
2) Ho notato che le tue foto hanno sempre i colori molto caldi e piacevoli.
Quale deve essere la temperatura di colore per foto di giorno con il sole?
Io eri ho usato 5600°K ma non so se e’ corretto…puoi aiutarmi.
Sono un tuo super fan ho letto tutti i tuoi articoli.
Edy Trigona Genova ITALY
Dear Neil,
You’re right and the 70-200 is a fantastic lens.
Yesterday I used it outdoors in the daytime with the sun and SB 800.
My settings were:
ISO 100 Nikon D 200 camera set in manual mode with 70-200 lens in prevalence to 2.8
MATRIX, SB 800, TTL BL
I have two questions:
1) Should I have set the SB 800 correctly at-1EV? Or for a simple fill-in I can still
down to EV -2, -3.
2) I have noticed that your photos are always nice and warm colors.
What should be the color temperature for photo day with the sun?
I’ve used were 5600 ° K but I do not know if it is correct. Could you help me here.
I’m your super fan I read all your articles.
Edy Trigona Genova ITALY
Hi there Edy
1.) I normally work around -3EV when I use flash as subtle fill-flash outside. But it can vary, depending on the situation. Here’s a more complete article on how to use on-camera fill-flash.
2.) You need to shoot in RAW. Then the precise and correct White Balance setting is less of an issue at the time of shooting.
Neil is a photographer’s photographer. He is willing to get down and dirty and put himself in harm’s way for the shot. :-)
Great post – it’s so true we tend to have people stand against a background. I’m trying to get a way from doing that myself. I think I need to pull out my 70-200 – I’ve gotten too comfortable with my light weight 50mm 1.4.
I LOVE the 70-200/2.8. It’s one of my favorite lenses too.
It’s really great to shoot people with this lens, when you don’t need to show the entire environment around the model. Less = more.
Thanx for sharing this, Neil.
Yes the 70-200 is a great lens and I’m glad I purchased it. Now Neil how often would you say you shoot at 200 when it comes to outdoor portraits?
Now I just need the $2500 to buy this lens!!!
I love my 70-200 lens too. It’s my “go to” lens and like the credit card commercial “don’t leave home without it”.
very nice pull back shot to show what you were working with. this gives me hope to try to revisit a park that I thought was too busy one day when I was doing a shoot.
in these pictures ..it was overcast day or sunny?…did you use flash as fill light or it was completely available light?..did you use matrix and expose to the face cause i see some back light and over-light..thanks
It was overcast but the light was strong.
I normally work around -3EV when I use flash as subtle fill-flash outside. But it can vary, depending on the situation. Here’s a more complete article on how to use on-camera fill-flash. I did use fill-flash for most of this photo session. This linked article explains how I approach this.
Right at the start of the photo session, I did use off-camera flash – speedlight with a softbox – when we were taking photographs on the rooftop of their apartment. But the rest of the time, out on the street, it was on-camera fill-flash.
Good stuff Neil. I use my 70-200 a lot for the same reasons you do and your composition tips are very good here. Sometimes a step or two can make a world of difference. Unfortunately, I usually realize that when I’m running the pictures through Lightroom! Workin on it though…
The top photo with painted artwork as a background helps me understand your Neon Sky background a bit. Still trying to wrap my head around what you saw at the shopping center that afternoon. I love every photo in this article, and I look forward to getting down and dirty with my camera! =)
Daylight or off-camera flash on the artwork shots? Looks like a bright overcast day or perhaps OCF to the viewers left. Another great article. Thanks Neil.
On-camera TTL fill-flash, with the FEC dialed down.
Damn. When you mentioned being in the middle of the street I assumed you’d be further than the reach of on-camera flash. Shows you what I know…
It’s just a kiss of light from fill-flash.
As you dial down the FEC, the range of your flash extends.
Thanks again! Definitely something to keep in mind and try next time out.