
Photographing wide-angle portraits
In photographing wide-angle portraits, we have to make the decision whether we want to embrace the wide-angle distortion (such as Bill Brandt famously did), or have a more natural approach where the wide-angle is used to show more of the environment and to help with a dynamic composition.
With this photo of Anastasiya, I wanted to include these massive billboards 5th Avenue. That meant I had to use a wide focal length. In this example, I had my 24-7mm zoom racked to 24mm.
The idea here is that we need to be purposeful. Better to shoot in a more controlled way with a specific idea in mind, than afterwards think to yourself, “if only their hands and feet weren’t so distorted.” It needs to be a conscious decision at some point. Control.
So if the intention is to use a wide-angle lens for a portrait, and not have crazy distortion, there are a few things we should look out for:
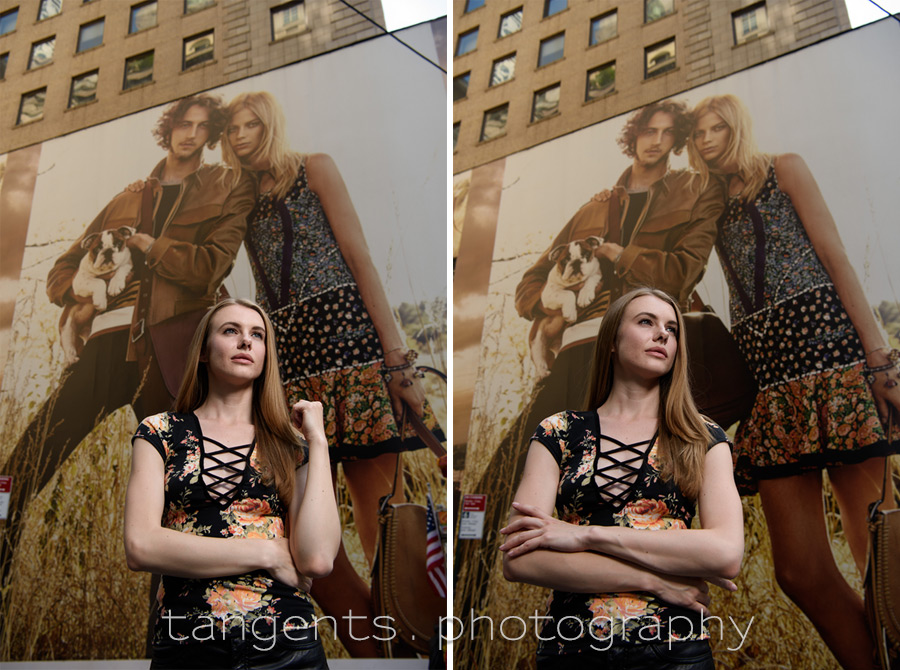
- Shoot from waist-high if you can. Then you have about the same distance to your subject’s feet as their face. Think of how photographers used twin-lens reflex cameras hanging from their neck – the camera was about belly-button height. This helps minimizing perspective distortion. Shooting from lower down also prevents you from shooting ‘down’ on your subject.
- If you shoot from a lower angle, as in these two examples above, then you are likely to get severe perspective distortion – you can see that Anastasiya’ hands and arms look much larger in the frame compared to her face. The way around this is to move further away – don’t shoot so close-up, and then, as in this case, have your subject lean forward ever so slightly. This will help correct the distortion. That’s what we did with this frame.
- With a wide-angle lens, try to keep your subject central – the closer they are to the edge of the frame, the more stretched-out their features will look. Oddly-shaped, distorted heads aren’t attractive for portraits!

Post-processing the photo
The main image shown at the top was boosted a bit with some mild HDR via the Aurora HDR software.

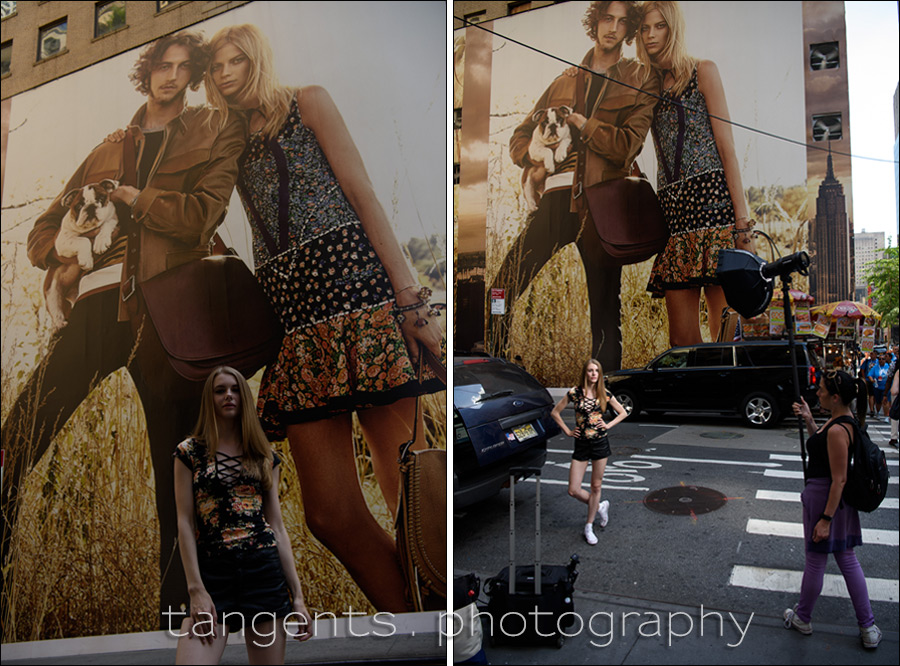
Photo gear used during this photo session
This pull-back shot (and a comparison without flash) will show the effect the off-camera flash had, and how it was positioned. In this instance, I had my assistant hold up the Profoto B1 flash (B&H / Amazon), with the Profoto OCF Beauty Dish (24?) (B&H / Amazon). (This softbox also needs the OCF speedring to mount to the Profoto B1 or B2 flash.)
I like this setup because it is powerful, but the softbox is small enough to not be unwieldy out on the streets in New York.
- 1/200 @ f/5.6 @ 200 ISO
- Nikon D810
- Nikon 24-70mm f/2.8E VR @ 24mm
- Profoto B1 TTL flash (B&H / Amazon)
- Profoto OCF Beauty Dish (24?) (B&H / Amazon)
Related articles
- Photo sessions: Posing, lighting & context
- Posing technique – Adjusting a pose with incremental changes
- Posing tip – Check the wrists and hands
- Composition for full-length portraits – step back!
- Anastasiya on Instagram
- Anastasiya on Model Mayhem
Great Neil, as usual. I particularly appreciated the idea of asking the subject to lean forward!
It may be a little bit off topic here, but I believe that good teaching – as you do – is a very useful exercise for the teacher himself. If this is true for you, I hope you might be willing to explore this aspect of photography in a future topic…
Which topic would that be?
My suggested topic would be “The benefits of teaching”.
And just to add my 2 cents: when I decided to teach a brief workshop in photography open to any level of knowledge – so no technical jargon – I had to do an effort to reach the core of what I try to achieve whenever I take a photo.
I asked the participants questions like “how does painting compare to photography?”, “how does sculpture compare to photography?”, “what is the color of snow?”…
I never asked myself those questions before the workshop, but in doing so for teaching purposes I ended up with a better understanding of my own way of taking photographs. That was my reward.
Neil, I’m glad you’ve posted a new article!
Really, it’s an interesting thought of leaning forward.
Still working on wide angle techniques the I like. Do you tend to keep the model centered and the crop to avoid excess distortion or just keep things level and mid to low and work those angles?
I mention exactly that in the article: “With a wide-angle lens, try to keep your subject central – the closer they are to the edge of the frame, the more stretched-out their features will look.”
Hi Neil, yes I agree keep the subject/s central in the frame. I get dramatic and highly usable images using a 20mm wide angle and 15mm fisheye in this way. They always prove popular shots with my brides and grooms.
Neil, I noticed your assistant is using a monopod to support the B1 Flash. I’m reluctant to use the one I happen to have as it seems a little weak. What monopod is your assistant using. Would you recommend this particular one or do you have another in mind?
Just as important as the sturdiness of this monopod, is that it should be tall enough – I want the light to come from above my subject’s eye level. For this, I use the 75″ tall Gitzo monopod.