Portrait lighting setup – Chiaroscuro
Chiaroscuro is defined as the use of strong contrasts between light and dark – bold contrasts affecting a whole composition. Chiaroscuro in an Italian phrase meaning Light and Dark. Chiaro = Light; Scuro = Dark.
In Film Noir, there are many examples of the use of Chiaroscuro, enhancing the mood. Here though, we’re going to look at a straight-forward way of using Chiaroscuro as a lighting technique. This then becomes an easy starting point to experiment further.
By adding planes that have a gradient between light and dark, you can enhance the idea of dimension and depth in your photographs.
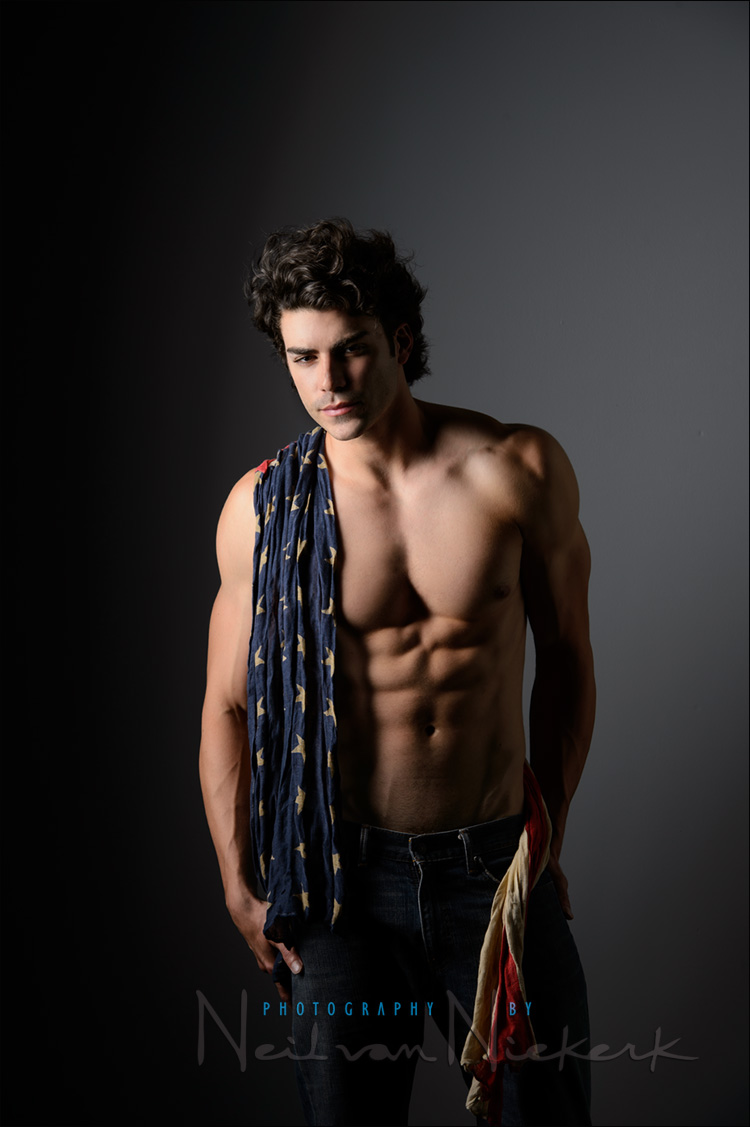
The photograph above will explain the essence of it – the planes of light and dark. This dramatic photo of Frankie, was lit by one light – a gridded strip-box. The grid helps contain the spill of light. The counterpoint to “containing the spill of light” is that the grid directs the light.
This single light source, the gridded stripbox, lights both our model and the background.
Now carefully notice how the gradient of light on our subject, moves from light to dark (as we look from left to right). The gradient of light on our background goes from light to dark in the opposite direction.
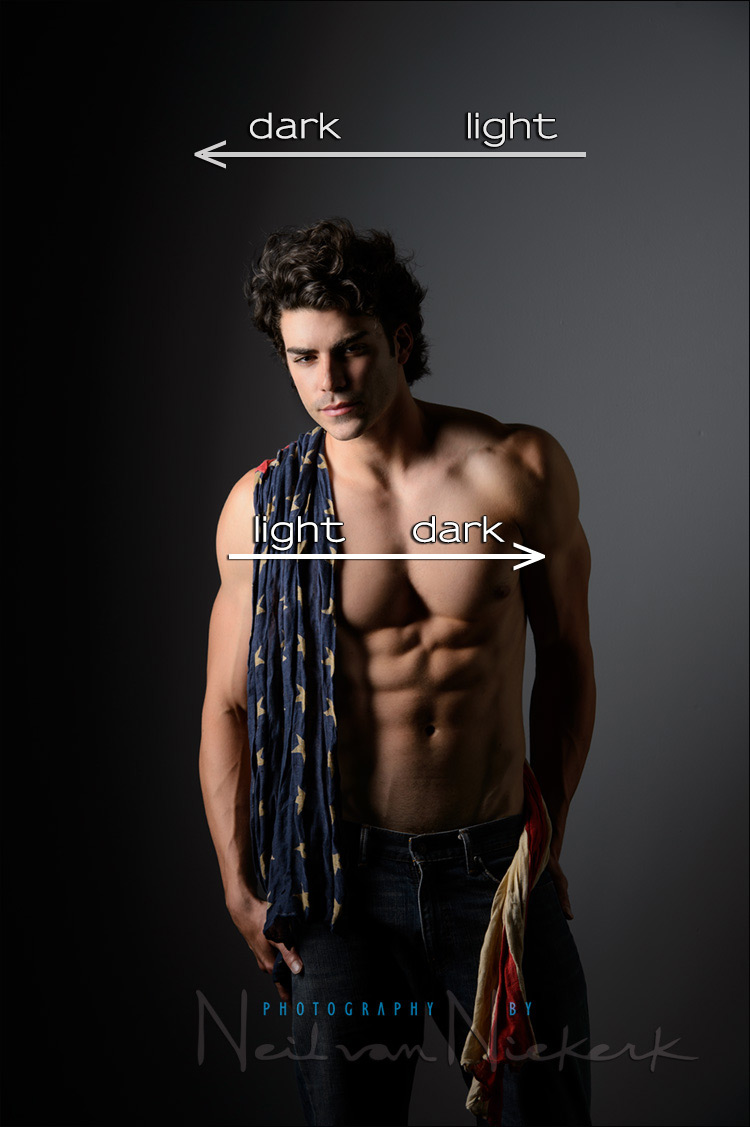
If the background had been uniformly dark – i.e., without the light falling on the background – his left shoulder shoulder would’ve blended in with the dark background. That wouldn’t necessarily be wrong. In fact, that would still fall within the definition of Chiaroscuro. And it would also fall within the realm of what we see in lighting with Film Noir. However, the gradient of light in the background (going in the opposite direction as the gradient of light on him), helps etch him against the simple background. The visual representation of form and dimension is better this way. You see his shape. And the final image is dramatic, without being overly dark.
For me, this is a good starting point for dramatic portraits with a single light. I aim for the light to look good on my subject – and then the light spilling on the background is controlled, to help define our subject. We saw the same effect in the portrait of my friend Brian, using the beauty dish as a single light source.

Direction & Quality of Light
I wanted to distill the essence of what we, as photographers, work with – light! Before we can truly grasp on-camera flash and off-camera flash, and really, any kind of photography, we have to be aware of the direction and quality of light. We need to observe the light that we have, and then decide how best to use it, or enhance it.
With this book, I try my best to share those “aha!” moments with you, and I do believe this book can make a difference to your photography.
The book is available on Amazon USA and Amazon UK, or can be ordered through Barnes & Nobles and other bookstores. The book is also available on the Apple iBook Store, as well as Amazon Kindle.

Photo gear (& equivalents), and lighting gear used
- f/10 @ 100 ISO
- Nikon D4
- Nikon 70-200mm f2.8 AF-S VR II / Canon EF 70-200mm f/2.8L IS II
- Profoto D1 Air 500Ws Monolight
- Profoto RFi 1’×6’ softbox and a Profoto 50 degree 1×6 soft-grid, to camera left.
- white V-flat as a reflector (to camera right)
The lighting is simplicity itself. A 1×6 ft gridded stripbox to camera left, with a white V-flat to camera right as a reflector to give some fill-light.
A smaller gridded stripbox would’ve worked as well. Even a 3 ft gridded Octabox. The actual light modifier is less important than the fact that it is gridded. The grid is what controls the way the light falls on our model and the background.
Related articles
- Using the beauty dish as a single light source (model: Brian)
- Portrait lighting in the studio – influences & inspiration (model: Viktoria)
- Using a big gridded strip-box / soft-box (model: Anita DeBauch)
- Studio photography – Working with a large Octa Softbox
- NJ photography studio space rental
- more articles on studio lighting & studio photography
Studio lighting workshops
If you are interested in learning more about studio lighting, including lighting for headshots, I offer workshops on studio lighting. The workshops will be held at my studio space in NJ, and it has a wide range of studio lighting gear to play with!
Neil,
Thank you for this Tangent! How far is your model from the background? What material is your Vflat and where did you get them from ( I assume you are using bookends)?
Thanks
I would say he was about 3 – 4 feet away from the wall.
The V-flat is made of 2 large pieces of white foamcore that you can buy from Home Depot, and then tape together on the long end. I use the V-flats to block light, or as reflectors. They come in handy.
V-flats are so versatile. I’m still trying to work out how to work v-flats into my small studio that is curved on all sides.
Does anyone have a source for foamcore in Canada? homedepot.ca does not have it.
Thanks
Hi Neil,
Fantastic post! One of my favorites. Chiaroscuro, film noir, male portraits, gradient of light…I cannot ask for more. Refreshing read, and images, too!
I use Profoto RFi 1’x3’/1’x4′ softboxes (with my D1 Air 500W), and really like them. I also have a very small studio, but using v-flats sounds like a great idea.
Thanks so much!
Excelent work! Neil could you tell which gels do you use to iluminate the skin? Thanks.
I didn’t use any gels here.