Tangents

photography tutorials, reviews & workshops

tangents photography blog
learn : discuss : share
  • Tangents
  • Tutorials
    • Flash Photography
    • Wedding Photography
    • Studio Photography
    • Posing People
    • Understanding Your Camera
    • Exposure metering
    • BFT
    • Best Photo Books
  • Reviews
    • Sony
    • Nikon
    • Canon
    • Fuji
    • Profoto
    • lighting gear
  • Workshops
    • Info: Workshops
    • In-person
      tutoring sessions
    • Online
      tutoring sessions
    • Workshops in
      New Jersey (NJ)
    • Workshops in
      New York (NYC)
    • Photo walks in NYC
    • Studio Workshop
    • Video tutorials
    • Workshop results
  • Books
    • On-Camera Flash (revised ed.)
    • Direction & Quality of Light
    • Off-Camera Flash Photography
    • Lighting & Design
    • On-Camera Flash (1st ed.)
  • Projects
    • Two Perspectives
    • B&W Infrared
    • Vintage lenses
    • Time-lapse photography
  • Info
    • About
    • Contact
    • My Photo Gear
    • Books by NvN
    • Join us on Facebook
    • Acclaim
    • Success Stories

portraits of the bride – looking for the less obvious image

August 30, 2010 Neil vN 26 Comments

wedding photography – looking for the less obvious image

While waiting with the bride and her bridesmaids before the ceremony, their excitement made for good candid photos.  But, as ever, I was on the look-out for the less obvious photo. Trying to find something unexpected …

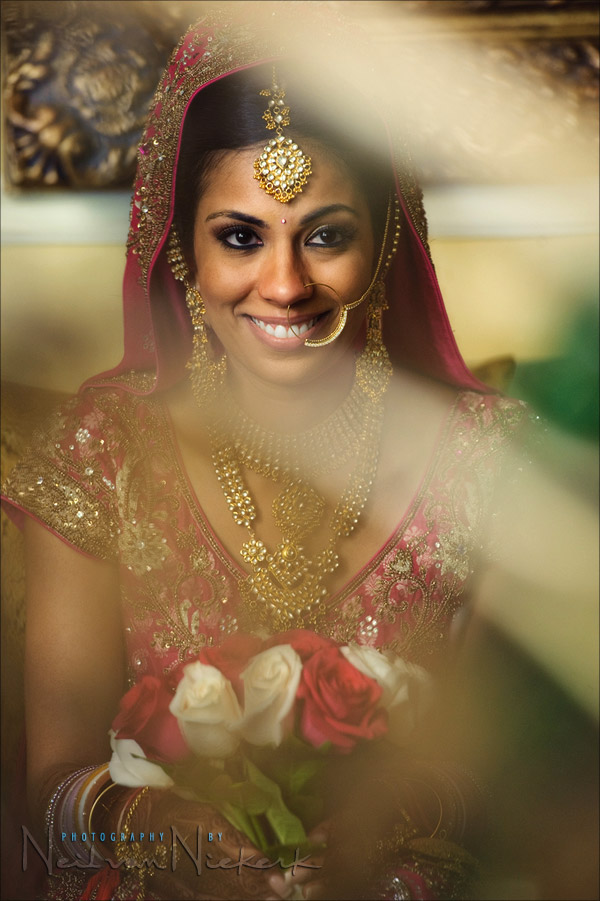
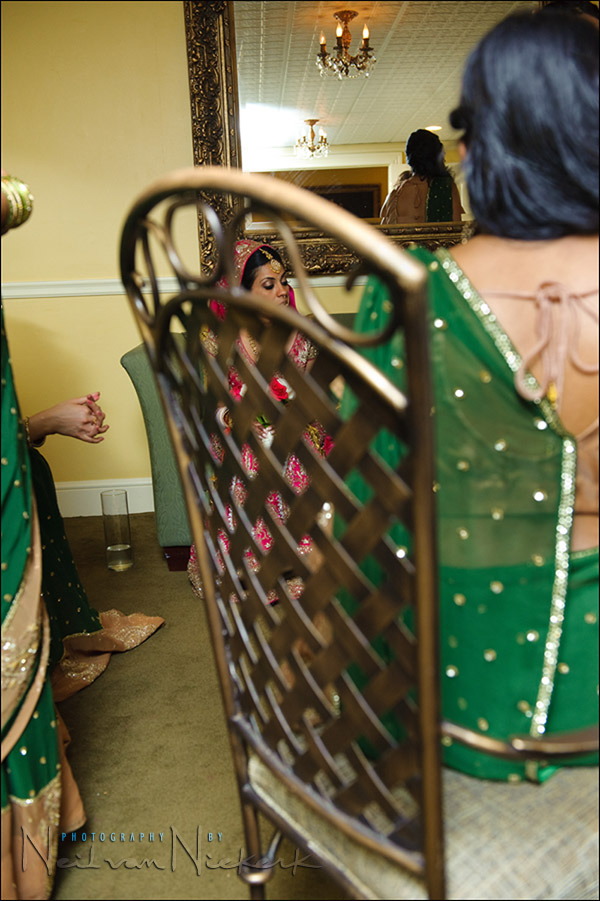
Changing my position and perspective, I saw this scene.  Nothing spectacular, until I zoomed in close through the back of the chair.  Using the swirly pattern of the chair’s back, I was able to frame Diya, the bride, as in the photo above.  I took several frames, but liked this one the most where Diya was looking at the bridesmaid to my right .. her gaze nearly towards the camera. I liked how her eyes were accentuated by the loops in the chair’s back, with everything else going softer as a result of the chair.

I bounced my flash to my left, and slightly towards Diya. Using the black foamie thing, my intention in how I bounced my flash, was to get soft directional light. By bouncing off to the side, the exposure for the chair wasn’t blown out in comparison to her. Processing the image to post here, was similar to that described in this previous article, (but minus the B&W layer).

settings:  1/125 @ f3.5 @ 1250 ISO … TTL flash
70-2oomm f2.8 lens, used at 200mm

One thing that is imperative for me in wedding photography, is to get clean simple portraits of both the bride and groom .. and of course, portraits of them together.

This image below is typical of that.  I had Diya stand under the entrance of the reception venue, and bounced flash into the ‘ceiling’ of the area where the cars and limos arrive. The bounce flash helps open up the light on Diya’s features.  It’s a way to make sure the image is a success, taking little risk.  So while I do try to be creative and finding the less obvious images, I also have to make sure that I have certain images ‘in my pocket’.

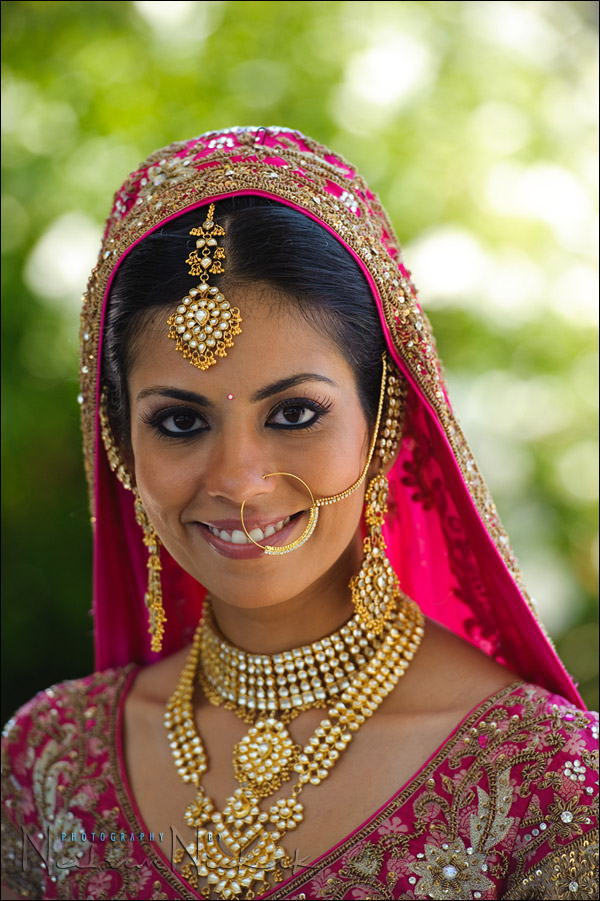
In this photo, I made sure there was NO direct flash on my subject.  The 2nd photo is without bounce fill-flash flash, just for comparison.

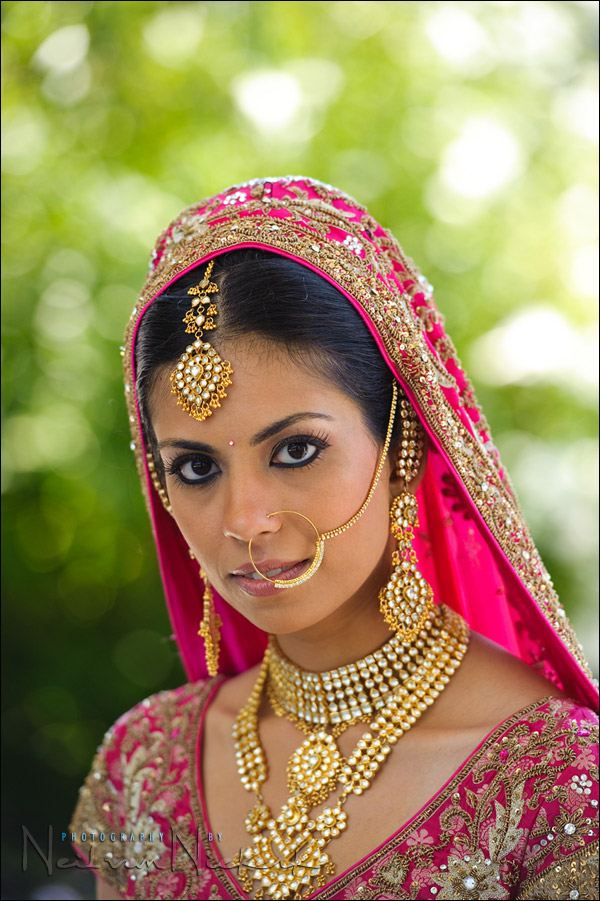
settings:  1/125 @ f3.5 @ 1250 ISO … TTL flash (1st image)
70-2oomm f2.8 lens, used at 185mm

Two more photographs to show some variety:

The first image is a semi-candid image as the bride was secretly watching her groom arrive on a horse, surrounded by dancing and singing family members and guests.  (Indian weddings are very colorful in every respect!)

settings:  1/800 @ f3.2 @ 800 ISO … no flash, just ambient light
70-2oomm f2.8 lens, used at 150mm

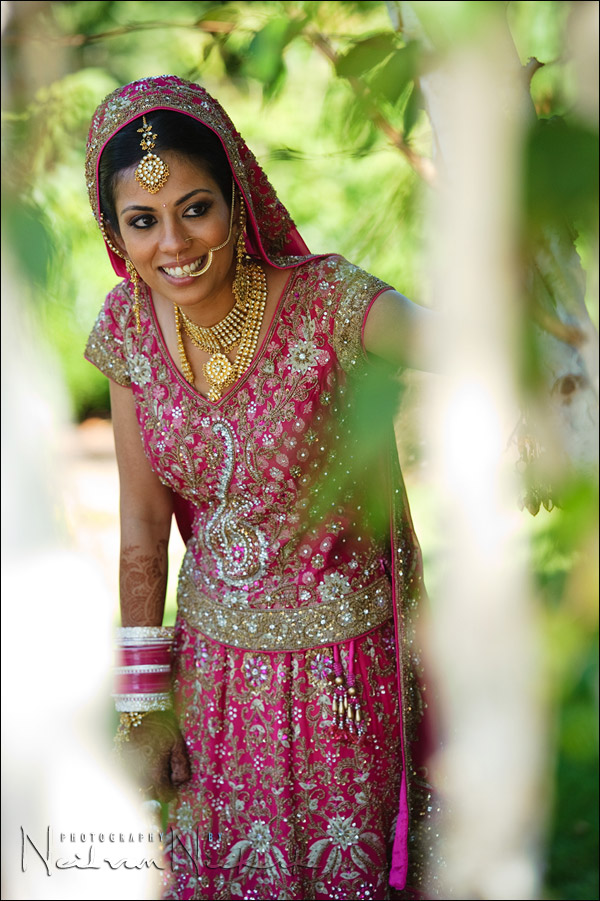
As Diya walked back to the bridal suite, I noticed the way the trees were lined on either side of the door.  I knew it would give an interesting half-hidden image with the compression a longer focal length would give.  I quickly positioned Diya, and managed to get this portrait.

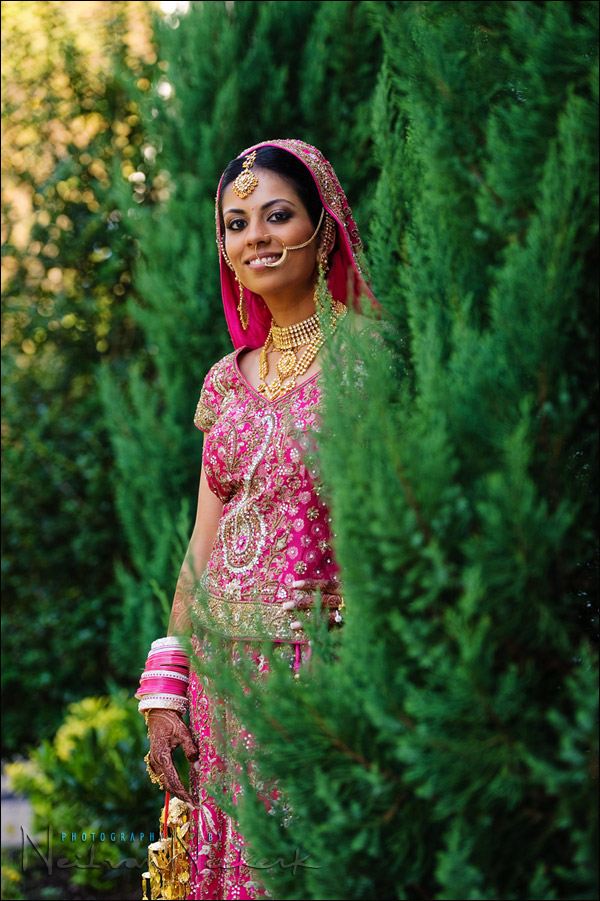
settings:  1/250 @ f3.2 @ 200 ISO … just a touch of on-camera TTL fill flash
70-200mm f2.8 lens, used at 100mm

A big thank you to my friend Jason Groupp who invited me as the second photographer on this day, and graciously allowed me to post these images.

Equipment used for these photos:
Nikon D3;   Nikon 70-200mm f2.8 AF-S II (B&H);
Nikon SB-900 (B&H);  Nikon SD-9 battery pack (B&H)


other articles on wedding photography


Filed Under: flash photography, style, wedding photography


Help support this website

If you find these articles of value, please help support this website by using these B&H and Amazon affiliate links to order your photo gear.

I also offer photography workshops and tutoring sessions, whether in person, or via online video tutoring sessions.

Please follow me on Instagram for more.

You can also join our thriving photo community in the Tangents group on Facebook, where we show our photos and discuss all things photography.

Thank you,

Neil vN

Books by Neil van Niekerk


26 Comments, Add Your Own

  1. 1Damian Brown says

    August 30, 2010 at 7:46 am

    Thanks for this post Neil, good work especially on getting the image ‘through the chair’ That’s really seeing the unseen!

    Reply
  2. 2arnold soshkin says

    August 30, 2010 at 10:08 am

    One thing I am confused about is that the image through the chair was shot by bouncing the flash to your right. By looking at the image the catch lights in the eyes and the shadow on her face is on camera right which makes it look like it was bounced from your left instead.

    Reply
  3. 3Neil vN says

    August 30, 2010 at 11:07 am

    Arnold, you’re correct! I fixed the post now to state that the flash was pointed to my left.

    This error – the confusion between left and right – is a problem I somehow have. I even mention it in this post on my book on flash photography. One of the two errata are due to this left-right dyslexia. I have no explanation for it. Sorry. : )

    Neil vN

    Reply
  4. 4Winston Mattis says

    August 30, 2010 at 11:48 am

    Every time I see you shots at wide @f3.5 they look so sharp.I my self have a D700 with 70-200 f2.8 version,but never get that sharp results.
    How do you do it?

    Reply
  5. 5Neil vN says

    August 30, 2010 at 11:49 am

    Winston .. the new Nikon 70-200 improves edge-to-edge sharpness, but the previous version of the 70-200 f2.8 VR was super-sharp in the central area even at f2.8

    The new lens I wouldn’t even hesitate to shoot wide open at f2.8 even for critically important photographs.

    But still, it makes me think there is another problem there if your images are soft, even at f3.5

    Neil vN

    Reply
  6. 6Johann says

    August 30, 2010 at 11:59 am

    Jy’t seker gesukkel in die army boet!

    Reply
  7. 7Neil vN says

    August 30, 2010 at 12:34 pm

    Johann .. you have no idea how much I hated being in the army!

    Neil vN

    Reply
  8. 8Jannine says

    August 30, 2010 at 12:44 pm

    Interesting, very sharp too, did you use straight forward ttl on the flashgun Neil not the ttl bl?

    Reply
  9. 9Neil vN says

    August 30, 2010 at 12:51 pm

    Jannine … I honestly can’t remember, but it was most likely along these lines of how I choose between TTL BL and TTL on Nikon speedlights.

    Neil vN

    Reply
  10. 10Gracious says

    August 30, 2010 at 2:48 pm

    Hi Neil,

    Thankyou for this post. Would you try taking this kind of images when you’re the main photographer? As a second photographer I guess we have a sort of ‘easy’ feeling which often gives you creative ideas.
    Can it be that you’re doind less weddings this season?

    Gracious

    Reply
  11. 11Neil vN says

    August 30, 2010 at 3:18 pm

    Gracious … there is more freedom as a 2nd photographer at a wedding, but I would still take these photos. As I mention in the text here, good portraits of the bride and groom are absolutely essential.

    Actually, I am doing more weddings than last year. Admittedly though, 2009 was a dip for nearly every photographer I know.

    Neil vN

    Reply
  12. 12jason groupp says

    August 30, 2010 at 8:42 pm

    Neil, it was so much fun working with you! This is a great post, and I enjoyed watching you work. Who says Nikon and Canon can’t get along!?!?!

    Reply
  13. 13MichaelBen says

    August 31, 2010 at 3:47 pm

    Hi Neil
    Yet another insightful post. Thanks for your generous shares of your profound knowledge.
    Regarding your postprocessing of these pics. I really like the colors. How did you tweak the colors in PP?
    Could be interesting to see eg. picture 1 before and after..
    Thanks again
    Michael

    Reply
  14. 14Neil vN says

    August 31, 2010 at 4:39 pm

    Michael .. the straight-out-of-the-camera shot had an ugly yellow cast to it from bouncing flash off the wall next to me. But a simple click on her eye with the eye-dropper tool, brought the colors very close to what you see in the final image.
    (left & right hand images, respectively.)

    From there I adjust the color and contrast and black point as I feel the need to, as part of my normal RAW workflow.

    For the final image at the top, I did do further post-processing, as described. But the final image really isn’t vastly different from the RAW image with the WB corrected.

    Neil vN

    Reply
  15. 15Frank says

    August 31, 2010 at 8:53 pm

    The latitude when shooting in RAW is a beautiful thing, Neil. On a related note, have you ever encountered a bride and/or groom who were fair-skinned, with more of a pinkish/reddish skin tone, and one or both got a little too much sun prior to the wedding day? Is this something you would try compensating for with a gel on your flash, or simply rely on tweaking the skin tones as best you can in post-processing?

    Reply
  16. 16Neil vN says

    August 31, 2010 at 9:03 pm

    Frank, that kind of finer attention to detail is difficult during the actual wedding shoot. It is something that is best left for Monday morning, feet up on the desk and a cup of coffee in the hand, working on the RAW files.

    Neil vN

    Reply
  17. 17Sheri Johnson says

    August 31, 2010 at 9:04 pm

    I truly appreciate the information and the images, especially the comparison of images with and without the fill-flash.

    Reply
  18. 18Bogdan says

    August 31, 2010 at 11:01 pm

    When you can’t get the skin tones right (happens on venues that have mixed lighting, churches are the worst offenders) there’s always the option of B&W conversion…
    Cheers!

    Bogdan

    Reply
  19. 19Ernst says

    September 1, 2010 at 10:07 pm

    Hello Neil,

    Beautiful photos and, as always, your advise is appreciated.

    I started 2nd shooting last year and have now shot with five photographers.

    My understanding (which might be wrong) of the 2nd photographer role is to stay quiet and out of the way of the main photographer while take candids (along the lines of the first photo of Diya seated), holding a reflector, carrying/setting up lights etc. The main photographer would do ALL the posing of the bride & groom.

    It appears you had a bit of time with the bride by positioning and posing her at the entrance to the reception and among the trees. Is this unusual for a 2nd photographer? Should I be asking for some time alone, so to speak, with the bride and/or groom to take posed photos?

    I would certainly appreciate the experience and the photos would add to my portfolio. But I am wondering if that would be, well, a bit cheeky a somewhat unusual request to make.

    Appreciate your thoughts.

    Cheers
    Ernst

    Reply
  20. 20Neil vN says

    September 2, 2010 at 3:08 am

    Ernst, the specific role of the 2nd photographer is something that depends entirely on the level of trust and friendship and just the way the principal photographer likes to work.

    For the photos you refer to, I was alone with the bride while the principal photographer (Jason Groupp) was photographing the groom’s approach on the horse. So I had time to play around a bit.

    Neil vN

    Reply
  21. 21Jerry says

    September 4, 2010 at 12:09 pm

    Neil read your book twice and the inexpensive black foaming thing is beginning to work out for me the more I use it. My question is what is your preference or technique with low glass ceilings in a reception hall. Your pictures shows the white low ceiling, but what about all glass. Thanks again. Jerry

    Reply
  22. 22Neil vN says

    September 4, 2010 at 3:32 pm

    Jerry … I assume you’re referring to venues which are like large conservatories? There are venues here which are like that .. mostly glass. What I do, is try and find a few positions where I can bounce flash off the pillars and supports that hold the entire structure up. But I also try to place one or two off-camera flash setups as high as I can .. and often with a 45″ white shoot-through umbrella each, just to get more light into the area.

    Neil vN

    Reply
  23. 23Kulbir says

    September 4, 2010 at 5:21 pm

    Neil,

    My thanks for sharing your techniques with the world.

    It was a pleasure watching you in action at Diya’s wedding.

    Kulbir

    Reply
  24. 24Mike Sweeney says

    September 29, 2010 at 9:29 am

    A point about the 70-200 lens. It is a wonderful lens but it’s picky on each body. I had to microalign mine twice. Once for each D300 body. The lens is accurate, I had Nikon clean and adjust it last year so I am thinking each body is at one end or the other of the focusing spec. The brand new D300 was useless with the 70-200 and had to go back. So check the body and try a micro alignment if you can

    Reply
  25. 25Maheh Soni says

    February 21, 2011 at 10:30 am

    Dear Neil,
    Thanks for sharing a lots of technical issue with us. Here in India most of wedding reception are held in open lawn or garden where bride and groom are positioned on a open stage where only one wall is there which is our background, so in this situation how do use the flash as bounce, because there is no side or behind wall.
    Please comment.
    Regards
    Mahesh Soni

    Reply
  26. 26Neil vN says

    March 6, 2011 at 8:45 pm

    Mahesh … then you have to use additional lighting.

    Neil vN

    Reply

Leave a Reply Cancel reply

Your email address will not be published. Required fields are marked *

categories

Articles & Tutorials

  • • About myself & this site
    • Books by Neil vN
    • Best photography books
    • Black foamie thing
    • Photographers’ success stories
  • • Flash Photography Techniques
    • Natural looking flash
    • Flash + Ambient light
    • Dragging the shutter
    • Bouncing your flash
    • On-camera flash outdoors
    • Exposure metering
    • Flash exposure compensation
    • Bounce flash examples
    • Which is the best flashgun?
    • Flash brackets
    • Off-camera flash photography
    • Flash photography basics
    • Using video lights
    • Flash photography tips
  • • Photography workshops NJ / NYC
    • Models @ photography workshops
tutorials:
flash photography
Photography
Workshops

All rights reserved. Copyright © Neil van Niekerk 2025 · Customization by The Traveling Designer

Copyright © 2025 · NvN on Genesis Framework · WordPress · Log in