
[ click on photo to see a larger image ]
the progression of an idea during a photo shoot; incl the use of off camera flash
Because of the positive comments I’ve had to the recent addition of video clips that show a glimpse of how I work, I thought I’d show the progression of an idea. Not just how the actual image was made, but how the idea progressed.
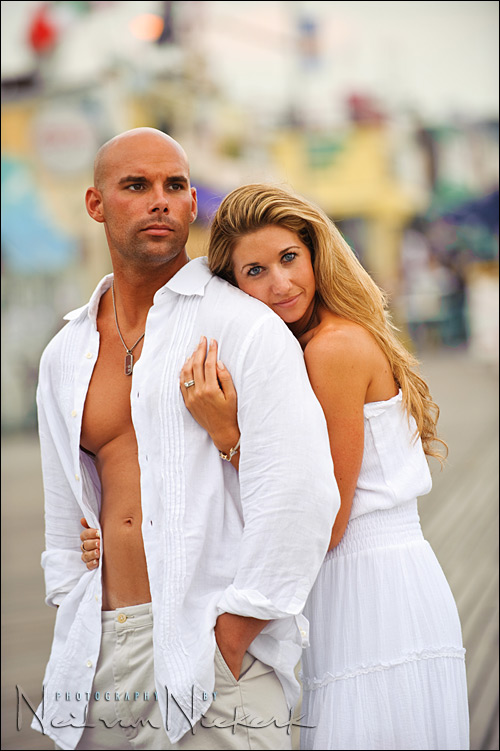
The photo above of Sarah and Mark at Coney Island, is from the day-long photo session where we went to different locations in New York. Where this image above started, was in a previous sequence ..
Here I just used the soft late afternoon light, diffused by the approaching thunderstorm. Beautiful light. No additional light or flash needed.
Turning around, I saw the sky was darkening rapidly, and becoming menacing. As it turned out, about 10 minutes later we were dashing for the car as the rain started slamming down on us.
Here is a test shot of Sarah against the sky:
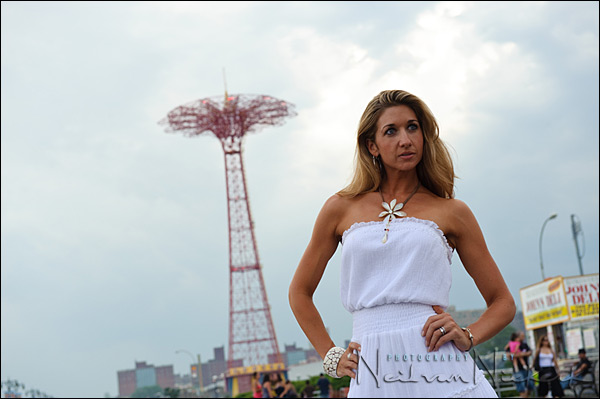
Meh. There’s nothing going on there. There’s no drama, and no punch to the image.
The camera settings here were: 1/250th @ f5.6 @ 400 ISO
but I wanted the sky to appear darker and more somber.
So I added flash from a Q-flash in a softbox off to my right – a similar set-up to this one, but with a Q-flash instead of a speedlight. The Q-flash is also TTL-controlled by the Quantum Freewire system, as shown here in this post on the lighting set-up I took with me to Vegas. My assistant, the-other-Neil, held the softbox up high.
Here it is .. the next step .. a test shot to see how it would look with Sarah lit with flash from the softbox, and with my settings such that the sky is now darker by more than a stop compared to the first test shot.
Aaah, now we’re onto something. There’s more drama to the scene now.
My settings here: 1/250th @ f6.3 @ 200 ISO
So there is a 1.3 stop difference between this and the previous image, with the flash then exposing correctly for Sarah.
A point I’d like to labor here for a while … TTL flash vs manual flash.
I know there are many hard-core strobists out there that would insist on the flash being on manual, and there are distinct advantages, primarily the consistency in exposure throughout a sequence of images. With Manual flash, once you have determined correct exposure, if your light-to-subject distance remains the same, then your exposure remains absolutely constant from shot to shot. This makes post-production a breeze.
However, I often find that when I am working fast, I’ll take the speed of using TTL flash over using manual flash. In this example, I wanted to under-expose my sky by more than a stop. I changed both my ISO and my aperture … and my flash exposure followed.
With manual flash, the usual method would be to determine the aperture and ISO for manual flash, and then control the background exposure with the choice of shutter speed. There is a chance then of hitting the ceiling at max sync speed if your background isn’t dark enough yet. So you’d have to figure out a shutter speed as a starting point, and then work out the flash power setting (at that specific flash-to-subject distance), and then figure out the combination of aperture and ISO.
It works. I suspect the majority of photographers that do on-location lighting with off-camera lighting would work with manual flash. And any photographer that wants to get a grip on mastering lighting, absolutely have to know how to use manual flash. Comfortably and fast. And understand how the settings need to be juggled – shutter speed, aperture, ISO, flash power, light-to-subject distance.
So … back to using TTL flash. Since TTL flash will follow my camera’s settings, it was faster for me here to just use TTL flash. Remember, the thunderstorm was brewing. (A video clip that follows next week will show a sequence following this where we relied on the incoming wind.) But I digress …
TTL flash follows my settings. I want to get 1.3 stops under for my background? (or more) … then I simply change my aperture and ISO and my flash output will follow. Simple. The possible variation in exposure is something I can live with and can fix in post if necessary.
Back to the sequence of images. Now, as adorable as Sarah looked … it needed something more, something a little more Fashion-y. So I added Mark and had Sarah lean back into him.
Here is the image straight out of the raw conversion program:

The settings are still: 1/250th @ f6.3 @ 200 ISO
The composition needed to be tightened up, so I went for a more cinematic crop, and added some Photoshop fairy dust again to make the image pop even more .. and there you have it!
This blog has always been a superb place to learn. Clear and concise explanations of your exquisite lighting techniques are enjoyable and easy to read and understand. Lately with the addition of video and posts such as the one above that feature step by step explanations with photographic examples has made a superb blog even better.
Many thanks Neil for providing your readers with such valuable information on a frequent basis. This is one of the finest photoblogs in the world. I have your book on pre-order from amazon and I cannot wait to get it in my hands.
Regards,
Tom K.
Neil,
Excellent post.
Quick question for you thought – say you underexposed the background by a stop and a half (for example). Do you then need to change your FLASH EXPOSURE COMPENSATION to be + 1.5 stops?
Or if you have FEC at 0.0 (not + or -), will you get a correct exposure on your subject?
Thanks very much,
Kris
Hey Neil,
I’ve been following your blog since the start of the year and always look forward to reading your entries. I’ve never left you any comments and felt it was long overdue to come and say thank you. Keep doing what you do, and thanks so much for sharing your knowledge and experience.
Michael
This is some really good stuff man. It encourages me to get my butt out there and shoot. ( But today is a holiday) LOL!
Awesome post Neil! Thanks for posting this.
Inspirational stuff as always Neil. I’m booked onto your Brighton UK course later this month and can’t wait. I hope you have a moment to show us some Photoshop ‘Magic’ on the course, that would be great! It’s got to be worth a cocktail in the Grand Hotel Bar.
Neil,
I have been considering upgrading my off camera flash setup from an SB900 to a quantum t5dr flash. Obviously the Quantum is more powerful but could you elaborate on the difference I would notice? I typically use my Nikon flash in the 28″ Westcott softbox.
Thanks so much for your blog, I look forward to reading your posts. Your post processing fairydust is excellent as well!!!
Brian
I’m REALLY looking forward to the Sept. workshop in Seattle. Thanks for all the great info on your blog. See you then!
Linda
Neil,
I’m up for touching on the subject of post processing.
Tom K.
Hi! Neil,
Yet another excellent post.
One thing that I love in these photos are the lovely skin tones. Did you use any type of gel and/or WB setting to get those tones.
Thanks,
Tam
Hi Neil,
As always, great post, love to read your blog especially the “how-tos.” You mentioned that you wanted to darken the sky so you stopped down. I can understand that changing the aperture from 5.6 to 6.3 would cause the scene to be darker, but at the same time the ISO changed from 400 to 200. Does this also effectively darken the scene (by an additional stop)?
Thanks!
Blake
Neil, great work!!!! I am scheduling a couple of shoots this weekend and can’t wait to apply many of your off camera flash techniques.
Thanks
Neil, nice shots! I too was wondering how you got those great skin tones. I was guessing maybe skylight filter in Color Efex. I’m a part time pro-photographer with experience in portraits, weddings, and events. I’m looking to really take my photography to the next level. I’ve been trying to find a school (probably online) or in So Cal that’s more advanced than a typical entry level class. I don’t want to waste my time or money on learning such basics as apeture or shutter speed. I’ve been looking into NYI and the Photography Institute. Any suggestions?
Thanks for your great work and advice!
BILL
Hi Neil
Just wanted to get this straight in my mind…
get the exposure for the background of X then dial in some -ev to darken that brooding sky. Now the flash add some +FEC as you’re using ttl? Does this about sum it up or am I having a brain *art?