
Vintage photo session and Off-camera flash
Anyone who regularly follows the Tangents blog or has my 2nd book, off-camera flash photography, might recognize Sarah. When she told me she was visiting New York, I made sure that I squeezed in a photo session with her in my schedule. The weather on the day was grey and drizzly … enough reason to juice it up with some off-camera flash. And then play with the images in post-processing a bit.
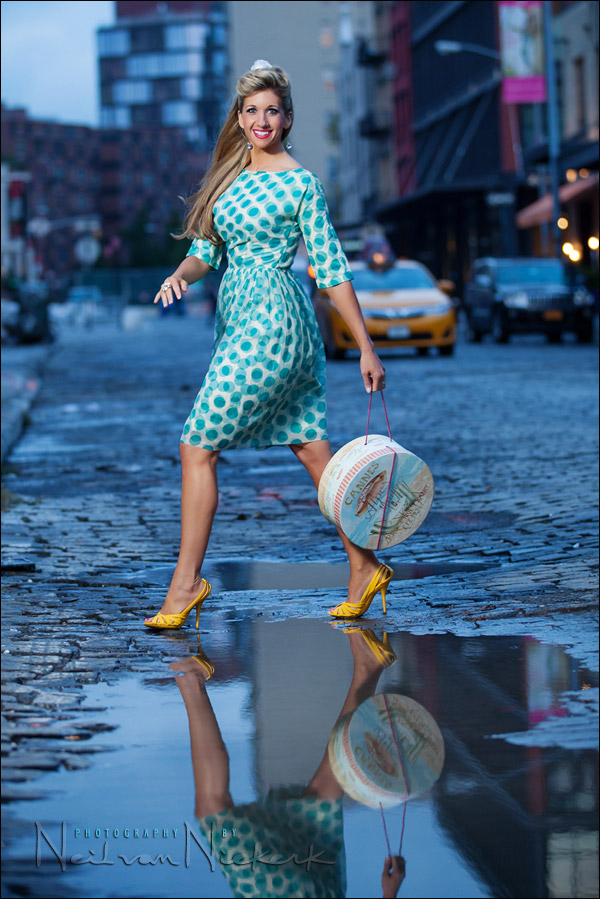
On this rainy day there were random pools of water in the street, and it took just a few minutes to find a viewpoint where we could get Sarah’s reflection in the water. My favorite image is this one though, where her reflection is only partly shown. I wanted that compressed perspective that a 70-200mm f/2.8 can give you. So for this sequence, I used the Canon 70-200mm f2.8L IS II (affiliate), at its widest aperture. The wide aperture helped give some separation from the background.
Camera settings and decisions
Since it was early evening, the color balance had gone very blue compared to Daylight. With this final image, I warmed up the tones for my subject considerably in post-processing. Even then, the background remains with the colder blue hues. Despite what the image appears like, I did not gel my flash for effect here, like I sometimes do. The available light really had that cold a color balance compared to the flash’s color balance.
I loved using the Canon 600EX-RT speedlite (affiliate) and ST-E3-RT Speedlite Transmitter (affiliate) during the entire day’s shooting.
My enthusiasm for the amazing flexibility of the current Canon flash system is still undiminished since my review of the Canon ST-E3-RT and Canon 600EX-RT speedlites (with Molly K as a model), and my review of the Canon 600EX-RT speedlite, (with Karyn as the model).
The lighting here was quite straight-forward again, as my lighting setups tend to be. It was my regular Lastolite EZYBOX 24×24″ softbox (affiliate), with the speedlight, to camera left.
Sarah took multiple passes until we had a few shots in the bag where I caught her stride perfectly, and the movements of her arms and body fit the image too. For this reason, I wanted to shoot more than one image per pass. I had the flash in manual output, and had figured out my settings so that the flash would emit slightly more than than 1/4 full power per shot. This way I made sure I could fire off two shots every time she walked across that part of the puddle.
camera settings: 1/200 @ f/2.8 @ 640 ISO
With that decision made … my flash output had to be balanced with the ambient light to some extent at least. And this is where I ended up. 1/200 was max sync speed. I couldn’t risk going into HSS mode. Now, with the Canon 5D markII and the Canon 600EX-RT, there is a warning sign on the speedlight or controller that will come up, warning the shutter speed is too high. Despite that, as reported in my previous review, the flash worked perfectly well.
Post-processing the photo
For this initial retouch of the photo, I used the Healing Tool in Photoshop for any skin blemishes and marks. Then I used two essential Photoshop plug-ins – Shine-Off and Imagenomic Portraiture – as described in this article: Photoshop filters – retouching for portraits. That gives me a basic file that looks good and I can work on a little bit
To enhance this selected image, I used a Photoshop filter to give it a warmer, brighter tone.
Photo gear used during this photo session
- Canon 5D mark II;
- Canon 70-200mm f2.8L IS II
- Canon 600EX-RT speedlite
- ST-E3-RT Speedlite Transmitter
- Canon CP-E4 battery pack
- Lastolite EZYBOX 24×24″ softbox
Related articles featuring Sarah
- The progression of an idea (photo session with Sarah & Mark)
- Overpowering the sun with flash (models: Sarah & Mark)
- NYC photo sessions – Sarah & Mark (Vimeo clip)
- What you see might not quite what was there
Great article
Nice. How far away from the subject was the Lastolite? For a small softbox, it easily covers a full body shot. Didn’t think it could do this.
Around 8 – 12 ft, depending on how far she as stepped towards the softbox as I tripped the shutter.
How did you focus with f2.8 while she was walking?
Sarah moved parallel to me, so I was able to pre-focus and lock / hold the focus.
Rockin’!!!
Great article as always Neil. Thank you.
Aren’t those 600EX-RT units great?? I love mine, too. I haven’t used my ST-E3 much, since I can use any of my three 600EX-RT units as a master, but I have noticed that “Tv!” warning that pops up on the flash’s LCD whenever my shutter speed is over 1/125th. I’ve never had an issue with that, nor have I had any problem using HSS (High Speed Sync) with these new flashes and a Canon 5D2, despite what the manual says. Just great, consistent OCF. The batteries seem to deplete much faster than on my 580EXII speedlights, and the 600EX-RT also seems to overheat much faster as well, but I’ve taken all that into account now.
Neil…..I have a 580Exll and a set of JrX Radio Poppers. I was looking into upgrading to the PX line of poppers so I can shoot ETTL. Now seeing this shot I am inclined to try manual with my little Jr poppers. I confess I am a remedial flash student. Gorgeous colors!
Hey Neil,
Great post!! I enjoyed the post so much I posted a link on my guild’s FB page. Very good stuff!!
Hey Neil, I’ve been looking everywhere in my Nikon manual and can’t seem to find it and I know you know both Nikon and Canon so well! How can I prefocus (and lock) with my Nikon D700 other than using manual?
Sheryl,
2 ways.
1: You merely place your focus point on the spot you wish to pre-focus on, then depress the shutter halfway which will keep it locked then recompose and wait until subject comes in range, then fully depress the shutter to fire it.
2: The better way. Your AF/ON button on back of camera, you should be able to lock onto the pre-focus spot, use your thumb on that and keep it depressed, then recompose, and when subject comes into range fire the shutter, keeping your thumb depressed on the AF-ON button, keeps the focus locked until you release it, then you can fire more than just the one shot, as you follow the subject.
Of course this depends on the direction of subject if coming towards you a bit harder to fire more then 2 shots, but if panning you probably will get 3-5 depends on shutter frame rate.
Trev.
Actually also there is also a 3rd way, using follow/continuous focusing [AF-C Nikon; A1 Servo Canon] on subject, just pan with subject with your shutter half depressed which will continuously focus and as you pan with the subject and he/she reaches the correct spot, fully depress the shutter to fire it.
Trev.
Thanks Trev!
Great post,
I wonder have you had any thoughts about using film for vintage shots? As far as I have tried, the yellowish tint on the image looks similar when using Kodak ColorPlus negative film.
Agung
Nope, I have no desire to inflict that on myself again.